編輯:關於android開發
 實現這樣的側滑效果,在5.0以前我們用的最多的就是SlidingMenu這個開源框架,而5.0之後,google推出了自己的側滑實現庫,那就是DrawerLayout,它的用法比SlidingMenu更簡單,而且因為是google的親生兒子,所以現在人們更傾向於使用DrawerLayout,但是再怎麼說,這些都是別人實現好的東西,我們只是拿來用用而已,對於內部的原理,很多程序員卻不怎麼明白,在接下來的文章中我會通過android中的一些基礎控件來實現於此相似的效果,當然,也許還有很多種實現方式,但是基本的原理是類似的。
首先,我們會用到一個控件:HorizontalScrollView 從名字我們就可以了解到,這是一種水平滑動的控件,也就是當內容大於屏幕的寬度的時候,可以左右滑動來使超出屏幕的內容顯示在屏幕上。
第一步:把菜單的布局簡單的寫出來
<span style="font-size:18px;"><span style="font-family:KaiTi_GB2312;font-size:14px;"><!--{cke_protected}{C}%3C!%2D%2D%3Fxml%20version%3D%221.0%22%20encoding%3D%22utf-8%22%3F%2D%2D%3E-->
<relativelayout android:layout_height="match_parent" android:layout_width="match_parent" xmlns:android="http://schemas.android.com/apk/res/android">
    <linearlayout android:layout_centerinparent="true" android:layout_height="match_parent" android:layout_width="match_parent" android:orientation="vertical">
        <relativelayout android:layout_height="wrap_content" android:layout_width="wrap_content">
            <imageview android:id="@+id/img1" android:layout_height="wrap_content" android:layout_width="wrap_content" android:src="@drawable/ic_launcher">
            <textview android:id="@+id/text1" android:layout_centervertical="true" android:layout_height="wrap_content" android:layout_torightof="@id/img1" android:layout_width="wrap_content" android:text="item1">


        </textview></imageview></relativelayout>


        <relativelayout android:layout_height="wrap_content" android:layout_width="wrap_content">
            <imageview android:id="@+id/img2" android:layout_height="wrap_content" android:layout_width="wrap_content" android:src="@drawable/ic_launcher">
            <textview android:id="@+id/text2" android:layout_centervertical="true" android:layout_height="wrap_content" android:layout_torightof="@id/img2" android:layout_width="wrap_content" android:text="item1">


        </textview></imageview></relativelayout>


        <relativelayout android:layout_height="wrap_content" android:layout_width="wrap_content">
            <imageview android:id="@+id/img3" android:layout_height="wrap_content" android:layout_width="wrap_content" android:src="@drawable/ic_launcher">
            <textview android:id="@+id/text3" android:layout_centervertical="true" android:layout_height="wrap_content" android:layout_torightof="@id/img3" android:layout_width="wrap_content" android:text="item1">


        </textview></imageview></relativelayout>


        <relativelayout android:layout_height="wrap_content" android:layout_width="wrap_content">
            <imageview android:id="@+id/img4" android:layout_height="wrap_content" android:layout_width="wrap_content" android:src="@drawable/ic_launcher">
            <textview android:id="@+id/text4" android:layout_centervertical="true" android:layout_height="wrap_content" android:layout_torightof="@id/img4" android:layout_width="wrap_content" android:text="item1">


        </textview></imageview></relativelayout>


        <relativelayout android:layout_height="wrap_content" android:layout_width="wrap_content">
            <imageview android:id="@+id/img5" android:layout_height="wrap_content" android:layout_width="wrap_content" android:src="@drawable/ic_launcher">
            <textview android:id="@+id/text5" android:layout_centervertical="true" android:layout_height="wrap_content" android:layout_torightof="@id/img5" android:layout_width="wrap_content" android:text="item1">


        </textview></imageview></relativelayout>
    </linearlayout>
</relativelayout></span></span>
第二步:寫出整體布局
<span style="font-size:18px;"><span style="font-family:KaiTi_GB2312;font-size:14px;"><!--{cke_protected}{C}%3C!%2D%2D%3Fxml%20version%3D%221.0%22%20encoding%3D%22utf-8%22%3F%2D%2D%3E-->
<linearlayout android:layout_height="match_parent" android:layout_width="match_parent" android:orientation="vertical" xmlns:android="http://schemas.android.com/apk/res/android" xmlns:tools="http://schemas.android.com/tools">
<googleplay.xiaokai.com.qq.slidmenu android:background="@drawable/img_frame_background" android:id="@+id/horscrview" android:layout_height="match_parent" android:layout_width="wrap_content" android:scrollbars="none">
    <linearlayout android:layout_height="match_parent" android:layout_width="wrap_content" android:orientation="horizontal">
        <include layout="@layout/left_menulayout">
        <linearlayout android:background="@drawable/qq" android:layout_height="match_parent" android:layout_width="match_parent">
        </linearlayout>
    </include></linearlayout>
</googleplay.xiaokai.com.qq.slidmenu>
</linearlayout></span>
</span>
注意:此時的googplay.xiaokai.com.qq.SlidMenu就是我們要實現的控件。
第三步:繼承HorizontalScrollView實現自定義控件
<span style="font-size:18px;">package googleplay.xiaokai.com.qq;

import android.content.Context;
import android.util.AttributeSet;
import android.util.DisplayMetrics;
import android.util.TypedValue;
import android.view.MotionEvent;
import android.view.ViewGroup;
import android.view.WindowManager;
import android.widget.HorizontalScrollView;
import android.widget.LinearLayout;


/**
 * Created by 孫曉凱 on 2016/3/27.
 */
public class SlidMenu extends HorizontalScrollView {
    int mScreenWit;//屏幕寬度
    int mRightWithScr;
    LinearLayout mWrap;
    ViewGroup mMenu;
    ViewGroup mContent;
    int mMenuWidth ;
    private boolean flag;


    public SlidMenu(Context context, AttributeSet attrs) {
        super(context, attrs);
        //得到屏幕的寬度
        WindowManager winmana = (WindowManager) context.getSystemService(context.WINDOW_SERVICE);
        DisplayMetrics metris = new DisplayMetrics();
        winmana.getDefaultDisplay().getMetrics(metris);
        mScreenWit = metris.widthPixels;//得到的是像素
        //把50dp轉換成像素
        mRightWithScr = (int) TypedValue.applyDimension(TypedValue.COMPLEX_UNIT_DIP, 50, context.getResources().getDisplayMetrics());


    }


    public SlidMenu(Context context) {
        super(context);


    }


    @Override
    protected void onMeasure(int widthMeasureSpec, int heightMeasureSpec) {


        if (!flag) {
            mWrap = (LinearLayout) getChildAt(0);//得到此空間中的第一個子控件
            mMenu = (ViewGroup) mWrap.getChildAt(0);//得到menu
            mContent = (ViewGroup) mWrap.getChildAt(1);//得到內容控件


            mMenuWidth = mMenu.getLayoutParams().width = mScreenWit - mRightWithScr;//側滑菜單的寬度為屏幕寬度減去50dp
            mContent.getLayoutParams().width = mScreenWit;//設置內容控件寬度
            flag = true;
        }
        super.onMeasure(widthMeasureSpec, heightMeasureSpec);
    }


    /*
    實現的功能是將menu隱藏,通過設置偏移量
     */
    @Override
    protected void onLayout(boolean changed, int l, int t, int r, int b) {


        if(changed) {
            this.scrollTo(mMenuWidth, 0);//向左移動
        }
        super.onLayout(changed, l, t, r, b);
    }


    @Override
    public boolean onTouchEvent(MotionEvent ev) {
        int action = ev.getAction();
        switch (action){
            case MotionEvent.ACTION_UP:
                int scx = getScrollX(); //就是當前view的左上角相對於母視圖的左上角的X軸偏移量
                if(scx>=mMenuWidth/2){
                    this.smoothScrollTo(mMenuWidth,0);
                }else{
                    this.smoothScrollTo(0,0);
                }
            return true;
        }
        return super.onTouchEvent(ev);
    }
}</span>
此時程序還不夠靈活,比如如果想讓讓菜單距離屏幕右邊的距離是可以自己調控的,應該怎麼辦呢?
此時我們可以自定義一個屬性。
自定義屬性第一步:
在values文件夾中創建一個attr.xml文件;
第二步:在文件中定義屬性
<span style="font-size:18px;"><!--{cke_protected}{C}%3C!%2D%2D%3Fxml%20version%3D%221.0%22%20encoding%3D%22utf-8%22%3F%2D%2D%3E-->
<resources>
    <declare-styleable name="SlidMenu">
        <attr format="dimension" name="RithtPadding">
        </attr>
    </declare-styleable>
</resources>
RithtPadding就是自定義的屬性的名稱;
<!--{cke_protected}{C}%3C!%2D%2D%3Fxml%20version%3D%221.0%22%20encoding%3D%22utf-8%22%3F%2D%2D%3E-->
<linearlayout xmlns:my="http://schemas.android.com/apk/res-auto">
    xmlns:android="http://schemas.android.com/apk/res/android"
    xmlns:tools="http://schemas.android.com/tools"
    android:orientation="vertical"
    android:layout_width="match_parent"
    android:layout_height="match_parent" >
<googleplay.xiaokai.com.qq.slidmenu android:background="@drawable/img_frame_background" android:id="@+id/horscrview" android:layout_height="match_parent" android:layout_width="wrap_content" android:scrollbars="none" my:rithtpadding="100dp">
    >
    <linearlayout android:layout_height="match_parent" android:layout_width="wrap_content" android:orientation="horizontal">
        <include layout="@layout/left_menulayout">
        <linearlayout android:background="@drawable/qq" android:layout_height="match_parent" android:layout_width="match_parent">
        </linearlayout>
    </include></linearlayout>
</googleplay.xiaokai.com.qq.slidmenu>
</linearlayout></span>
第三步:在代碼中得到布局文件中的屬性的值,並進行相應的操作
<span style="font-size:18px;">public SlidMenu(Context context, AttributeSet attrs, int defStyleAttr) {
        super(context, attrs, defStyleAttr);
        //得到屏幕的寬度
        WindowManager winmana = (WindowManager) context.getSystemService(context.WINDOW_SERVICE);
        DisplayMetrics metris = new DisplayMetrics();
        winmana.getDefaultDisplay().getMetrics(metris);
        mScreenWit = metris.widthPixels;//得到的是像素


        <span style="color:#3366ff;">TypedArray array = context.getTheme().obtainStyledAttributes(attrs,R.styleable.SlidMenu,defStyleAttr,0);
        int n = array.getIndexCount();
        for(int i=0;i<n;i++){ attr="array.getIndex(i);" case="" int="" mrightwithscr="array.getDimensionPixelSize(attr,(int)" r.styleable.slidmenu_rithtpadding:="" span="" switch="">
    }</n;i++){></span></span>
嗯,這次好像比較完美了,诶?不對,人家的側滑都是在左上角有一個點擊按鈕的,一點,菜單就可以出來,再一點,菜單就會進去,好吧,我們來實現它!
只需要兩步即可:
第一步:在自定義控件中添加以下三個方法:
<span style="font-size:18px;">/*
    打開菜單
     */
    public void openMenu(){
        if(isOpen)return;
        else {
            this.smoothScrollTo(0,0);//打開
            isOpen = true;
        }
    }


    /*
    關閉菜單
     */
    public void closeMenu(){
        if(!isOpen){
            return ;
        }else{
            this.smoothScrollTo(mMenuWidth,0);
            isOpen = false;
        }
    }


    /*
    切換菜單
     */
    public void toggle(){
        if(isOpen){
            closeMenu();
        }else{
            openMenu();
        }
    }</span>
第二步:在布局文件中定義一個按鈕(這個都會,我就不貼代碼了),然後在使用控件的時候在點擊方法中直接調用即可
<span style="font-size:18px;">public class MainActivity extends AppCompatActivity {
    private SlidMenu slidmenu;


    @Override
    protected void onCreate(Bundle savedInstanceState) {


        super.onCreate(savedInstanceState);
        supportRequestWindowFeature(Window.FEATURE_NO_TITLE);<span style="font-family: Arial, Helvetica, sans-serif;">//</span><span style="font-family: Arial, Helvetica, sans-serif;">如果繼承的是ActionBarActivity或者是AppCompatActivity就會報錯,</span><span style="font-family: Arial, Helvetica, sans-serif;">如果你執意要用這個方法,請繼承Activity。</span>
//        如果你繼承的是AppCompatActivity或ActionBarActivity請調用下面的方法代替上面的方法
//        supportRequestWindowFeature(Window.FEATURE_NO_TITLE);
        setContentView(R.layout.activity_main);
        slidmenu = (SlidMenu) findViewById(R.id.horscrview);
    }
    public void toggle(View view){
        slidmenu.toggle();
    }


}
</span>
OK,大功告成,這次總可以了吧! 嗯,看似還行,但是我們還可以做成更絢麗的效果!
實現這種效果也很簡單,主要通過屬性動畫來實現,在自定義控件中添加如下代碼:
<span style="font-size:18px;">/**
     * 滾動發生時
     */
    @Override
    protected void onScrollChanged(int l, int t, int oldl, int oldt)
    {
        super.onScrollChanged(l, t, oldl, oldt);

        /**
         * 區別1:內容區域1.0~0.7 縮放的效果 scale : 1.0~0.0 0.7 + 0.3 * scale
         *
         * 區別2:菜單的偏移量需要修改
         *
         * 區別3:菜單的顯示時有縮放以及透明度變化 縮放:0.7 ~1.0 1.0 - scale * 0.3 透明度 0.6 ~ 1.0
         * 0.6+ 0.4 * (1- scale) ;
         *
         */
        float rightScale = 0.7f + 0.3f * scale;
        float leftScale = 1.0f - scale * 0.3f;
        float leftAlpha = 0.6f + 0.4f * (1 - scale);


        // 調用屬性動畫,設置TranslationX
        ViewHelper.setTranslationX(mMenu, mMenuWidth * scale * 0.8f);


        ViewHelper.setScaleX(mMenu, leftScale);
        ViewHelper.setScaleY(mMenu, leftScale);
        ViewHelper.setAlpha(mMenu, leftAlpha);
        // 設置content的縮放的中心點
        ViewHelper.setPivotX(mContent, 0);
        ViewHelper.setPivotY(mContent, mContent.getHeight() / 2);
        ViewHelper.setScaleX(mContent, rightScale);
        ViewHelper.setScaleY(mContent, rightScale);


    }</span>
嗯,這次才是大功告成!
圖:
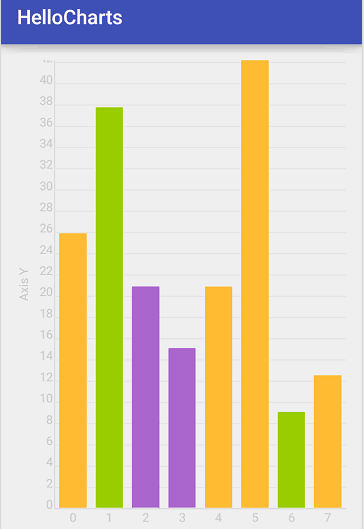 圖表框架HelloCharts(2)柱狀圖,hellocharts柱狀圖
圖表框架HelloCharts(2)柱狀圖,hellocharts柱狀圖1.效果圖 2.xml代碼 activity_column_chart.xml <Fram
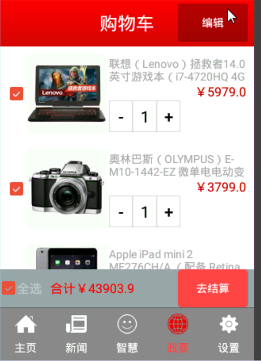 硅谷商城6--購物車編輯實現,硅谷商城6--購物車
硅谷商城6--購物車編輯實現,硅谷商城6--購物車 完成狀態
 Android junit單元測試,androidjunit
Android junit單元測試,androidjunit軟件測試的分類* 黑盒測試 * 測試邏輯業務* 白盒測試 * 測試邏輯方法 根據測試粒度 * 方法測試:fun
 Android listview和ListAdapter搭配使用,androidlistadapter
Android listview和ListAdapter搭配使用,androidlistadapterListView時Android中自帶的數據顯示控件,要使用List
 【原創】StickHeaderListView的簡單實現,解決footerView問題,stickheaderlistview
【原創】StickHeaderListView的簡單實現,解決foote