編輯:關於android開發
AlerDialog :功能最豐富
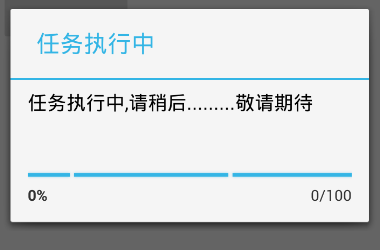
PorgressDialog:進度對話框
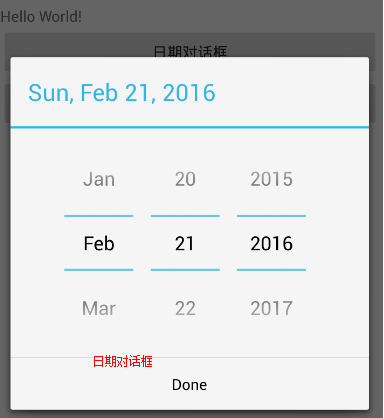
DatePickerDialog:日期選擇對話框
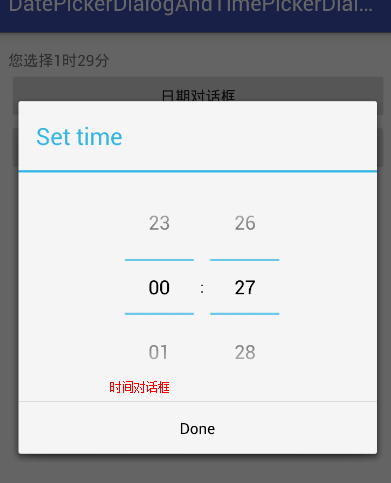
TimePickerDialog:時間選擇對話框
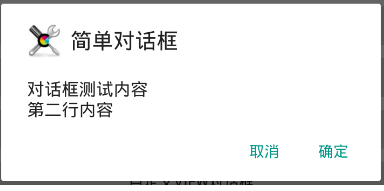
setMessage():設置對話框的內容為簡單文本
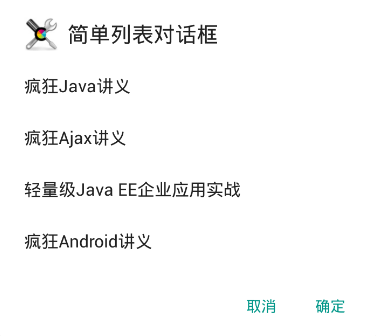
setItems()設置對話框的內容為簡單列表
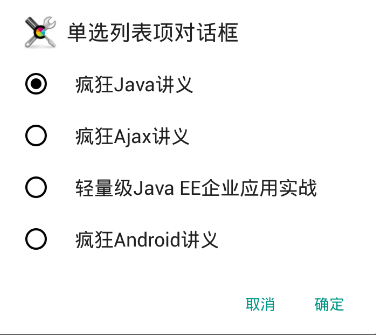
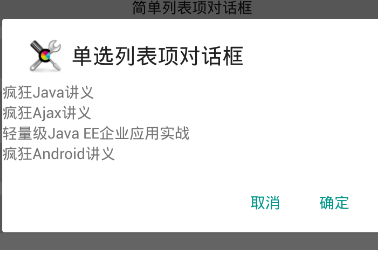
setSingleChoiceItems():設置對話的內容為單選列表項
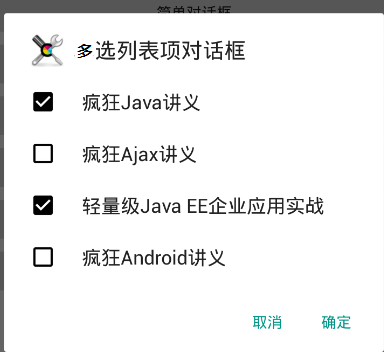
setMultiChoiceItems():設置對話框內容為多先列表項
setAdapter():設置對話框的內容為自定的列表項
setView():設置對話框的內容為自定義View

activity_main.xml
<?xml version="1.0" encoding="utf-8"?>
<LinearLayout
    xmlns:android="http://schemas.android.com/apk/res/android"
    xmlns:tools="http://schemas.android.com/tools"
    android:layout_width="match_parent"
    android:layout_height="match_parent"
    android:orientation="vertical"
    android:gravity="center_horizontal"
    tools:context="com.itheima.alerdialog.MainActivity">

    <!-- 顯示一個普通的文本編輯框組件 -->

    <EditText
        android:id="@+id/show"
        android:layout_width="match_parent"
        android:layout_height="wrap_content"
        android:editable="false"/>


    <!-- 定義一個普通的按鈕組件 -->
    <Button
        android:layout_width="match_parent"
        android:layout_height="wrap_content"
        android:text="簡單對話框"
        android:onClick="simple"
        />

    <!-- 定義一個普通的按鈕組件 -->
    <Button
        android:layout_width="match_parent"
        android:layout_height="wrap_content"
        android:text="簡單列表項對話框"
        android:onClick="simpleList"
        />
    <!-- 定義一個普通的按鈕組件 -->
    <Button
        android:layout_width="match_parent"
        android:layout_height="wrap_content"
        android:text="單選列表項對話框"
        android:onClick="singleChoice"
        />

    <!-- 定義一個普通的按鈕組件 -->
    <Button
        android:layout_width="match_parent"
        android:layout_height="wrap_content"
        android:text="多選列表項對話框"
        android:onClick="multiChoice"
        />
    <!-- 定義一個普通的按鈕組件 -->
    <Button
        android:layout_width="match_parent"
        android:layout_height="wrap_content"
        android:text="自定義列表項對話框"
        android:onClick="customList"
        />

    <!-- 定義一個普通的按鈕組件 -->
    <Button
        android:layout_width="match_parent"
        android:layout_height="wrap_content"
        android:text="自定義View對話框"
        android:onClick="customView"
        />

</LinearLayout>
array_item.xml
<?xml version="1.0" encoding="utf-8"?>
<TextView xmlns:android="http://schemas.android.com/apk/res/android"
          android:layout_width="match_parent"
          android:layout_height="wrap_content"
    android:id="@+id/tv">

</TextView>
login.xml
<?xml version="1.0" encoding="utf-8"?>
<TableLayout xmlns:android="http://schemas.android.com/apk/res/android"
             android:id="@+id/loginForm"
             android:layout_width="match_parent"
             android:layout_height="match_parent">
    <TableRow>
        <TextView
            android:layout_width="match_parent"
            android:layout_height="wrap_content"
            android:text="用戶名:"
            android:textSize="10pt"/>
        <!-- 輸入用戶名的文本框 -->
        <EditText
            android:layout_width="match_parent"
            android:layout_height="wrap_content"
            android:hint="請填寫登錄賬號"
            android:selectAllOnFocus="true"/>
    </TableRow>
    <TableRow>
        <TextView
            android:layout_width="match_parent"
            android:layout_height="wrap_content"
            android:text="密碼:"
            android:textSize="10pt"/>
        <!-- 輸入密碼的文本框 -->
        <EditText
            android:layout_width="match_parent"
            android:layout_height="wrap_content"
            android:hint="請填寫密碼"
            android:password="true"/>
    </TableRow>
    <TableRow>
        <TextView
            android:layout_width="match_parent"
            android:layout_height="wrap_content"
            android:text="電話號碼:"
            android:textSize="10pt"/>
        <!-- 輸入電話號碼的文本框 -->
        <EditText
            android:layout_width="match_parent"
            android:layout_height="wrap_content"
            android:hint="請填寫您的電話號碼"
            android:selectAllOnFocus="true"
            android:phoneNumber="true"/>
    </TableRow>
</TableLayout>
Activity
/**
 * 對話框
 * 1.使用AlerDialog.Builder 創建對象builder
 * 2.setTitle
 * 3.setIcon
 * 4.set內容
 * 5.create,再show顯示對話框
 */
public class MainActivity extends AppCompatActivity {

    private TextView show;
    private String[] items = {
            "瘋狂Java講義", "瘋狂Ajax講義",
            "輕量級Java EE企業應用實戰",
            "瘋狂Android講義"};

    @Override
    protected void onCreate(Bundle savedInstanceState) {
        super.onCreate(savedInstanceState);
        setContentView(R.layout.activity_main);

        show = (TextView) findViewById(R.id.show);
    }


    /**
     * 簡單對話框
     *
     * @param v
     */
    public void simple(View v) {

        //建立對話框
        AlertDialog.Builder builder = new AlertDialog.Builder(this)
                //設置標題
                .setTitle("簡單對話框")
                        //設置Icon
                .setIcon(R.drawable.tools)
                        //設置內容
                .setMessage("對話框測試內容\n第二行內容");
        //添加確定按鍵
        setPositiveButton(builder);
        //添加取消按鍵
        setNegativeButton(builder);
        //建立對話框並顯示
        builder.create().show();

    }

    /**
     * 簡單列表項對話框
     *
     * @param v
     */
    public void simpleList(View v) {

        AlertDialog.Builder builder = new AlertDialog.Builder(this)
                //設置標題
                .setTitle("簡單列表對話框")
                        ///設置圖標
                .setIcon(R.drawable.tools)
                        //設置內容
                .setItems(items, new DialogInterface.OnClickListener() {
                    @Override
                    public void onClick(DialogInterface dialog, int which) {
                        show.setText("您選中了<<" + items[which] + ">>");
                    }
                });
        //設置確定與取消
        setPositiveButton(builder);
        setNegativeButton(builder);
        //建立並顯示
        builder.create().show();


    }

    /**
     * 單選列表項對話框
     *
     * @param v
     */
    public void singleChoice(View v) {

        AlertDialog.Builder builder = new AlertDialog.Builder(this)
                //設置標題
                .setTitle("單選列表項對話框")
                        //設置ICON
                .setIcon(R.drawable.tools)
                        //設置單選列表項目
                .setSingleChoiceItems(items, 0, new DialogInterface.OnClickListener() {
                    @Override
                    public void onClick(DialogInterface dialog, int which) {

                        show.setText("您選中了<<" + items[which] + ">>");
                    }
                });
        //設置確定與取消
        setPositiveButton(builder);
        setNegativeButton(builder);
        //建立與顯示
        builder.create().show();


    }

    /**
     * 多選列表項對話框
     *
     * @param v
     */
    public void multiChoice(View v) {

        AlertDialog.Builder builder = new AlertDialog.Builder(this)
                //設置標題
                .setTitle("多選列表項對話框")
                        //設置ICON
                .setIcon(R.drawable.tools)
                        //設置多選項目
                .setMultiChoiceItems(items, new boolean[]{true, false, true, false}, new DialogInterface.OnMultiChoiceClickListener() {
                    @Override
                    public void onClick(DialogInterface dialog, int which, boolean isChecked) {
                        show.setText("您選擇了<<" + items[which] + ">>");
                    }
                });


        //設置確定與取消
        setPositiveButton(builder);
        setNegativeButton(builder);
        //建立與顯示
        builder.create().show();
    }

    /**
     * 自定義列表項對話框
     *
     * @param v
     */
    public void customList(View v) {
        AlertDialog.Builder builder = new AlertDialog.Builder(this)
                //設置標題
                .setTitle("自定義列表項對話框")
                        //設置ICON
                .setIcon(R.drawable.tools)
                .setAdapter(new ArrayAdapter<String>(this, R.layout.array_item,items), new DialogInterface.OnClickListener() {
                    @Override
                    public void onClick(DialogInterface dialog, int which) {
                        show.setText("您選擇了<<" + items[which] + ">>");
                    }
                });

        //設置確定與取消
        setPositiveButton(builder);
        setNegativeButton(builder);
        //建立與顯示
        builder.create().show();
    }

    /**
     * 自定義View對話框
     *
     * @param v
     */
    public void customView(View v) {
        //獲取打氣筒生成VIEW對象
        TableLayout loginForm = (TableLayout) getLayoutInflater().inflate(R.layout.login, null);
        //建立對話框
        AlertDialog.Builder builder = new AlertDialog.Builder(this)
                //設置標題
        .setTitle("自定義View對話框")
                //設置ICON
        .setIcon(R.drawable.tools)
                //設置自定義顯示的VIEW
        .setView(loginForm);
        //設置確定與取消
        setPositiveButton(builder);
        setNegativeButton(builder);
        //建立並顯示
        builder.create().show();


    }
    /**
     * 設置確定按鍵
     *
     * @param builder
     * @return
     */
    private AlertDialog.Builder setPositiveButton(AlertDialog.Builder builder) {

        return builder.setPositiveButton("確定", new DialogInterface.OnClickListener() {
            @Override
            public void onClick(DialogInterface dialog, int which) {
                show.setText("單擊了[ 確定 ] 按鍵");
            }
        });
    }

    /**
     * 設置取消按鍵
     *
     * @param builder
     * @return
     */
    private AlertDialog.Builder setNegativeButton(AlertDialog.Builder builder) {
        return builder.setNegativeButton("取消", new DialogInterface.OnClickListener() {
            @Override
            public void onClick(DialogInterface dialog, int which) {

                show.setText("單擊了[ 取消 ] 按鍵");
            }
        });

    }
}
創建日期與時間對話框

1.new DatePickerDialog 或者 new TimePickerDialog

2.配置構造方法,最重要的為監聽器

3.show
<?xml version="1.0" encoding="utf-8"?>
<LinearLayout
    xmlns:android="http://schemas.android.com/apk/res/android"
    xmlns:tools="http://schemas.android.com/tools"
    android:layout_width="match_parent"
    android:layout_height="match_parent"
    android:orientation="vertical"
    android:paddingBottom="@dimen/activity_vertical_margin"
    android:paddingLeft="@dimen/activity_horizontal_margin"
    android:paddingRight="@dimen/activity_horizontal_margin"
    android:paddingTop="@dimen/activity_vertical_margin"
    tools:context="com.itheima.datepickerdialogandtimepickerdialog.MainActivity">

    <TextView
        android:id="@+id/show"
        android:layout_width="wrap_content"
        android:layout_height="wrap_content"
        android:text="Hello World!"/>
    <!--顯示日期對話框-->
    <Button
        android:layout_width="match_parent"
        android:layout_height="wrap_content"
        android:onClick="showDate"
        android:text="日期對話框"/>
    <!--顯示時間對話框-->
    <Button
        android:layout_width="match_parent"
        android:layout_height="wrap_content"
        android:onClick="showTime"
        android:text="時間對話框"/>

</LinearLayout>
/**
 * 創建日期與時間對話框
 * 1.new DatePickerDialog 或者 new TimePickerDialog
 * 2.配置構造方法,最重要的為監聽器
 * 3.show
 *
 *
 * @author  劉楠
 */
public class MainActivity extends AppCompatActivity {

    private TextView tv_show;

    @Override
    protected void onCreate(Bundle savedInstanceState) {
        super.onCreate(savedInstanceState);
        setContentView(R.layout.activity_main);

        tv_show = (TextView) findViewById(R.id.show);

    }

    /**
     * 顯示日期對話框
     *
     * @param v
     */
    public void showDate(View v) {


        Calendar c = Calendar.getInstance();

        new DatePickerDialog(this, new DatePickerDialog.OnDateSetListener() {
            @Override
            public void onDateSet(DatePicker view, int year, int monthOfYear, int dayOfMonth) {


                tv_show.setText("您選擇"+year+"年"+monthOfYear+"月"+dayOfMonth+"日");
            }


        },
                //設置初始日期
                c.get(Calendar.YEAR),
                c.get(Calendar.MONTH),
                c.get(Calendar.DAY_OF_MONTH)

        ).show();//顯示

    }

    /**
     * 顯示時間對話框
     *
     * @param v
     */
    public void showTime(View v) {
        Calendar c=Calendar.getInstance();

        new TimePickerDialog(this, new TimePickerDialog.OnTimeSetListener() {
            @Override
            public void onTimeSet(TimePicker view, int hourOfDay, int minute) {
                tv_show.setText("您選擇"+hourOfDay+"時"+minute+"分");

            }
        },
                //設置初始時間
                c.get(Calendar.HOUR_OF_DAY),
                c.get(Calendar.MINUTE),
                true //使用24小時制

        ).show();
    }
}
即可
調用對話框的方法如
setTitle:設置標題
setMessage:設置消息
setMax:設置對話框時度條的最大值
setProgress:設置進度
setProgressStyle:設置進度條風格
<?xml version="1.0" encoding="utf-8"?>
<LinearLayout
    xmlns:android="http://schemas.android.com/apk/res/android"
    xmlns:tools="http://schemas.android.com/tools"
    android:layout_width="match_parent"
    android:layout_height="match_parent"
    android:orientation="vertical"
    android:paddingBottom="@dimen/activity_vertical_margin"
    android:paddingLeft="@dimen/activity_horizontal_margin"
    android:paddingRight="@dimen/activity_horizontal_margin"
    android:paddingTop="@dimen/activity_vertical_margin"
    tools:context="com.itheima.progressdialog.MainActivity">

    <Button
        android:layout_width="wrap_content"
        android:layout_height="wrap_content"
        android:onClick="showSpinnr"
        android:text="普通的環形對話框"/>

    <Button
        android:layout_width="wrap_content"
        android:layout_height="wrap_content"
        android:onClick="showIndeterMinate"
        android:text="不顯示時度對話框"/>

    <Button
        android:layout_width="wrap_content"
        android:layout_height="wrap_content"
        android:onClick="showProgress"
        android:text="顯示進度對話框"/>
</LinearLayout>
/**
* 進度條對話框
* 1.創建ProgressDialog對象
* 2.設置標題,內容setTitle,setMessage
* 3.設置進度條是否可見setIndeterminate --true為不可見
* 4.設置風格setProgressStyle
* 5.調 用show方法
* @author 劉楠
*/
public class MainActivity extends AppCompatActivity {
final static int MAX_PROGRESS = 100;
//定義一個數組模擬耗時
private int [] data = new int[50];
//對話框2,3
private ProgressDialog p1,p2;
//完成的百分比
private int progressStatus=0;
private int hasdata = 0;
private Handler handler = new Handler(){
@Override
public void handleMessage(Message msg) {
if(msg.what==0x123){
p2.setProgress(progressStatus);
}
}
};
@Override
protected void onCreate(Bundle savedInstanceState) {
super.onCreate(savedInstanceState);
setContentView(R.layout.activity_main);
}
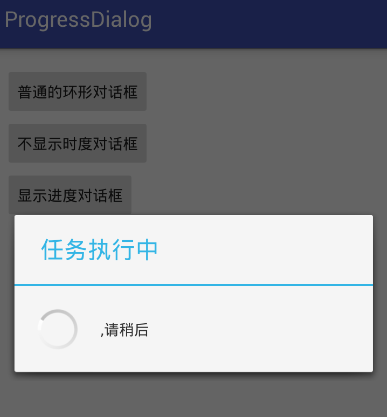
/**
* 普通的環形對話框
*
* @param v
*/
public void showSpinnr(View v) {
/**
* Context context, 上下文
*
* CharSequence title, 標題
* CharSequence message, 內容
* boolean indeterminate, 是否進度
* boolean cancelable 是否可以點擊取消
*/
ProgressDialog.show(this, "任務執行中", ",請稍後", false, true);
}
/**
* 不顯示時度對話框
*
* @param v
*/
public void showIndeterMinate(View v) {
p1= new ProgressDialog(MainActivity.this);
//設置標題
p1.setTitle("任務執行中");
//設置內容
p1.setMessage("任務執行中,請稍後.........敬請期待");
//可以點擊取消
p1.setCancelable(true);
//設置時度條風格
p1.setProgressStyle(ProgressDialog.STYLE_HORIZONTAL);
//設置進度條進度是否可見--不可見
p1.setIndeterminate(true);
p1.show();;
}
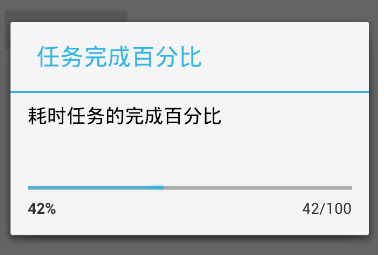
/**
* 顯示進度對話框
*
* @param v
*/
public void showProgress(View v) {
//將進度條進度設置為0
progressStatus = 0;
//重新開始填充數組
hasdata = 0;
p2 = new ProgressDialog(MainActivity.this);
//設置最大值
p2.setMax(MAX_PROGRESS);
//設置標題
p2.setTitle("任務完成百分比");
//設置內容
p2.setMessage("耗時任務的完成百分比");
//是否可以點擊取消 --不可點擊
p2.setCancelable(false);
//設置進度條風格--水平
p2.setProgressStyle(ProgressDialog.STYLE_HORIZONTAL);
//是否顯示進度
p2.setIndeterminate(false);
p2.show();
//設置一個耗時操作
new Thread(new Runnable() {
@Override
public void run() {
while(progressStatus<MAX_PROGRESS) {
progressStatus = MAX_PROGRESS * doWork() / data.length;
handler.sendEmptyMessage(0x123);
}
//如果到進度100
if(progressStatus>=MAX_PROGRESS){
p2.dismiss();
}
}
}).start();
}
/**
* 模擬一個耗時操作
*
* @return
*/
private int doWork() {
data[hasdata++] = (int) (Math.random()*100);
SystemClock.sleep(100);
return hasdata;
}
}
 Android 100多個Styles快速開發布局XML,一行搞定View屬性,一鍵統一配置UI...,androidui..
Android 100多個Styles快速開發布局XML,一行搞定View屬性,一鍵統一配置UI...,androidui.. Android開發中大量使用X
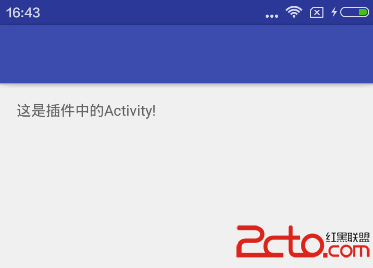 Android動態加載Activity原理
Android動態加載Activity原理 activity的啟動流程 加載一個Activity肯定不會像加載一般的類那樣,因為activity作為系統的組件有自己的
 PostgreSQL 9.5新特性:IMPORT FOREIGN SCHEMA
PostgreSQL 9.5新特性:IMPORT FOREIGN SCHEMA本次以故事的形式講述一名不緊跟時代步伐、不主動積極學習的員工在不了解最新特性的情況下,如何失
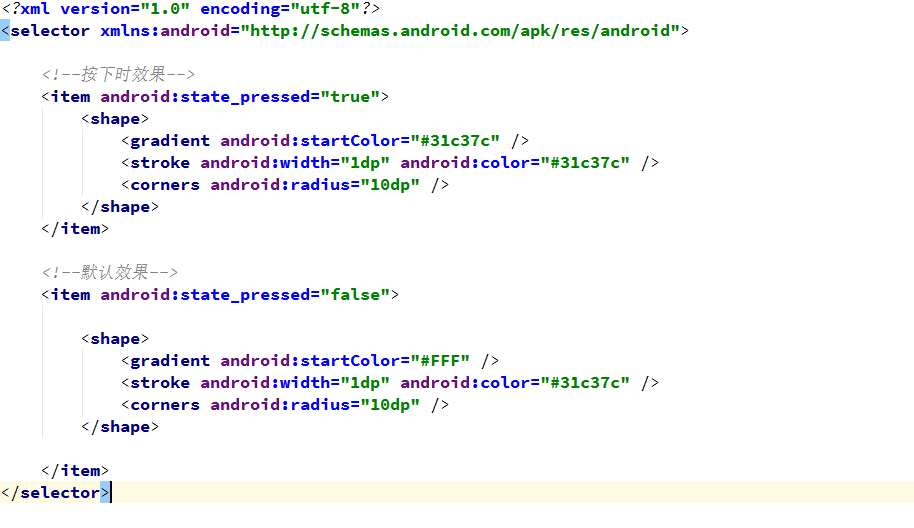 Android使用 selector 自定義控件背景 (以spinner 為例),androidspinner
Android使用 selector 自定義控件背景 (以spinner 為例),androidspinner1. 在drawable中設置背景spinner_st