編輯:Android開發實例
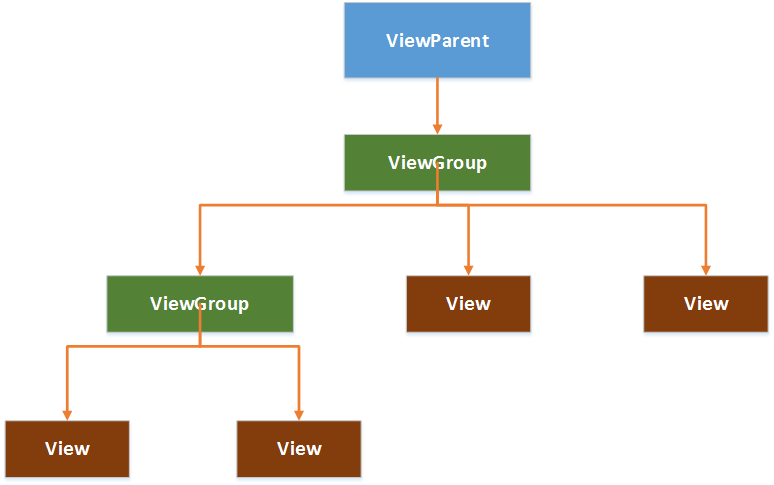
在Android中,視圖控件大致被分為兩類,即ViewGroup和View,ViewGroup控件作為父控件,包含並管理著子View,通過ViewGroup和View便形成了控件樹,各個ViewGoup對象和View對象就是控件樹中的節點。在控件樹中,以樹的深度來遍歷查找對應的控件元素,同時,上層控件負責子控件的測量與繪制,並傳遞交互事件。
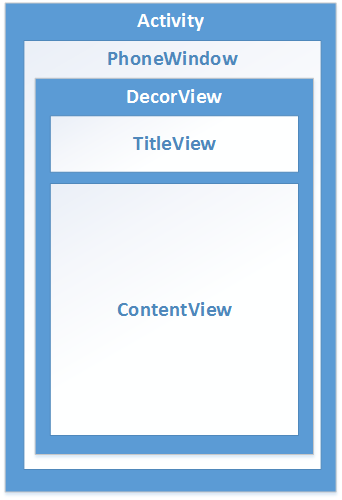
Android控件樹:
AndroidUI界面架構圖:
一.測量View的工具類:MeasureSpec
1.MeasureSpec包含了測量的模式和測量的大小,通過MeasureSpec.getMode()獲取測量模式,通過MeasureSpec.getSize()獲取測量大小;
2.MeasureSpec是一個32位的int值,高2位為測量的模式,低30位為測量的大小,使用位運算的目的在於提高優化效率。
二.測量的模式
1.EXACTLY,精確值模式:將layout_width或layout_height屬性指定為具體數值或者match_parent。
2.AT_MOST,最大值模式:將layout_width或layout_height指定為wrap_content。
3.UNSPECIFIED: View想多大就多大
三.View類默認的onMeasure()方法只支持EXACTLY模式,如果要支持其它模式,就必須重寫onMeasure(),重寫onMeasure()的模板代碼:
package com.example.demoapp.views;

import android.content.Context;
import android.view.View;

public class MeasuredView extends View {
  public MeasuredView(Context context) {
    super(context);
  }

  @Override
  protected void onMeasure(int widthMeasureSpec, int heightMeasureSpec) {
    // 調用父類的onMeasure()
    super.onMeasure(measureWidth(widthMeasureSpec), measureHeight(heightMeasureSpec));
    // 或者直接調用父類的setMeasuredDimension(),因為父類的onMeasure()最終調用了setMeasuredDimension()
    // setMeasuredDimension(measureWidth(widthMeasureSpec), measureHeight(heightMeasureSpec));
  }

  /**
   * 測量View的width
   * @param measureSpec MeasureSpec對象
   * @return View的width
   */
  private int measureWidth(int measureSpec) {
    int result = 0;
    int specMode = MeasureSpec.getMode(measureSpec);
    int specSize = MeasureSpec.getSize(measureSpec);

    if (specMode == MeasureSpec.EXACTLY) {
      result = specSize;
    } else {
      result = 200;
      if (specMode == MeasureSpec.AT_MOST) {
        result = Math.min(result, specSize);
      }
    }
    return result;
  }

  /**
   * 測量View的height
   * @param measureSpec MeasureSpec對象
   * @return View的height
   */
  private int measureHeight(int measureSpec) {
    int result = 0;
    int specMode = MeasureSpec.getMode(measureSpec);
    int specSize = MeasureSpec.getSize(measureSpec);

    if (specMode == MeasureSpec.EXACTLY) {
      result = specSize;
    } else {
      result = 200;
      if (specMode == MeasureSpec.AT_MOST) {
        result = Math.min(result, specSize);
      }
    }
    return result;
  }
}
四.View的繪制
1.2D繪圖必備利器——Canvas
1)獲取Canvas對象的方式:
a.由方法中的參數傳入,例如,View的onDraw()中有一個參數就是Canvas對象
b.通過構造方法構造,即:Canvas canvas = new Canvas(bitmap),在Canvas的構造方法傳入一個Bitmap對象,即可獲取一個Canvas對象。通過傳入Bitmap對象構造Canvas對象的過程稱為“畫布的裝載”,傳入的Bitmap對象承載了多有繪制在Canvas上的像素信息,調用Canvas.drawXXX方法(如:Canvas.drawBitmap(bitmap, 0, 0, null))都將發生在該Bitmap對象上。
2)利用Canvas繪圖
a.通過Canvas.drwaXXX進行繪制操作將直接作用於Bitmap對象,當再次刷新View的時候,我們將會被繪制的Bitmap對象發生了改變;
b.利用Canvas和Paint進行繪圖;
c.不管多麼復雜、精美的空間,都可以被拆分為一個個小的圖形單元,我們只要找到這些圖形單元,就可以將控件繪制出來。
五.ViewGroup的測量
1.ViewGroup的作用:管理子View,如子View的大小、位置;
2.ViewGroup通過遍歷子View,調用子View的Measure()來獲得每一個子View的測量結果;
3.ViewGroup測量完子View,調用子View的Layout()將子View放到合適的位置;
4.在自定義ViewGroup的時候,通常會重寫onLayout()控制子View的顯示;
5.如果需要支持wrap_content屬性,必須重寫onMeasure()。
六、ViewGroup的繪制
通常情況下,ViewGoup不需要繪制,但是ViewGroup會使用dispatchDraw()來繪制其子View。
七.自定義View
1.自定義View的時候,通常需要重寫onDraw()來繪制View要顯示的內容,如果還需要支持wrap_content屬性,必須重寫onMeasure();
2.通過自定義attrs屬性,可以設置新的View屬性;
3.View中一些重要的回調方法:
1)onFinishInflate():從XML中加載組建後回調;
2)onSizeChanged():組件大小改變時回調;
3)onMeasure():進行測量;
4)onLayout():設置顯示的位置;
5)onTouchEvent():觸摸事件。
4.實現自定義View的三種常用方法:
1)通過重寫onDraw()對原生控件進行擴展;
2)通過組合實現新的控件,通常集成一個合適的額ViewGoup,再通過addView()給它添加指定功能的控件,從而組合成新的復合控件。
3)重寫View實現全新的控件,通過重寫onDraw(),onMeasure()實現繪制邏輯,重寫onTouchEvent()實現交互邏輯。
5.自定義屬性
1)自定義屬性的方法:在res資源目錄的values目錄下創建一個attrs.xml的屬性定義文件,文件模板:
<?xml version="1.0" encoding="utf-8"?>
<resources>
  <declare-styleable name="customAttr">
    <attr name="title" format="string" />
    <attr name="fontSize" format="dimension" />
    <attr name="fontColor" format="color" />
    <attr name="background" format="reference|color" />
    <attr name="fontStyle" format="enum" />
    <attr name="shadeSupport" format="boolean" />
  </declare-styleable>
</resources>
2)通過TypedArray獲取自定義屬性集,通過TypedArray.getString()、TypedArray.getColor()等方法獲取屬性值,模板代碼:
package com.jy.myrecyclerview.test;

import android.content.Context;
import android.content.res.TypedArray;
import android.util.AttributeSet;
import android.view.View;

import com.jy.myrecyclerview.R;

/**
 * Created by 123 on 2016/5/6.
 */
public class TestCustomAttrs extends View {
  private Context mContext;
  private AttributeSet mAttrs;
  private String mTitle;
  private float mFontSize;
  private int mFontColor;
  private int mBackground;
  private int mFontStyle;
  private boolean mShadeSupport;

  public TestCustomAttrs(Context context) {
    super(context);
    this.mContext = context;
  }

  public TestCustomAttrs(Context context, AttributeSet attrs) {
    super(context, attrs);
    this.mContext = context;
    this.mAttrs = attrs;
  }

  public TestCustomAttrs(Context context, AttributeSet attrs, int defStyleAttr) {
    super(context, attrs, defStyleAttr);
    this.mContext = context;
    this.mAttrs = attrs;
  }

  private void getCustomAttrs() {
    TypedArray ta = mContext.obtainStyledAttributes(mAttrs, R.styleable.customAttr);
    mTitle = ta.getString(R.styleable.customAttr_title);
    mFontSize = ta.getDimension(R.styleable.customAttr_fontSize, 10);
    mFontColor = ta.getColor(R.styleable.customAttr_fontColor, 0);
    mBackground = ta.getColor(R.styleable.customAttr_background, 0);
    mFontStyle = ta.getInt(R.styleable.customAttr_fontStyle, 0);
    mShadeSupport = ta.getBoolean(R.styleable.customAttr_shadeSupport, false);
    ta.recycle();
  }
}
6.定義回調接口,實現自定義控件的靈活控制;
7.引用UI模板
1)自定義控件需要使用命名空間進行引入:xmlns:custom="http://schemas.android.com/apk/res-auto",即將自定義控件的命名空間取名為custom
2)在XML文件中使用自定義屬性的時候,就可以通過這個命名空間來引用,代碼模板如下:
<?xml version="1.0" encoding="utf-8"?>
<RelativeLayout xmlns:android="http://schemas.android.com/apk/res/android"
  xmlns:custom="http://schemas.android.com/apk/res-auto"
  android:layout_width="match_parent"
  android:layout_height="match_parent" >

  <com.jy.myrecyclerview.test.TestCustomAttrs
    android:id="@+id/id_recyclerview"
    android:divider="#ffff0000"
    android:dividerHeight="10dp"
    android:layout_width="match_parent"
    android:layout_height="match_parent"
    custom:title="title"
    custom:fontSize="12sp"
    custom:fontColor="@color/colorPrimary"
    custom:background="@color/colorPrimary"
    custom:shadeSupport="false" />

</RelativeLayout>
九.自定義ViewGroup
1.需要重寫的方法:
1)onMeasure():對子View進行測量;
2)onLayout():設置子View的位置;
3)onTouchEvent():設置觸摸交互事件。
以上就是本文的全部內容,希望對大家的學習有所幫助。
 Android MediaPlayer(多媒體播放)
Android提供了許多方法來控制播放的音頻/視頻文件和流。其中該方法是通過一類稱為MediaPlayer。Android是提供MediaPlayer類訪問內置的媒體播放
 Android TabWidget切換卡的實現應用
TabWidget類似於Android 中查看電話薄的界面,通過多個標簽切換顯示不同內容。要實現這一效果,首先要了解TabHost,它是一個用來存放多個Tab標簽
 Android本地化
Android應用程序可以在許多不同地區的許多設備上運行。為了使應用程序更具交互性,應用程序應該處理以適合應用程序將要使用的語言環境方面的文字,數字,文件等。在本章中,我
 Android登錄實例
登錄應用程序的屏幕,詢問憑據登錄到一些特定的應用。可能需要登錄到Facebook,微博等本章介紹了,如何創建一個登錄界面,以及如何管理安全問題和錯誤嘗試。首先,必須定義兩