編輯:Android資訊
最近在閒逛的時候,發現了一款粒子爆炸特效的控件,覺得比較有意思,效果也不錯。
但是代碼不好擴展,也就是說如果要提供不同的爆炸效果,需要修改的地方比較多。於是我對源代碼進行了一些重構,將爆炸流程和粒子運動分離。
對於源碼,大家可以參考以下鏈接
鏈接1 鏈接2
上面兩套代碼,其實結構都是一樣的,但是實現的效果不同(其實就是粒子運動的算法不同)。
本篇文章,將給大家介紹粒子爆炸特效的實現方式,替大家理清實現思路。
實現效果如下:

類設計圖如下:
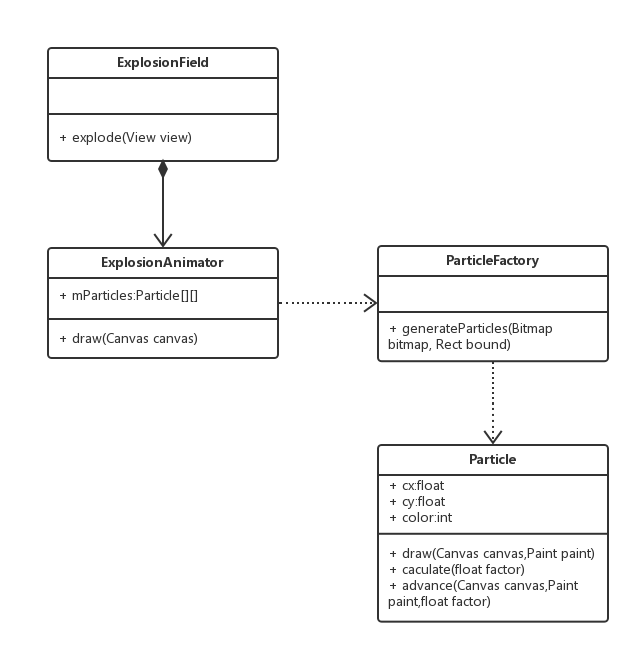
ExplosionField,爆炸效果發生的場地,是一個View。當一個控件需要爆炸時,需要為控件生成一個ExplosionField,這個ExplosionField**覆蓋整個屏幕**,於是我們才能看到完整的爆炸效果。
ExplosionAnimator,爆炸動畫,其實是一個計時器,繼承自ValueAnimator。1024s內,完成爆炸動畫,每次計時,就更新所有粒子的運動狀態。draw()方法是它最重要的方法,也就是使所有粒子重繪自身,從而實現動畫效果。
ParticleFactory,是一個抽象類。用於產生粒子數組,不同的ParticleFactory可以產生不同類型的粒子數組。
Particle,抽象的粒子類。代表粒子本身,必須擁有的屬性包括,當前自己的cx,cy坐標和顏色color。必須實現兩個方法,d**raw()方法選擇怎麼繪制自身(圓形還是方形等),**caculate()計算當前時間,自己所處的位置。
控件使用很簡單,首先要實現不同的爆炸效果,需要給ExplosionField傳入不同的ParticleFactory工廠,產生不同的粒子。
ExplosionField explosionField = new ExplosionField(this,new FallingParticleFactory());
然後哪個控件需要爆炸效果,就這樣添加
explosionField.addListener(findViewById(R.id.text));
explosionField.addListener(findViewById(R.id.layout1));
這樣就為兩個控件添加了爆炸效果,注意layout1代表的是一個viewgroup,那麼我們就會為viewgroup中的每個view添加爆炸效果。
我們可以想象,在ExplosionField的構造函數中,傳入不同的ParticleFactory,就可以生成不同的爆炸效果。
例如,例子中使用的是imageview,對於這個控件,我提供了一個工具類,可以獲得其背景的Bitmap對象
public static Bitmap createBitmapFromView(View view) {
        view.clearFocus();
        Bitmap bitmap = createBitmapSafely(view.getWidth(), view.getHeight(), Bitmap.Config.ARGB_8888, 1);
        if (bitmap != null) {
            synchronized (sCanvas) {
                Canvas canvas = sCanvas;
                canvas.setBitmap(bitmap);
                view.draw(canvas);
                canvas.setBitmap(null);
            }
        }
        return bitmap;
    }

    public static Bitmap createBitmapSafely(int width, int height, Bitmap.Config config, int retryCount) {
        try {
            return Bitmap.createBitmap(width, height, config);
        } catch (OutOfMemoryError e) {
            e.printStackTrace();
            if (retryCount > 0) {
                System.gc();
                return createBitmapSafely(width, height, config, retryCount - 1);
            }
            return null;
        }
    }
上面的方法,簡而言之,就是將控件的Bitmap對象復制了一份,然後返回。
我們知道,bitmap可以看成是一個像素矩陣,矩陣上面的點,就是一個個帶有顏色的像素,於是我們可以獲取每個點(未必需要每個)的顏色和位置,組裝成一個對象Particle,這麼一來,Particle就代表帶有顏色的點了。
獲取Bitmap以後,我們交給ParticleFactory進行加工,根據Bitmap生產Particle數組。
public abstract class ParticleFactory {
    public abstract Particle[][] generateParticles(Bitmap bitmap, Rect bound);
}
例如我們來看一個簡單實現類,也是gif圖中,第一個下落效果的工廠類
public class FallingParticleFactory extends ParticleFactory{
    public static final int PART_WH = 8; //默認小球寬高

    public Particle[][] generateParticles(Bitmap bitmap, Rect bound) {
        int w = bound.width();//場景寬度
        int h = bound.height();//場景高度

        int partW_Count = w / PART_WH; //橫向個數
        int partH_Count = h / PART_WH; //豎向個數

        int bitmap_part_w = bitmap.getWidth() / partW_Count;
        int bitmap_part_h = bitmap.getHeight() / partH_Count;

        Particle[][] particles = new Particle[partH_Count][partW_Count];
        Point point = null;
        for (int row = 0; row < partH_Count; row ++) { //行
            for (int column = 0; column < partW_Count; column ++) { //列
                //取得當前粒子所在位置的顏色
                int color = bitmap.getPixel(column * bitmap_part_w, row * bitmap_part_h);

                float x = bound.left + FallingParticleFactory.PART_WH * column;
                float y = bound.top + FallingParticleFactory.PART_WH * row;
                particles[row][column] = new FallingParticle(color,x,y,bound);
            }
        }

        return particles;
    }

}
其中Rect類型的bound,是代表原來View控件的寬高信息。
根據我們設定的每個粒子的大小,和控件的寬高,我們就可以計算出,有多少個粒子組成這個控件的背景。
我們取得每個粒子所在位置的顏色,位置,用於生產粒子,這就是FallingParticle。
爆炸時需要場地的,也就是繪制粒子的地方,我們通過給當前屏幕,添加一個覆蓋全屏幕的ExplosionField來作為爆炸場地。
public class ExplosionField extends View{
        ...

        /**
         * 給Activity加上全屏覆蓋的ExplosionField
         */
        private void attach2Activity(Activity activity) {
            ViewGroup rootView = (ViewGroup) activity.findViewById(Window.ID_ANDROID_CONTENT);

            ViewGroup.LayoutParams lp = new ViewGroup.LayoutParams(
                    ViewGroup.LayoutParams.MATCH_PARENT, ViewGroup.LayoutParams.MATCH_PARENT);
            rootView.addView(this, lp);
        }
        ...
}
爆炸場地添加以後,我們響應控件的點擊事件,開始動畫
首先是震動動畫
 /**
     * 爆破
     * @param view 使得該view爆破
     */
    public void explode(final View view) {
        //防止重復點擊
        if(explosionAnimatorsMap.get(view)!=null&&explosionAnimatorsMap.get(view).isStarted()){
            return;
        }
        if(view.getVisibility()!=View.VISIBLE||view.getAlpha()==0){
            return;
        }
        //為了正確繪制粒子
        final Rect rect = new Rect();
        view.getGlobalVisibleRect(rect); //得到view相對於整個屏幕的坐標
        int contentTop = ((ViewGroup)getParent()).getTop();
        Rect frame = new Rect();
        ((Activity) getContext()).getWindow().getDecorView().getWindowVisibleDisplayFrame(frame);
        int statusBarHeight = frame.top;
        rect.offset(0, -contentTop - statusBarHeight);//去掉狀態欄高度和標題欄高度

        //震動動畫
        ValueAnimator animator = ValueAnimator.ofFloat(0f, 1f).setDuration(150);
        animator.addUpdateListener(new ValueAnimator.AnimatorUpdateListener() {

            Random random = new Random();

            @Override
            public void onAnimationUpdate(ValueAnimator animation) {
                view.setTranslationX((random.nextFloat() - 0.5f) * view.getWidth() * 0.05f);
                view.setTranslationY((random.nextFloat() - 0.5f) * view.getHeight() * 0.05f);
            }
        });
        animator.addListener(new AnimatorListenerAdapter() {
            @Override
            public void onAnimationEnd(Animator animation) {
                super.onAnimationEnd(animation);
                explode(view, rect);//爆炸動畫
            }
        });
        animator.start();
    }
震動動畫很簡單,就是x,y方向上,隨機產生一些位移,使原控件發生移動即可。
在震動動畫的最後,調用了爆炸動畫,於是爆炸動畫開始。
private void explode(final View view,Rect rect) {
        final ExplosionAnimator animator = new ExplosionAnimator(this, Utils.createBitmapFromView(view), rect,mParticleFactory);
        explosionAnimators.add(animator);
        explosionAnimatorsMap.put(view, animator);
        animator.addListener(new AnimatorListenerAdapter() {
            @Override
            public void onAnimationStart(Animator animation) {
                //縮小,透明動畫
                view.animate().setDuration(150).scaleX(0f).scaleY(0f).alpha(0f).start();
            }

            @Override
            public void onAnimationEnd(Animator animation) {
                view.animate().alpha(1f).scaleX(1f).scaleY(1f).setDuration(150).start();

                //動畫結束時從動畫集中移除
                explosionAnimators.remove(animation);
                explosionAnimatorsMap.remove(view);
                animation = null;
            }
        });
        animator.start();
    }
爆炸動畫首先將原控件隱藏。
我們來看爆炸動畫的具體實現
public class ExplosionAnimator extends ValueAnimator {
    ...

    public ExplosionAnimator(View view, Bitmap bitmap, Rect bound,ParticleFactory particleFactory) {
        mParticleFactory = particleFactory;
        mPaint = new Paint();
        mContainer = view;
        setFloatValues(0.0f, 1.0f);
        setDuration(DEFAULT_DURATION);
        mParticles = mParticleFactory.generateParticles(bitmap, bound);
    }
    //最重要的方法
    public void draw(Canvas canvas) {
        if(!isStarted()) { //動畫結束時停止
            return;
        }
        //所有粒子運動
        for (Particle[] particle : mParticles) {
            for (Particle p : particle) {
                p.advance(canvas,mPaint,(Float) getAnimatedValue());
            }
        }
        mContainer.invalidate();
    }

    @Override
    public void start() {
        super.start();
        mContainer.invalidate();
    }
}
實現很簡單,就是根據工廠類,生成粒子數組。
而其實質是一個ValueAnimator,在一定時間內,從0數到1。
然後提供了一個draw()方法,方法裡面調用了每個粒子的advance()方法,並且傳入了當前數到的數字(是一個小數)。
advance()方法裡,其實調用了draw()方法和caculate()方法。
上面的實現,其實是一個固定的流程,添加了爆炸場地以後,我們就開始從0數到1,在這個過程中,粒子會根據當前時間,繪制自己的位置,所以粒子的位置,其實是它自己決定的,和流程無關。
也就是說,我們只要用不同的算法,繪制粒子的位置即可,實現了流程和粒子運動的分離。
舉個例子,gif圖中,下落效果的粒子是這樣運動的
public class FallingParticle extends Particle{
    static Random random = new Random();
    float radius = FallingParticleFactory.PART_WH;
    float alpha = 1.0f;
    Rect mBound;
    /**
     * @param color 顏色
     * @param x
     * @param y
     */
    public FallingParticle(int color, float x, float y,Rect bound) {
        super(color, x, y);
        mBound = bound;
    }
    ...
    protected void caculate(float factor){
        cx = cx + factor * random.nextInt(mBound.width()) * (random.nextFloat() - 0.5f);
        cy = cy + factor * random.nextInt(mBound.height() / 2);

        radius = radius - factor * random.nextInt(2);

        alpha = (1f - factor) * (1 + random.nextFloat());
    }
}
caculate(float factor)方法,根據當前時間,計算粒子的下一個位置
我們可以看到,在這個粒子中,cy也就是豎直方向上是不斷增加的,cx也就是水平方向上,是隨機增加或者減少,這樣就形成了下落效果。
計算出當前位置以後,粒子就將自己繪制出來
protected void draw(Canvas canvas,Paint paint){
        paint.setColor(color);
        paint.setAlpha((int) (Color.alpha(color) * alpha)); //這樣透明顏色就不是黑色了
        canvas.drawCircle(cx, cy, radius, paint);
    }
從上面的代碼結構可以看出,爆炸流程和粒子具體運動無關,最重要的是,我們要實現自己的caculate()方法,決定粒子的運動形態。
而不同的粒子可以由對應的工廠產生,所以要擴展爆炸特性,只需要定義一個粒子類,和生成粒子類的工廠即可。
源碼下載 github地址
 Android多渠道打包工具Gradle插件使用詳解
項目介紹 gradle-packer-plugin 是Android多渠道打包工具Gradle插件,可方便的於自動化構建系統集成,通過很少的配置可實現如下功能 :
 Android之批量加載圖片OOM問題解決方案
一、OOM問題出現的場景和原因 一個好的app總少不了精美的圖片,所以Android開發中圖片的加載總是避免不了的,而在加載圖片過程中,如果處理不當則會出現OOM
 Android View 自定義 RangeSeekBar 范圍選擇器
前段時間群裡兄弟項目中有類似這樣的需求 我看到兄弟受苦受難,於心不忍。又因事不關己,打算高高掛起。正在愛恨糾結之時,日神對我說:沒事多造點輪子,你的人生會有很多
 Android內存洩漏的8種可能
Java是垃圾回收語言的一種,其優點是開發者無需特意管理內存分配,降低了應用由於局部故障(segmentation fault)導致崩潰,同時防止未釋放的內存把堆