編輯:Android資訊
在清楚了View繪制機制中的第一步測量之後,我們繼續來了解分析View繪制的第二個過程,那就是布局定位。繼續跟蹤分析源碼,根據之前的流程分析我們知道View的繪制是從RootViewImpl的performTraversals方法開始的,在此方法中依次調用了performMeasure、performLayout、performDraw等方法進行測量、布局、繪制,那麼下面我們就看看則方performLayout中都做了哪些事情,該方法的關鍵源碼如下:
private void performLayout(WindowManager.LayoutParams lp, int desiredWindowWidth,
            int desiredWindowHeight) {
        mLayoutRequested = false;
        mScrollMayChange = true;
        mInLayout = true;
        final View host = mView;
          ……
        try {
            host.layout(0, 0, host.getMeasuredWidth(), host.getMeasuredHeight());
……
        } finally {
            Trace.traceEnd(Trace.TRACE_TAG_VIEW);
        }
        mInLayout = false;
    }
從中看出,最關鍵的代碼就是調用了host.layout方法,那麼大家還記不記得host是個什麼東東呢?對了,正是我們之前說的根視圖DecorView。那麼我們就回到DecorView看看它在layout方法中到底做了什麼事情。令人失望的是,我們在DecorView中並沒有發現該方法,不要急,根據該類的繼承體系,我們最終追蹤到layout方法在View中。

public void layout(int l, int t, int r, int b) {
        if ((mPrivateFlags3 & PFLAG3_MEASURE_NEEDED_BEFORE_LAYOUT) != 0) {
            onMeasure(mOldWidthMeasureSpec, mOldHeightMeasureSpec);
            mPrivateFlags3 &= ~PFLAG3_MEASURE_NEEDED_BEFORE_LAYOUT;
        }
        int oldL = mLeft;
        int oldT = mTop;
        int oldB = mBottom;
        int oldR = mRight;
        boolean changed = isLayoutModeOptical(mParent) ?
                setOpticalFrame(l, t, r, b) : setFrame(l, t, r, b);

        if (changed || (mPrivateFlags & PFLAG_LAYOUT_REQUIRED) == PFLAG_LAYOUT_REQUIRED) {
            onLayout(changed, l, t, r, b);
            mPrivateFlags &= ~PFLAG_LAYOUT_REQUIRED;

            ListenerInfo li = mListenerInfo;
            if (li != null && li.mOnLayoutChangeListeners != null) {
                ArrayList<OnLayoutChangeListener> listenersCopy =
                        (ArrayList<OnLayoutChangeListener>)li.mOnLayoutChangeListeners.clone();
                int numListeners = listenersCopy.size();
                for (int i = 0; i < numListeners; ++i) {
                    listenersCopy.get(i).onLayoutChange(this, l, t, r, b, oldL, oldT, oldR, oldB);
                }
            }
        }

        mPrivateFlags &= ~PFLAG_FORCE_LAYOUT;
        mPrivateFlags3 |= PFLAG3_IS_LAID_OUT;
    }

protected void onLayout(boolean changed, int left, int top, int right, int bottom) {}
該方法中的4個參數代表了當前的View與父View之間4個方向上的距離,同時從說明中可以看出,此方法不應該被子類重寫,如果需要重新布局,可以在子類中重寫的方法是onLayout,此方法在View中是個空方法,什麼都沒有寫。可實際上layout的方法在View中並沒有被標識為final,這就意味是可以被重寫的。
繼續查看ViewGoup中的相關代碼,果然layout被重寫了並添加了final標識,同時onLayout被標識為抽象方法,所以繼承了ViewGroup的類是,是不能重寫layout方法的,並且要實現onLayout方法。從代碼可以看出,雖然ViewGroup重寫了layout,實際本質上還是調用了View的layout,然後通過調用onLayout方法最終完成布局定位的。
       @Override
    public final void layout(int l, int t, int r, int b) {
        if (!mSuppressLayout && (mTransition == null || !mTransition.isChangingLayout())) {
            if (mTransition != null) {
                mTransition.layoutChange(this);
            }
            super.layout(l, t, r, b);
        } else {
            // record the fact that we noop'd it; request layout when transition finishes
            mLayoutCalledWhileSuppressed = true;
        }
    }
    @Override
    protected abstract void onLayout(boolean changed,
            int l, int t, int r, int b);
在DecorView中,並沒有發現onLayout方法,所以它使用的肯定是其父類FrameLayout中的,找到FrameLayout的源碼,可以查看到onLayout方法,具體如下:
  @Override
    protected void onLayout(boolean changed, int left, int top, int right, int bottom) {
        layoutChildren(left, top, right, bottom, false /* no force left gravity */);
    }

    void layoutChildren(int left, int top, int right, int bottom,
                                  boolean forceLeftGravity) {
        final int count = getChildCount();

        final int parentLeft = getPaddingLeftWithForeground();
        final int parentRight = right - left - getPaddingRightWithForeground();

        final int parentTop = getPaddingTopWithForeground();
        final int parentBottom = bottom - top - getPaddingBottomWithForeground();

        mForegroundBoundsChanged = true;

        for (int i = 0; i < count; i++) {
            final View child = getChildAt(i);
            if (child.getVisibility() != GONE) {
                final LayoutParams lp = (LayoutParams) child.getLayoutParams();

                final int width = child.getMeasuredWidth();
                final int height = child.getMeasuredHeight();

                int childLeft;
                int childTop;

                int gravity = lp.gravity;
                if (gravity == -1) {
                    gravity = DEFAULT_CHILD_GRAVITY;
                }

                final int layoutDirection = getLayoutDirection();
                final int absoluteGravity = Gravity.getAbsoluteGravity(gravity, layoutDirection);
                final int verticalGravity = gravity & Gravity.VERTICAL_GRAVITY_MASK;

                switch (absoluteGravity & Gravity.HORIZONTAL_GRAVITY_MASK) {
                    case Gravity.CENTER_HORIZONTAL:
                        childLeft = parentLeft + (parentRight - parentLeft - width) / 2 +
                        lp.leftMargin - lp.rightMargin;
                        break;
                    case Gravity.RIGHT:
                        if (!forceLeftGravity) {
                            childLeft = parentRight - width - lp.rightMargin;
                            break;
                        }
                    case Gravity.LEFT:
                    default:
                        childLeft = parentLeft + lp.leftMargin;
                }

                switch (verticalGravity) {
                    case Gravity.TOP:
                        childTop = parentTop + lp.topMargin;
                        break;
                    case Gravity.CENTER_VERTICAL:
                        childTop = parentTop + (parentBottom - parentTop - height) / 2 +
                        lp.topMargin - lp.bottomMargin;
                        break;
                    case Gravity.BOTTOM:
                        childTop = parentBottom - height - lp.bottomMargin;
                        break;
                    default:
                        childTop = parentTop + lp.topMargin;
                }

                child.layout(childLeft, childTop, childLeft + width, childTop + height);
            }
        }
    }
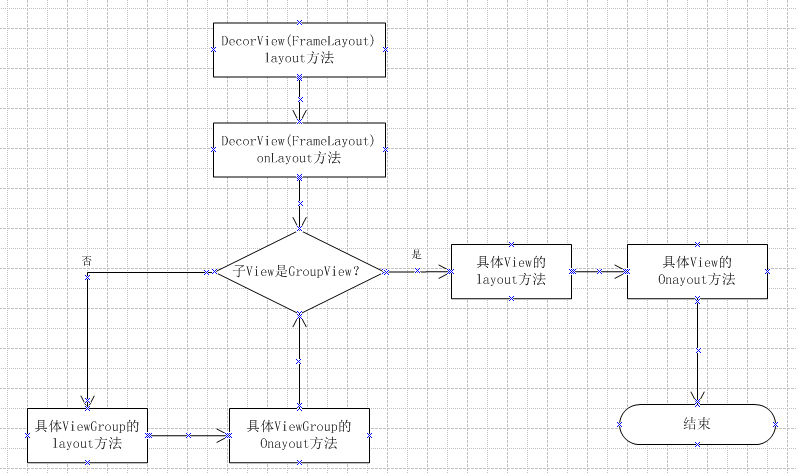
從方法中,我們可以看出在Framelayout中最終調用了layoutChildren方法,在該方法中根據測量結果和一些布局屬性對容器中每一個View都調用了layout方法進行了布局。根據以上的代碼分析,我們可以得出View布局定位的流程圖如下。
 Android Paint 之 PathEffect 詳解
在之前講 Android Paint的使用詳解的時候,其中有一個方法setPathEffect(PathEffect effect)沒有詳細介紹,這篇就結合代碼來
 對手越火越好,微軟2013賺16億Android授權費
雖然在移動市場,微軟一直被安卓設備排擠,但是對手越火越好。2月10日,據外媒ZDNet從Nomura金融公司數據統計得知,根據兩巨頭之間的專利授權協議,微軟201
 8 個最優秀的 Android Studio 插件
本文由碼農網 – 王國峰原創翻譯,轉載請看清文末的轉載要求,歡迎參與我們的付費投稿計劃! Android Studio是目前Google官方設計的用於原生
 GitHub 上排名前 100 的 Android 開源庫介紹
本項目主要對目前 GitHub 上排名前 100 的 Android 開源庫進行簡單的介紹, 至於排名完全是根據GitHub搜索Java語言選擇 (Best Ma