編輯:關於Android編程
最近做項目,碰到如下的需求:ViewPager分頁,如果是6頁(包括6頁)就用圓點,如果是6頁以上就用進度條來切換。前面一種交互方法最常見,用小圓點來表示當前選中的頁面,這些小圓點稱為導航點,很多App都是這種實現方式。當用戶第一次安裝或升級應用時,都會利用導航頁面告訴用戶當前版本的主要亮點,一般情況下當行頁面有三部分組成,背景圖片,導航文字和滑動的原點,即下面的效果:

這裡就不作詳細的講解,大家可以參考我以前寫過的博客:
ViewPager實現圖片輪翻效果
今天來實現ViewPager進度條切換,主要邏輯如下:
MainActivity.java
package com.jackie.slidebarviewdemo.activity;

import android.os.Bundle;
import android.support.v7.app.AppCompatActivity;
import android.widget.TextView;

import com.jackie.slidebarviewdemo.R;
import com.jackie.slidebarviewdemo.widget.SlideBarView;

public class MainActivity extends AppCompatActivity {
  private SlideBarView mSlideBarView;
  private TextView mTextView;

  @Override
  protected void onCreate(Bundle savedInstanceState) {
    super.onCreate(savedInstanceState);
    setContentView(R.layout.activity_main);

    mSlideBarView = (SlideBarView) findViewById(R.id.slide_bar);
    mTextView = (TextView) findViewById(R.id.text_view);

    mSlideBarView.setTotalPage(80);
    mSlideBarView.setOnSlideChangeListener(new SlideBarView.OnSlideChangeListener() {
      @Override
      public void onSlideChange(int page) {
        mTextView.setText("當前是第" + page + "頁");
      }
    });
  }
}
SlideBarView.java
package com.jackie.slidebarviewdemo.widget;

import android.content.Context;
import android.util.AttributeSet;
import android.view.LayoutInflater;
import android.view.MotionEvent;
import android.view.View;
import android.widget.LinearLayout;
import android.widget.PopupWindow;
import android.widget.RelativeLayout;
import android.widget.TextView;

import com.jackie.slidebarviewdemo.R;
import com.jackie.slidebarviewdemo.utils.ConvertUtils;

/**
 * Created by Jackie on 2017/1/17.
 */

public class SlideBarView extends RelativeLayout {
  private LayoutInflater mInflater;

  private RelativeLayout mSlideBarView;
  private View mSlideBarBlock;

  private PopupWindow mPopupWindow;
  private TextView mPopupText;

  private int mDp40;

  private String mBound = "no"; // no表示沒到邊界,left為到左邊界了,right表示到右邊界了

  public interface OnSlideChangeListener {
    void onSlideChange(int page);
  }

  private OnSlideChangeListener mOnSlideChangeListener;
  public void setOnSlideChangeListener(OnSlideChangeListener onSlideChangeListener) {
    this.mOnSlideChangeListener = onSlideChangeListener;
  }

  public SlideBarView(Context context) {
    this(context, null);
  }

  public SlideBarView(Context context, AttributeSet attrs) {
    this(context, attrs, 0);
  }

  public SlideBarView(Context context, AttributeSet attrs, int defStyleAttr) {
    super(context, attrs, defStyleAttr);

    init(context);
    initEvent();
  }

  private void init(Context context) {
    mInflater = LayoutInflater.from(context);
    View slideBar = mInflater.inflate(R.layout.slide_bar, null);
    LayoutParams params = new LayoutParams(LayoutParams.MATCH_PARENT, LayoutParams.MATCH_PARENT);
    addView(slideBar, params);

    mSlideBarView = (RelativeLayout) slideBar.findViewById(R.id.slide_bar_view);
    mSlideBarBlock = slideBar.findViewById(R.id.slide_bar_block);

    mDp40 = ConvertUtils.dip2px(context, 40);
  }

  private void initEvent() {
    mSlideBarView.setOnTouchListener(new OnTouchListener() {
      int currentX = 0;
      int startX = 0;

      @Override
      public boolean onTouch(View v, MotionEvent event) {
        switch (event.getAction()) {
          case MotionEvent.ACTION_DOWN:
            currentX = (int) event.getX();
            startX = (int) event.getX();

            // 設置滑塊的滑動, 手指第一次點下去把滑塊放到手指上
            int downLeft = currentX - mSlideBarBlock.getMeasuredWidth() / 2;
            int downTop = mSlideBarBlock.getTop();
            int downRight = downLeft + mSlideBarBlock.getWidth();
            int downBottom = mSlideBarBlock.getBottom();

            //邊界檢測
            if (downLeft < 0) {
              downLeft = 0;
              downRight = mSlideBarBlock.getMeasuredWidth();
            } else if (downRight > mSlideBarView.getMeasuredWidth()) {
              downLeft = mSlideBarView.getMeasuredWidth() - mSlideBarBlock.getMeasuredWidth();
              downRight = mSlideBarView.getMeasuredWidth();
            }

            mSlideBarBlock.layout(downLeft, downTop, downRight, downBottom);
            break;
          case MotionEvent.ACTION_MOVE:
            currentX = (int) event.getX();
            int currentPage = currentX * mTotalPage / mSlideBarView.getMeasuredWidth();
            if (currentPage < 0) {
              currentPage = 0;
            } else if (currentPage > mTotalPage) {
              currentPage = mTotalPage;
            }

            // 設置滑塊的滑動
            int moveLeft = currentX - mSlideBarBlock.getMeasuredWidth() / 2;
            int moveTop = mSlideBarBlock.getTop();
            int moveRight = moveLeft + mSlideBarBlock.getMeasuredWidth();
            int moveBottom = mSlideBarBlock.getBottom();

            //邊界處理
            if (moveLeft < 0) {
              mBound = "left";

              moveLeft = 0;
              moveRight = mSlideBarBlock.getMeasuredWidth();
            } else if (moveRight >= mSlideBarView.getMeasuredWidth()) {
              mBound = "right";

              moveLeft = mSlideBarView.getMeasuredWidth() - mSlideBarBlock.getMeasuredWidth();
              moveRight = mSlideBarView.getMeasuredWidth();
            } else {
              mBound = "no";
            }

            mSlideBarBlock.layout(moveLeft, moveTop, moveRight, moveBottom);
            startX = currentX;

            //設置popupWindow的彈出位置
            if (mOnSlideChangeListener != null) {
              if (currentPage == mTotalPage) {
                //防止ViewPager越界
                currentPage = mTotalPage - 1;
              }

              mOnSlideChangeListener.onSlideChange(currentPage);

              if (mPopupWindow != null) {
                mPopupText.setText(currentPage + "");

                //設置PopupWindow的滑動
                if (!mPopupWindow.isShowing()) {
                  int[] location = new int[2];
                  mSlideBarView.getLocationInWindow(location);
                  mPopupWindow.showAsDropDown(mSlideBarView, currentX, location[1] - mDp40);
                } else {
                  if ("no".equals(mBound)) {
                    int[] location = new int[2] ;
                    mSlideBarView.getLocationInWindow(location);
                    mPopupWindow.update(currentX, location[1] - mDp40, mPopupWindow.getWidth(), mPopupWindow.getHeight(), true);
                  }
                }
              }
            }
            break;
          case MotionEvent.ACTION_UP:
            currentX = 0;
            startX = 0;
            mPopupWindow.dismiss();
            break;
        }

        return true;
      }
    });

    // 初始化PopupWindow
    View contentView = mInflater.inflate(R.layout.popup_window, null);
    mPopupText = (TextView) contentView.findViewById(R.id.popup_text);
    mPopupWindow = new PopupWindow(LinearLayout.LayoutParams.WRAP_CONTENT, LinearLayout.LayoutParams.WRAP_CONTENT);
    mPopupWindow.setContentView(contentView);
    mPopupWindow.setOutsideTouchable(true);
    mPopupWindow.setBackgroundDrawable(getResources().getDrawable(R.mipmap.popup_window_bg));
    mPopupWindow.setAnimationStyle(0);
  }

  int mTotalPage = 0;
  public void setTotalPage(int totalPage) {
    this.mTotalPage = totalPage;
  }
}
相關的單位轉化工具,大家可以拷貝到自己的項目中直接使用。
ConvertUtils.java
package com.jackie.slidebarviewdemo.utils;

import android.content.Context;

public class ConvertUtils {
  public static int dip2px(Context context, float dpValue) {
    final float scale = context.getResources().getDisplayMetrics().density;
    return (int) (dpValue * scale + 0.5f);
  }

  public static int px2dip(Context context, float pxValue) {
    final float scale = context.getResources().getDisplayMetrics().density;
    return (int) (pxValue / scale + 0.5f);
  }

  public static int px2sp(Context context, float pxValue) {
    final float fontScale = context.getResources().getDisplayMetrics().scaledDensity;
    return (int) (pxValue / fontScale + 0.5f);
  }

  public static int sp2px(Context context, float spValue) {
    final float fontScale = context.getResources().getDisplayMetrics().scaledDensity;
    return (int) (spValue * fontScale + 0.5f);
  }
}
自定義組合控件,然後實現相關的手勢,思路很清晰,代碼也很詳細,這裡就直接貼代碼了。
activity_main.xml
<?xml version="1.0" encoding="utf-8"?>
<RelativeLayout
  xmlns:android="http://schemas.android.com/apk/res/android"
  android:layout_width="match_parent"
  android:layout_height="match_parent">

  <LinearLayout
    android:layout_width="match_parent"
    android:layout_height="wrap_content"
    android:layout_centerInParent="true"
    android:orientation="vertical">

    <com.jackie.slidebarviewdemo.widget.SlideBarView
      android:id="@+id/slide_bar"
      android:layout_width="match_parent"
      android:layout_height="50dp"
      android:layout_marginLeft="20dp"
      android:layout_marginRight="20dp"/>

    <TextView
      android:id="@+id/text_view"
      android:layout_width="wrap_content"
      android:layout_height="wrap_content"
      android:layout_gravity="center_horizontal"
      android:layout_marginTop="20dp"
      android:textColor="#000"
      android:textSize="20dp"
      android:text="當前是第0頁"/>
  </LinearLayout>
</RelativeLayout>
activity_main.xml
<?xml version="1.0" encoding="utf-8"?>
<RelativeLayout xmlns:android="http://schemas.android.com/apk/res/android"
  android:layout_width="match_parent"
  android:layout_height="match_parent">

  <RelativeLayout
    android:id="@+id/slide_bar_view"
    android:layout_width="match_parent"
    android:layout_height="50dp">

    <View
      android:layout_width="match_parent"
      android:layout_height="5dp"
      android:layout_centerInParent="true"
      android:background="@drawable/shape_slide_bar_bg"/>

    <View
      android:id="@+id/slide_bar_block"
      android:layout_width="20dp"
      android:layout_height="14dp"
      android:background="#b9b9b9"
      android:layout_centerVertical="true" />
  </RelativeLayout>
</RelativeLayout>
popup_window.xml
<?xml version="1.0" encoding="utf-8"?>
<RelativeLayout xmlns:android="http://schemas.android.com/apk/res/android"
  android:layout_width="match_parent"
  android:layout_height="match_parent">
  <RelativeLayout
    android:layout_width="30dp"
    android:layout_height="30dp">
    <TextView
      android:id="@+id/popup_text"
      android:layout_width="wrap_content"
      android:layout_height="wrap_content"
      android:textColor="#fff"
      android:textSize="16dp"
      android:gravity="center"
      android:layout_centerInParent="true" />
  </RelativeLayout>
</RelativeLayout>
附上相關的資源文件:
shape_slide_bar_bg.xml
<?xml version="1.0" encoding="utf-8"?>
<shape xmlns:android="http://schemas.android.com/apk/res/android"
  android:shape="rectangle">
  <solid android:color="#dcdcdc" />
  <corners android:radius="1dp"/>
</shape>
popup_window_bg.9.png

效果如下:

以上就是本文的全部內容,希望對大家的學習有所幫助,也希望大家多多支持本站。
 LayoutInflater——inflate方法不同參數的區別
LayoutInflater有兩個參數inflate(XmlPullParser parser, ViewGroup root, boolean attachToRoot
 Android : DevicePolicyManager
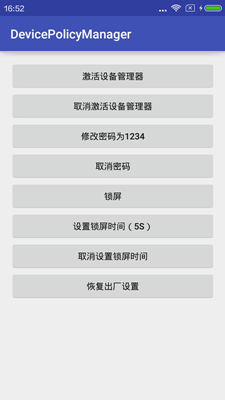
介紹Android 2.2(API 8)開始提供了一個可管理和操作設備的類DevicePolicyManager,通過這個類可以進行鎖屏、設置密碼、清除密碼、恢復出廠設置
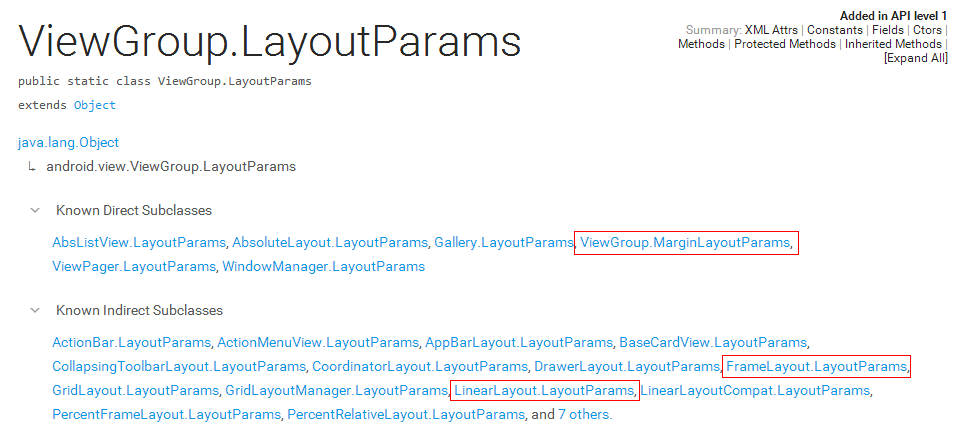 自定義控件知識儲備-LayoutParams的那些事
在上一篇文章裡,我總結了一下自定義控件需要了解的基礎知識:View的繪制流程——《自定義控件知識儲備-View的繪制流程》。其中,在View的測量
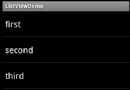 Android listview與adapter詳解及實例代碼
一個ListView通常有兩個職責。(1)將數據填充到布局。(2)處理用戶的選擇點擊等操作。第一點很好理解,ListView就是實現這個功能的。第二點也不難做到,在後面的