編輯:關於Android編程
我們在常用的電商或者旅游APP中,例如美團,手機淘寶等等,都能夠看的到有那種下拉式的二級列表菜單。具體如圖所示:
上面兩張圖就是美團的一個二級列表菜單的一個展示。我相信很多人都想開發一個跟它一樣的功能放到自己的APP中。好,接下來我們就開始動手,解決它。
1.結構分析
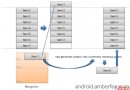
首先,我們給出這個下拉菜單需要的組建。我們用線框圖來分析。
1)如上圖所示,最外圍的是一個Activity,頂部包含了一個View的容器,這個容器主要是裝載ToggleButton來實現諸如美團裡面的“美食,全城,理我最近,刷選”這一行。這一行一點就會彈出對應的下來菜單。
2)下拉菜單是如何實現的呢?,這裡我們利用了PopupWindow來實現這一彈出式窗口。然後我們在彈出式窗口裡面再定義我們的下來列表項,是單列還是二級菜單,都是由裡面來定。
3)不同的菜單,需要一級或者需要二級,在這裡根據我的需求而變動。我們在PopupWindow上面加一個自定義的LeftView,或者是MiddleView,RightView。主要是一個ToggleButton,你彈出一個窗口,你就定制一個窗口。
4)視圖裡面嵌入ListView,就形成了列表項。
好分析就到上面為止,接下來我們一步步的說明實現。
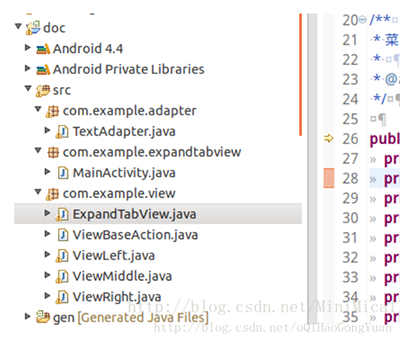
2.項目結構
本項目的項目結構如圖所示:
1) Adapter。適配器,主要是為ListView提供數據適配的。
2)MainActivity。主活動頁面。
3)ExpandTabView。本項目的核心類,它包含ToggleButton容器和PopupWindow,是控制彈出窗口的核心類。
4)ViewLeft,ViewMiddle,ViewRight。是彈出裡面嵌套的類,實現不同的列表菜單。
3.MainActivity
承載所有元素。看代碼比看文字實在。
package com.example.expandtabview;
import java.util.ArrayList;
import Android.app.Activity;
import android.os.Bundle;
import android.util.Log;
import android.view.View;
import android.widget.Toast;
import com.example.view.ExpandTabView;
import com.example.view.ViewLeft;
import com.example.view.ViewMiddle;
import com.example.view.ViewRight;
public class MainActivity extends Activity {
  private static final String TAG = "MainActivity";
  private ExpandTabView expandTabView;
  private ArrayList mViewArray = new ArrayList();
  private ViewLeft viewLeft;
  private ViewMiddle viewMiddle;
  private ViewRight viewRight;
  @Override
  protected void onCreate(Bundle savedInstanceState) {
    super.onCreate(savedInstanceState);
    setContentView(R.layout.activity_main);
    initView();
    initVaule();
    initListener();
  }
  private void initView() {
    Log.d(TAG,"initView");
    expandTabView = (ExpandTabView) findViewById(R.id.expandtab_view);
    viewLeft = new ViewLeft(this);
    viewMiddle = new ViewMiddle(this);
    viewRight = new ViewRight(this);
  }
  private void initVaule() {
    Log.d(TAG,"initValue");
    mViewArray.add(viewLeft);
    mViewArray.add(viewMiddle);
    mViewArray.add(viewRight);
    ArrayList mTextArray = new ArrayList();
    mTextArray.add("距離");
    mTextArray.add("區域");
    mTextArray.add("距離");
    expandTabView.setValue(mTextArray, mViewArray);//將三個下拉列表設置進去
    expandTabView.setTitle(viewLeft.getShowText(), 0);
    expandTabView.setTitle(viewMiddle.getShowText(), 1);
    expandTabView.setTitle(viewRight.getShowText(), 2);
  }
  private void initListener() {
    Log.d(TAG,"initListener");
    viewLeft.setOnSelectListener(new ViewLeft.OnSelectListener() {
      @Override
      public void getValue(String distance, String showText) {
        Log.d("ViewLeft", "OnSelectListener, getValue");
        onRefresh(viewLeft, showText);
      }
    });
    viewMiddle.setOnSelectListener(new ViewMiddle.OnSelectListener() {
      @Override
      public void getValue(String showText) {
        Log.d("ViewMiddle","OnSelectListener, getValue");
        onRefresh(viewMiddle,showText);
      }
    });
    viewRight.setOnSelectListener(new ViewRight.OnSelectListener() {
      @Override
      public void getValue(String distance, String showText) {
        Log.d("ViewRight","OnSelectListener, getValue");
        onRefresh(viewRight, showText);
      }
    });
  }
  private void onRefresh(View view, String showText) {
    Log.d(TAG,"onRefresh,view:"+view+",showText:"+showText);
    expandTabView.onPressBack();
    int position = getPositon(view);
    if (position >= 0 && !expandTabView.getTitle(position).equals(showText)) {
      expandTabView.setTitle(showText, position);
    }
    Toast.makeText(MainActivity.this, showText, Toast.LENGTH_SHORT).show();
  }
  private int getPositon(View tView) {
    Log.d(TAG,"getPosition");
    for (int i = 0; i < mViewArray.size(); i++) {
      if (mViewArray.get(i) == tView) {
        return i;
      }
    }
    return -1;
  }
  @Override
  public void onBackPressed() {
    if (!expandTabView.onPressBack()) {
      finish();
    }
  }
}
4 .ExpandTabView
最主要就是如何處理當我們點擊這些ToggleButton的時候要彈出或者收起這些PopupWindow。
package com.example.view;
import java.util.ArrayList;
import com.example.expandtabview.R;
import android.app.Activity;
import android.content.Context;
import android.util.AttributeSet;
import android.util.Log;
import android.view.LayoutInflater;
import android.view.View;
import android.widget.LinearLayout;
import android.widget.PopupWindow;
import android.widget.PopupWindow.OnDismissListener;
import android.widget.RelativeLayout;
import android.widget.TextView;
import android.widget.ToggleButton;
/**
 * 菜單控件頭部,封裝了下拉動畫,動態生成頭部按鈕個數
 *
 * @author zengjinlong
 */
public class ExpandTabView extends LinearLayout implements OnDismissListener {
  private static final String TAG = "ExpandTabView";
  private ToggleButton selectedButton;
  private ArrayList mTextArray = new ArrayList();
  private ArrayList mViewArray = new ArrayList();
  private ArrayList mToggleButton = new ArrayList();
  private Context mContext;
  private final int SMALL = 0;
  private int displayWidth;
  private int displayHeight;
  private PopupWindow popupWindow;
  private int selectPosition;
  public ExpandTabView(Context context) {
    super(context);
    init(context);
  }
  public ExpandTabView(Context context, AttributeSet attrs) {
    super(context, attrs);
    init(context);
  }
  /**
   * 根據選擇的位置設置tabitem顯示的值
   */
  public void setTitle(String valueText, int position) {
    if (position < mToggleButton.size()) {
      mToggleButton.get(position).setText(valueText);
    }
  }
  public void setTitle(String title){
  }
  /**
   * 根據選擇的位置獲取tabitem顯示的值
   */
  public String getTitle(int position) {
    if (position < mToggleButton.size() && mToggleButton.get(position).getText() != null) {
      return mToggleButton.get(position).getText().toString();
    }
    return "";
  }
  /**
   * 設置tabitem的個數和初始值
   * @param textArray 標題數組
   * @param viewArray 控件數組
   */
  public void setValue(ArrayList textArray, ArrayList viewArray) {
    if (mContext == null) {
      return;
    }
    LayoutInflater inflater = (LayoutInflater) mContext.getSystemService(Context.LAYOUT_INFLATER_SERVICE);
    Log.d(TAG,"setValue");
    mTextArray = textArray;
    for (int i = 0; i < viewArray.size(); i++) {
      final RelativeLayout r = new RelativeLayout(mContext);
      int maxHeight = (int) (displayHeight * 0.7);
      RelativeLayout.LayoutParams rl = new RelativeLayout.LayoutParams(RelativeLayout.LayoutParams.MATCH_PARENT, maxHeight);
      rl.leftMargin = 10;
      rl.rightMargin = 10;
      r.addView(viewArray.get(i), rl);
      mViewArray.add(r);
      r.setTag(SMALL);
      ToggleButton tButton = (ToggleButton) inflater.inflate(R.layout.toggle_button, this, false);
      addView(tButton);
      View line = new TextView(mContext);
      line.setBackgroundResource(R.drawable.choosebar_line);
      if (i < viewArray.size() - 1) {
        LinearLayout.LayoutParams lp = new LinearLayout.LayoutParams(2, LinearLayout.LayoutParams.MATCH_PARENT);
        addView(line, lp);
      }
      mToggleButton.add(tButton);
      tButton.setTag(i);
      tButton.setText(mTextArray.get(i));
      r.setOnClickListener(new OnClickListener() {
        @Override
        public void onClick(View v) {
          Log.d("RelativeLayout","view:"+v);
          onPressBack();
        }
      });
      r.setBackgroundColor(mContext.getResources().getColor(R.color.popup_main_background));
      tButton.setOnClickListener(new OnClickListener() {
        @Override
        public void onClick(View view) {
          Log.d("tButton","setOnClickListener(l)");
          // initPopupWindow();
          ToggleButton tButton = (ToggleButton) view;
          if (selectedButton != null && selectedButton != tButton) {
            selectedButton.setChecked(false);
          }
          selectedButton = tButton;
          selectPosition = (Integer) selectedButton.getTag();
          startAnimation();
          if (mOnButtonClickListener != null && tButton.isChecked()) {
            mOnButtonClickListener.onClick(selectPosition);
          }
        }
      });
    }// for..
  }
  private void startAnimation() {
    Log.d(TAG,"startAnimation");
    if (popupWindow == null) {
      Log.d(TAG,"startAnimation(),new popupWindow now");
      popupWindow = new PopupWindow(mViewArray.get(selectPosition), displayWidth, displayHeight);
      popupWindow.setAnimationStyle(R.style.PopupWindowAnimation);
      popupWindow.setFocusable(false);
      popupWindow.setOutsideTouchable(true);
    }
    Log.d(TAG,"startAnimation(),selectedButton:"+selectedButton+",isChecked:"+selectedButton.isChecked()+
        ",popupWindow.isShowing:"+popupWindow.isShowing());
    if (selectedButton.isChecked()) {
      if (!popupWindow.isShowing()) {
        showPopup(selectPosition);
      } else {
        popupWindow.setOnDismissListener(this);
        popupWindow.dismiss();
        hideView();
      }
    } else {
      if (popupWindow.isShowing()) {
        popupWindow.dismiss();
        hideView();
      }
    }
  }
  private void showPopup(int position) {
    View tView = mViewArray.get(selectPosition).getChildAt(0);
    if (tView instanceof ViewBaseAction) {
      ViewBaseAction f = (ViewBaseAction) tView;
      f.show();
    }
    if (popupWindow.getContentView() != mViewArray.get(position)) {
      popupWindow.setContentView(mViewArray.get(position));
    }
    popupWindow.showAsDropDown(this, 0, 0);
  }
  /**
   * 如果菜單成展開狀態,則讓菜單收回去
   */
  public boolean onPressBack() {
    Log.d(TAG,"onPressBack");
    if (popupWindow != null && popupWindow.isShowing()) {
      popupWindow.dismiss();
      hideView();
      if (selectedButton != null) {
        selectedButton.setChecked(false);
      }
      return true;
    } else {
      return false;
    }
  }
  private void hideView() {
    Log.d(TAG, "hide()");
    View tView = mViewArray.get(selectPosition).getChildAt(0);
    if (tView instanceof ViewBaseAction) {
      ViewBaseAction f = (ViewBaseAction) tView;
      f.hide();
    }
  }
  private void init(Context context) {
    mContext = context;
    displayWidth = ((Activity) mContext).getWindowManager().getDefaultDisplay().getWidth();
    displayHeight = ((Activity) mContext).getWindowManager().getDefaultDisplay().getHeight();
    setOrientation(LinearLayout.HORIZONTAL);
  }
  @Override
  public void onDismiss() {
    Log.d(TAG,"onDismiss,selectPosition:"+selectPosition);
    showPopup(selectPosition);
    popupWindow.setOnDismissListener(null);
  }
  private OnButtonClickListener mOnButtonClickListener;
  /**
   * 設置tabitem的點擊監聽事件
   */
  public void setOnButtonClickListener(OnButtonClickListener l) {
    mOnButtonClickListener = l;
  }
  /**
   * 自定義tabitem點擊回調接口
   */
  public interface OnButtonClickListener {
    public void onClick(int selectPosition);
  }
}
5.ViewLeft
其中的一個示例,其他兩個就不列舉了
package com.example.view;
import com.example.adapter.TextAdapter;
import com.example.expandtabview.R;
import android.content.Context;
import android.util.AttributeSet;
import android.view.LayoutInflater;
import android.view.View;
import android.widget.ListView;
import android.widget.RelativeLayout;
import android.widget.Toast;
public class ViewLeft extends RelativeLayout implements ViewBaseAction{
  private static final String TAG = "ViewLeft";
  private ListView mListView;
  private final String[] items = new String[] { "item1", "item2", "item3", "item4", "item5", "item6" };//顯示字段
  private final String[] itemsVaule = new String[] { "1", "2", "3", "4", "5", "6" };//隱藏id
  private OnSelectListener mOnSelectListener;
  private TextAdapter adapter;
  private String mDistance;
  private String showText = "item1";
  private Context mContext;
  public String getShowText() {
    return showText;
  }
  public ViewLeft(Context context) {
    super(context);
    init(context);
  }
  public ViewLeft(Context context, AttributeSet attrs, int defStyle) {
    super(context, attrs, defStyle);
    init(context);
  }
  public ViewLeft(Context context, AttributeSet attrs) {
    super(context, attrs);
    init(context);
  }
  private void init(Context context) {
    mContext = context;
    LayoutInflater inflater = (LayoutInflater) context.getSystemService(Context.LAYOUT_INFLATER_SERVICE);
    inflater.inflate(R.layout.view_distance, this, true);
    setBackgroundDrawable(getResources().getDrawable(R.drawable.choosearea_bg_mid));
    mListView = (ListView) findViewById(R.id.listView);
    adapter = new TextAdapter(context, items, R.drawable.choose_item_right, R.drawable.choose_eara_item_selector);
    adapter.setTextSize(17);
    if (mDistance != null) {
      for (int i = 0; i < itemsVaule.length; i++) {
        if (itemsVaule[i].equals(mDistance)) {
          adapter.setSelectedPositionNoNotify(i);
          showText = items[i];
          break;
        }
      }
    }
    mListView.setAdapter(adapter);
    adapter.setOnItemClickListener(new TextAdapter.OnItemClickListener() {
      @Override
      public void onItemClick(View view, int position) {
        if (mOnSelectListener != null) {
          showText = items[position];
          mOnSelectListener.getValue(itemsVaule[position], items[position]);
        }
      }
    });
  }
  public void setOnSelectListener(OnSelectListener onSelectListener) {
    mOnSelectListener = onSelectListener;
  }
  public interface OnSelectListener {
    public void getValue(String distance, String showText);
  }
  @Override
  public void hide() {
  }
  @Override
  public void show() {
  }
}
6.效果圖
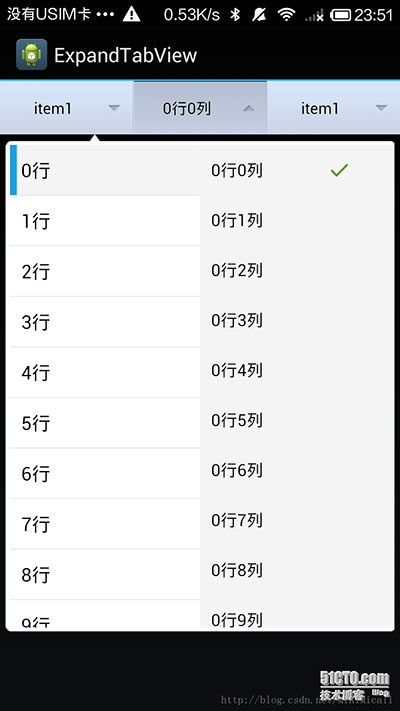
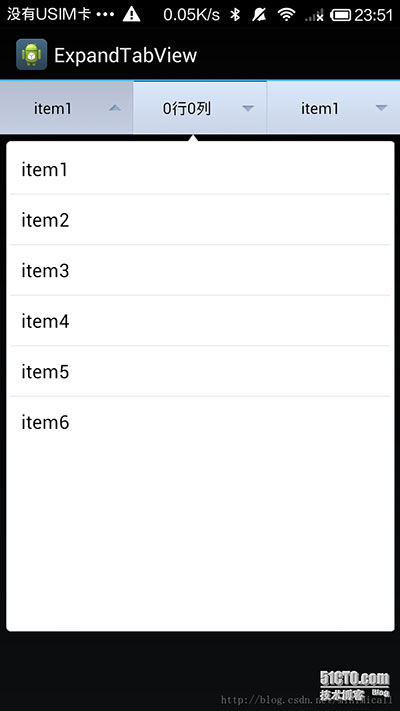
以上所述是小編給大家介紹的Android仿美團淘寶實現多級下拉列表菜單功能,多條目的實例代碼,希望對大家有所幫助,如果大家有任何疑問請給我留言,小編會及時回復大家的。在此也非常感謝大家對本站網站的支持!
 Smalidea+IntelliJ IDEA/Android Studio動態調試安卓app教程
smalidea smalidea是一個IntelliJ IDEA/Android Studio smali語言插件,可實現動態調試smali代碼。 github地址
 Android基礎入門教程——2.4.5 ListView之checkbox錯位問題解決
Android基礎入門教程——2.4.5 ListView之checkbox錯位問題解決標簽(空格分隔): Android基礎入門教程本節引言:
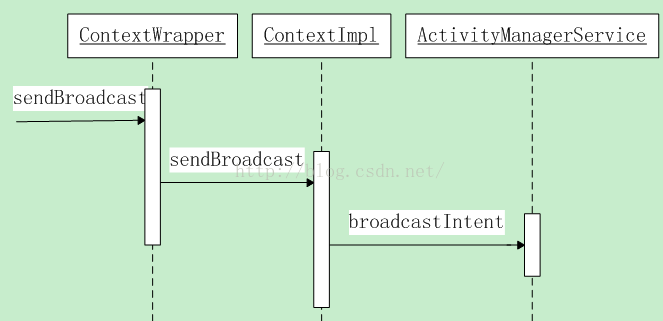 Android廣播之發送廣播的源碼分析
前面文章介紹了Android注冊廣播的過程,這篇介紹下廣播的發送過程。廣播的發送過程比廣播的注冊過程復雜的多,主要有以下幾個步驟:1.廣播的發送者將一個特定類型的廣播發送
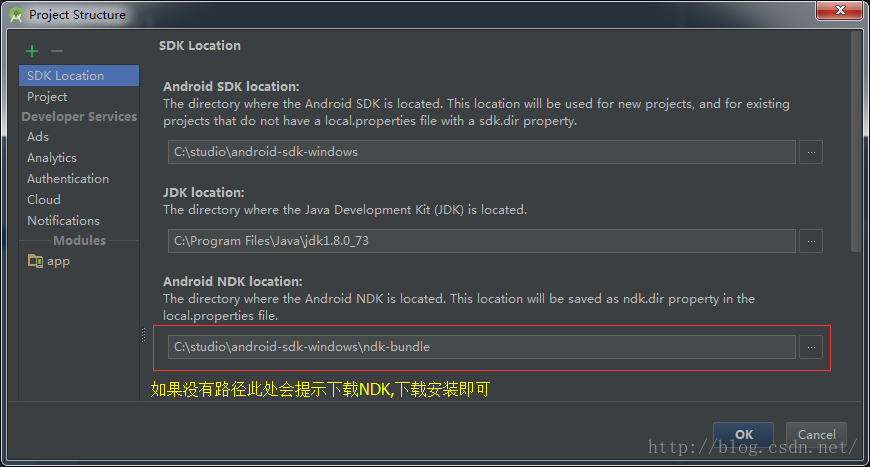 Android Studio使用JNI調用C代碼
一、配置NDK環境第一步:在AndroidStudio中配置ndk環境需要下載ndk包,在AndroidStudio中File-->ProjectStructure