編輯:關於Android編程
類似QQ分組的樣子,實現tableView的折疊與展開。其實要做這個效果我先想到的是在tableView中再嵌套多個tableView,這個想法實現起來就有點難了。
所以還是換個思路,把tableView的HeaderView用上了。給headerView加上手勢,輕松解決折疊展開的問題。
直接上代碼吧。
@property (nonatomic, strong) UITableView *myTableView;
@property (nonatomic, strong) NSMutableArray *listArray;  // 數據源
@property (nonatomic, strong) NSMutableArray *titlesArray;  // 分組的名稱
@property (nonatomic, strong) NSMutableDictionary *openSectionDict; // 記錄哪個組展開
- (void)viewDidLoad {
 [super viewDidLoad];
 // 初始化tableView
 _myTableView = [[UITableView alloc] initWithFrame:self.view.frame style:UITableViewStyleGrouped];
 self.myTableView.delegate = self;
 self.myTableView.dataSource = self;
 [self.view addSubview:_myTableView];
 self.openSectionDict = [[NSMutableDictionary alloc] init]; // 初始化字典
 [self setUpData];
}
// 給數據源賦值
- (void)setUpData {
 self.listArray = [NSMutableArray new];
 self.titlesArray = [NSMutableArray new];
 for (int i = 0; i < 5; i++) {  // 5個section
  [self.titlesArray addObject:[NSString stringWithFormat:@"section %d", i]];
  NSMutableArray *array = [NSMutableArray new];
  for (int i = 0; i < 4; i++) { // 每個section有4個row
   [array addObject:[NSString stringWithFormat:@"row %d", i]];
  }
  [self.listArray addObject:array];
 }
}
// 實現tableView的代理方法
#pragma mark - tableView dataSource
- (NSInteger)numberOfSectionsInTableView:(UITableView *)tableView {
 return 5;
}
- (NSInteger)tableView:(UITableView *)tableView numberOfRowsInSection:(NSInteger)section {
 if ([[self.openSectionDict valueForKey:[NSString stringWithFormat:@"%ld", section]] integerValue] == 0) { //根據記錄的展開狀態設置row的數量
  return 0;
 } else {
  return 4;
 }
}
- (UITableViewCell *)tableView:(UITableView *)tableView cellForRowAtIndexPath:(NSIndexPath *)indexPath {
 UITableViewCell *cell = [tableView dequeueReusableCellWithIdentifier:@"CELL_ID"];
 if (!cell) {
  cell = [[UITableViewCell alloc] initWithStyle:UITableViewCellStyleSubtitle reuseIdentifier:@"CELL_ID"];
  cell.textLabel.text = [NSString stringWithFormat:@"row %ld", indexPath.row];
 }
 return cell;
}
#pragma mark - tableView delegate
- (CGFloat)tableView:(UITableView *)tableView heightForRowAtIndexPath:(NSIndexPath *)indexPath {
 return 45;
}
- (CGFloat)tableView:(UITableView *)tableView heightForHeaderInSection:(NSInteger)section {
 return 40;
}
- (UIView *)tableView:(UITableView *)tableView viewForHeaderInSection:(NSInteger)section {
 UIView *view = [[UIView alloc] initWithFrame:CGRectMake(0, 0, tableView.bounds.size.width, 40)];
 view.backgroundColor = [UIColor whiteColor];
 view.tag = KTAG + section;
 UILabel *label = [[UILabel alloc] initWithFrame:CGRectMake(20, 0, view.bounds.size.width, view.bounds.size.height)];
 label.text = self.titlesArray[section];
 [view addSubview:label];
 if ([[self.openSectionDict valueForKey:[NSString stringWithFormat:@"%ld", section]] integerValue] == 0) {
  UIImageView *imageView = [[UIImageView alloc] initWithFrame:CGRectMake(10, (view.bounds.size.height - 10) / 2, 7, 10)];
  imageView.image = [UIImage imageNamed:@"Triangle_right_gray"]; // 三角形小圖片
  [view addSubview:imageView];
 } else {
  UIImageView *imageView = [[UIImageView alloc] initWithFrame:CGRectMake(10, (view.bounds.size.height - 7) / 2, 10, 7)];
  imageView.image = [UIImage imageNamed:@"Triangle_down_gray"];
  [view addSubview:imageView];
 }
 UITapGestureRecognizer *tap = [[UITapGestureRecognizer alloc] initWithTarget:self action:@selector(collegeTaped:)];
 [view addGestureRecognizer:tap];
 return view;
}
- (CGFloat)tableView:(UITableView *)tableView heightForFooterInSection:(NSInteger)section {
 return 0.1;
}
#pragma mark - sectionHeader clicked
- (void)collegeTaped:(UITapGestureRecognizer *)sender {
 NSString *key = [NSString stringWithFormat:@"%ld", sender.view.tag - KTAG];
 // 給展開標識賦值
 if ([[self.openSectionDict objectForKey:key] integerValue] == 0) {
  [self.openSectionDict setObject:@"1" forKey:key];
 } else {
  [self.openSectionDict setObject:@"0" forKey:key];
 }
 NSUInteger index = sender.view.tag;
 NSIndexSet *set = [NSIndexSet indexSetWithIndex:index - KTAG];
 [self.myTableView reloadSections:set withRowAnimation:UITableViewRowAnimationFade];
}
最後的效果:

以上所述是小編給大家介紹的iOS開發中TableView類似QQ分組的折疊與展開效果,希望對大家有所幫助,如果大家有任何疑問請給我留言,小編會及時回復大家的。在此也非常感謝大家對本站網站的支持!
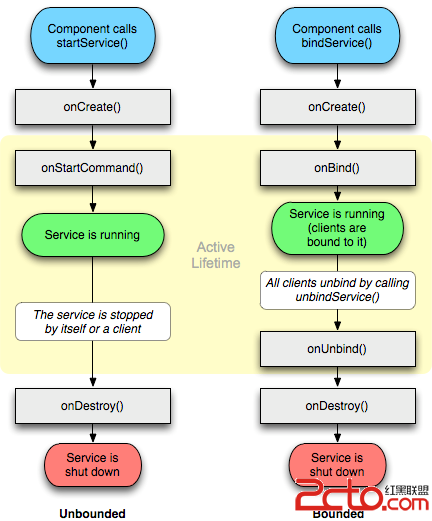 Android學習筆記---Service及IntentService理解
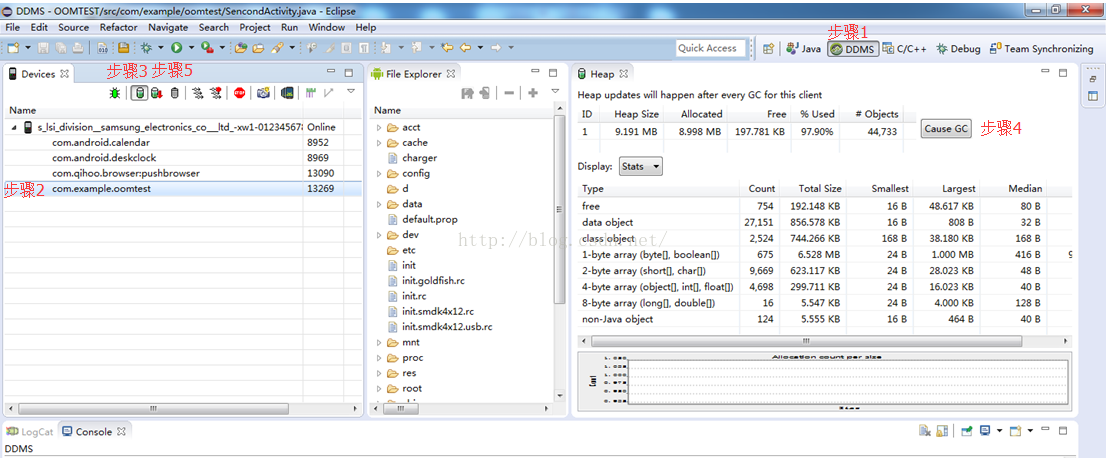
一.Android Service服務: Android中的服務是運行在後台的服務,他是不可見的沒有界面的東西。你可以
 Android中使用GridView和ImageViewSwitcher實現電子相冊簡單功能實例
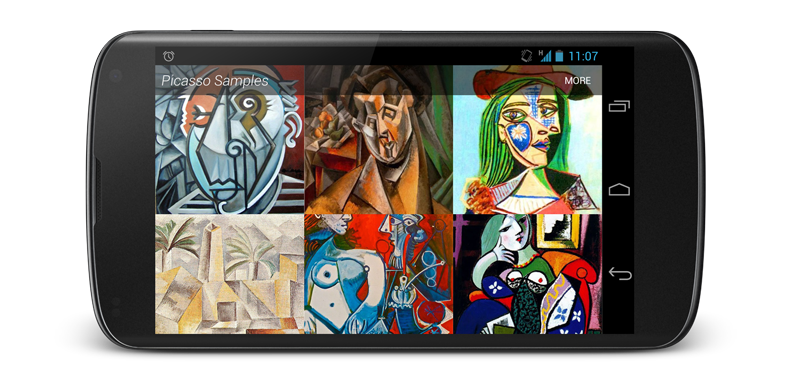
我們在手機上查看相冊時,首先看到的是網格狀的圖片展示界面,然後我們選擇想要欣賞的照片點擊進入,這樣就可以全屏觀看該照片,並且可以通過左右滑動來切換照片。如下圖的顯示效果:
 淺談android中圖片處理之色彩特效處理ColorMatrix(三)
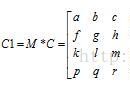
在android開發中對圖片處理很是頻繁,其中對圖片的顏色處理就是很常見的一種。我們經常看到一些類似美圖秀秀,美顏相機的app,為什麼那麼黑的人拍出來是確實那麼地白呢?長
 【工具篇】Android studio 自定義注釋快速生成淺析
前言團隊協作中,盡量保證各自代碼自己維護。這樣既能保證代碼編寫者在邏輯上的一慣性,也能避免修改不熟悉的代碼而引起bug問題。但即使是這樣的規避,也依然無法避免程序員之間代