編輯:關於Android編程
在之前的博文《Android 中使用 ViewPager實現屏幕頁面切換和頁面輪播效果》和《詳解Android中Fragment的兩種創建方式》以及《Android中fragment與activity之間的交互(兩種實現方式)》中我們介紹了ViewPager以及Fragment各自的使用場景以及不同的實現方式。
那如果將他們兩結合起來,會不會擦出點火花呢,答案是肯定的。之前在介紹ViewPager時,我們實現了多個ImageView的切換,並配合更新導航原點的狀態。那我們現在就將之前的imageview替換為fragment,將導航原點替換為更加生動的布局,比如我們經常使用的微信(取消了ActionBar):
(1)我們可以通過點擊下面的導航按鈕選擇對應的顯示界面(fragment),如下圖:
(2)我們也可以通過滑動界面(fragment)來實現界面切換,同時下面的導航按鈕狀態也會發生變化,如下圖:
那麼重點來了,這樣的效果要怎麼實現呢,大至分為以下的步驟
(1)布局文件中直接部署ViewPager以及下方的導航布局
(2)根據導航的個數來建立對應的fragment布局並建立配套的Fragment類(為方便後期擴展,建議建立與導航個數相同的fragments)
(3)drable下使用selector實現導航組件的形態變化
(4)通過FragmentPagerAdapter(V4包下)實現ViewPager與Fragment的關聯
(5)設置下方導航的點擊事件以及ViewPager的OnPageChangeListener方法實現對應的狀態改變
第一步:layout中的主布局文件activity_main.xml文件
取消了actionBar,采用LinearLayout嵌套來實現主布局:
<?xml version="1.0" encoding="utf-8"?>
<LinearLayout
xmlns:android="http://schemas.android.com/apk/res/android"
 xmlns:tools="http://schemas.android.com/tools"
 android:id="@+id/activity_main"
 android:layout_width="match_parent"
 android:layout_height="match_parent"
 android:orientation="vertical" tools:context="com.example.administrator.viewpagerfragment.MainActivity">
 <LinearLayout
 android:background="@color/colorblack"
 android:padding="10dp"
 android:layout_width="match_parent"
 android:layout_height="wrap_content">
 <TextView
 android:layout_width="0dp"
 android:layout_weight="1"
 android:gravity="center_vertical"
 android:layout_height="match_parent"
 android:layout_marginLeft="5dp"
 android:text="潘侯爺微信"
 android:textSize="20sp"
 android:textColor="@color/colorWhite"/>
 <ImageView
android:src="@mipmap/jy_drltsz_btn_addperson"
 android:adjustViewBounds="true"
 android:maxHeight="23dp"
 android:layout_width="wrap_content"
 android:layout_height="wrap_content" />
 </LinearLayout>
 <android.support.v4.view.ViewPager
 android:id="@+id/viewPager"
 android:layout_width="match_parent"
 android:layout_height="0dp"
 android:layout_weight="1"/>
 <View
 android:layout_width="match_parent"
 android:layout_height="1dp"
 android:background="@color/colornormal"/>
 <LinearLayout
 android:orientation="horizontal"
 android:padding="5dp"
 android:layout_width="match_parent"
 android:layout_height="wrap_content">
 <LinearLayout
 android:id="@+id/weixin"
 android:clickable="true"
 android:orientation="vertical"
 android:layout_width="0dp"
 android:gravity="center"
 android:layout_weight="1"
 android:layout_height="wrap_content">
 <ImageView
 android:id="@+id/weixin_img"
android:background="@drawable/weixin_picture_selector"
 android:layout_width="30dp"
 android:layout_height="25dp" />
 <TextView
 android:id="@+id/weixin_txt"
 android:layout_width="wrap_content"
 android:gravity="center"
 android:layout_height="wrap_content"
 android:text="微信"
 android:textSize="12sp"
android:textColor="@drawable/weixin_text_selector"/>
 </LinearLayout>
 <LinearLayout
 android:id="@+id/contact"
 android:clickable="true"
 android:orientation="vertical"
 android:layout_width="0dp"
 android:gravity="center"
 android:layout_weight="1"
 android:layout_height="wrap_content">
 <ImageView
 android:id="@+id/contact_img"
android:background="@drawable/txl_picture_selector"
 android:layout_width="30dp"
 android:layout_height="25dp" />
 <TextView
 android:id="@+id/contact_txt"
 android:layout_width="wrap_content"
 android:gravity="center"
 android:layout_height="wrap_content"
 android:text="通訊錄"
 android:textSize="12sp"
android:textColor="@drawable/weixin_text_selector"/>
 </LinearLayout>
 <LinearLayout
 android:id="@+id/find"
 android:clickable="true"
 android:orientation="vertical"
 android:layout_width="0dp"
 android:gravity="center"
 android:layout_weight="1"
 android:layout_height="wrap_content">
 <ImageView
 android:id="@+id/find_img"
android:background="@drawable/find_picture_selector"
 android:layout_width="30dp"
 android:layout_height="25dp" />
 <TextView
 android:id="@+id/find_txt"
 android:layout_width="wrap_content"
 android:gravity="center"
 android:layout_height="wrap_content"
 android:text="發現"
 android:textSize="12sp" android:textColor="@drawable/weixin_text_selector"/>
 </LinearLayout>
 <LinearLayout
 android:id="@+id/self"
 android:clickable="true"
 android:orientation="vertical"
 android:layout_width="0dp"
 android:gravity="center"
 android:layout_weight="1"
 android:layout_height="wrap_content">
 <ImageView
 android:id="@+id/self_img"
android:background="@drawable/me_picture_selector"
 android:layout_width="30dp"
 android:layout_height="25dp" />
 <TextView
 android:id="@+id/self_txt"
 android:layout_width="wrap_content"
 android:gravity="center"
 android:layout_height="wrap_content"
 android:text="我"
 android:textSize="12sp"
android:textColor="@drawable/weixin_text_selector"/>
 </LinearLayout>
 </LinearLayout>
</LinearLayout>
第二步:layout中fragment的布局文件(可自由擴展)
這裡四個導航對應四個不同的fragment(實現上面的效果,也可以只建立一個fragment,但這樣不利於後期擴展),這裡我們只演示其中一個weixin_fragment.xml(其他三個為 contactListFragment; findFragment;selfFragment)
<?xml version="1.0" encoding="utf-8"?>
<LinearLayout xmlns:android="http://schemas.android.com/apk/res/android"
 xmlns:app="http://schemas.android.com/apk/res-auto"
 android:orientation="vertical"
 android:layout_width="match_parent"
 android:layout_height="match_parent">
 <TextView
 android:id="@+id/tv"
 android:layout_width="match_parent"
 android:layout_height="match_parent"
 android:text="沒有微信消息"
 android:gravity="center"
 android:textSize="50sp"/>
</LinearLayout>
第三步:drable中設定下方導航組件不同的形態
導航組件中文字形態變化只是顏色不同,圖片的話需要設置點擊前後不同的圖片(這裡演示一種)
(1)文字的變化wenxin_text_selector.xml
這裡使用selected而不用checked的原因:個人使用的導航布局為linerlayout,並且為linerlayout設置chiclable而不是其中的Text/imageView,所以為了判斷變化,這裡使用了selected,方便代碼中設置調用。
 <?xml version="1.0" encoding="utf-8"?>
 <selector xmlns:android="http://schemas.android.com/apk/res/android">
 <item android:color="@color/colorpressed" android:state_selected="true"/>
 <item android:color="@color/colornormal" android:state_selected="false" />
 </selector>
(2)圖片的變化weixin_picture_selector.xml
 <?xml version="1.0" encoding="utf-8"?>
<selector xmlns:android="http://schemas.android.com/apk/res/android">
 <item android:drawable="@mipmap/weixin_pressed" android:state_selected="true"/>
 <item android:drawable="@mipmap/weixin_normal" android:state_selected="false" />
 </selector>
第四步:Java中對應fragment布局的Fragment繼承類
這裡建議繼承android.support.v4.app.Fragment包下的.Fragment,因為後面要用的FragmentPagerAdapter屬於V4包,應該統一。
4個fragment對應4個java類,這裡演示一個,其他三個都一樣。
import android.os.Bundle;
import android.support.annotation.Nullable;
import android.support.v4.app.Fragment;
import android.view.LayoutInflater;
import android.view.View;
import android.view.ViewGroup;
import android.widget.TextView;
/**
 * Created by panchengjia on 2016/12/24.
 */
public class WeixinFragment extends Fragment {
 @Nullable
 @Override
 public View onCreateView(LayoutInflater inflater, ViewGroup container, Bundle savedInstanceState) {
 View view = inflater.inflate(R.layout.weixin_fragment,container,false);
 return view;
 }
}
第五步:java中功能實現MainActivity.java文件
代碼中詳細標注了各個實現步驟的注釋,這裡不再贅述(為了提高程序運行效率,很多重復方法未封裝,代碼看起來有點臃腫了)
import android.support.v4.app.Fragment;
import android.support.v4.app.FragmentManager;
import android.support.v4.app.FragmentPagerAdapter;
import android.support.v4.view.ViewPager;
import android.support.v7.app.AppCompatActivity;
import android.os.Bundle;
import android.view.View;
import android.widget.ImageView;
import android.widget.LinearLayout;
import android.widget.TextView;
import java.util.ArrayList;
public class MainActivity extends AppCompatActivity implements View.OnClickListener {
 //聲明存儲fragment的集合
 private ArrayList<Fragment> fragments;
 //聲明四個導航對應fragment
 WeixinFragment weixinFragment;
 ContactListFragment contactListFragment;
 FindFragment findFragment;
 SelfFragment selfFragment;
 //聲明ViewPager
 private ViewPager viewPager;
 FragmentManager fragmentManager;//聲明fragment管理
 //聲明導航欄中對應的布局
 private LinearLayout weixin, contact, find, self;
 //聲明導航欄中包含的imageview和textview
 private ImageView weixin_img, contact_img, find_img, self_img;
 private TextView weixin_txt, contact_txt, find_txt, self_txt;
 @Override
 protected void onCreate(Bundle savedInstanceState) {
 super.onCreate(savedInstanceState);
 setContentView(R.layout.activity_main);
 //初始化加載首頁布局
 initView();
 //調用自定義initListener方法,為各個組件添加監聽事件
 initListener();
 //設置默認選擇的pager和導航欄的狀態
 viewPager.setCurrentItem(0);
 weixin_img.setSelected(true);
 weixin_txt.setSelected(true);
 }
 private void initListener() {
 //為四大導航組件添加監聽
 weixin.setOnClickListener(this);
 contact.setOnClickListener(this);
 find.setOnClickListener(this);
 self.setOnClickListener(this);
 //為viewpager添加頁面變化的監聽以及事件處理
 viewPager.addOnPageChangeListener(new ViewPager.OnPageChangeListener() {
 @Override
 public void onPageScrolled(int position, float positionOffset, int positionOffsetPixels) {
 }
 @Override
 public void onPageSelected(int position) {
 //根據位置直接決定顯示哪個fragment
 viewPager.setCurrentItem(position);
 switch (position) {
  case 0:
  weixin_img.setSelected(true);
  weixin_txt.setSelected(true);
  contact_img.setSelected(false);
  contact_txt.setSelected(false);
  find_img.setSelected(false);
  find_txt.setSelected(false);
  self_img.setSelected(false);
  self_txt.setSelected(false);
  break;
  case 1:
  weixin_img.setSelected(false);
  weixin_txt.setSelected(false);
  contact_img.setSelected(true);
  contact_txt.setSelected(true);
  find_img.setSelected(false);
  find_txt.setSelected(false);
  self_img.setSelected(false);
  self_txt.setSelected(false);
  break;
  case 2:
  weixin_img.setSelected(false);
  weixin_txt.setSelected(false);
  contact_img.setSelected(false);
  contact_txt.setSelected(false);
  find_img.setSelected(true);
  find_txt.setSelected(true);
  self_img.setSelected(false);
  self_txt.setSelected(false);
  break;
  case 3:
  weixin_img.setSelected(false);
  weixin_txt.setSelected(false);
  contact_img.setSelected(false);
  contact_txt.setSelected(false);
  find_img.setSelected(false);
  find_txt.setSelected(false);
  self_img.setSelected(true);
  self_txt.setSelected(true);
  break;
 }
 }
 @Override
 public void onPageScrollStateChanged(int state) {
 }
 });
 }
 private void initView() {
 //在主布局中根據id找到ViewPager
 viewPager = (ViewPager) findViewById(R.id.viewPager);
 //實例化所屬四個fragment
 weixinFragment = new WeixinFragment();
 contactListFragment = new ContactListFragment();
 findFragment = new FindFragment();
 selfFragment = new SelfFragment();
 fragments = new ArrayList<>();
 //添加fragments到集合中
 fragments.add(weixinFragment);
 fragments.add(contactListFragment);
 fragments.add(findFragment);
 fragments.add(selfFragment);
 fragmentManager = getSupportFragmentManager();
 //為ViewPager設置適配器用於部署fragments
 viewPager.setAdapter(new MyFragmentPagerAdapter(fragmentManager));
 weixin = (LinearLayout) findViewById(R.id.weixin);
 contact = (LinearLayout) findViewById(R.id.contact);
 find = (LinearLayout) findViewById(R.id.find);
 self = (LinearLayout) findViewById(R.id.self);
 weixin_img = (ImageView) findViewById(R.id.weixin_img);
 contact_img = (ImageView) findViewById(R.id.contact_img);
 find_img = (ImageView) findViewById(R.id.find_img);
 self_img = (ImageView) findViewById(R.id.self_img);
 weixin_txt = (TextView) findViewById(R.id.weixin_txt);
 contact_txt = (TextView) findViewById(R.id.contact_txt);
 find_txt = (TextView) findViewById(R.id.find_txt);
 self_txt = (TextView) findViewById(R.id.self_txt);
 }
 /**
 * 設置導航欄的點擊事件並同步更新對應的ViewPager
 * 點擊事件其實就是更改導航布局中對應的Text/ImageView
 * 的選中狀態,配合drable中的selector更改圖片以及文字變化
 *
 * @param v
 */
 @Override
 public void onClick(View v) {
 switch (v.getId()) {
 case R.id.weixin:
 viewPager.setCurrentItem(0);
 weixin_img.setSelected(true);
 weixin_txt.setSelected(true);
 contact_img.setSelected(false);
 contact_txt.setSelected(false);
 find_img.setSelected(false);
 find_txt.setSelected(false);
 self_img.setSelected(false);
 self_txt.setSelected(false);
 break;
 case R.id.contact:
 viewPager.setCurrentItem(1);
 weixin_img.setSelected(false);
 weixin_txt.setSelected(false);
 contact_img.setSelected(true);
 contact_txt.setSelected(true);
 find_img.setSelected(false);
 find_txt.setSelected(false);
 self_img.setSelected(false);
 self_txt.setSelected(false);
 break;
 case R.id.find:
 viewPager.setCurrentItem(2);
 weixin_img.setSelected(false);
 weixin_txt.setSelected(false);
 contact_img.setSelected(false);
 contact_txt.setSelected(false);
 find_img.setSelected(true);
 find_txt.setSelected(true);
 self_img.setSelected(false);
 self_txt.setSelected(false);
 break;
 case R.id.self:
 viewPager.setCurrentItem(3);
 weixin_img.setSelected(false);
 weixin_txt.setSelected(false);
 contact_img.setSelected(false);
 contact_txt.setSelected(false);
 find_img.setSelected(false);
 find_txt.setSelected(false);
 self_img.setSelected(true);
 self_txt.setSelected(true);
 break;
 }
 }
 //創建FragmentPagerAdapter
 class MyFragmentPagerAdapter extends FragmentPagerAdapter {
 public MyFragmentPagerAdapter(FragmentManager fm) {
 super(fm);
 }
 @Override
 public android.support.v4.app.Fragment getItem(int position) {
 return fragments.get(position);
 }
 @Override
 public int getCount() {
 return fragments.size();
 }
 }
}
以上就是本文的全部內容,希望本文的內容對大家的學習或者工作能帶來一定的幫助,同時也希望多多支持本站!
 Android 組件樣式定制方法詳解
前言android中有很多現成的組件可以使用,但是android上面的程序很多時候用系統自帶的組件都不太合適,主要是樣式可能不是我們想要的。這個時候我們就需要定制一些樣式
 android系統在靜音模式下關閉camera拍照聲音的方法
話說為了防止偷拍,業內有不成文規定,手機公司在做camera時,點擊拍照和錄像鍵的時候,必須要有提示音。因此,google也就非常人性化的將播放拍照聲音的函數,放到了ca
 android:Activity數據傳遞之對象(parcelable)
這篇文章裡面寫了用seralizable使對象序列化在Activity直之間進行傳遞seralizable是在java api中的類,而在android中也有一個類使對象
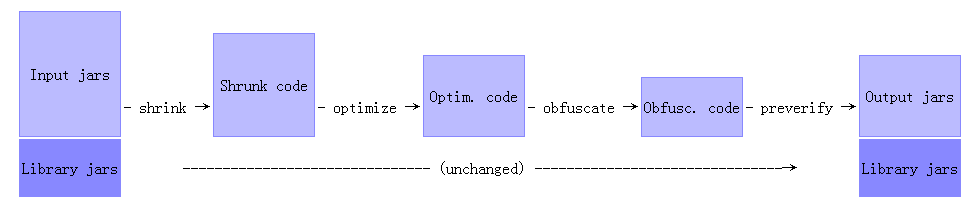 Android Proguard工具使用和配置詳解
Android開發中的ProguardProguard是Android開發時經常會用到的一個工具,在Android SDK中已經集成了一個免費的Proguard版本,位於