編輯:關於Android編程
在一個比較坑的需求裡,一段文字右上角需要追加一個圓形紅點。最右側有個金額,紅點動態隨著文字移動,然後各種擺布局,一下午坑死我了。後來果斷放棄。然後就想試試直接自定義view來實現這個需求。
最坑的就是效果下面的第一種情況和第二種情況,就是這兩種情況給逼的
廢話不說,開搞。
首先自定義個view 繼承自 view 類
public class MyViewAndCircle extends View{
}
然後不用說了 ,直接飄紅,必須要實現幾個必要的方法了。
 public MyViewAndCircle(Context context) {
    this(context,null);
    // TODO Auto-generated constructor stub
  }
  public MyViewAndCircle(Context context, AttributeSet attrs) {
    this(context, attrs,0);
    // TODO Auto-generated constructor stub
  }
  public MyViewAndCircle(Context context, AttributeSet attrs, int defStyleAttr) {
    super(context, attrs, defStyleAttr);
}
然後就要想想這個需求到底是什麼鬼了。
因為目前來說需要一個文本,還要有個紅色圓形追加到文本域後邊,那麼有兩種考慮了
- 1、文本+畫圓
- 2、文本+圖片
在這裡我選第一種了,畢竟在view裡邊畫個圓還是比較easy的,這種教程網上一搜一大把
那麼既然有了目標
就可以寫 attrs了 ,
<declare-styleable name="CustomMyViewTitle">
    <attr name="titleTextview"/>
    <attr name="titleSizeview"/>
    <attr name="titleColorview"/>
  </declare-styleable>
  <attr name="titleTextview" format="string" />
  <attr name="titleColorview" format="color" />
  <attr name="titleSizeview" format="dimension" />
如上 我們定義了==文本自身==, ==文本size==,==文本color==,為什麼不定義圓形用的屬性。那是因為。。。用不到,畫個圓而已嘛,不用那麼麻煩
next:
定義完了屬性之後那麼就要引入了:
public MyViewAndCircle(Context context, AttributeSet attrs, int defStyleAttr) {
    super(context, attrs, defStyleAttr);
    // TODO Auto-generated constructor stub
    TypedArray a = context.getTheme().obtainStyledAttributes(attrs, R.styleable.CustomMyViewTitle, defStyleAttr, 0);
    int n = a.getIndexCount();
    for (int i = 0; i < n; i++) {
      int attr = a.getIndex(i);
      switch (attr) {
      case R.styleable.CustomMyViewTitle_titleTextview:
        mText = a.getString(attr);
        break;
      case R.styleable.CustomMyViewTitle_titleSizeview:
        mTextSize = a.getDimensionPixelOffset(attr, (int) TypedValue.applyDimension(TypedValue.COMPLEX_UNIT_SP, 16, getResources().getDisplayMetrics()));
        break;
      case R.styleable.CustomMyViewTitle_titleColorview:
        mTextColor = a.getInt(attr, Color.BLACK);
        break;
      }
    }
    a.recycle();
  }
至此我們就將定義的控件中用的屬性撸出來了,那麼下面就開始撸代碼了。
我貼個完整代碼:代碼裡都加了注釋來著
這個是view的代碼:
package com.qiao.view;
import com.qiao.Utils.Utils;
import com.qiao.selfview.R;
import com.qiao.selfview.R.styleable;
import android.content.Context;
import android.content.res.TypedArray;
import android.graphics.Bitmap;
import android.graphics.Canvas;
import android.graphics.Color;
import android.graphics.Paint;
import android.graphics.Rect;
import android.graphics.RectF;
import android.text.TextPaint;
import android.text.TextUtils;
import android.util.AttributeSet;
import android.util.TypedValue;
import android.view.View;
import android.view.View.MeasureSpec;
/**
 * 在一個比較坑的需求裡,一段文字右上角需要追加一個圓形紅點。最右側有個金額,紅點動態隨著文字移動,然後各種擺布局,我去坑死我了。
 * 後來放棄了,就有了這個東西(⊙o⊙)…
 * 大神請加Q群,大家一起探討:123869487
 * @author 有點涼了
 *
 */
public class MyViewAndCircle extends View{
  private String mText;//描述文字
  private int mTextColor;//描述文字顏色
  private int mTextSize;//描述文字大小
  private Rect rect;//控制邊框 完整控件控制邊框顯示(寬高之類的)
  private Rect mTextBound;//控制文本范圍
  private Rect mCircle;//控制紅色圓點的位置
  private Paint mPaint;//控制畫筆
  private int mWidth;//寬
  private int mHeight;//高
  private boolean isShow = true;
  RectF oval = null;//控制圓的邊界
  public MyViewAndCircle(Context context) {
    this(context,null);
    // TODO Auto-generated constructor stub
  }
  public MyViewAndCircle(Context context, AttributeSet attrs) {
    this(context, attrs,0);
    // TODO Auto-generated constructor stub
  }
  public MyViewAndCircle(Context context, AttributeSet attrs, int defStyleAttr) {
    super(context, attrs, defStyleAttr);
    // TODO Auto-generated constructor stub
    TypedArray a = context.getTheme().obtainStyledAttributes(attrs, R.styleable.CustomMyViewTitle, defStyleAttr, 0);
    int n = a.getIndexCount();
    for (int i = 0; i < n; i++) {
      int attr = a.getIndex(i);
      switch (attr) {
      case R.styleable.CustomMyViewTitle_titleTextview:
        mText = a.getString(attr);
        break;
      case R.styleable.CustomMyViewTitle_titleSizeview:
        mTextSize = a.getDimensionPixelOffset(attr, (int) TypedValue.applyDimension(TypedValue.COMPLEX_UNIT_SP, 16, getResources().getDisplayMetrics()));
        break;
      case R.styleable.CustomMyViewTitle_titleColorview:
        mTextColor = a.getInt(attr, Color.BLACK);
        break;
      }
    }
    a.recycle();
    mPaint = new Paint();//這裡做初始化
    rect = new Rect();
    mTextBound = new Rect();
  }
  @Override
  protected void onMeasure(int widthMeasureSpec, int heightMeasureSpec) {
    // TODO Auto-generated method stub
    super.onMeasure(widthMeasureSpec, heightMeasureSpec);
    //在這裡測量當前控件的寬和高,具體的意思請看
    /**
     * 系統幫我們測量的高度和寬度都是MATCH_PARNET,當我們設置明確的寬度和高度時,系統幫我們測量的結果就是我們設置的結果,
     * 當我們設置為WRAP_CONTENT,或者MATCH_PARENT系統幫我們測量的結果就是MATCH_PARENT的長度。
     * 所以,當設置了WRAP_CONTENT時,我們需要自己進行測量,即重寫onMesure方法”:
     * 重寫之前先了解MeasureSpec的specMode,一共三種類型:
     * EXACTLY:一般是設置了明確的值或者是MATCH_PARENT;
     * AT_MOST:表示子布局限制在一個最大值內,一般為WARP_CONTENT;
     * UNSPECIFIED:表示子布局想要多大就多大,很少使用;
     */
    int specMode = MeasureSpec.getMode(widthMeasureSpec);
    int spenSize = MeasureSpec.getSize(widthMeasureSpec);
    if (specMode ==MeasureSpec.EXACTLY) {
      mWidth = spenSize;
    }
    specMode = MeasureSpec.getMode(heightMeasureSpec);
    spenSize = MeasureSpec.getSize(heightMeasureSpec);
    if (specMode==MeasureSpec.EXACTLY) {
      mHeight = spenSize;
    }else {
      mPaint.setTextSize(16);
      mPaint.getTextBounds(mText, 0, mText.length(), mTextBound);
      float textHeight = mTextBound.height();
      int desired = (int) (getPaddingTop()+textHeight+getPaddingBottom());
      mHeight = desired;
    }
    setMeasuredDimension(mWidth, mHeight);
  }
  @Override
  protected void onDraw(Canvas canvas) {
    // TODO Auto-generated method stub
    super.onDraw(canvas);
    //這裡就開始執行繪制了
    mPaint.setTextSize(mTextSize);
    mPaint.getTextBounds(mText, 0, mText.length(), mTextBound);//計算文字所需要的寬度
    mPaint.setColor(Color.BLUE);
    mPaint.setStyle(Paint.Style.STROKE);
    mPaint.setTextSize(mTextSize);
    Utils.mLogError("==-->rect.width() "+rect.width());
    rect.left=0;
    rect.top=0;
    rect.right=getMeasuredWidth();
    rect.bottom = getMeasuredHeight();
    canvas.drawRect(rect, mPaint);//這裡在繪制最外側布局的寬高
    mPaint.reset();
    //下面判斷文本是否超出了父布局寬,然後分別作了設置
    if (mTextBound.width()>mWidth) {
//     文字超長展示
      mPaint.setTextSize(mTextSize);
      TextPaint paint = new TextPaint(mPaint);
      String msg = TextUtils.ellipsize(mText, paint, (float) mWidth - getPaddingLeft() - getPaddingRight(),
          TextUtils.TruncateAt.END).toString();
      canvas.drawText(msg, getPaddingLeft(), mHeight/2 - getPaddingTop()+mTextBound.height()/2, mPaint);
      mPaint.reset();
      if (isShow) {
        // 控制紅色圓形大小
        mPaint.setAntiAlias(true);
        mPaint.setColor(Color.parseColor("#FE4D3D"));
        oval = new RectF();
        oval.left = getMeasuredWidth()-30;
        oval.right=getMeasuredWidth();
        oval.top=getMeasuredHeight()/2 - mTextBound.height()/2 - 30;
        oval.bottom=getMeasuredHeight()/2 - mTextBound.height()/2;
        canvas.drawArc(oval, 0, 360, true, mPaint);
        mPaint.reset();
      }
    }else {
      //正常情況
      mPaint.setTextSize(mTextSize);
      canvas.drawText(mText, getPaddingLeft(), (mHeight/2 - mTextBound.height()/2)+mTextBound.height()-getPaddingBottom(), mPaint);
      mPaint.reset();
      if (isShow) {
        // 控制紅色圓形大小
        mPaint.setAntiAlias(true);
        mPaint.setColor(Color.parseColor("#FE4D3D"));
        oval = new RectF();
        oval.left = mTextBound.width()+getPaddingRight();
        oval.right=mTextBound.width()+getPaddingRight()+30;
        oval.top=getMeasuredHeight()/2 - mTextBound.height()/2 - 30;
        oval.bottom=getMeasuredHeight()/2 - mTextBound.height()/2;
        canvas.drawArc(oval, 0, 360, true, mPaint);
        mPaint.reset();
      }
    }
  }
  public void setTitleText(String mText){
    this.mText = mText;
  }
  public void setIsVisiable(boolean isShow){
    this.isShow = isShow;
  }
  public void notification(){
    invalidate();
  }
}
這個是activity界面:
package com.qiao.selfview;
import android.os.Bundle;
import android.view.View;
import android.view.View.OnClickListener;
import android.widget.Button;
import android.widget.TextView;
import com.qiao.base.BaseActivity;
import com.qiao.view.MyViewAndCircle;
public class MySelfView extends BaseActivity{
  private Button button_show;
  private Button button_show_one;
  private Button button_show_circle;
  private Button button_show_circle_no;
  private MyViewAndCircle textView;
  @Override
  protected void onCreate(Bundle savedInstanceState) {
    // TODO Auto-generated method stub
    super.onCreate(savedInstanceState);
    setContentView(R.layout.activity_myselfview);
    textView = (MyViewAndCircle) findViewById(R.id.textView);
    button_show_one = (Button) findViewById(R.id.button_show_one);
    button_show = (Button) findViewById(R.id.button_show);
    button_show_circle = (Button) findViewById(R.id.button_show_circle);
    button_show_circle_no = (Button) findViewById(R.id.button_show_circle_no);
    button_show_one.setOnClickListener(new OnClickListener() {
      @Override
      public void onClick(View v) {
        // TODO Auto-generated method stub
        textView.setTitleText("收拾收拾");
        textView.notification();
      }
    });
    button_show.setOnClickListener(new OnClickListener() {
      @Override
      public void onClick(View v) {
        // TODO Auto-generated method stub
        textView.setTitleText("我的天吶這個不科學,是不是,你說是不是,我說是的,我的天吶。這個東西是個什麼鬼。啥玩意????????????????");
        textView.notification();
      }
    });
    button_show_circle.setOnClickListener(new OnClickListener() {
      @Override
      public void onClick(View v) {
        // TODO Auto-generated method stub
        textView.setIsVisiable(true);
        textView.notification();
      }
    });
    button_show_circle_no.setOnClickListener(new OnClickListener() {
      @Override
      public void onClick(View v) {
        // TODO Auto-generated method stub
        textView.setIsVisiable(false);
        textView.notification();
      }
    });
  }
}
這個當然就是activity布局了:
<?xml version="1.0" encoding="utf-8"?>
<LinearLayout xmlns:android="http://schemas.android.com/apk/res/android"
xmlns:qiao="http://schemas.android.com/apk/res/com.qiao.selfview"
android:layout_width="match_parent"
android:layout_height="match_parent"
android:orientation="vertical" >
<LinearLayout
android:layout_width="match_parent"
android:layout_height="50dp"
android:padding="3dp" >
<com.qiao.view.MyViewAndCircle
android:id="@+id/textView"
android:layout_width="match_parent"
android:layout_height="match_parent"
android:padding="2dp"
qiao:titleSizeview="13sp"
qiao:titleTextview="測試測試測試測試測試測試測試測試測試測試" />
</LinearLayout>
<Button
android:id="@+id/button_show_one"
android:layout_width="wrap_content"
android:layout_height="wrap_content"
android:text="設置短文字01" />
<Button
android:id="@+id/button_show"
android:layout_width="wrap_content"
android:layout_height="wrap_content"
android:text="設置長文字02" />
<Button
android:id="@+id/button_show_circle"
android:layout_width="wrap_content"
android:layout_height="wrap_content"
android:text="設置圓顯示" />
<Button
android:id="@+id/button_show_circle_no"
android:layout_width="wrap_content"
android:layout_height="wrap_content"
android:text="設置圓不顯示" />
<TextView
android:layout_width="wrap_content"
android:layout_height="wrap_content"
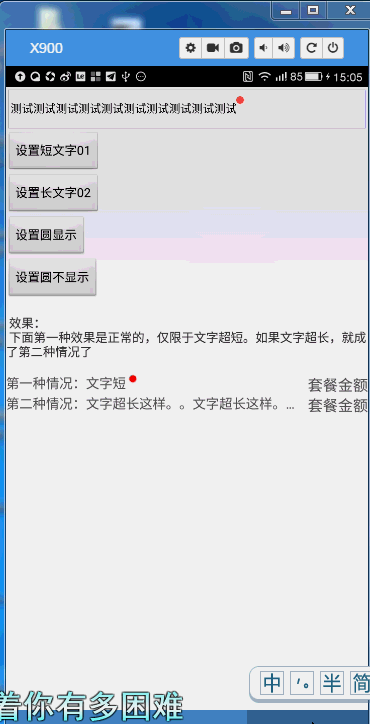
android:text="\n 效果:\n 下面第一種效果是正常的,僅限於文字超短。如果文字超長,就成了第二種情況了 \n"/>
<LinearLayout
android:layout_width="match_parent"
android:layout_height="wrap_content" >
<RelativeLayout
android:layout_width="match_parent"
android:layout_height="wrap_content" >
<RelativeLayout
android:layout_width="match_parent"
android:layout_height="wrap_content"
android:layout_toLeftOf="@+id/amount" >
<TextView
android:id="@+id/textView_balance_service_name"
android:layout_width="wrap_content"
android:layout_height="wrap_content"
android:layout_alignParentLeft="true"
android:ellipsize="end"
android:singleLine="true"
android:text="第一種情況:文字短"
android:textColor="#555555"
android:textSize="15sp" />
<ImageView
android:id="@+id/imageview_has_tag"
android:layout_width="9dp"
android:layout_height="9dp"
android:layout_alignParentTop="true"
android:layout_marginLeft="3dp"
android:layout_toRightOf="@+id/textView_balance_service_name"
android:src="@drawable/from_shop_sell"
android:visibility="visible" />
</RelativeLayout>
<TextView
android:id="@+id/amount"
android:layout_width="wrap_content"
android:layout_height="wrap_content"
android:layout_alignParentRight="true"
android:gravity="right"
android:text="套餐金額"
android:textColor="#555555"
android:textSize="17sp" />
</RelativeLayout>
</LinearLayout>
<LinearLayout
android:layout_width="match_parent"
android:layout_height="wrap_content" >
<RelativeLayout
android:layout_width="match_parent"
android:layout_height="wrap_content" >
<RelativeLayout
android:layout_width="match_parent"
android:layout_height="wrap_content"
android:layout_toLeftOf="@+id/amount_one" >
<TextView
android:id="@+id/textView_balance_service_name_one"
android:layout_width="wrap_content"
android:layout_height="wrap_content"
android:layout_alignParentLeft="true"
android:ellipsize="end"
android:singleLine="true"
android:text="第二種情況:文字超長這樣。。文字超長這樣。。文字超長這樣。。文字超長這樣。。文字超長這樣。。文字超長這樣。。文字超長這樣。。文字超長這樣。。文字超長這樣。。文字超長這樣。。文字超長這樣。。文字超長這樣。。文字超長這樣。。文字超長這樣。。文字超長這樣。。"
android:textColor="#555555"
android:textSize="15sp" />
<ImageView
android:id="@+id/imageview_has_tag_one"
android:layout_width="9dp"
android:layout_height="9dp"
android:layout_alignParentTop="true"
android:layout_marginLeft="3dp"
android:layout_toRightOf="@+id/textView_balance_service_name_one"
android:src="@drawable/from_shop_sell"
android:visibility="visible" />
</RelativeLayout>
<TextView
android:id="@+id/amount_one"
android:layout_width="wrap_content"
android:layout_height="wrap_content"
android:layout_alignParentRight="true"
android:gravity="right"
android:text="套餐金額"
android:textColor="#555555"
android:textSize="17sp" />
</RelativeLayout>
</LinearLayout>
</LinearLayout>
以上所述是小編給大家介紹的Android開發中TextView 實現右上角跟隨文本動態追加圓形紅點,希望對大家有所幫助,如果大家有任何疑問請給我留言,小編會及時回復大家的。在此也非常感謝大家對本站網站的支持!
 Android基礎整合項目之節日群發助手(三)
在前面兩個章節中我們已經完成了群發助手的讀聯系人,存取數據庫;使用 SimpleCursorAdapter綁定數據庫與ListV
 Android開發系列二之窗口Activity的生命周期
在上篇文章給大家介紹了android開發系列一之用按鈕實現顯示時間,感興趣的朋友可以點擊閱讀詳情。在Activity從創建到銷毀的過程中需要在不同的階段調用7個生命周期的
 Android使用WindowManager制作一個可拖動的控件
效果圖如下第一步:新建DragView繼承RelativeLayoutpackage com.rong.activity;import com.rong.test.R;i
 如何為RecyclerView添加Header和Footer
過去的兩天,在項目中,拋棄了ListView, 想試一試RecyclerView, 在用的過程中,遇到了一些問題,比如:如何為RecyclerView添加Header和F