編輯:關於Android編程
Android 調用WCF實例
1. 構建服務端程序
using System.ServiceModel;

namespace yournamespace
{
  [ServiceContract(Name = "HelloService", Namespace = "http://www.master.haku")]
  public interface IHello
  {
    [OperationContract]
    string SayHello();
  }
}
namespace YourNameSpace
{
  public class YourService
  {
   public string SayHello(string words)
   {
      return "Hello " + words;
   }
  }
}
2. 構建IIS網站宿主
YourService.svc
<%@ServiceHost Debug="true" Service="YourNameSpace.YourService"%>
Web.config
<?xml version="1.0" encoding="utf-8"?>
<configuration>
 <system.serviceModel>
  <serviceHostingEnvironment>
   <serviceActivations >
    <add relativeAddress="YourService.svc" service="YourNameSpace.YourService"/>
   </serviceActivations >
  </serviceHostingEnvironment >

  <bindings>
   <basicHttpBinding>
    <binding name="BasicHttpBindingCfg" closeTimeout="00:01:00"
      openTimeout="00:01:00" receiveTimeout="00:10:00" sendTimeout="00:01:00"
      bypassProxyOnLocal="false" hostNameComparisonMode="StrongWildcard"
      maxBufferPoolSize="524288" maxReceivedMessageSize="2147483647"
      messageEncoding="Text" textEncoding="utf-8" useDefaultWebProxy="true"
      allowCookies="false">
     <readerQuotas maxDepth="32" maxStringContentLength="8192" maxArrayLength="16384"
       maxBytesPerRead="4096" maxNameTableCharCount="16384" />
     <security mode="None">
      <transport clientCredentialType="None" proxyCredentialType="None"
        realm="" />
      <message clientCredentialType="UserName" algorithmSuite="Default" />
     </security>
    </binding>
   </basicHttpBinding>
  </bindings>

  <services>
   <service name="YourNameSpace.YourService" behaviorConfiguration="ServiceBehavior">
    <host>
     <baseAddresses>
      <add baseAddress="http://localhost:59173/YourService"/>
     </baseAddresses>
    </host>
    <endpoint binding="basicHttpBinding" contract="YourNameSpace.你的服務契約接口">
     <identity>
      <dns value="localhost" />
     </identity>
    </endpoint>
   </service>
  </services>

  <behaviors>
   <serviceBehaviors>
    <behavior name="ServiceBehavior">
     <serviceMetadata httpGetEnabled="true" />
     <serviceDebug includeExceptionDetailInFaults="true" />
    </behavior>
   </serviceBehaviors>
  </behaviors>
 </system.serviceModel>
 <system.web>
  <compilation debug="true" />
 </system.web>
</configuration>
3. 寄宿服務
把網站發布到web服務器, 指定網站虛擬目錄指向該目錄
如果你能夠訪問http://你的IP:端口/虛擬目錄/服務.svc
那麼,恭喜你,你的服務端成功了!
4. 使用ksoap2調用WCF
去ksoap2官網
http://code.google.com/p/ksoap2-android/ 下載最新jar
5. 在Eclipse中新建一個Java項目,測試你的服務
新建一個接口, 用於專門讀取WCF返回的SoapObject對象
ISoapService
package junit.soap.wcf;

import org.ksoap2.serialization.SoapObject;

public interface ISoapService {
  SoapObject LoadResult();
}
HelloService
package junit.soap.wcf;

import java.io.IOException;
import org.ksoap2.SoapEnvelope;
import org.ksoap2.serialization.SoapObject;
import org.ksoap2.serialization.SoapSerializationEnvelope;
import org.ksoap2.transport.HttpTransportSE;
import org.xmlpull.v1.XmlPullParserException;

public class HelloService implements ISoapService {
  private static final String NameSpace = "http://www.master.haku";
  private static final String URL = "http://你的服務器/虛擬目錄/你的服務.svc";
  private static final String SOAP_ACTION = "http://www.master.haku/你的服務/SayHello";
  private static final String MethodName = "SayHello";

  private String words;

  public HelloService(String words) {
    this.words = words;
  }

  public SoapObject LoadResult() {
    SoapObject soapObject = new SoapObject(NameSpace, MethodName);
    soapObject.addProperty("words", words);

    SoapSerializationEnvelope envelope = new SoapSerializationEnvelope(SoapEnvelope.VER11); // 版本
    envelope.bodyOut = soapObject;
    envelope.dotNet = true;
    envelope.setOutputSoapObject(soapObject);

    HttpTransportSE trans = new HttpTransportSE(URL);
    trans.debug = true; // 使用調試功能

    try {
      trans.call(SOAP_ACTION, envelope);
      System.out.println("Call Successful!");
    } catch (IOException e) {
      System.out.println("IOException");
      e.printStackTrace();
    } catch (XmlPullParserException e) {
      System.out.println("XmlPullParserException");
      e.printStackTrace();
    }

    SoapObject result = (SoapObject) envelope.bodyIn;

    return result;
  }
}
測試程序
package junit.soap.wcf;

import org.ksoap2.serialization.SoapObject;

public class HelloWcfTest {
  public static void main(String[] args) {
    HelloService service = new HelloService("Master HaKu");
    SoapObject result = service.LoadResult();

    System.out.println("WCF返回的數據是:" + result.getProperty(0));
  }
}
經過測試成功
運行結果:
Hello Master HaKu
6. Android客戶端測試
package david.android.wcf;

import android.app.Activity;
import android.os.Bundle;
import android.view.View;
import android.view.View.OnClickListener;
import android.widget.Button;
import android.widget.TextView;
import android.widget.Toast;
import org.ksoap2.serialization.SoapObject;

public class AndroidWcfDemoActivity extends Activity {
  private Button mButton1;
  private TextView text;

  /** Called when the activity is first created. */
  @Override
  public void onCreate(Bundle savedInstanceState) {
    super.onCreate(savedInstanceState);
    setContentView(R.layout.main);
    mButton1 = (Button) findViewById(R.id.myButton1);
    text = (TextView) this.findViewById(R.id.show);

    mButton1.setOnClickListener(new Button.OnClickListener() {
      @Override
      public void onClick(View v) {

         HelloService service = new HelloService("Master HaKu");
                SoapObject result = service.LoadResult();

        text.setText("WCF返回的數據是:" + result.getProperty(0));
      }
    });
  }
}
7. 最後運行結果

感謝閱讀,希望能幫助到大家,謝謝大家對本站的支持!
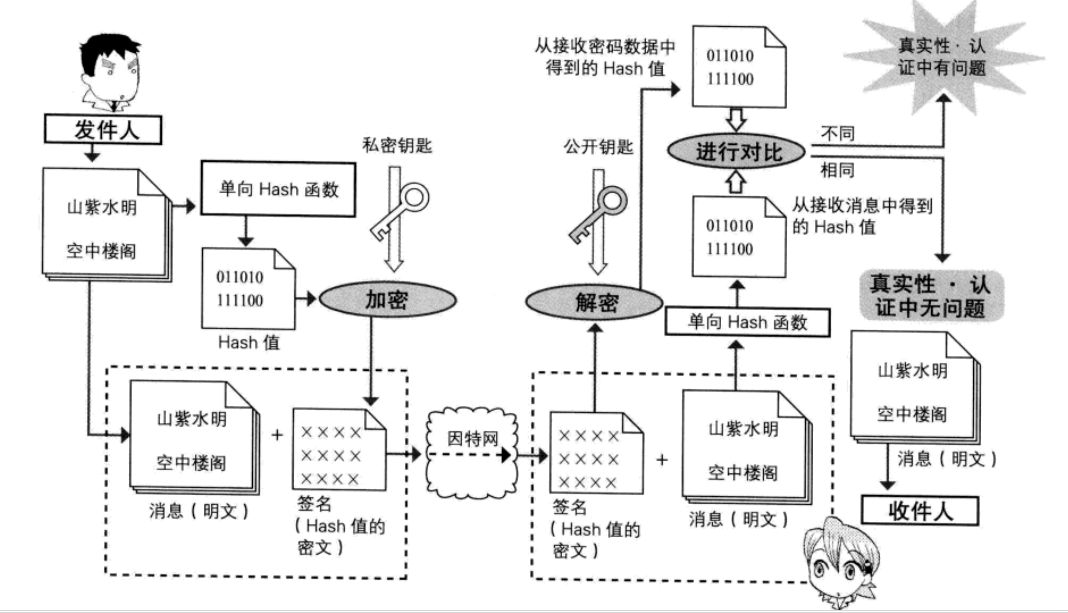 Android 安全加密:數字簽名和數字證書詳解
Android安全加密專題文章索引 Android安全加密:對稱加密 Android安全加密:非對稱加密 Android安全加密:消
 Android自定義View詳解
轉載請標明出處:http://blog.csdn.net/lmj623565791/article/details/24252901很多的Android入門程序猿來說對於
 在Android中使用幀動
幀動畫:是指多張圖片快速切換先看一下實現的效果 實現方式第一步:使用Android Studio創建一個Android工程,並且在drawable
 Android桌面懸浮窗進階,QQ手機管家小火箭效果實現
今天是2013年的最後一天了,這裡首先提前祝大家新年快樂!同時,本篇文章也是我今年的最後一篇文章了,因此我想要讓它盡量有點特殊性,比起平時的文章要多一些特色