編輯:關於Android編程
轉載請標明出處:http://blog.csdn.net/lmj623565791/article/details/24252901
很多的Android入門程序猿來說對於Android自定義View,可能都是比較恐懼的,但是這又是高手進階的必經之路,所有准備在自定義View上面花一些功夫,多寫一些文章。先總結下自定義View的步驟:
1、自定義View的屬性
2、在View的構造方法中獲得我們自定義的屬性
[ 3、重寫onMesure ]
4、重寫onDraw
我把3用[]標出了,所以說3不一定是必須的,當然了大部分情況下還是需要重寫的。
1、自定義View的屬性,首先在res/values/ 下建立一個attrs.xml , 在裡面定義我們的屬性和聲明我們的整個樣式。
<?xml version="1.0" encoding="utf-8"?>
<resources>

 <attr name="titleText" format="string" />
 <attr name="titleTextColor" format="color" />
 <attr name="titleTextSize" format="dimension" />

 <declare-styleable name="CustomTitleView">
  <attr name="titleText" />
  <attr name="titleTextColor" />
  <attr name="titleTextSize" />
 </declare-styleable>

</resources>
我們定義了字體,字體顏色,字體大小3個屬性,format是值該屬性的取值類型:
一共有:string,color,demension,integer,enum,reference,float,boolean,fraction,flag;不清楚的可以google一把。
然後在布局中聲明我們的自定義View
<RelativeLayout xmlns:android="http://schemas.android.com/apk/res/android"
 xmlns:tools="http://schemas.android.com/tools"
 xmlns:custom="http://schemas.android.com/apk/res/com.example.customview01"
 android:layout_width="match_parent"
 android:layout_height="match_parent" >

 <com.example.customview01.view.CustomTitleView
  android:layout_width="200dp"
  android:layout_height="100dp"
  custom:titleText="3712"
  custom:titleTextColor="#ff0000"
  custom:titleTextSize="40sp" />

</RelativeLayout>
一定要引入 xmlns:custom="http://schemas.android.com/apk/res/com.example.customview01"我們的命名空間,後面的包路徑指的是項目的package
2、在View的構造方法中,獲得我們的自定義的樣式
/**
  * 文本
  */
 private String mTitleText;
 /**
  * 文本的顏色
  */
 private int mTitleTextColor;
 /**
  * 文本的大小
  */
 private int mTitleTextSize;

 /**
  * 繪制時控制文本繪制的范圍
  */
 private Rect mBound;
 private Paint mPaint;

 public CustomTitleView(Context context, AttributeSet attrs)
 {
  this(context, attrs, 0);
 }

 public CustomTitleView(Context context)
 {
  this(context, null);
 }

 /**
  * 獲得我自定義的樣式屬性
  *
  * @param context
  * @param attrs
  * @param defStyle
  */
 public CustomTitleView(Context context, AttributeSet attrs, int defStyle)
 {
  super(context, attrs, defStyle);
  /**
   * 獲得我們所定義的自定義樣式屬性
   */
  TypedArray a = context.getTheme().obtainStyledAttributes(attrs, R.styleable.CustomTitleView, defStyle, 0);
  int n = a.getIndexCount();
  for (int i = 0; i < n; i++)
  {
   int attr = a.getIndex(i);
   switch (attr)
   {
   case R.styleable.CustomTitleView_titleText:
    mTitleText = a.getString(attr);
    break;
   case R.styleable.CustomTitleView_titleTextColor:
    // 默認顏色設置為黑色
    mTitleTextColor = a.getColor(attr, Color.BLACK);
    break;
   case R.styleable.CustomTitleView_titleTextSize:
    // 默認設置為16sp,TypeValue也可以把sp轉化為px
    mTitleTextSize = a.getDimensionPixelSize(attr, (int) TypedValue.applyDimension(
      TypedValue.COMPLEX_UNIT_SP, 16, getResources().getDisplayMetrics()));
    break;

   }

  }
  a.recycle();

  /**
   * 獲得繪制文本的寬和高
   */
  mPaint = new Paint();
  mPaint.setTextSize(mTitleTextSize);
  // mPaint.setColor(mTitleTextColor);
  mBound = new Rect();
  mPaint.getTextBounds(mTitleText, 0, mTitleText.length(), mBound);

 }
我們重寫了3個構造方法,默認的布局文件調用的是兩個參數的構造方法,所以記得讓所有的構造調用我們的三個參數的構造,我們在三個參數的構造中獲得自定義屬性。
3、我們重寫onDraw,onMesure調用系統提供的:
@Override
 protected void onMeasure(int widthMeasureSpec, int heightMeasureSpec)
 {
  super.onMeasure(widthMeasureSpec, heightMeasureSpec);
 }

 @Override
 protected void onDraw(Canvas canvas)
 {
  mPaint.setColor(Color.YELLOW);
  canvas.drawRect(0, 0, getMeasuredWidth(), getMeasuredHeight(), mPaint);

  mPaint.setColor(mTitleTextColor);
  canvas.drawText(mTitleText, getWidth() / 2 - mBound.width() / 2, getHeight() / 2 + mBound.height() / 2, mPaint);
 }
此時的效果是:
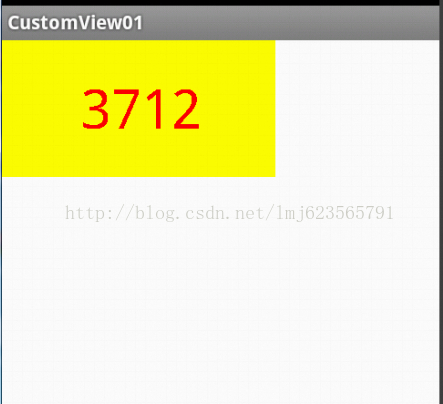
是不是覺得還不錯,基本已經實現了自定義View。但是此時如果我們把布局文件的寬和高寫成wrap_content,會發現效果並不是我們的預期:
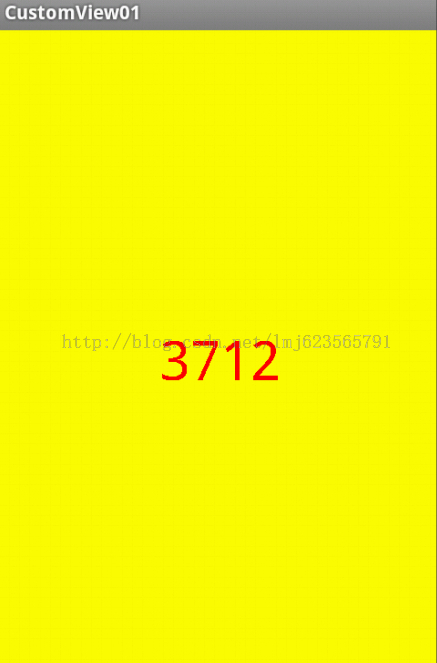
系統幫我們測量的高度和寬度都是MATCH_PARNET,當我們設置明確的寬度和高度時,系統幫我們測量的結果就是我們設置的結果,當我們設置為WRAP_CONTENT,或者MATCH_PARENT系統幫我們測量的結果就是MATCH_PARENT的長度。
所以,當設置了WRAP_CONTENT時,我們需要自己進行測量,即重寫onMesure方法”:
重寫之前先了解MeasureSpec的specMode,一共三種類型:
EXACTLY:一般是設置了明確的值或者是MATCH_PARENT
AT_MOST:表示子布局限制在一個最大值內,一般為WARP_CONTENT
UNSPECIFIED:表示子布局想要多大就多大,很少使用
下面是我們重寫onMeasure代碼:
@Override
protected void onMeasure(int widthMeasureSpec, int heightMeasureSpec)
{
 int widthMode = MeasureSpec.getMode(widthMeasureSpec);
 int widthSize = MeasureSpec.getSize(widthMeasureSpec);
 int heightMode = MeasureSpec.getMode(heightMeasureSpec);
 int heightSize = MeasureSpec.getSize(heightMeasureSpec);
 int width;
 int height ;
 if (widthMode == MeasureSpec.EXACTLY)
 {
  width = widthSize;
 } else
 {
  mPaint.setTextSize(mTitleTextSize);
  mPaint.getTextBounds(mTitle, 0, mTitle.length(), mBounds);
  float textWidth = mBounds.width();
  int desired = (int) (getPaddingLeft() + textWidth + getPaddingRight());
  width = desired;
 }

 if (heightMode == MeasureSpec.EXACTLY)
 {
  height = heightSize;
 } else
 {
  mPaint.setTextSize(mTitleTextSize);
  mPaint.getTextBounds(mTitle, 0, mTitle.length(), mBounds);
  float textHeight = mBounds.height();
  int desired = (int) (getPaddingTop() + textHeight + getPaddingBottom());
  height = desired;
 }


 setMeasuredDimension(width, height);
}
現在我們修改下布局文件:
<RelativeLayout xmlns:android="http://schemas.android.com/apk/res/android"
 xmlns:tools="http://schemas.android.com/tools"
 xmlns:custom="http://schemas.android.com/apk/res/com.example.customview01"
 android:layout_width="match_parent"
 android:layout_height="match_parent" >

 <com.example.customview01.view.CustomTitleView
  android:layout_width="wrap_content"
  android:layout_height="wrap_content"
  custom:titleText="3712"
  android:padding="10dp"
  custom:titleTextColor="#ff0000"
  android:layout_centerInParent="true"
  custom:titleTextSize="40sp" />

</RelativeLayout>
現在的效果是:
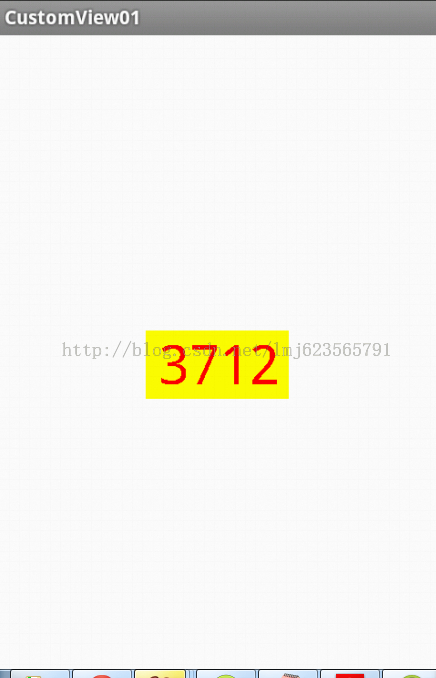
完全復合我們的預期,現在我們可以對高度、寬度進行隨便的設置了,基本可以滿足我們的需求。
當然了,這樣下來我們這個自定義View與TextView相比豈不是沒什麼優勢,所有我們覺得給自定義View添加一個事件:
在構造中添加:
this.setOnClickListener(new OnClickListener()
  {

   @Override
   public void onClick(View v)
   {
    mTitleText = randomText();
    postInvalidate();
   }

  });
private String randomText()
 {
  Random random = new Random();
  Set<Integer> set = new HashSet<Integer>();
  while (set.size() < 4)
  {
   int randomInt = random.nextInt(10);
   set.add(randomInt);
  }
  StringBuffer sb = new StringBuffer();
  for (Integer i : set)
  {
   sb.append("" + i);
  }

  return sb.toString();
 }
下面再來運行:
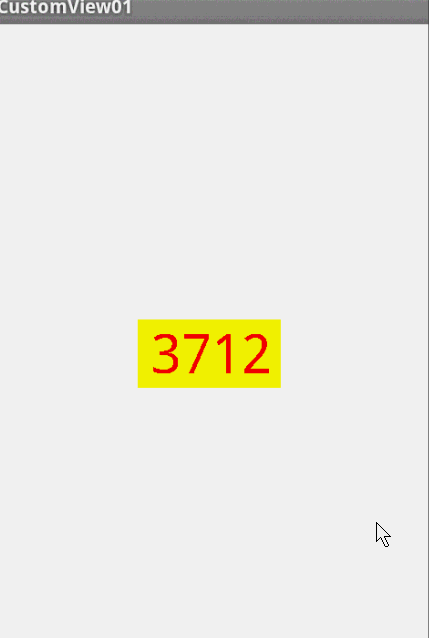
我們添加了一個點擊事件,每次讓它隨機生成一個4位的隨機數,有興趣的可以在onDraw中添加一點噪點,然後改寫為驗證碼,是不是感覺很不錯。
源碼下載: Android自定義View
以上就是本文的全部內容,希望對大家的學習有所幫助,也希望大家多多支持本站。
 如何使用Fiddler對Android應用進行抓包
1.場景還原之FliddlerFiddler是一款抓包神器,近日,由於項目中要嵌入H5頁面,公司又沒專門的UI設計師,所以你懂得,這個任務就要給我喽!可憐的我並沒有藝術細
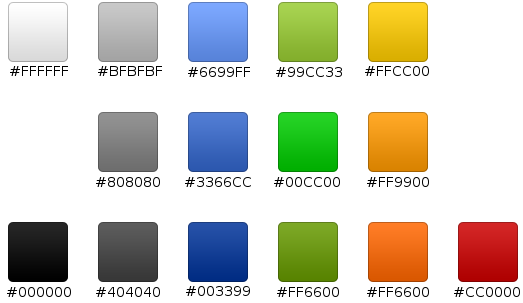 Android 界面開發顏色整理
下圖是幫助文檔中的關於界面開發的推薦色值,大家可以參考一下: 補充一些常用的顏色值: <color name=white>#f
 Android中的腦殘設計總結
Trackball軌跡球 這有點類似於PC上面的鼠標,可以用於導航,為此便有了Focus,但是這實際操作意義並不大,因為整個屏幕都是觸控的,還用導航干什麼,先把Focus
 Android源碼系列之深入理解ImageView的ScaleType屬性
做Android開發的童靴們肯定對系統自帶的控件使用的都非常熟悉,比如Button、TextView、ImageView等。如果你問我具體使用,我會給說:拿ImageVi