編輯:關於Android編程
前言:
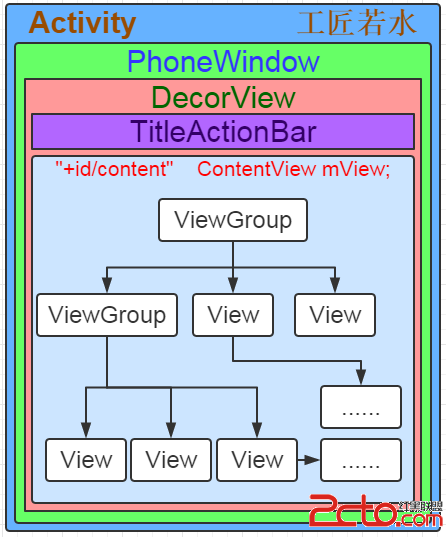
上篇介紹了自定義控件的基本要求以及繪制的基本原理,本篇文章主要介紹如何給自定義控件自定義一些屬性。本篇文章將繼續以上篇文章自定義圓形百分比為例進行講解。有關原理知識請參考Android自定義控件基本原理詳解(一)這篇文章。
需求產生背景:
為何要引入自定義屬性?當Android提供的原生屬性不能滿足實際的需求的時候,比如我們需要自定義圓形百分比半徑大小、圓形背景、圓形顯示的位置、圓形進度的背景等等。這個時候就需要我們自定義屬性了。
自定義屬性步驟:
1.)在res/values文件下添加一個attrs.xml文件,如果項目比較大的話,會導致attrs.xml代碼相當龐大,這時可以根據相應的功能模塊起名字,方便查找,例如:登錄模塊相關attrs_login.xml
<?xml version="1.0" encoding="utf-8"?>
<resources>
 <declare-styleable name="RoundImageView">
  <attr name="borderRadius" />
  <attr name="type" />
 </declare-styleable>

</resources>
2.)如何聲明一組屬性
使用<declare-styleable name="PercentView"></declare-styleable>來定義一個屬性集合,name就是屬性集合的名字,這個名字一定要起的見名知意。
 <declare-styleable name="PercentView">
 <!--添加屬性-->
 </declare-styleable>
然後就是定義屬性值了,通過<attr name="textColor" format="color" /> 方式定義屬性值,屬性名字同樣也要起的見名知意,format表示這個屬性的值的類型,類型有以下幾種:
•reference:引用資源
•string:字符串
•Color:顏色
•boolean:布爾值
•dimension:尺寸值
•float:浮點型
•integer:整型
•fraction:百分數
•enum:枚舉類型
•flag:位或運算
基於上面的要求,我們可以定義一下百分比控件屬性
 <declare-styleable name="PercentView">
  <attr name="percent_circle_gravity"><!--圓形繪制的位置-->
   <flag name="left" value="0" />
   <flag name="top" value="1" />
   <flag name="center" value="2" />
   <flag name="right" value="3" />
   <flag name="bottom" value="4" />
  </attr>
  <attr name="percent_circle_radius" format="dimension" /><!--圓形半徑-->
  <attr name="percent_circle_progress" format="integer" /><!--當前進度值-->
  <attr name="percent_progress_color" format="color" /><!--進度顯示顏色-->
  <attr name="percent_background_color" format="color" /><!--圓形背景色-->
 </declare-styleable>
3.)布局中如何使用
<?xml version="1.0" encoding="utf-8"?>
<LinearLayout xmlns:android="http://schemas.android.com/apk/res/android"
 xmlns:lee="http://schemas.android.com/apk/res-auto"
 android:layout_width="match_parent"
 android:layout_height="match_parent"
 android:orientation="vertical">

 <com.whoislcj.views.PercentView
  android:layout_width="200dp"
  android:layout_height="200dp"
  android:layout_margin="10dp"
  android:background="@color/red"
  android:padding="10dp"
  lee:percent_background_color="@color/gray"
  lee:percent_circle_gravity="left"
  lee:percent_circle_progress="30"
  lee:percent_circle_radius="50dp"
  lee:percent_progress_color="@color/blue" />

</LinearLayout>
為屬性集設置一個屬性集名稱,我這裡用的lee,我這是因為實在想不起使用什麼屬性集名稱了,建議在真正的項目中使用項目的縮寫,比如微信可能就是使用wx。
4.)自定義控件中如何獲取自定義屬性
每一個屬性集合編譯之後都會對應一個styleable對象,通過styleable對象獲取TypedArray typedArray,然後通過鍵值對獲取屬性值,這點有點類似SharedPreference的取法。
 TypedArray typedArray = context.obtainStyledAttributes(attrs, R.styleable.PercentView);
 if (typedArray != null) {
  backgroundColor = typedArray.getColor(R.styleable.PercentView_percent_background_color, Color.GRAY);
  progressColor = typedArray.getColor(R.styleable.PercentView_percent_progress_color, Color.BLUE);
  radius = typedArray.getDimension(R.styleable.PercentView_percent_circle_radius, 0);
  progress = typedArray.getInt(R.styleable.PercentView_percent_circle_progress, 0);
  gravity = typedArray.getInt(R.styleable.PercentView_percent_circle_gravity, CENTER);
  typedArray.recycle();
  }
5.)完整示例
public class PercentView extends View {
 private final static String TAG = PercentView.class.getSimpleName();
 private Paint mPaint;
 private int backgroundColor = Color.GRAY;
 private int progressColor = Color.BLUE;
 private float radius;
 private int progress;
 private float centerX = 0;
 private float centerY = 0;
 public static final int LEFT = 0;
 public static final int TOP = 1;
 public static final int CENTER = 2;
 public static final int RIGHT = 3;
 public static final int BOTTOM = 4;
 private int gravity = CENTER;
 private RectF rectF; //用於定義的圓弧的形狀和大小的界限

 public PercentView(Context context) {
  super(context);
  init();
 }

 public PercentView(Context context, AttributeSet attrs) {
  super(context, attrs);
  initParams(context, attrs);
  init();
 }

 public PercentView(Context context, AttributeSet attrs, int defStyleAttr) {
  super(context, attrs, defStyleAttr);
  initParams(context, attrs);
  init();
 }

 private void init() {
  mPaint = new Paint();
  mPaint.setAntiAlias(true);
  rectF = new RectF();
 }

 private void initParams(Context context, AttributeSet attrs) {
  mPaint = new Paint();
  mPaint.setAntiAlias(true);
  rectF = new RectF();
  TypedArray typedArray = context.obtainStyledAttributes(attrs, R.styleable.PercentView);
  if (typedArray != null) {
   backgroundColor = typedArray.getColor(R.styleable.PercentView_percent_background_color, Color.GRAY);
   progressColor = typedArray.getColor(R.styleable.PercentView_percent_progress_color, Color.BLUE);
   radius = typedArray.getDimension(R.styleable.PercentView_percent_circle_radius, 0);
   progress = typedArray.getInt(R.styleable.PercentView_percent_circle_progress, 0);
   gravity = typedArray.getInt(R.styleable.PercentView_percent_circle_gravity, CENTER);
   typedArray.recycle();
  }
 }

 @Override
 protected void onMeasure(int widthMeasureSpec, int heightMeasureSpec) {
  super.onMeasure(widthMeasureSpec, heightMeasureSpec);
  int widthMode = MeasureSpec.getMode(widthMeasureSpec);
  int widthSize = MeasureSpec.getSize(widthMeasureSpec);
  int heightMode = MeasureSpec.getMode(heightMeasureSpec);
  int heightSize = MeasureSpec.getSize(heightMeasureSpec);
  Log.e(TAG, "onMeasure--widthMode-->" + widthMode);
  switch (widthMode) {
   case MeasureSpec.EXACTLY://
    break;
   case MeasureSpec.AT_MOST:
    break;
   case MeasureSpec.UNSPECIFIED:
    break;
  }
  Log.e(TAG, "onMeasure--widthSize-->" + widthSize);
  Log.e(TAG, "onMeasure--heightMode-->" + heightMode);
  Log.e(TAG, "onMeasure--heightSize-->" + heightSize);
  int with = getWidth();
  int height = getHeight();
  Log.e(TAG, "onDraw---->" + with + "*" + height);
  centerX = with / 2;
  centerY = with / 2;
  switch (gravity) {
   case LEFT:
    centerX = radius + getPaddingLeft();
    break;
   case TOP:
    centerY = radius + getPaddingTop();
    break;
   case CENTER:
    break;
   case RIGHT:
    centerX = with - radius - getPaddingRight();
    break;
   case BOTTOM:
    centerY = height - radius - getPaddingBottom();
    break;
  }
  float left = centerX - radius;
  float top = centerY - radius;
  float right = centerX + radius;
  float bottom = centerY + radius;
  rectF.set(left, top, right, bottom);
 }

 @Override
 protected void onLayout(boolean changed, int left, int top, int right, int bottom) {
  super.onLayout(changed, left, top, right, bottom);
  Log.e(TAG, "onLayout");
 }

 @Override
 protected void onDraw(Canvas canvas) {
  super.onDraw(canvas);
  mPaint.setColor(backgroundColor);
  // FILL填充, STROKE描邊,FILL_AND_STROKE填充和描邊
  mPaint.setStyle(Paint.Style.FILL_AND_STROKE);
  canvas.drawCircle(centerX, centerY, radius, mPaint);
  mPaint.setColor(progressColor);

  double percent = progress * 1.0 / 100;
  int angle = (int) (percent * 360);
  canvas.drawArc(rectF, 270, angle, true, mPaint); //根據進度畫圓弧
 }
}
運行結果:
根據不同的配置顯示的兩種效果

小結:
通過自定義屬性可以達到自定義的控件也能像原生的控件一樣實現可配置。但是在實際的項目開發中,像本文介紹的這種自定義控件使用頻率並不是最高的,使用頻率較高的是通過自定義一個組合控件的方式,來達到布局文件的復用,以減少項目維護成本以及開發成本,下篇文章將重點介紹如何自定義控件組合,點擊查看。
以上就是本文的全部內容,希望對大家的學習有所幫助,也希望大家多多支持本站。
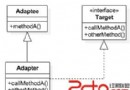 Android中的設計模式-適配器模式
適配器模式從名字上就可以看出適配器是為了針對接口不匹配的情況,而做出的兼容方法,假設我們有一個已經存在的類Adaptee,其中有一些已經存在並實現好的方法methodA。
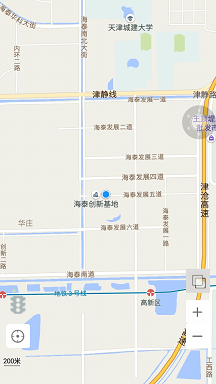 android 百度地圖系列之地圖初始化及定位
在Android應用中,很多時候需要地圖功能,回顧過去寫的項目和百度地圖api,開始總結一下Android百度地圖的實現。首先總結一下怎麼開始一個Android百度地圖功
 Android的PopupWindow彈窗(以常見的分享界面為例)
1.主要代碼: 聲明: private View shareView; private PopupWindow pop; 在onCreate方法裡: // 引入
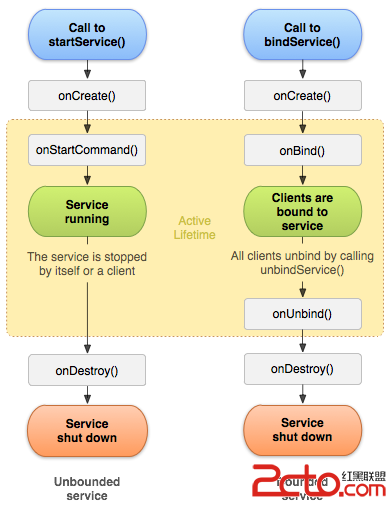
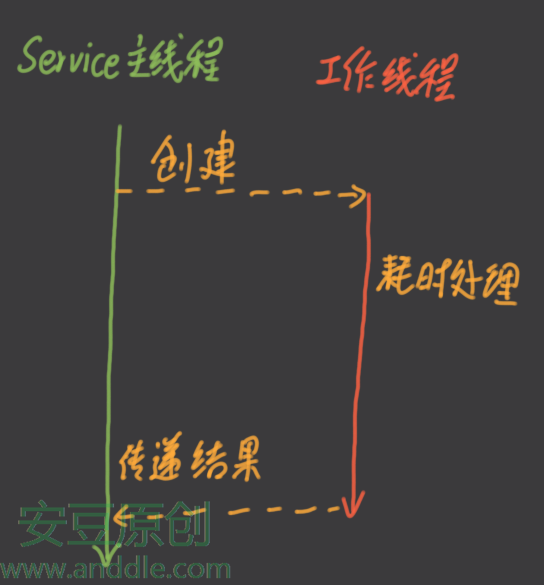 四大組件之Service(四)-Service的線程、工作線程、權限及系統Service
第5節 Service的線程和工作線程剛開始使用Service的時候,常常會有一個誤區:認為這個Service運行於應用中一個單獨的線程。其實Service組件和其他組件