編輯:關於Android編程
本文實例講述了Android獲取設備CPU核數、時鐘頻率以及內存大小的方法。分享給大家供大家參考,具體如下:
因項目需要,分析了一下 Facebook 的開源項目 - Device Year Class。
Device Year Class 的主要功能是根據 CPU核數、時鐘頻率 以及 內存大小 對設備進行分級。代碼很簡單,只包含兩個類:
DeviceInfo -> 獲取設備參數,
YearClass -> 根據參數進行分級。
下表是 Facebook 公司提供的分級標准,其中 Year 欄表示分級結果。
Year
Cores
Clock
RAM
2008
1
528MHz
192MB
2009
n/a
600MHz
290MB
2010
n/a
1.0GHz
512MB
2011
2
1.2GHz
1GB
2012
4
1.5GHz
1.5GB
2013
n/a
2.0GHz
2GB
2014
n/a
>2GHz
>2GB
關於輸出年份的計算方法可以參考源碼,本文只把一些比較常用的功能抽取出來做一個簡要介紹。
獲取 CPU 核數
我們都知道,Linux 中的設備都是以文件的形式存在,CPU 也不例外,因此 CPU 的文件個數就等價與核數。
Android 的 CPU 設備文件位於 /sys/devices/system/cpu/ 目錄,文件名的的格式為 cpu\d+。
root@generic_x86_64:/sys/devices/system/cpu # ls
cpu0
cpufreq
cpuidle
kernel_max
modalias
offline
online
possible
power
present
uevent
統計一下文件個數便可以獲得 CPU 核數。
public static int getNumberOfCPUCores() {
 if (Build.VERSION.SDK_INT <= Build.VERSION_CODES.GINGERBREAD_MR1) {
 // Gingerbread doesn't support giving a single application access to both cores, but a
 // handful of devices (Atrix 4G and Droid X2 for example) were released with a dual-core
 // chipset and Gingerbread; that can let an app in the background run without impacting
 // the foreground application. But for our purposes, it makes them single core.
 return 1;
 }
 int cores;
 try {
 cores = new File("/sys/devices/system/cpu/").listFiles(CPU_FILTER).length;
 } catch (SecurityException e) {
 cores = DEVICEINFO_UNKNOWN;
 } catch (NullPointerException e) {
 cores = DEVICEINFO_UNKNOWN;
 }
 return cores;
}
private static final FileFilter CPU_FILTER = new FileFilter() {
 @Override
 public boolean accept(File pathname) {
 String path = pathname.getName();
 //regex is slow, so checking char by char.
 if (path.startsWith("cpu")) {
  for (int i = 3; i < path.length(); i++) {
  if (path.charAt(i) < '0' || path.charAt(i) > '9') {
   return false;
  }
  }
  return true;
 }
 return false;
 }
};
獲取時鐘頻率
獲取時鐘頻率需要讀取系統文件 - /sys/devices/system/cpu/cpu0/cpufreq/cpuinfo_max_freq 或者 /proc/cpuinfo。
我的 Android 模擬器中並沒有 cpuinfo_max_freq 文件,因此只能讀取 /proc/cpuinfo。
/proc/cpuinfo 包含了很多 cpu 數據。
processor : 0
vendor_id : GenuineIntel
cpu family : 6
model : 70
model name : Intel(R) Core(TM) i7-4770HQ CPU @ 2.20GHz
stepping : 1
cpu MHz : 0.000
cache size : 1024 KB
fdiv_bug : no
hlt_bug : no
f00f_bug : no
coma_bug : no
fpu : yes
fpu_exception : yes
cpuid level : 4
wp : yes
代碼如下:
public static int getCPUMaxFreqKHz() {
 int maxFreq = DEVICEINFO_UNKNOWN;
 try {
 for (int i = 0; i < getNumberOfCPUCores(); i++) {
  String filename =
   "/sys/devices/system/cpu/cpu" + i + "/cpufreq/cpuinfo_max_freq";
  File cpuInfoMaxFreqFile = new File(filename);
  if (cpuInfoMaxFreqFile.exists()) {
  byte[] buffer = new byte[128];
  FileInputStream stream = new FileInputStream(cpuInfoMaxFreqFile);
  try {
   stream.read(buffer);
   int endIndex = 0;
   //Trim the first number out of the byte buffer.
   while (buffer[endIndex] >= '0' && buffer[endIndex] <= '9'
    && endIndex < buffer.length) endIndex++;
   String str = new String(buffer, 0, endIndex);
   Integer freqBound = Integer.parseInt(str);
   if (freqBound > maxFreq) maxFreq = freqBound;
  } catch (NumberFormatException e) {
   //Fall through and use /proc/cpuinfo.
  } finally {
   stream.close();
  }
  }
 }
 if (maxFreq == DEVICEINFO_UNKNOWN) {
  FileInputStream stream = new FileInputStream("/proc/cpuinfo");
  try {
  int freqBound = parseFileForValue("cpu MHz", stream);
  freqBound *= 1000; //MHz -> kHz
  if (freqBound > maxFreq) maxFreq = freqBound;
  } finally {
  stream.close();
  }
 }
 } catch (IOException e) {
 maxFreq = DEVICEINFO_UNKNOWN; //Fall through and return unknown.
 }
 return maxFreq;
}
獲取內存大小
如果 SDK 版本大於等於 JELLY_BEAN ,可以通過 ActivityManager 來獲取內從大小。
ActivityManager.MemoryInfo memInfo = new ActivityManager.MemoryInfo();
ActivityManager am = (ActivityManager) c.getSystemService(Context.ACTIVITY_SERVICE);
am.getMemoryInfo(memInfo);
如果版本低於 JELLY_BEAN ,則只能讀取系統文件了。
FileInputStream stream = new FileInputStream("/proc/meminfo");
totalMem = parseFileForValue("MemTotal", stream);
完整代碼如下:
@TargetApi(Build.VERSION_CODES.JELLY_BEAN)
public static long getTotalMemory(Context c) {
 // memInfo.totalMem not supported in pre-Jelly Bean APIs.
 if (Build.VERSION.SDK_INT >= Build.VERSION_CODES.JELLY_BEAN) {
 ActivityManager.MemoryInfo memInfo = new ActivityManager.MemoryInfo();
 ActivityManager am = (ActivityManager) c.getSystemService(Context.ACTIVITY_SERVICE);
 am.getMemoryInfo(memInfo);
 if (memInfo != null) {
  return memInfo.totalMem;
 } else {
  return DEVICEINFO_UNKNOWN;
 }
 } else {
 long totalMem = DEVICEINFO_UNKNOWN;
 try {
  FileInputStream stream = new FileInputStream("/proc/meminfo");
  try {
  totalMem = parseFileForValue("MemTotal", stream);
  totalMem *= 1024;
  } finally {
  stream.close();
  }
 } catch (IOException e) {
 }
 return totalMem;
 }
}
更多關於Android相關內容感興趣的讀者可查看本站專題:《Android視圖View技巧總結》、《Android操作XML數據技巧總結》、《Android編程之activity操作技巧總結》、《Android資源操作技巧匯總》、《Android文件操作技巧匯總》、《Android操作SQLite數據庫技巧總結》、《Android操作json格式數據技巧總結》、《Android數據庫操作技巧總結》、《Android編程開發之SD卡操作方法匯總》、《Android開發入門與進階教程》及《Android控件用法總結》
希望本文所述對大家Android程序設計有所幫助。
 Android動態資源加載原理和應用
動態加載資源原理通常我們調用getResources()方法獲取資源文件public Resources getResources() { return mReso
 android 軟鍵盤的顯示與隱藏問題的研究
在android中,經常會和輸入法的軟件鍵盤交互。在Manifest文件裡,系統給activity的一個屬性-windowSoftInputMode來控制輸入法的顯示方式
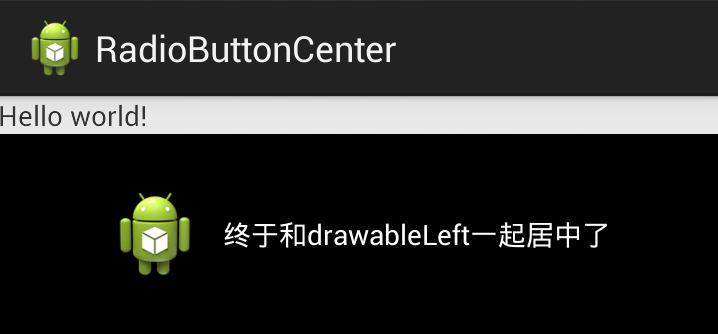 Android 讓自定義TextView的drawableLeft與文本一起居中
前言 TextView的drawableLeft、drawableRight和drawableTop是一個常用、好用的屬性,可以在文本的上下左右放置一個圖片,
 頁面未隨軟鍵盤上升及android隱藏軟鍵盤總結
就是在配置文件裡對應activity加上這句:android:windowSoftInputMode=stateVisible|adjustResize &nb