編輯:關於Android編程
DrawerLayout顧名思義就是一個管理布局的。使用方式可以與其它的布局類類似。
DrawerLayout帶有滑動的功能。只要按照drawerLayout的規定布局方式寫完布局,就能有側滑的效果。
直接將DrawerLayout作為根布局,然後其內部
第一個View為內容區域
第二個View為左側菜單
第三個View為右側側滑菜單
當前第三個是可選的。
使用的包如下:
import android.support.v4.widget.DrawerLayout;
使用這些包的時候有時有的會報錯。這時候確保android.support.v4是不是最新的版本。
可以更新一下support包,文件存放在sdk/extres/support中。
然後可以通過eclipse>project right click>Android Tools>Add Support library…
或者可以直接把文件復制到Project中libs文件夾中。
<android.support.v4.widget.DrawerLayout
 xmlns:android="http://schemas.android.com/apk/res/android"
 android:id="@+id/drawer_layout"
 android:layout_width="match_parent"
 android:layout_height="match_parent">
 <FrameLayout
  android:id="@+id/content_frame"
  android:layout_width="match_parent"
  android:layout_height="match_parent" />
 <ListView
  android:id="@+id/left_drawer"
  android:layout_width="240dp"
  android:layout_height="match_parent"
  android:layout_gravity="start"
  android:choiceMode="singleChoice"
  android:divider="@android:color/transparent"
  android:dividerHeight="0dp"
  android:background="#111"/>
</android.support.v4.widget.DrawerLayout>
Drawer positioning and layout is controlled using the android:layout_gravity attribute on child views corresponding to which side of the view you want the drawer to emerge from: left or right.
(Or start/end on platform versions that support layout direction.)
也就是說
android:layout_gravity="start" 相當於左側的MENU向右滑動即顯示菜單,LEFT/START(RIGHT/END)
那麼從布局文件中可知:
FrameLayout是內容區, ListView是左側菜單。
我們需做一個Fragment來裝載內容:
public class PageFragment extends Fragment {
  public final static String ITEM_POSITION_NUMBER = "item_position_num";
  public PageFragment(){}
  @Override
  public View onCreateView(LayoutInflater inflater, ViewGroup container,
    Bundle savedInstanceState) {
   View convertView = inflater.inflate(R.layout.page_fragment_layout, null);
   TextView tv = (TextView) convertView.findViewById(R.id.textView);
   int num = getArguments().getInt(ITEM_POSITION_NUMBER);
   //從res/array中獲取list數據
   String[] dynastyList = getResources().getStringArray(R.array.list_item);
   tv.setText(dynastyList[num]);
   return convertView;
  }
 }
代碼中可以看出當我們在左側菜單中選擇SelectItem時會把對應的值顯示到內容區。
代碼中的page_fragment_layout.xml僅是FrameLayout內加一個TextView所以就不貼代碼了。
接下來我們需要把listView進行填充數據。
private ListView menuList;
private String[] mMenuTitles;
private String[] historyTitles;
private String[] musicTitles;
private String[] movieTitles;
private String[] listTitles;
     // 歷史欄
  historyTitles = getResources().getStringArray(R.array.history);
  // 音樂欄
  musicTitles = getResources().getStringArray(R.array.music);
  // 電影欄
  movieTitles = getResources().getStringArray(R.array.movie);
  // 標題數組
  mMenuTitles = getResources().getStringArray(R.array.title);
  // 每一項的標題
  listTitles = getResources().getStringArray(R.array.list_item);

  drawLayout = (DrawerLayout) findViewById(R.id.drawer_layout);
  menuList = (ListView) findViewById(R.id.left_menu);

  // 設置菜單陰影效果
  // drawLayout.setDrawerShadow(R.drawable.drawer_shadow,
  // GravityCompat.START);
  List<Item> list = new ArrayList<Item>();
  // 菜單加入歷史標題和歷史項
  HeaderItem historyHeader = new HeaderItem(mMenuTitles[0]);
  list.add(historyHeader);
  for (int i = 0; i < historyTitles.length; i++) {
   EventItem historyitem = new EventItem(historyTitles[i]);
   list.add(historyitem);
  }

  // 菜單加入音樂標題和音樂項
  HeaderItem musicHeader = new HeaderItem(mMenuTitles[1]);
  list.add(musicHeader);
  for (int i = 0; i < musicTitles.length; i++) {
   EventItem musicItem = new EventItem(musicTitles[i]);
   list.add(musicItem);
  }

  // 菜單加入電影標題和電影項
  HeaderItem movieHeader = new HeaderItem(mMenuTitles[2]);
  list.add(movieHeader);
  for (int i = 0; i < movieTitles.length; i++) {
   EventItem movieItem = new EventItem(movieTitles[i]);
   list.add(movieItem);
  }

  MyListAdapter adapter = new MyListAdapter(this, list);
  menuList.setAdapter(adapter);
這個數據填充有點麻煩。自定義ListAdapter然後進行適配。
數據在res/values/arrays.xml中
<?xml version="1.0" encoding="utf-8"?>
<resources>
 <string-array name="history">
  <item >三國</item>
  <item >楚漢</item>
  <item >春秋</item>
  <item >戰國</item>
 </string-array>
  <string-array name="music">
  <item >爵士</item>
  <item >古典</item>
  <item >現代</item>
  <item >民謠</item>
 </string-array>
  <string-array name="movie">
  <item >懸疑</item>
  <item >愛情</item>
  <item >歷史</item>
  <item >恐怖</item>
 </string-array>
 <string-array name="title">
  <item >歷史</item>
  <item >音樂</item>
  <item >電影</item>
 </string-array>
 <string-array name="list_item">
  <item >歷史</item>
  <item >三國</item>
  <item >楚漢</item>
  <item >春秋</item>
  <item >戰國</item>
  <item >音樂</item>
  <item >爵士</item>
  <item >古典</item>
  <item >現代</item>
  <item >民謠</item>
  <item >電影</item>
  <item >懸疑</item>
  <item >愛情</item>
  <item >歷史</item>
  <item >恐怖</item>
 </string-array>
</resources>
然後就是listView的監聽:
  private void initListener() {
  // 菜單單擊事件監聽器
  menuList.setOnItemClickListener(new DrawerItemClickListener());
 }

 /* The click listner for ListView in the navigation drawer */
 private class DrawerItemClickListener implements
   ListView.OnItemClickListener {
  @Override
  public void onItemClick(AdapterView<?> parent, View view, int position,
    long id) {
   Log.i("Light", "position:" + position);
   selectItem(position);
  }
 }

 private void selectItem(int position) {
  // update the main content by replacing fragments
  PageFragment fragment = new PageFragment();
  // 將當前選擇的項傳遞到Fragment
  Bundle args = new Bundle();
  args.putInt(PageFragment.ITEM_POSITION_NUMBER, position);
  fragment.setArguments(args);

  FragmentTransaction ft = MainActivity.this.getSupportFragmentManager()
    .beginTransaction();
  ft.replace(R.id.content_frame, fragment).commit();

  drawLayout.closeDrawer(menuList);
  // update selected item and title, then close the drawer
  menuList.setItemChecked(position, true);
  // 注意這裡改變的是ActionBar的標題
  getActionBar().setTitle(listTitles[position]);
 }
我們關心的是當某一個Item被點擊時會發生什麼即代碼:
private void selectItem(int position) {
  // update the main content by replacing fragments
  PageFragment fragment = new PageFragment();
  // 將當前選擇的項傳遞到Fragment
  Bundle args = new Bundle();
  args.putInt(PageFragment.ITEM_POSITION_NUMBER, position);
  fragment.setArguments(args);

  FragmentTransaction ft = MainActivity.this.getSupportFragmentManager()
    .beginTransaction();
  ft.replace(R.id.content_frame, fragment).commit();

  drawLayout.closeDrawer(menuList);
  // update selected item and title, then close the drawer
  menuList.setItemChecked(position, true);
  // 注意這裡改變的是ActionBar的標題
  getActionBar().setTitle(listTitles[position]);
 }
從代碼中可以看出
1. 首先我們先通過new PageFragment();獲取內容區。
2. 通過Bundle把數據打包起來然後注入fragment.setArguments(args);中這樣fragment就能獲取到此數據。
在fragment類中通過getArguments().getInt(ITEM_POSITION_NUMBER);可以獲取傳遞的值。
3. 然後通過ft.replace(R.id.content_frame, fragment).commit();把內容替換成之前定義的PageFragment
4. 關閉菜單通過drawLayout.closeDrawer(menuList); 整個代碼中我們僅用DrawLayout這一個函數
5. 同時把ActionBar的標題改為selectedItem對應的值。
*這時有人會問我們怎麼沒有ListView與DrawerLayout進行綁定的操作。我們在之前也說過DrawerLayout中的第二個開始即是菜單View,內部已經綁定好了。
就這些內容可以實現左右側滑動菜單效果了。

以上就是本文的全部內容,希望對大家的學習有所幫助,也希望大家多多支持本站。
 如果寫一個android支持的html文件
Software License .box { overflow:hidden
 Android登陸界面實現清除輸入框內容和震動效果
本文為大家分享Android登陸界面實現清除輸入框內容和震動效果的全部代碼,具體內容如下:效果圖:主要代碼如下自定義的一個EditText,用於實現有文字的時候顯示可以清
 Android系統開發(4)——Autotools
Autotools工具的構成1、autoscanautoscan是用來掃描源代碼目錄生成configure.san文件的,configure.san包含了系統配置的基本選
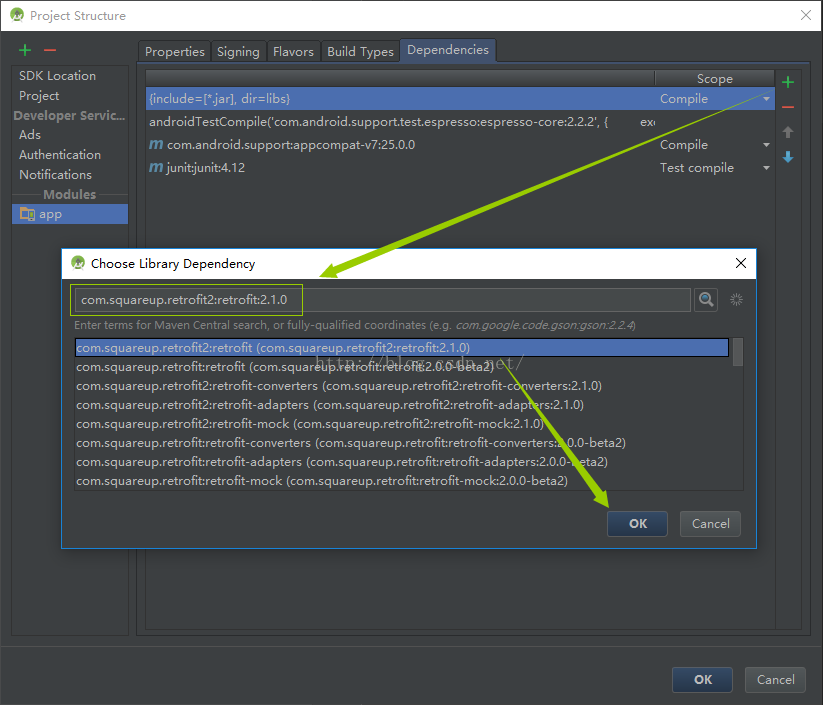 Android開發-Retrofit-AndroidStudio(一)百度首頁解析
有能力的同學可以直接去看 Retrofit官方Demo:https://github.com/square/retrofit我這邊簡單使用一下,以百度首頁解析作為開篇:導