編輯:關於Android編程
本文實例為大家分享了ActionBar下拉式導航的實現代碼,供大家參考,具體內容如下
利用Actionbar同樣可以很輕松的實現下拉式的導航方式,若想實現這種效果:
1)actionBar.setNavigationMode(ActionBar.NAVIGATION_MODE_LIST)
2)setListNavigationCallbacks(SpinnerAdapter adapter,ActionBar.OnNavigationListener callback).
首先是創建一個Fragment類:
package ccom.app.main;

import android.annotation.SuppressLint;
import android.app.Fragment;
import android.content.Context;
import android.os.Bundle;
import android.view.LayoutInflater;
import android.view.View;
import android.view.ViewGroup;
import android.view.ViewGroup.LayoutParams;
import android.widget.TextView;

@SuppressLint("NewApi")
public class MyFragment extends Fragment {

 @Override
 public View onCreateView(LayoutInflater inflater, ViewGroup container,
   Bundle savedInstanceState) {

  Context context = this.getActivity();

  TextView tv = new TextView(context);

  Bundle arc = this.getArguments();

  int tabs=arc.getInt("key");

  tv.setLayoutParams(new LayoutParams(LayoutParams.FILL_PARENT,
    LayoutParams.WRAP_CONTENT));

  tv.setText("hello actionbar "+tabs);

  return tv;

 }

}
main.xml:
<RelativeLayout xmlns:android="http://schemas.android.com/apk/res/android"
 xmlns:tools="http://schemas.android.com/tools"
 android:layout_width="match_parent"
 android:layout_height="match_parent"
 tools:context=".Main" >

 <LinearLayout
  android:id="@+id/content"
  android:layout_width="match_parent"
  android:layout_height="match_parent"
  android:orientation="vertical" />

</RelativeLayout>
自定義的用於顯示textview的mytextview.xml:
<?xml version="1.0" encoding="utf-8"?>
<TextView xmlns:android="http://schemas.android.com/apk/res/android"
 android:id="@+id/text1"
 android:textColor="#fff"
 android:background="#696969"
 android:layout_width="60sp"
 android:layout_height="match_parent"
 android:textAppearance="?android:attr/textAppearanceListItemSmall"
 android:gravity="center_vertical"
 android:paddingStart="?android:attr/listPreferredItemPaddingStart"
 android:minHeight="?android:attr/listPreferredItemHeightSmall"
/>
Main.java
package ccom.app.main;

import android.annotation.SuppressLint;
import android.app.ActionBar;
import android.app.Activity;
import android.app.FragmentTransaction;
import android.os.Bundle;
import android.widget.ArrayAdapter;

@SuppressLint("NewApi")
public class Main extends Activity implements ActionBar.OnNavigationListener {

 ActionBar actionBar = null;

 @Override
 protected void onCreate(Bundle savedInstanceState) {
  super.onCreate(savedInstanceState);
  setContentView(R.layout.main);

  actionBar = this.getActionBar();

  actionBar.setDisplayShowTitleEnabled(true);

  actionBar.setNavigationMode(ActionBar.NAVIGATION_MODE_LIST);

  actionBar.setListNavigationCallbacks(new ArrayAdapter(Main.this,
    R.layout.mytextview, R.id.text1, new String[] { "tab1", "tab2",
      "tab3" }), this);

 }

 @Override
 public boolean onNavigationItemSelected(int itemPosition, long itemId) {

  MyFragment mf = new MyFragment();
  Bundle bundle = new Bundle();
  bundle.putInt("key", itemPosition + 1);
  mf.setArguments(bundle);

  FragmentTransaction action = this.getFragmentManager()
    .beginTransaction();
  action.replace(R.id.content, mf);
  action.commit();
  return true;
 }

}
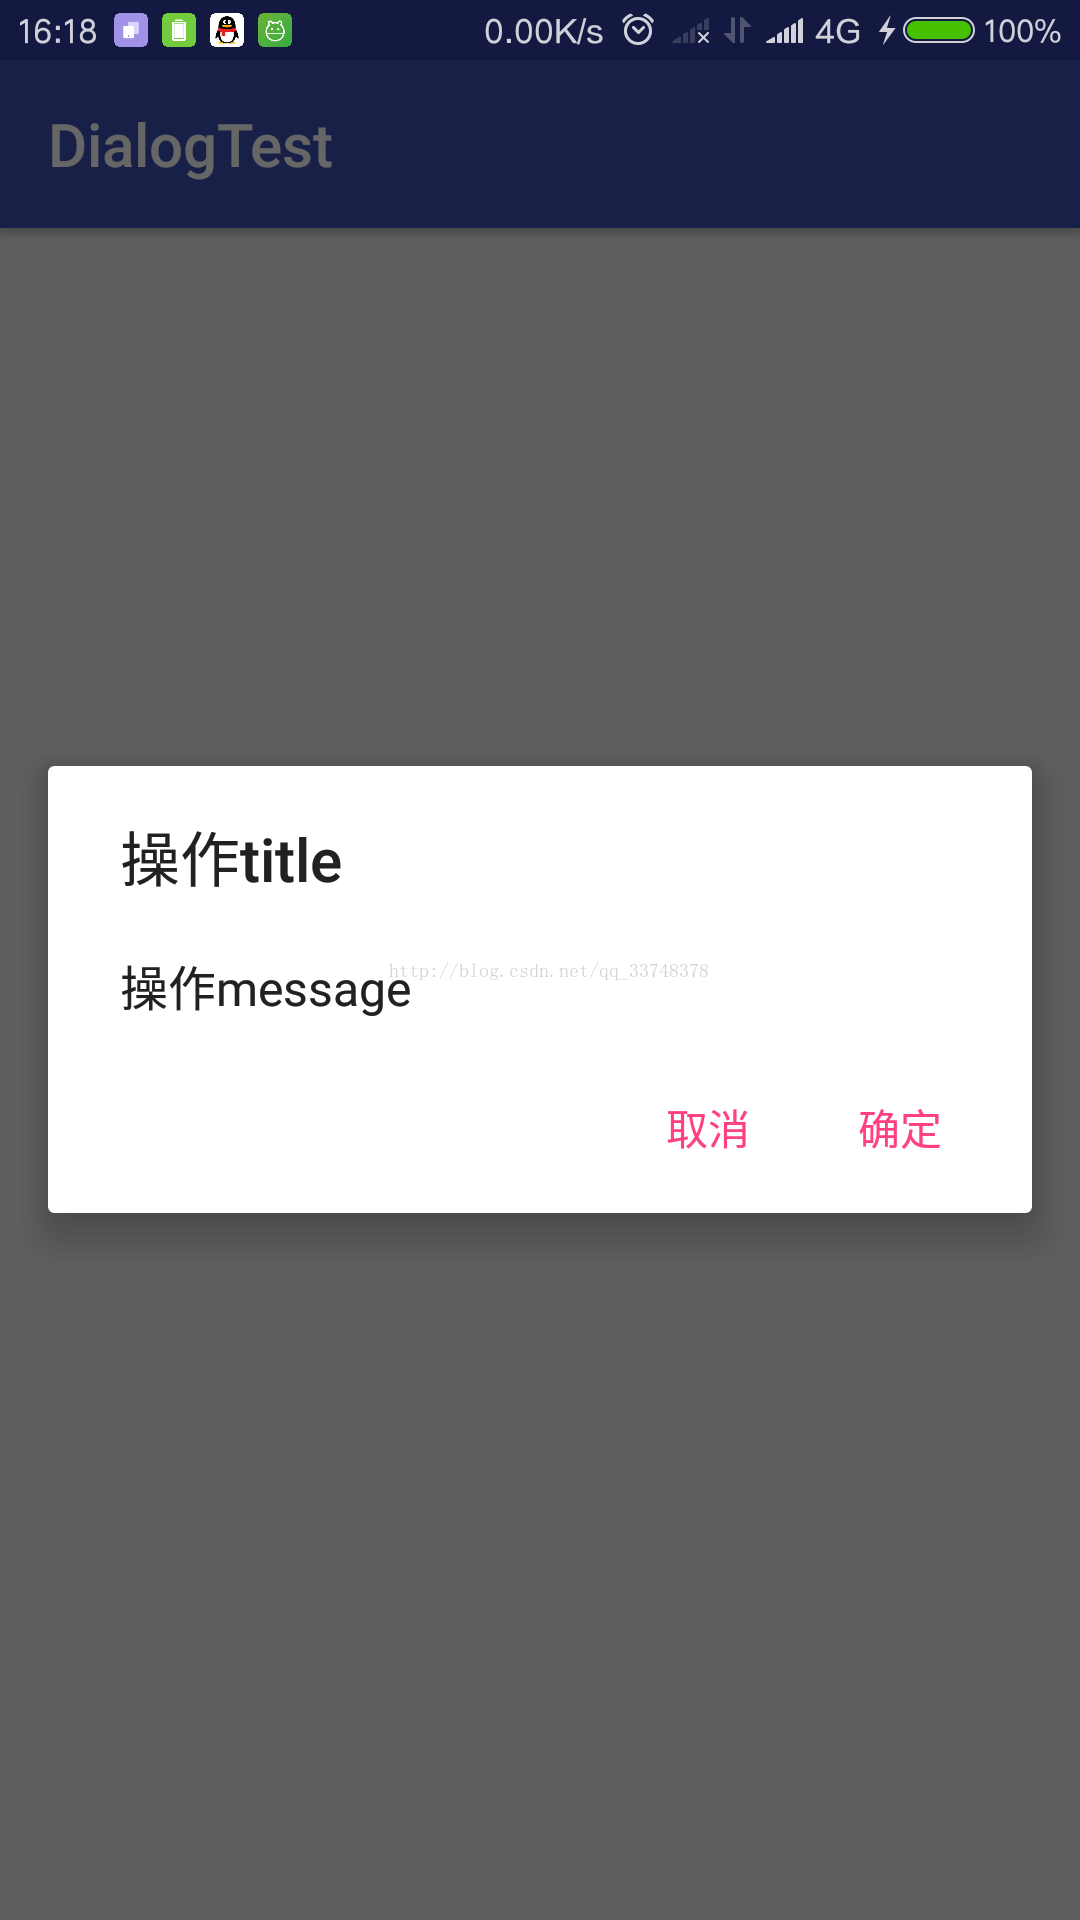
實現的效果如圖:

以上就是本文的全部內容,希望能給大家一個參考,也希望大家多多支持本站。
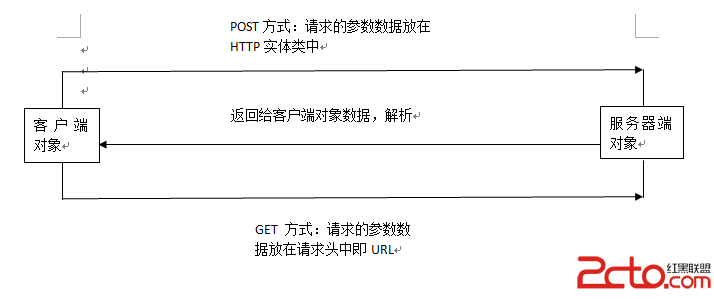 Android客戶端請求服務器端的詳細解釋
Android客戶端請求服務器端的詳細解釋1. Android客戶端與服務器端通信方式:Android與服務器通信通常采用HTTP通信方式和Socket通信方式,而HTT
 Android仿淘寶商品浏覽界面圖片滾動效果
用手機淘寶浏覽商品詳情時,商品圖片是放在後面的,在第一個ScrollView滾動到最底下時會有提示,繼續拖動才能浏覽圖片。仿照這個效果寫一個出來並不難,只要定義一個Lay
 Android開發中在TableView上添加懸浮按鈕的方法
如果直接在TableVIewController上貼Button的話會導致這個會隨之滾動,下面解決在TableView上實現位置固定懸浮按鈕的兩種方法: 1.在view
 Android網絡編程TCP、UDP(三)——UDP實例:搜索局域網所有的設備
接上面的UDP,本篇主要討論如何在局域網中搜索所有的設備,這個需求在物聯網應用的比較多,也比較綜合,特把名字加在標題中了。最後一塊是網絡編程的常見問題。3.6 實例:在局
 服務器基於PHP CodeIgniter,Android基於Volley實現多文件/圖片上傳(含服務器,web版和android客戶端完整代碼)
問題背景:app在上傳圖片時,同時傳遞參數,支持傳遞多個圖片。本文中的環