編輯:關於Android編程
很多人也許會問:360被卸載之後會跳轉到指定的反饋頁面,是怎麼弄的?
其實這個問題的核心就在於:應用被卸載了,如果能夠做到後續的代碼邏輯繼續執行
我們再來仔細分析一下場景和流程
一個應用被用戶卸載肯定是有理由的,而開發者卻未必能得知這一重要的理由,畢竟用戶很少會主動反饋建議,多半就是用得不爽就卸,如果能在被卸載後獲取到用戶的一些反饋,那對開發者進一步改進應用是非常有利的。目前據我所知,國內的Android應用中實現這一功能的只有360手機衛士、360平板衛士,那麼如何實現這一功能的?
我們可以把實現卸載反饋的問題轉化為監聽自己是否被卸載,只有得知自己被卸載,才可以設計相應的反饋處理流程。以下的列表是我在研究這一問題的思路:
1、注冊BroadcastReceiver,監聽"android.intent.action.PACKAGE_REMOVED"系統廣播
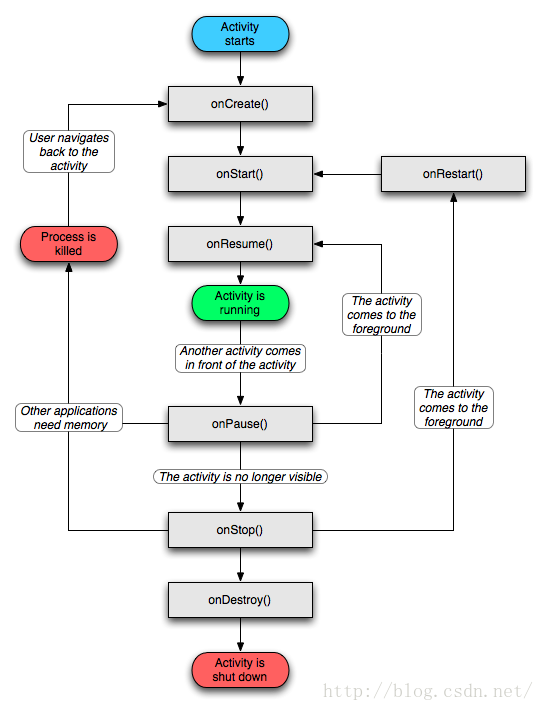
結果:NO。未寫代碼,直接分析,卸載的第一步就是退出當前應用的主進程,而此廣播是在已經卸載完成後才發出的,此時主進程都沒有了,去哪onReceive()呢?
2、若能收到"將要卸載XX包"的系統廣播,在主進程被退出之前就搶先進行反饋處理就好了,可惜沒有這樣的系統廣播,不過經過調研,倒是發現了一個辦法,讀取系統log,當日志中包含"android.intent.action.DELETE"和自己的包名時,意味著自己將要被卸載。
結果:NO。調試時發現此方法有兩個缺陷,(1)點擊設置中的卸載按鈕即發出此Intent,此時用戶尚未在彈框中確認卸載;(2)pm命令卸載不出發此Intent,意味著被諸如手機安全管家,豌豆莢等軟件卸載時,無法提前得知卸載意圖。
3、由於時間點不容易把控,所以干脆不依賴系統廣播或log,考慮到卸載過程會刪除"/data/data/包名"目錄,我們可以用線程直接輪詢這個目錄是否存在,以此為依據判斷自己是否被卸載。
結果:NO。同方法1,主進程退出,相應的線程必定退出,線程還沒等到判斷目錄是否存在就已經被銷毀了。
4、改用C端進程輪詢"/data/data/包名"目錄是否存在
結果:YES。借助Java端進程fork出來的C端進程在應用被卸載後不會被銷毀。
解決的方案確定了,下面來看一下代碼吧:
#include <jni.h>
#include <stdio.h>
#include <stdlib.h>
#include <string.h>
#include <android/log.h>
#include <unistd.h>
#include <sys/inotify.h>

#include "com_example_uninstalldemos_NativeClass.h"

/* 宏定義begin */
//清0宏
#define MEM_ZERO(pDest, destSize) memset(pDest, 0, destSize)

#define LOG_TAG "onEvent"

//LOG宏定義
#define LOGD(fmt, args...) __android_log_print(ANDROID_LOG_INFO, LOG_TAG, fmt, ##args)

JNIEXPORT jstring JNICALL Java_com_example_uninstalldemos_NativeClass_init(JNIEnv* env, jobject thiz) {

  //初始化log
  LOGD("init start...");

  //fork子進程,以執行輪詢任務
  pid_t pid = fork();
  if (pid < 0) {
    //出錯log
    LOGD("fork failed...");
  } else if (pid == 0) {
    //子進程注冊"/data/data/pym.test.uninstalledobserver"目錄監聽器
    int fileDescriptor = inotify_init();
    if (fileDescriptor < 0) {
      LOGD("inotify_init failed...");
      exit(1);
    }

    int watchDescriptor;
    watchDescriptor = inotify_add_watch(fileDescriptor,"/data/data/com.example.uninstalldemos", IN_DELETE);
    LOGD("watchDescriptor=%d",watchDescriptor);
    if (watchDescriptor < 0) {
      LOGD("inotify_add_watch failed...");
      exit(1);
    }

    //分配緩存,以便讀取event,緩存大小=一個struct inotify_event的大小,這樣一次處理一個event
    void *p_buf = malloc(sizeof(struct inotify_event));
    if (p_buf == NULL) {
      LOGD("malloc failed...");
      exit(1);
    }
    //開始監聽
    LOGD("start observer...");
    size_t readBytes = read(fileDescriptor, p_buf,sizeof(struct inotify_event));

    //read會阻塞進程,走到這裡說明收到目錄被刪除的事件,注銷監聽器
    free(p_buf);
    inotify_rm_watch(fileDescriptor, IN_DELETE);

    //目錄不存在log
    LOGD("uninstall");

    //執行命令am start -a android.intent.action.VIEW -d http://shouji.360.cn/web/uninstall/uninstall.html
    execlp(
      "am", "am", "start", "-a", "android.intent.action.VIEW", "-d",
      "http://shouji.360.cn/web/uninstall/uninstall.html", (char *)NULL);
    //4.2以上的系統由於用戶權限管理更嚴格,需要加上 --user 0
    //execlp("am", "am", "start", "--user", "0", "-a",
    //"android.intent.action.VIEW", "-d", "https://www.google.com",(char *) NULL);

  } else {
    //父進程直接退出,使子進程被init進程領養,以避免子進程僵死
  }

  return (*env)->NewStringUTF(env, "Hello from JNI !");
}
這裡面主要是用到了Linux中的inotify,這個相關的內容可以自行百度一下~~
這裡有一個很重要的知識,也是解決這個問題的關鍵所在,就是Linux中父進程死了,但是子進程不會死,而是被init進程領養。所以當我們應用(進程)卸載了,但是我們fork的子進程並不會銷毀,所以我們上述的邏輯代碼就可以放到這裡來做了。(學習了)
Android應用程序代碼:
MyActivity.java
package com.example.uninstalldemos;

import android.app.Activity;
import android.content.Intent;
import android.os.Bundle;
import android.util.Log;

public class MyActivity extends Activity {

  @Override
  public void onCreate(Bundle savedInstanceState) {
    super.onCreate(savedInstanceState);
    setContentView(R.layout.activity_main);

    Intent intent = new Intent(this, SDCardListenSer.class);
    startService(intent);
    NativeClass nativeObj = new NativeClass();
    nativeObj.init();
  }

  static {
    Log.d("onEvent", "load jni lib");
    System.loadLibrary("hello-jni");
  }
}
SDCardListenSer.java
package com.example.uninstalldemos;

import android.annotation.SuppressLint;
import android.app.Service;
import android.content.Context;
import android.content.Intent;
import android.net.Uri;
import android.os.Environment;
import android.os.FileObserver;
import android.os.IBinder;
import android.util.Log;
import java.io.File;
import java.io.IOException;

public class SDCardListenSer extends Service {
  SDCardListener[] listenners;

  @SuppressLint("SdCardPath")
  @Override
  public void onCreate() {
    SDCardListener[] listenners = {
        new SDCardListener("/data/data/com.example.uninstalldemos", this),
        new SDCardListener(Environment.getExternalStorageDirectory() + File.separator + "1.txt", this) };
    this.listenners = listenners;

    Log.i("onEvent", "=========onCreate============");
    for (SDCardListener listener : listenners) {
      listener.startWatching();
    }

    File file = new File(Environment.getExternalStorageDirectory() + File.separator + "1.txt");
    Log.i("onEvent", "dddddddddddddddddddddd nCreate============");
    if (file.exists())
      file.delete();
    /*try {
      file.createNewFile();
    } catch (IOException e) {
      e.printStackTrace();
    }*/
  }

  @Override
  public void onDestroy() {
    for (SDCardListener listener : listenners) {
      listener.stopWatching();
    }
  }

  @Override
  public IBinder onBind(Intent intent) {
    return null;
  }
}

class SDCardListener extends FileObserver {
  private String mPath;
  private final Context mContext;

  public SDCardListener(String parentpath, Context ctx) {
    super(parentpath);
    this.mPath = parentpath;
    this.mContext = ctx;
  }

  @Override
  public void onEvent(int event, String path) {
    int action = event & FileObserver.ALL_EVENTS;
    switch (action) {

    case FileObserver.DELETE:
      Log.i("onEvent", "delete path: " + mPath + File.separator + path);
      //openBrowser();
      break;

    case FileObserver.MODIFY:
      Log.i("onEvent", "更改目錄" + mPath + File.separator + path);
      break;

    case FileObserver.CREATE:
      Log.i("onEvent", "創建文件" + mPath + File.separator + path);
      break;

    default:
      break;
    }
  }

  protected void openBrowser() {
    Uri uri = Uri.parse("http://aoi.androidesk.com");
    Intent intent = new Intent(Intent.ACTION_VIEW, uri);
    mContext.startActivity(intent);
  }

  public void exeShell(String cmd) {
    try {
      Runtime.getRuntime().exec(cmd);
    } catch (Throwable t) {
      t.printStackTrace();
    }
  }

}
開啟一個服務,在這個服務中我們可以看到,用到了一個很重要的一個類FileObserver,也是用來監聽文件的變更的,這個和上面的inotify功能差不多。關於這個類的具體用法和介紹,可以自行百度呀~~
運行:
我們將應用安裝之後,打開log進行檢測日志:
adb logcat -s onEvent

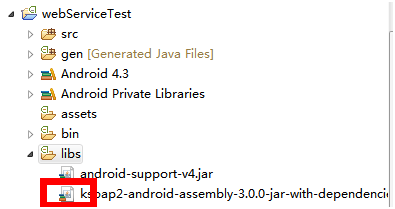 Android通過ksoap2這個框架調用webservice大講堂
昨天有人問我Android怎麼連接mysql數據庫,和對數據庫的操作呀,我想把,給他說說json通信,可是他並不知道怎麼弄,哎算了吧,直接叫他用ksoap吧,給他說了大半
 理解及使用adb
Android Debug Bridge,Android調試橋接器,簡稱adb,是用於管理模擬器或真機狀態的萬能工具。平時大家在開發android應用過程中,可能沒有直接
 Android給自定義按鍵添加廣播和通過廣播給當前焦點輸入框賦值
一、給自定義按鍵添加廣播修改PhoneWindowManager.java中的interceptKeyBeforeDispatching方法/frameworks/bas
 Android自定義View實現廣告信息上下滾動效果
先看看效果:實現代碼:public class ScrollBanner extends LinearLayout { private TextView mBanner