編輯:關於Android編程
本文實例講述了Android編程實現TCP客戶端的方法。分享給大家供大家參考,具體如下:
因為項目上需要實現一個TCP Client 端;在網上找好多例子基本上都是阻塞方式完成;
我的實現例子:由Activity 及sever 來實現,在sever 創建一個線程來監聽接受數據。收到數據,通過廣播發送給Activity;
服務端我沒有去實現,你可以下載TCP Socket 調試工具v2.2;創建個9005端口;客戶端:訪問的IP為10.0.2.2

AnetTest.java:
/**
* Copyright 2010 archfree
*
*/
package com.archfree.demo;
import android.app.Activity;
import android.content.BroadcastReceiver;
import android.content.ComponentName;
import android.content.Context;
import android.content.Intent;
import android.content.IntentFilter;
import android.content.ServiceConnection;
import android.os.Bundle;
import android.os.IBinder;
import android.util.Log;
import android.view.View;
import android.view.View.OnClickListener;
import android.widget.Button;
import android.widget.EditText;
import android.widget.TextView;
public class AnetTest extends Activity {
   /**
   * 通過ServiceConnection的內部類實現來連接Service和Activity
   *
   */
   public static final String TAG = "AnetTest";
   private static final boolean DEBUG = true;// false
   private String msg = "";
   private UpdateReceiver mReceiver;
   private Context mContext;
   private ReceiveMessage mReceiveMessage;
   // 實現一個 BroadcastReceiver,用於接收指定的 Broadcast
   public class UpdateReceiver extends BroadcastReceiver {
     @Override
     public void onReceive(Context context, Intent intent) {
       if (DEBUG)
         Log.d(TAG, "onReceive: " + intent);
       msg = intent.getStringExtra("msg");
       System.out.println("recv:" + msg);
       // System.out.println();
       ((EditText) findViewById(R.id.tv_recv)).append(msg + "/n");
     }
   }
   private ServiceConnection serviceConnection = new ServiceConnection() {
     @Override
     public void onServiceConnected(ComponentName name, IBinder service) {
       mReceiveMessage = ((ReceiveMessage.LocalBinder) service)
           .getService();
       if (DEBUG)
         Log.d(TAG, "on serivce connected");
     }
     @Override
     public void onServiceDisconnected(ComponentName name) {
       mReceiveMessage = null;
     }
   };
   /** Called when the activity is first created. */
   @Override
   public void onCreate(Bundle savedInstanceState) {
     super.onCreate(savedInstanceState);
     setContentView(R.layout.main);
     // 實例化自定義的 BroadcastReceiver
     mReceiver = new UpdateReceiver();
     IntentFilter filter = new IntentFilter();
     // 為 BroadcastReceiver 指定 action ,使之用於接收同 action 的廣播
     filter.addAction("com.archfree.demo.msg");
     // 以編程方式注冊 BroadcastReceiver 。配置方式注冊 BroadcastReceiver 的例子見
     // AndroidManifest.xml 文件
     // 一般在 OnStart 時注冊,在 OnStop 時取消注冊
     this.registerReceiver(mReceiver, filter);
     mContext = AnetTest.this;
     /**
     * Button bn_conn bn_send bn_bind bn_unbind
     */
     // Button bn_conn = (Button) findViewById(R.id.bn_conn);
     Button bn_send = (Button) findViewById(R.id.bn_send);
     Button bn_bind = (Button) findViewById(R.id.bn_bind);
     Button bn_unbind = (Button) findViewById(R.id.bn_unbind);
     EditText tv_recv = (EditText) findViewById(R.id.tv_recv);
     /**
     * EditText et_send
     */
     EditText et_send = (EditText) findViewById(R.id.et_send);
     /**
     * bn_send on click
     */
     bn_send.setOnClickListener(new OnClickListener() {
       public void onClick(View arg0) {
         // TODO
         ((EditText) findViewById(R.id.tv_recv)).clearComposingText();
         mReceiveMessage
            .SendMessageToServer("0001058512250000190010900005300010001354758032278512   460029807503542       0613408000011    ");
       }
     });
     /**
     * bn_bind on click
     */
     bn_bind.setOnClickListener(new OnClickListener() {
       public void onClick(View arg0) {
         // TODO
         Intent i = new Intent();
         Bundle bundle = new Bundle();
         bundle.putString("chatmessage",
             ((EditText) findViewById(R.id.et_send)).getText()
                 .toString());
         i.putExtras(bundle);
         System.out.println(" send onclick");
         bindService(new Intent("com.archfree.demo.ReceiveMessage"),
             serviceConnection, BIND_AUTO_CREATE);
       }
     });
     /**
     * bn_unbind on click
     */
     bn_unbind.setOnClickListener(new OnClickListener() {
       public void onClick(View arg0) {
         // TODO
         mContext.unbindService(serviceConnection);
       }
     });
     /**
     * Activity和本地服務交互,需要使用bind和unbind方法
     * */
   }
   @Override
   protected void onDestroy() {
     // TODO Auto-generated method stub
     super.onDestroy();
     unbindService(serviceConnection);
     unregisterReceiver(mReceiver);
   }
}
ReceiveMessage.java 參考網絡資源,修改;
package com.archfree.demo;
import java.io.IOException;
import java.net.InetSocketAddress;
import java.nio.ByteBuffer;
import java.nio.CharBuffer;
import java.nio.channels.SocketChannel;
import java.nio.charset.CharacterCodingException;
import java.nio.charset.Charset;
import java.nio.charset.CharsetDecoder;
import android.app.Notification;
import android.app.NotificationManager;
import android.app.PendingIntent;
import android.app.Service;
import android.content.Context;
import android.content.Intent;
import android.os.Binder;
import android.os.IBinder;
public class ReceiveMessage extends Service {
  // @Override
  // public int onStartCommand(Intent intent, int flags, int startId) {
  // // TODO Auto-generated method stub
  // return super.onStartCommand(intent, flags, startId);
  // }
  private SocketChannel client = null;
  private InetSocketAddress isa = null;
  private String message = "";
  public void onCreate() {
    System.out.println("----- onCreate---------");
    super.onCreate();
    ConnectToServer();
    StartServerListener();
  }
  public void onDestroy() {
    super.onDestroy();
    DisConnectToServer();
  }
  public void onStart(Intent intent, int startId) {
    System.out.println("----- onStart---------");
    super.onStart(intent, startId);
  }
  /*
   * IBinder方法 , LocalBinder 類,mBinder接口這三項用於
   * Activity進行Service的綁定,點擊發送消息按鈕之後觸發綁定 並通過Intent將Activity中的EditText的值
   * 傳送到Service中向服務器發送
   */
  public IBinder onBind(Intent intent) {
    System.out.println("----- onBind---------");
//    message = intent.getStringExtra("chatmessage");
//    if (message.length() > 0) {
//      SendMessageToServer(message);
//    }
    return mBinder;
  }
  public class LocalBinder extends Binder {
    ReceiveMessage getService() {
      return ReceiveMessage.this;
    }
  }
  private final IBinder mBinder = new LocalBinder();
  // 用於鏈接服務器端
  public void ConnectToServer() {
    try {
      client = SocketChannel.open();
      //isa = new InetSocketAddress("10.0.2.2", 9005);
      isa = new InetSocketAddress("211.141.230.246", 6666);
      client.connect(isa);
      client.configureBlocking(false);
    } catch (IOException e) {
      // TODO Auto-generated catch block
      e.printStackTrace();
    }
  }
  // 斷開與服務器端的鏈接
  public void DisConnectToServer() {
    try {
      client.close();
    } catch (IOException e) {
      // TODO Auto-generated catch block
      e.printStackTrace();
    }
  }
  // 啟動服務器端的監聽線程,從Server端接收消息
  public void StartServerListener() {
    ServerListener a = new ServerListener();
    a.start();
  }
  // 向Server端發送消息
  public void SendMessageToServer(String msg) {
    System.out.println("Send:" + msg);
    try {
      ByteBuffer bytebuf = ByteBuffer.allocate(1024);
      bytebuf = ByteBuffer.wrap(msg.getBytes("UTF-8"));
      client.write(bytebuf);
      bytebuf.flip();
    } catch (IOException e) {
      // TODO Auto-generated catch block
      e.printStackTrace();
      System.out.println(" SendMessageToServer IOException===");
    }
  }
  private void shownotification(String tab) {
    System.out.println("shownotification=====" + tab);
    NotificationManager barmanager = (NotificationManager) getSystemService(Context.NOTIFICATION_SERVICE);
    Notification msg = new Notification(
        android.R.drawable.stat_notify_chat, "A Message Coming!",
        System.currentTimeMillis());
    PendingIntent contentIntent = PendingIntent.getActivity(this, 0,
        new Intent(this, AnetTest.class), PendingIntent.FLAG_ONE_SHOT);
    msg.setLatestEventInfo(this, "Message", "Message:" + tab, contentIntent);
    barmanager.notify(0, msg);
  }
  // 發送廣播信息
  private void sendMsg(String msg){
    // 指定廣播目標的 action (注:指定了此 action 的 receiver 會接收此廣播)
    Intent intent = new Intent("com.archfree.demo.msg");
    // 需要傳遞的參數
    intent.putExtra("msg", msg);
    // 發送廣播
    this.sendBroadcast(intent);
  }
  private class ServerListener extends Thread {
    //private  ByteBuffer buf = ByteBuffer.allocate(1024);
    public void run() {
      try {
        // 無線循環,監聽服務器,如果有不為空的信息送達,則更新Activity的UI
        while (true) {
          ByteBuffer buf = ByteBuffer.allocate(1024);
          //buf.clear();
          client.read(buf);
          buf.flip();
          Charset charset = Charset.forName("UTF-8");
          CharsetDecoder decoder = charset.newDecoder();
          CharBuffer charBuffer;
          charBuffer = decoder.decode(buf);
          String result = charBuffer.toString();
          if (result.length() > 0)
          {// recvData(result);
            sendMsg(result);
            //System.out.println("+++++="+result);
            //shownotification(result);
          }
          // System.out.println("++++++++++++++++++="+result);
        }
      } catch (CharacterCodingException e) {
        // TODO Auto-generated catch block
        e.printStackTrace();
      } catch (IOException e) {
        // TODO Auto-generated catch block
        e.printStackTrace();
      }
    }
  }
}
AndroidManifest.xml
<?xml version="1.0" encoding="utf-8"?>
<manifest xmlns:android="http://schemas.android.com/apk/res/android"
  package="com.archfree.demo" android:versionCode="1"
  android:versionName="1.0">
  <application android:icon="@drawable/icon" android:label="@string/app_name">
    <activity android:name=".AnetTest" android:label="@string/app_name">
      <intent-filter>
        <action android:name="android.intent.action.MAIN" />
        <category android:name="android.intent.category.LAUNCHER" />
      </intent-filter>
    </activity>
更多關於Android相關內容感興趣的讀者可查看本站專題:《Android通信方式總結》、《Android調試技巧與常見問題解決方法匯總》、《Android開發入門與進階教程》、《Android多媒體操作技巧匯總(音頻,視頻,錄音等)》、《Android基本組件用法總結》、《Android視圖View技巧總結》、《Android布局layout技巧總結》及《Android控件用法總結》
希望本文所述對大家Android程序設計有所幫助。
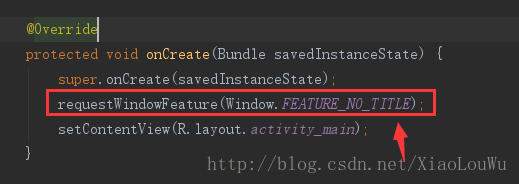 Android 中無法取消標題欄的問題小結(兩種方法)
我們都知道取消標題欄有兩種方式,一種是在Java代碼中取消,另一種通過設置styles.xml文件中的Theme即可;如下圖:第一種:第二種:但是運行在Android 5
 androidGraphics(十五)——QQ紅點拖動刪除效果實現(基本原理篇)
前幾篇給大家講了有關繪圖的知識,這篇我們稍微停一下,來看下手機QQ中拖動刪除的效果是如何實現的;這篇涉及到的知識有:- saveLayer圖層相關知識- Path的貝賽爾
 Android四大組件之Service的介紹
Service的基本認識Service是一個可以在後台執行長時間運行操作而不使用用戶界面的應用組件.Service可由其他應用組件啟動,而且即使用戶切換到其他應用,Ser
 android反編譯odex文件
關於android的反編譯工具,相信大家並不陌生 如APK-TOOL,dex2jar APK-TOOL 用於反編譯出布局文件 dex2jar 用於將dex