編輯:關於Android編程
1、為何要序列化?
-- 把內存中的java對象能夠在磁盤上持久保存
-- 通過網絡傳輸對象
-- 通過RMI(Remote Method Invocation 遠程過程調用)傳輸。
通過序列化可以把對象轉化為與平台無關的二進制流,在重新使用前進行反序列化,重新轉化為java對象。
(遠程過程調用針對分布式Java應用,對開發人員屏蔽不同JVM和網絡連接等細節,是的分布在不同JVM上的對象似乎存在於一個統一的JVM中,能夠方便的通訊)
2、如何讓Java對象可以被序列化?
在java裡只需讓目標類實現Serializable接口,無須實現任何方法。Serializable接口是一種標記接口,用來標明某個類可以被序列化。
3、如何使用序列化與反序列化?
序列化:使用ObjectOutputStream對象輸出流的writeObject()方法,可以把對象寫到輸出流中。
反序列化:使用ObjectInputStream對象寫入流的readObject()方法,並強制轉換為已知的目標類即可。
4、對象引用的序列化
如果一個類Person某個成員變量引用了其他類(如class PersonInfo)。即:
class Person implements Serializable{

   String name;

   PersonInfo info;

}
如果想將Person類進行序列化,那麼必須要滿足:PersonInfo類也能夠序列化,即也實現了Serializable接口,
class PersonInfo implements Serializable
5、多個對象引用同一個子對象
PersonInfo info = new PersonInfo(“male”,"china");

Person xiaomi = new Person("小明",info);

Person dabai = new Person("大白",info);
如果依次對上面三個對象序列化,原本是下面兩個對象都指向上面同一個對象,也就是指存在一個info對象,java為了防止在每個對象序列化時序列化三個info對象,設定了如果多次序列化同一樣java對象時,只有在第一次序列化時把這個對象轉換為字節序列輸出,之後再對它序列化只會指向第一次序列化的編號,而不會再去序列化這個對象。
6、父類序列化
如果父類實現了Serializable接口,則子類自動可序列化,不需要再顯示實現該接口。
7、利用Serializable保存自定義數據至本地的例子
MainActivity如下:
package cc.test.serializable;
import java.io.File;
import java.io.FileInputStream;
import java.io.FileOutputStream;
import java.io.IOException;
import java.io.ObjectInputStream;
import java.io.ObjectOutputStream;
import java.util.ArrayList;
import android.app.Activity;
import android.os.Bundle;
import android.os.Environment;
/**
 * Demo描述:
 * 將ArrayList<自定義數據>在SDCard上進行存取.
 *
 * Parcelable和Serializable的區別:
 * 內存間數據傳輸時推薦使用Parcelable,如activity間傳輸數據
 * 比如:http://blog.csdn.net/lfdfhl/article/details/10961459
 * 保存到本地或者網絡傳輸時推薦使用Serializable
 */
public class TestSerializableActivity extends Activity {
  @Override
  public void onCreate(Bundle savedInstanceState) {
    super.onCreate(savedInstanceState);
    setContentView(R.layout.main);
    testSerializable();
  }
  private void testSerializable() {
    FileOutputStream fileOutputStream=null;
    ObjectOutputStream objectOutputStream =null;
    FileInputStream fileInputStream = null;
    ObjectInputStream objectInputStream = null;
    ArrayList<Student> studentsArrayList = new ArrayList<Student>();
    Student student = null;
    for (int i = 1; i < 5; i++) {
      student = new Student(i, "小明" + i);
      studentsArrayList.add(student);
    }
    try {
      //存入數據
      File file = new File(Environment.getExternalStorageDirectory().toString()
                 + File.separator +"Test"+File.separator + "data.dat");
      if (!file.getParentFile().exists()) {
        file.getParentFile().mkdirs();
      }
      if (!file.exists()) {
        file.createNewFile();
      }
      fileOutputStream= new FileOutputStream(file.toString());
      objectOutputStream= new ObjectOutputStream(fileOutputStream);
      objectOutputStream.writeObject(studentsArrayList);
       //取出數據
      fileInputStream = new FileInputStream(file.toString());
      objectInputStream = new ObjectInputStream(fileInputStream);
      ArrayList<Student> savedArrayList =(ArrayList<Student>) objectInputStream.readObject();
      for (int i = 0; i < savedArrayList.size(); i++) {
        System.out.println("取出的數據:" + savedArrayList.get(i).toString());
      }
    } catch (Exception e) {
      // TODO: handle exception
    }finally{
      if (objectOutputStream!=null) {
        try {
          objectOutputStream.close();
        } catch (IOException e) {
          e.printStackTrace();
        }
      }
      if (fileOutputStream!=null) {
        try {
          fileOutputStream.close();
        } catch (IOException e) {
          e.printStackTrace();
        }
      }
      if (objectInputStream!=null) {
        try {
          objectInputStream.close();
        } catch (IOException e) {
          e.printStackTrace();
        }
      }
      if (fileInputStream!=null) {
        try {
          fileInputStream.close();
        } catch (IOException e) {
          e.printStackTrace();
        }
      }
    }
  }
}
Student如下:
package cc.test.serializable;
import java.io.Serializable;
public class Student implements Serializable {
  private Integer id;
  private String name;
  //注意定義此字段
  public static final long serialVersionUID = 9527L;
  public Student() {
    super();
  }
  public Student(Integer id, String name) {
    super();
    this.id = id;
    this.name = name;
  }
  public Integer getId() {
    return id;
  }
  public void setId(Integer id) {
    this.id = id;
  }
  public String getName() {
    return name;
  }
  public void setName(String name) {
    this.name = name;
  }
  @Override
  public String toString() {
    return "Student [id=" + id + ", name=" + name + "]";
  }
}
main.xml如下:
<?xml version="1.0" encoding="utf-8"?>
<LinearLayout xmlns:android="http://schemas.android.com/apk/res/android"
  android:layout_width="fill_parent"
  android:layout_height="fill_parent"
  android:orientation="vertical" >
  <TextView
    android:layout_width="fill_parent"
    android:layout_height="wrap_content"
    android:text="@string/hello" />
</LinearLayout>
 Android5.0 新特性學習總結
低版本android上實現Material design應用Android5.0版本,推出了Material Design的概念,這是在設計上Android的又一大突破。
 自定義圓形ImageView 實現思路 -- Android 學習之路
自定義圓形ImageView圓形ImageView在頭像顯示用的比較普遍了,今天對於實現圓形ImageView做個總結;主要思路是 重寫 onDraw() ;方法有兩個:
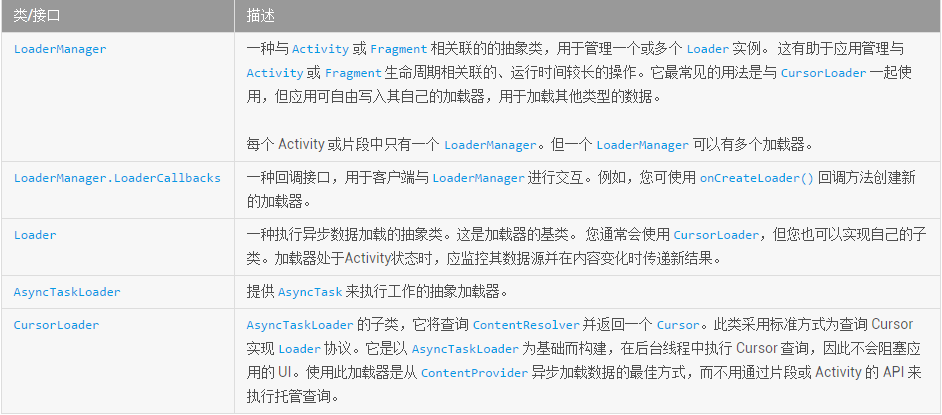 Android Loader(加載器)詳解
Loader(加載器)簡介Android 3.0 中引入了加載器,支持輕松在 Activity 或Fragment中異步加載數據。 加載器具有以下特征:(1)可用於每個
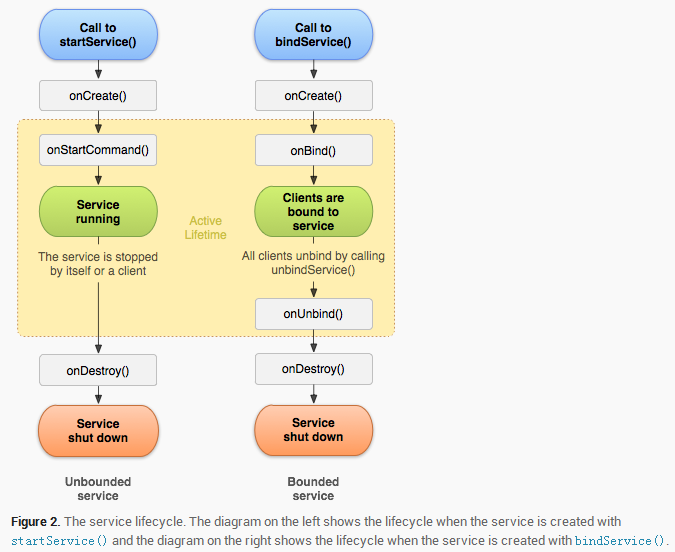 Android 後台服務簡要概述
本篇文章主要講述android servivce相關知識,其中會穿插一些其他的知識點,作為初學者的教程。老鳥繞路本文會講述如下內容:- 為什麼要用Service- Ser