編輯:關於Android編程
首先,如果你想在android3.0及以下版本使用fragment,你必須引用android-support-v4.jar這個包
然後你寫的activity不能再繼承自Activity類了,而是要繼承android.support.v4.app.FragmentActivity,一些其他的父類也有相應的變化.
由於在android的實現機制中fragment和activity會被分別實例化為兩個不相干的對象,他們之間的聯系由activity的一個成員對象fragmentmanager來維護.fragment實例化後會到activity中的fragmentmanager去注冊一下,這個動作封裝在fragment對象的onAttach中,所以你可以在fragment中聲明一些回調接口,當fragment調用onAttach時,將這些回調接口實例化,這樣fragment就能調用各個activity的成員函數了,當然activity必須implements這些接口,否則會包classcasterror
fragment和activity的回調機制又是OOP的一次完美演繹!
下面通過一個例子來說明:
首先,我們看下界面


左邊的TextView會根據右邊點擊button的不同而改變。
下面開始介紹代碼:
1.在layout裡新建fragment1.xml
<?xml version="1.0" encoding="utf-8"?>
<LinearLayout xmlns:android="http://schemas.android.com/apk/res/android"
 android:layout_width="match_parent"
 android:layout_height="match_parent"
 android:background="#00ff00"
 android:orientation="vertical" >
 <TextView
 android:id="@+id/fragment_text"
 android:layout_width="wrap_content"
 android:layout_height="wrap_content"
 android:text="this is fragment 1"
 android:textColor="#000000"
 android:textSize="25sp" />
</LinearLayout>
可以看出,這裡就只有一個TextView
2.在layout裡新建fragment2.xml
<?xml version="1.0" encoding="utf-8"?>
<LinearLayout xmlns:android="http://schemas.android.com/apk/res/android"
 android:layout_width="match_parent"
 android:layout_height="match_parent"
 android:background="#ffff00"
 android:orientation="vertical" >
 <TextView
 android:layout_width="wrap_content"
 android:layout_height="wrap_content"
 android:text="this is fragment 2"
 android:textColor="#000000"
 android:textSize="25sp" />
 <Button
 android:id="@+id/button"
 android:layout_width="wrap_content"
 android:layout_height="wrap_content"
 android:text="num 1" />
 <Button
 android:id="@+id/button2"
 android:layout_width="wrap_content"
 android:layout_height="wrap_content"
 android:text="num 2" />
 <Button
 android:id="@+id/button3"
 android:layout_width="wrap_content"
 android:layout_height="wrap_content"
 android:text="num 3" />
</LinearLayout>
這裡是三個button
3.創建類Fragment1繼承Fragment
package lgx.fram.framents;

import android.app.Fragment;
import android.os.Bundle;
import android.view.LayoutInflater;
import android.view.View;
import android.view.ViewGroup;

public class Fragment1 extends Fragment {
 @Override
 public View onCreateView(LayoutInflater inflater, ViewGroup container,
  Bundle savedInstanceState) {
 return inflater.inflate(R.layout.fragment1, container, false);
 }
}
重寫onCreateView()方法,這裡 return inflater.inflate(R.layout.fragment1, container, false); 這句話是重點
4.創建類Fragment2繼承Fragment
package lgx.fram.framents;

import android.app.Fragment;
import android.os.Bundle;
import android.view.LayoutInflater;
import android.view.View;
import android.view.View.OnClickListener;
import android.view.ViewGroup;
import android.widget.Button;
import android.widget.TextView;

public class Fragment2 extends Fragment {
 @Override
 public View onCreateView(LayoutInflater inflater, ViewGroup container,
  Bundle savedInstanceState) {
 return inflater.inflate(R.layout.fragment2, container, false);
 }

 TextView textview;
 Button button, button2, button3;

 @Override
 public void onActivityCreated(Bundle savedInstanceState) {
 super.onActivityCreated(savedInstanceState);
 button = (Button) getActivity().findViewById(R.id.button);
 button2 = (Button) getActivity().findViewById(R.id.button2);
 button3 = (Button) getActivity().findViewById(R.id.button3);
 textview = (TextView) getActivity().findViewById(R.id.fragment_text);
 button.setOnClickListener(new OnClickListener() {

  @Override
  public void onClick(View v) {
  textview.setText(button.getText());
  }
 });
 button2.setOnClickListener(new OnClickListener() {

  @Override
  public void onClick(View v) {
  textview.setText(button2.getText());
  }
 });
 button3.setOnClickListener(new OnClickListener() {

  @Override
  public void onClick(View v) {
  textview.setText(button3.getText());
  }
 });
 }
}
button = (Button) getActivity().findViewById(R.id.button);
通過這種方法來得到fragment上面的控件
5.activity_fragment.xml裡面的代碼是這個樣子的
<?xml version="1.0" encoding="utf-8"?>
<LinearLayout xmlns:android="http://schemas.android.com/apk/res/android"
 android:id="@+id/main_layout"
 android:layout_width="match_parent"
 android:layout_height="match_parent"
 android:baselineAligned="false"
 android:orientation="horizontal" >
 <fragment
 android:id="@+id/fragment1"
 android:name="lgx.fram.framents.Fragment1"
 android:layout_width="match_parent"
 android:layout_height="match_parent"
 android:layout_weight="1" />
 <fragment
 android:id="@+id/fragment2"
 android:name="lgx.fram.framents.Fragment2"
 android:layout_width="match_parent"
 android:layout_height="match_parent"
 android:layout_weight="1" />
</LinearLayout>
注意:控件fragment裡的android:name=" "裡面填寫的是你的Fragment類的絕對路徑(腦子突然短路,是這樣說的嗎??),id用來標示fragment。
6.FragmentActivity是最簡單的,就只是setContentView,並沒有進行其他改變。看下面
package lgx.fram.framents;

import android.app.Activity;
import android.os.Bundle;


public class FragmentActivity extends Activity {

 @Override
 protected void onCreate(Bundle savedInstanceState) {
 super.onCreate(savedInstanceState);
 setContentView(R.layout.activity_fragment);
 }

}
在這裡我的整個小應用就做完了。我這裡的Fragment通過布局文件加入到Activity裡的,還有另一種方式是通過編程的方式將Fragment加入Activity裡。這裡我簡單敘述
上面的1,2,3,4都不需要動。
第5步驟,activity_fragment.xml裡面的代碼變成下面的
<?xml version="1.0" encoding="utf-8"?>
<LinearLayout xmlns:android="http://schemas.android.com/apk/res/android"
 android:id="@+id/main_layout"
 android:layout_width="match_parent"
 android:layout_height="match_parent"
 android:baselineAligned="false"
 android:orientation="horizontal" >
</LinearLayout>
你會發現我知識去掉了兩個Fragment,整個LinearLayout加進去了id
第6個步驟,裡面的注釋,已經寫得很清楚了:
package lgx.fram.framents;

import android.os.Bundle;
import android.app.Activity;
import android.view.Display;
import android.view.Menu;
@author lenovo 動態添加Fragment主要分為4步:
(1)獲取到FragmentManager,在Activity中可以直接通過getFragmentManager得到。
(2)開啟一個事務,通過調用beginTransaction方法開啟。
(3)向容器內加入Fragment,一般使用replace方法實現,需要傳入容器的id和Fragment的實例。
(4)提交事務,調用commit方法提交。
public class FragmentActivity extends Activity {

 @Override
 protected void onCreate(Bundle savedInstanceState) {
 super.onCreate(savedInstanceState);
 setContentView(R.layout.activity_fragment);
 Display display = getWindowManager().getDefaultDisplay();
 if (display.getWidth() > display.getHeight()) {
  Fragment1 fragment1 = new Fragment1();
  getFragmentManager().beginTransaction()
   .replace(R.id.main_layout, fragment1).commit();
 } else {
  Fragment2 fragment2 = new Fragment2();
  getFragmentManager().beginTransaction()
   .replace(R.id.main_layout, fragment2).commit();
 }
 }

}
這個代碼的意思是,橫豎屏顯示不同的Fragment。如果是模擬機測試,請按Ctrl+F11。
 Android實現網絡多線程斷點續傳下載實例
我們編寫的是Andorid的HTTP協議多線程斷點下載應用程序。直接使用單線程下載HTTP文件對我們來說是一件非常簡單的事。那麼,多線程斷點需要什麼功能?1.多線程下載,
 服務Service的基本用法
作為 Android四大組件之一, 服務也少不了有很多非常重要的知識點,那自然要從最基本的用法開始學習了。定義一個服務:public class MyService ex
 Android ListView的item背景色設置
1.如何改變item的背景色和按下顏色 listview默認情況下,item的背景色是黑色,在用戶點擊時是黃色的。如果需要修改為自定義的背景顏色,一般情況下有三種
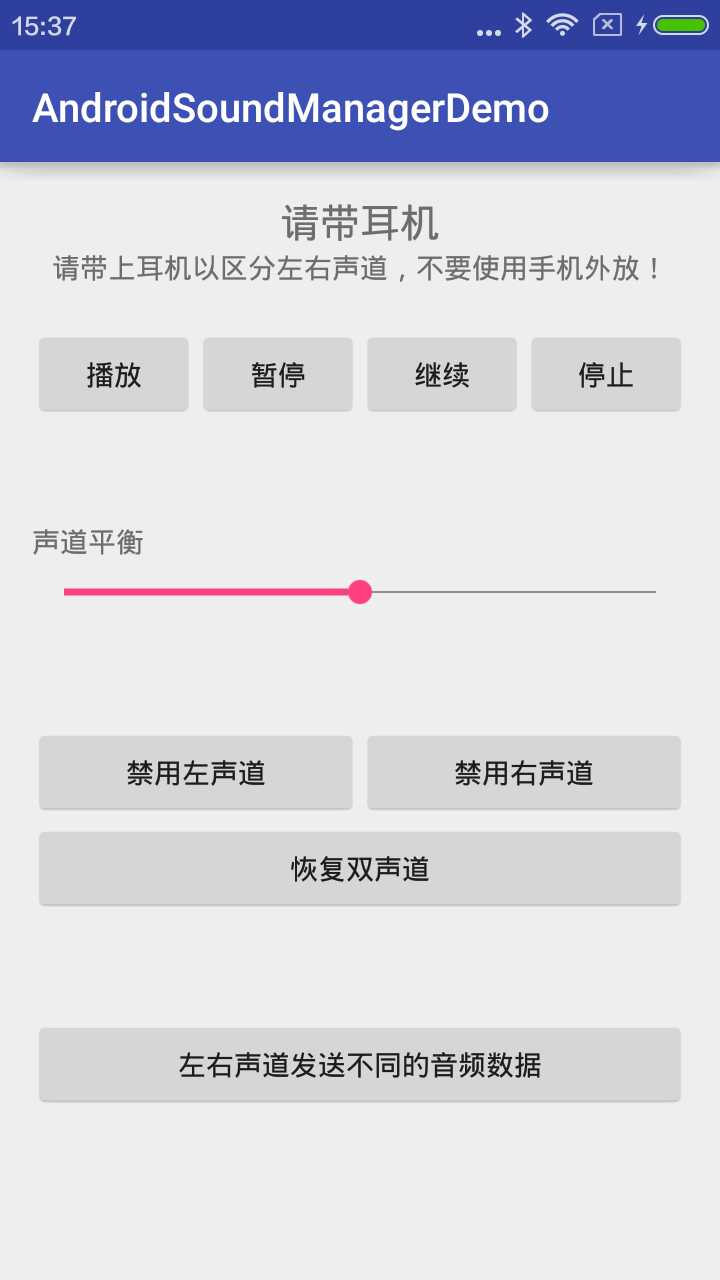 Android左右聲道的控制
效果圖源碼我這裡主要是用到了AudioTrack實現的左右聲道的控制,手機一般都只有兩個聲道,即左聲道和右聲道,我們在輸出的時候可以選擇單聲道,也可以選擇雙聲道(立體聲)