編輯:關於Android編程
本文實例講述了Android基於廣播事件機制實現簡單定時提醒功能代碼。分享給大家供大家參考,具體如下:
1.Android廣播事件機制
Android的廣播事件處理類似於普通的事件處理。不同之處在於,後者是靠點擊按鈕這樣的組件行為來觸發,而前者是通過構建Intent對象,使用sentBroadcast()方法來發起一個系統級別的事件廣播來傳遞信息。廣播事件的接收是通過定義一個繼承Broadcast Receiver的類實現的,繼承該類後覆蓋其onReceive()方法,在該方法中響應事件。Android系統中定義了很多標准的Broadcast Action來響應系統廣播事件。例如:ACTION_TIME_CHANGED(時間改變時觸發)。但是,我們也可以自己定義Broadcast Receiver接收廣播事件。
2.實現簡單的定時提醒功能
主要包括三部分部分:
1) 定時 - 通過定義Activity發出廣播
2) 接收廣播 - 通過實現BroadcastReceiver接收廣播
3) 提醒 - 並通過Notification提醒用戶
現在我們來具體實現這三部分:
2.1 如何定時,從而發出廣播呢?
現在的手機都有鬧鐘的功能,我們可以利用系統提供的鬧鐘功能,來定時,即發出廣播。具體地,在Android開發中可以用AlarmManager來實現。
AlarmManager 提供了一種系統級的提示服務,允許你安排在某個時間執行某一個服務。
AlarmManager的使用步驟說明如下:
1)獲得AlarmManager實例: AlarmManager對象一般不直接實例化,而是通過Context.getSystemService(Context.ALARM_SERVIECE) 方法獲得
2)定義一個PendingIntent來發出廣播。
3)調用AlarmManager的相關方法,設置定時、重復提醒等功能。
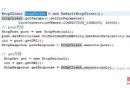
詳細代碼如下(ReminderSetting.java):
package com.Reminder;
import java.util.Calendar;
import android.app.Activity;
import android.app.AlarmManager;
import android.app.PendingIntent;
import android.content.Intent;
import android.os.Bundle;
import android.view.View;
import android.widget.Button;
/**
* trigger the Broadcast event and set the alarm
*/
public class ReminderSetting extends Activity {
  Button btnEnable;
  /** Called when the activity is first created. */
  @Override
  public void onCreate(Bundle savedInstanceState) {
    super.onCreate(savedInstanceState);
    setContentView(R.layout.main);
    /* create a button. When you click the button, the alarm clock is enabled */
    btnEnable=(Button)findViewById(R.id.btnEnable);
    btnEnable.setOnClickListener(new View.OnClickListener() {
      @Override
      public void onClick(View v) {
        setReminder(true);
      }
    });
  }
  /**
   * Set the alarm
   *
   * @param b whether enable the Alarm clock or not
   */
  private void setReminder(boolean b) {
    // get the AlarmManager instance
    AlarmManager am= (AlarmManager) getSystemService(ALARM_SERVICE);
    // create a PendingIntent that will perform a broadcast
    PendingIntent pi= PendingIntent.getBroadcast(ReminderSetting.this, 0, new Intent(this,MyReceiver.class), 0);
    if(b){
      // just use current time as the Alarm time.
      Calendar c=Calendar.getInstance();
      // schedule an alarm
      am.set(AlarmManager.RTC_WAKEUP, c.getTimeInMillis(), pi);
    }
    else{
      // cancel current alarm
      am.cancel(pi);
    }
  }
}
2.2 接收廣播
新建一個class 繼承BroadcastReceiver,並實現onReceive()方法。當BroadcastReceiver接收到廣播後,就會去執行OnReceive()方法。所以,我們在OnReceive()方法中加上代碼,當接收到廣播後就跳到顯示提醒信息的Activity。具體代碼如下( MyReceiver.java):
package com.Reminder;
import android.content.BroadcastReceiver;
import android.content.Context;
import android.content.Intent;
/**
* Receive the broadcast and start the activity that will show the alarm
*/
public class MyReceiver extends BroadcastReceiver {
  /**
   * called when the BroadcastReceiver is receiving an Intent broadcast.
   */
  @Override
  public void onReceive(Context context, Intent intent) {
    /* start another activity - MyAlarm to display the alarm */
    intent.setFlags(Intent.FLAG_ACTIVITY_NEW_TASK);
    intent.setClass(context, MyAlarm.class);
    context.startActivity(intent);
  }
}
注意:創建完BroadcastReceiver後,需要在AndroidManifest.xml中注冊:
<receiver android:name=".MyReceiver">
    <intent-filter>
    <action android:name= "com.Reminder.MyReceiver" />
  </intent-filter>
</receiver>
2.3 提醒功能
新建一個Activity,我們在這個Activity中通過Android的Notification對象來提醒用戶。我們將添加提示音,一個TextView來顯示提示內容和並一個button來取消提醒。
其中,創建Notification主要包括:
1)獲得系統級得服務NotificationManager,通過 Context.getSystemService(NOTIFICATION_SERVICE)獲得。
2)實例化Notification對象,並設置各種我們需要的屬性,比如:設置聲音。
3)調用NotificationManager的notify()方法顯示Notification
詳細代碼如下:MyAlarm.java
package com.Reminder;
import android.app.Activity;
import android.app.Notification;
import android.app.NotificationManager;
import android.net.Uri;
import android.os.Bundle;
import android.provider.MediaStore.Audio;
import android.view.View;
import android.widget.Button;
import android.widget.TextView;
/**
* Display the alarm information
*/
public class MyAlarm extends Activity {
  /**
   * An identifier for this notification unique within your application
   */
  public static final int NOTIFICATION_ID=1;
  @Override
  protected void onCreate(Bundle savedInstanceState) {
     super.onCreate(savedInstanceState);
     setContentView(R.layout.my_alarm);
    // create the instance of NotificationManager
    final NotificationManager nm=(NotificationManager) getSystemService(NOTIFICATION_SERVICE);
    // create the instance of Notification
    Notification n=new Notification();
    /* set the sound of the alarm. There are two way of setting the sound */
     // n.sound=Uri.parse("file:///sdcard/alarm.mp3");
    n.sound=Uri.withAppendedPath(Audio.Media.INTERNAL_CONTENT_URI, "20");
    // Post a notification to be shown in the status bar
    nm.notify(NOTIFICATION_ID, n);
    /* display some information */
    TextView tv=(TextView)findViewById(R.id.tvNotification);
    tv.setText("Hello, it's time to bla bla...");
    /* the button by which you can cancel the alarm */
    Button btnCancel=(Button)findViewById(R.id.btnCancel);
    btnCancel.setOnClickListener(new View.OnClickListener() {
      @Override
      public void onClick(View arg0) {
        nm.cancel(NOTIFICATION_ID);
        finish();
      }
    });
  }
}
希望本文所述對大家Android程序設計有所幫助。
 android 網絡連接處理分析
在Android中,可以有多種方式來實現網絡編程:創建URL,並使用URLConnection/HttpURLConnection使用HttpClient使用WebVie
 Android屏幕尺寸適配
使用“wrap_content”和“match_parent”要確保布局的靈活性並適應各種尺寸的屏幕,您應使用"
 Android 矩陣ColorMatrix
中文名:坐標矩陣高等數學裡有介紹,在圖像處理方面,主要是用於平面的縮放、平移、旋轉等操作。在Android裡面,Matrix由9個float值構成,是一個3*3的矩陣。最
 android仿愛奇藝加載動畫實例
本篇文章介紹了android仿愛奇藝加載動畫實例,具體代碼如下:效果圖:用到的知識點: Path ValueAnimator如果對Path和ValueAnimator