編輯:關於Android編程
本文實例講述了Android中日期與時間設置控件用法。分享給大家供大家參考。具體如下:
1、日期設置控件:DatePickerDialog
2、時間設置控件:TimePickerDialog
實例代碼:
頁面添加兩個Button,單擊分別顯示日期設置控件和時間設置控件,還是有TextView控件,用於顯示設置後的系統時間
main.xml:
<?xml version="1.0" encoding="utf-8"?>
<LinearLayout xmlns:Android="http://schemas.android.com/apk/res/android"
 Android:orientation="vertical"
 Android:layout_width="fill_parent"
 Android:layout_height="fill_parent"
 >
<TextView Android:id="@+id/dateAndTime"
 Android:layout_width="fill_parent"
 Android:layout_height="wrap_content"
 Android:text="@string/hello"
 />
<Button
 Android:id="@+id/setDate"
 Android:layout_width="fill_parent"
 Android:layout_height="wrap_content"
 Android:text="Set the Date"></Button>
<Button Android:id="@+id/setTime"
 Android:layout_width="fill_parent"
 Android:layout_height="wrap_content"
 Android:text="Set the Time"></Button>
</LinearLayout>
ChronoDemo.java如下:
package yyl.Android;
import java.text.DateFormat;
import java.util.Calendar;
import java.util.Locale;
import Android.app.Activity;
import Android.app.DatePickerDialog;
import Android.app.TimePickerDialog;
import Android.os.Bundle;
import Android.view.View;
import Android.widget.Button;
import Android.widget.DatePicker;
import Android.widget.TextView;
import Android.widget.TimePicker;
public class ChronoDemo extends Activity {
 //獲取日期格式器對象
 DateFormat fmtDateAndTime = DateFormat.getDateTimeInstance();
 //定義一個TextView控件對象
 TextView dateAndTimeLabel = null;
 //獲取一個日歷對象
 Calendar dateAndTime = Calendar.getInstance(Locale.CHINA);
 //當點擊DatePickerDialog控件的設置按鈕時,調用該方法
 DatePickerDialog.OnDateSetListener d = new DatePickerDialog.OnDateSetListener()
 {
 @Override
 public void onDateSet(DatePicker view, int year, int monthOfYear,int dayOfMonth) {
  //修改日歷控件的年,月,日
  //這裡的year,monthOfYear,dayOfMonth的值與DatePickerDialog控件設置的最新值一致
  dateAndTime.set(Calendar.YEAR, year);
  dateAndTime.set(Calendar.MONTH, monthOfYear);
  dateAndTime.set(Calendar.DAY_OF_MONTH, dayOfMonth);
  //將頁面TextView的顯示更新為最新時間
  updateLabel();
 }
 };
 TimePickerDialog.OnTimeSetListener t = new TimePickerDialog.OnTimeSetListener() {
 //同DatePickerDialog控件
 @Override
 public void onTimeSet(TimePicker view, int hourOfDay, int minute) {
  dateAndTime.set(Calendar.HOUR_OF_DAY, hourOfDay);
  dateAndTime.set(Calendar.MINUTE, minute);
  updateLabel();
 }
 };
 @Override
 public void onCreate(Bundle savedInstanceState) {
 super.onCreate(savedInstanceState);
 setContentView(R.layout.main);
 //得到頁面設定日期的按鈕控件對象
 Button dateBtn = (Button)findViewById(R.id.setDate);
 //設置按鈕的點擊事件監聽器
 dateBtn.setOnClickListener(new View.OnClickListener() {
  @Override
  public void onClick(View v) {
  //生成一個DatePickerDialog對象,並顯示。顯示的DatePickerDialog控件可以選擇年月日,並設置
  new DatePickerDialog(ChronoDemo.this,
   d,
   dateAndTime.get(Calendar.YEAR),
   dateAndTime.get(Calendar.MONTH),
   dateAndTime.get(Calendar.DAY_OF_MONTH)).show();
  }
 });
 Button timeBtn = (Button)findViewById(R.id.setTime);
 timeBtn.setOnClickListener(new View.OnClickListener() {
  //同上原理
  @Override
  public void onClick(View v) {
  new TimePickerDialog(ChronoDemo.this,
   t,
   dateAndTime.get(Calendar.HOUR_OF_DAY),
   dateAndTime.get(Calendar.MINUTE),
   true).show();
  }
 });
 dateAndTimeLabel=(TextView)findViewById(R.id.dateAndTime);
 updateLabel();
 }
 //更新頁面TextView的方法
 private void updateLabel() {
 dateAndTimeLabel.setText(fmtDateAndTime
 .format(dateAndTime.getTime()));
 }
}
希望本文所述對大家的Android程序設計有所幫助。
 COCOS2D-X之CPP調用Android函數Demo
希望這篇文章能夠給大家帶來幫助廢話少說直接在COCOS2D-X自帶的HelloCpp中添加代碼如下: #if (CC_TARGET_PLATFORM == CC_PLA
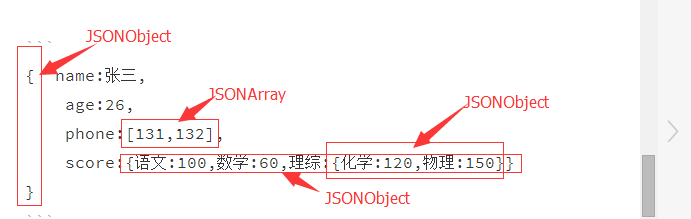 android開發筆記之Json解析
在上篇文章中我們提到在Android開發中經常用到xml文件,當然跟服務器打交道,大部分還是喜歡用Json數據。Json的定義:一種輕量級的數據交換格式,具有良好的可讀和
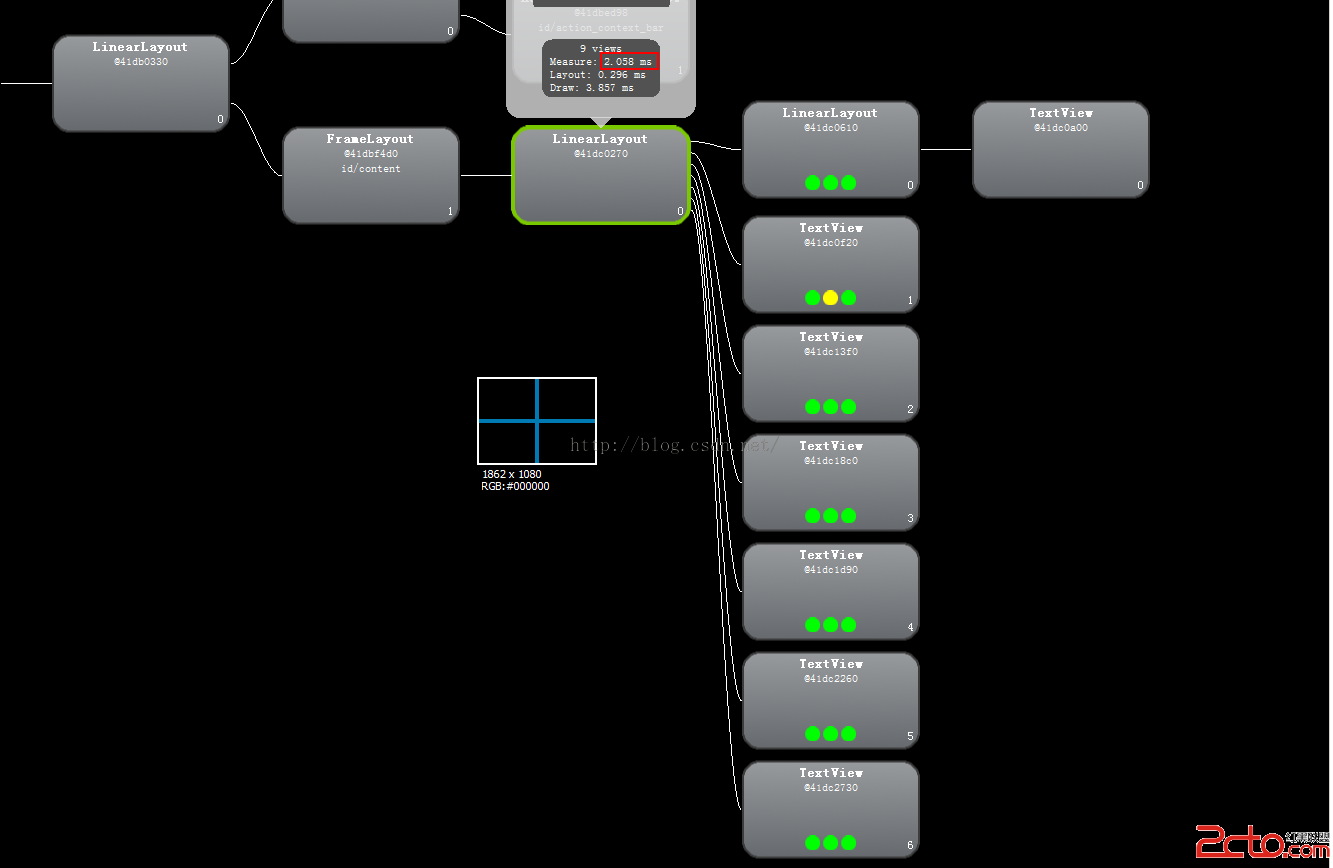 布局優化之RelativeLayout和LinearLayout及FrameLayout性能分析
工作一段時間後,經常會被領導說,你這個進入速度太慢了,競品的進入速度很快,你搞下優化吧?每當這時,你會怎麼辦?功能實現都有啊,進入時要加載那麼多view,這也沒辦法啊,等
 安卓實現高斯模糊
關於如何對圖片進行模糊處理,網上方法比較多,常用而又便捷的方法就是使用高斯模糊,但網上的方法大多效果並不理想,今天分享一個之前項目中用到的模糊處理方法來實現高斯模糊,好了