編輯:關於Android編程
直接上代碼和圖片。
情況一:
[html]
復制代碼 代碼如下:
<?xml version="1.0" encoding="utf-8"?>
<LinearLayout xmlns:android="http://schemas.android.com/apk/res/android"
android:layout_width="match_parent"
android:layout_height="match_parent"
android:orientation="horizontal" >
<fragment
android:id="@+id/titles"
android:layout_width="0dip"
android:layout_height="match_parent"
android:layout_weight="1"
class="com.a2bgeek.fragmentdemo.TitlesFragment" />
<FrameLayout
android:id="@+id/details"
android:layout_width="0dip"
android:layout_height="match_parent"
android:layout_weight="2" >
</FrameLayout>
</LinearLayout>
情況2:
[html]
復制代碼 代碼如下:
<?xml version="1.0" encoding="utf-8"?>
<LinearLayout xmlns:android="http://schemas.android.com/apk/res/android"
android:layout_width="match_parent"
android:layout_height="match_parent"
android:orientation="horizontal" >
<fragment
android:id="@+id/titles"
android:layout_width="match_parent"
android:layout_height="match_parent"
android:layout_weight="1"
class="com.a2bgeek.fragmentdemo.TitlesFragment" />
<FrameLayout
android:id="@+id/details"
android:layout_width="match_parent"
android:layout_height="match_parent"
android:layout_weight="2" >
</FrameLayout>
</LinearLayout>

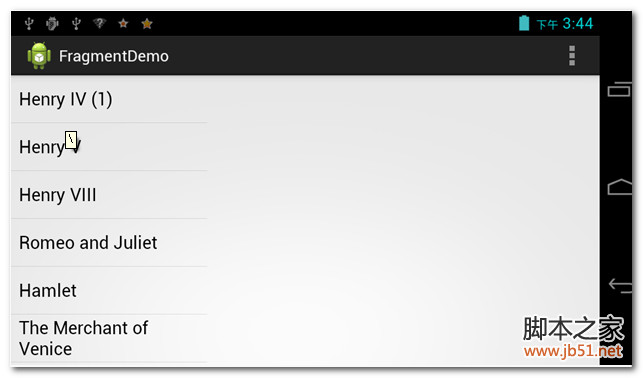
情況三:
Fragment這個東西在wrap_content的情況下會占據全部,和控件不太一樣。
 Android控件系列之TextView使用介紹
學習目的: 1、了解在Android中如何使用TextView控件 2、掌握TextView控件重要屬性 作用:TextView類似一般UI中的Label,TextBlo
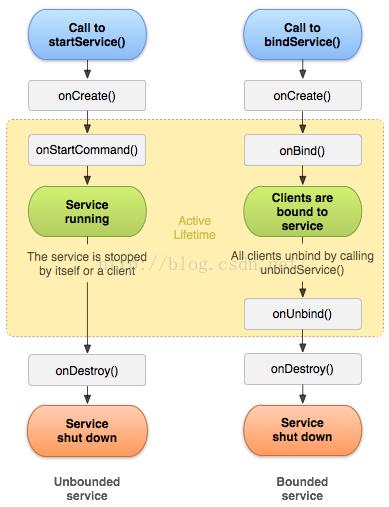 Android的四大組建Service 簡單、易懂的解析
Service 服務:四大組件之一特性: 沒有界面運行在後台,除了界面相關的之外,Activity能做的Service也能做。service的生命周期:上圖所述一共有兩種
 eclipse再見,android studio 新手入門教程(二)項目的導入
上一篇博客介紹了AS的一些常用設置方法,當工具調教妥當後,自然就要開始項目的開發啦。從零開始新建一個項目,這個簡單,不必多說,這篇博客會分享我從舊平台eclipse導入項
 CoordinatorLayout的使用如此簡單(Android)
曾在網上找了一些關於CoordinatorLayout的教程,大部分文章都是把CoordinatorLayout、AppbarLayout、CollapsingToolb
 一、初識GVR ---- Android VR視頻/Google VR for Android /VR Pano/VR Video
業余時間充足,於是想弄點自己的東西,找來找去還是回到當初感興趣的VR。目