編輯:關於Android編程
提到Handler大家並不陌生,Handler是android給我們提供用來更新UI的一套機制,也是一套消息處理機制,我們可以通過它發送消息,也可以通過它處理消息,它既可以發送消息也可以接收消息。當我們在子線程中對UI進行更改的操作的時候,應用會崩潰,系統提示我們不能在子線程中進行更新UI的操作。這時候Handler就可以派上用場了。為什麼要使用Handler呢,其實谷歌工程師估計考慮到程序員對於多線程的苦惱,所以android在設計的時候就封裝了一套消息創建、傳遞、處理機制,如果不遵循這樣的機制就沒有辦法更新UI信息的,就會拋出異常信息。這就是Handler。
在Android中我們對Handler的最基本用法是子線程和主線程之間的通訊,將耗時的操作放在子線程中進行,將操作後的結果或者數據通過Handler傳遞給UI線程,UI再通過這些數據更新UI和進行相應的用戶操作。
比如我們有如下代碼:
public class MainActivity extends Activity {
	private TextView textView;
	@Override
	protected void onCreate(Bundle savedInstanceState) {
		super.onCreate(savedInstanceState);
		setContentView(R.layout.activity_main);
		textView =(TextView) findViewById(R.id.textView);
		new Thread(){
			public void run() {
				try {
					Thread.sleep(1000);
					textView.setText("Hanlder");
				} catch (InterruptedException e) {
					// TODO Auto-generated catch block
					e.printStackTrace();
				}

			};
		}.start();
	}
}
這是用子線程的sleep模擬耗時操作,然後在子線程中去更新textView,運行之後程序崩潰。日志中記錄:Only the original thread that created a view hierarchy can touch its views.意思就是,只有創建了View的原始現成能夠處理操作View,通俗的就是只有UI現成能夠更新UI。
那我們的代碼更改為下面:
public class MainActivity extends Activity {
	private TextView textView;
	private Handler handler = new Handler(){
		public void handleMessage(android.os.Message msg) {
			textView.setText("Hanlder");
		};
	};

	@Override
	protected void onCreate(Bundle savedInstanceState) {
		super.onCreate(savedInstanceState);
		setContentView(R.layout.activity_main);
		textView =(TextView) findViewById(R.id.textView);
		new Thread(){
			public void run() {
				try {
					Thread.sleep(1000);
					handler.sendEmptyMessage(1);
				} catch (InterruptedException e) {
					// TODO Auto-generated catch block
					e.printStackTrace();
				}

			};
		}.start();
	}
}
這樣就可以實現UI的更新了。這是Handler最基本也是最簡單的用法了,實現子線程和主線程之間的通訊。
public class MainActivity extends Activity {
	private TextView textView;
	private int i=0;
	private boolean flag =false;
	private Runnable runnable = new Runnable() {
		@Override
		public void run() {
			i++;
			textView.setText(i+"");
			handler.postDelayed(runnable, 500);
		}
	};
	private Handler handler = new Handler();

	@Override
	protected void onCreate(Bundle savedInstanceState) {
		super.onCreate(savedInstanceState);
		setContentView(R.layout.activity_main);
		textView =(TextView) findViewById(R.id.textView);
		handler.postDelayed(runnable, 500);
	}

	//button的點擊事件的回調方法
	public void remove(View view){
		if(!flag){
			flag =true;
			handler.removeCallbacks(runnable);
		}else{
			flag =false;
			handler.postDelayed(runnable, 500);
		}
	}
}
界面的簡單實現效果就是在TextView上面顯示i的值,這裡的i的值是循環++的,我們在onCreate中使用handler來延遲500毫秒執行runnable對象,使i++,在runnable的run方法中我們也發送一個runnable對象,所有就可以循環執行i++的操作了額。方法remove根據flag的標志可以隨時停止和開始執行i++的循環操作,是不是感覺有點屌屌哒呢。這樣也可以實現簡單的循環操作,而且狀態自己隨時可以控制。
3.Handler的相關方法的使用。
a.public Handler(Callback callback)構造函數
大家應該在使用Handler的時候,都會使用它的默認的無參數的構造函數,然後重寫其handleMessage方法,進行相應的邏輯操作。Handler還有這樣一個構造函數public Handler(Callback callback)。先看下面的代碼
public class MainActivity extends Activity {
	private TextView textView;
	private Handler handler = new Handler(new Handler.Callback() {

		@Override
		public boolean handleMessage(Message msg) {
			Toast.makeText(getApplicationContext(), "callback handlemessage", 1000).show();    //代碼1
			return true;   //這裡返回值需要注意     // 代碼3
		}
	}){
		public void handleMessage(Message msg) {
			Toast.makeText(getApplicationContext(), "handler handlemessage", 1000).show();  //代碼2
		};
	};

	@Override
	protected void onCreate(Bundle savedInstanceState) {
		super.onCreate(savedInstanceState);
		setContentView(R.layout.activity_main);
		textView =(TextView) findViewById(R.id.textView);
	}

	public void show(View view){
		handler.sendEmptyMessage(1);
	}

}
上面的代碼中使用了public Handler(Callback callback)的構造函數。我們這裡可以進行消息傳遞的攔截。當我們的“代碼3”中return false的時候 “代碼1” “代碼2”會依次執行,當“代碼3”中return true的時候“代碼1”會先執行 ,但是“代碼2”不會執行,此時有點類似事件傳遞中返回true事件消費,false繼續向上傳遞的意思。我們可以使用Handler的這個構造方法,來進行消息傳遞的攔截。
b.Handler與Looper,MessageQueue的關系
學習Hanlder必須要弄清楚Hanlder與Looper,MessageQueue之間的關系。
Hanlder:在Android中主要是封裝了消息的發送。
Looper:類似一個“消息泵”,產生動力,接收Handler發送過來的消息,並且在Looper中存在一個loop方法和一個MessageQueue對象,通過loop方法一直輪詢,從MessageQueue中取出消息,並回傳給Hanlder自己
MessageQueue:就是一個存儲消息的容器。
下面我們可以從源代碼的角度來認識一下Handler和這兩個類之間的關系以及Handler中消息的處理邏輯。在我們一個引用創建的時候,其實也是通過一個主線程中的main方法執行的,這個“主線程(其實並不是一個線程,就是一個普通java類,但是有入口函數main)也即是ActivityThread。看ActivityThread的main函數怎麼寫的
  public static void main(String[] args) {
        SamplingProfilerIntegration.start();

        // CloseGuard defaults to true and can be quite spammy.  We
        // disable it here, but selectively enable it later (via
        // StrictMode) on debug builds, but using DropBox, not logs.
        CloseGuard.setEnabled(false);

        Process.setArgV0("");

        Looper.prepareMainLooper();
        if (sMainThreadHandler == null) {
            sMainThreadHandler = new Handler();
        }

        ActivityThread thread = new ActivityThread();
        thread.attach(false);

        if (false) {
            Looper.myLooper().setMessageLogging(new
                    LogPrinter(Log.DEBUG, "ActivityThread"));
        }

        Looper.loop();

        throw new RuntimeException("Main thread loop unexpectedly exited");
    }
}
前面的一些代碼就 不詳細講解了 ,在Acitivity的啟動過程中有講解到。我們看代碼的11行Looper.prepareMainLooper();方法,跟蹤進去,會發現這裡其實就是為我們整個應用程序關聯一個Looper對象,這個Looper其實就是我們UI線程關聯的Looper對象,當我們在主線程中穿件Handler對象的時候,其實關聯的也是這個Looper對象。
代碼24行,也就是調用Looper的輪詢方法。輪詢消息,開始的時候可能消息隊列中沒有消息。
當我們在主線程中創建自己的Hanlder對象的時候,我們一般的入口就是他的無參數構造函數
 public Handler() {
        if (FIND_POTENTIAL_LEAKS) {
            final Class klass = getClass();
            if ((klass.isAnonymousClass() || klass.isMemberClass() || klass.isLocalClass()) &&
                    (klass.getModifiers() & Modifier.STATIC) == 0) {
                Log.w(TAG, "The following Handler class should be static or leaks might occur: " +
                    klass.getCanonicalName());
            }
        }

        mLooper = Looper.myLooper();
        if (mLooper == null) {
            throw new RuntimeException(
                "Can't create handler inside thread that has not called Looper.prepare()");
        }
        mQueue = mLooper.mQueue;
        mCallback = null;
    }
從構造函數中,可以看出,handler中的Loopder對象通過Looper.myLooper()方法賦值,實質也是從主線程的ThreadLocal中取出Looper並且賦值,然後初始化MessageQueue對象來存放消息。
當我們Handler和Looper,MessageQueue初始化完畢之後,就看看消息的發送了,我們以一般的SendMessage(Message)來講解,跟蹤此方法可以看出,最後調用的是sendMessageAtTime方法,來看看這個方法
  public boolean sendMessageAtTime(Message msg, long uptimeMillis)
    {
        boolean sent = false;
        MessageQueue queue = mQueue;
        if (queue != null) {
            msg.target = this;
            sent = queue.enqueueMessage(msg, uptimeMillis);
        }
        else {
            RuntimeException e = new RuntimeException(
                this + " sendMessageAtTime() called with no mQueue");
            Log.w("Looper", e.getMessage(), e);
        }
        return sent;
    }
在這個函數中首先有一句代碼msg.target=this;這個東西後面有用,target指回handler自己,這就是我們上面所說的Looper接受handler發送的消息,並且將消息回傳給Handler自己。
代碼07行,就是將消息塞入MessageQueue中,此時我們的Looper有了,消息隊列MessageQueue中也有消息了。上面說過我們Looper.loop其實是一個死循環一直輪詢消息隊列中的消息那我們來具體看看loop方法
/
    public static void loop() {
        Looper me = myLooper();
        if (me == null) {
            throw new RuntimeException("No Looper; Looper.prepare() wasn't called on this thread.");
        }
        MessageQueue queue = me.mQueue;

        // Make sure the identity of this thread is that of the local process,
        // and keep track of what that identity token actually is.
        Binder.clearCallingIdentity();
        final long ident = Binder.clearCallingIdentity();

        while (true) {
            Message msg = queue.next(); // might block
            if (msg != null) {
                if (msg.target == null) {
                    // No target is a magic identifier for the quit message.
                    return;
                }

                long wallStart = 0;
                long threadStart = 0;

                // This must be in a local variable, in case a UI event sets the logger
                Printer logging = me.mLogging;
                if (logging != null) {
                    logging.println(">>>>> Dispatching to " + msg.target + " " +
                            msg.callback + ": " + msg.what);
                    wallStart = SystemClock.currentTimeMicro();
                    threadStart = SystemClock.currentThreadTimeMicro();
                }

                msg.target.dispatchMessage(msg);

                if (logging != null) {
                    long wallTime = SystemClock.currentTimeMicro() - wallStart;
                    long threadTime = SystemClock.currentThreadTimeMicro() - threadStart;

                    logging.println("<<<<< Finished to " + msg.target + " " + msg.callback);
                    if (logging instanceof Profiler) {
                        ((Profiler) logging).profile(msg, wallStart, wallTime,
                                threadStart, threadTime);
                    }
                }

                // Make sure that during the course of dispatching the
                // identity of the thread wasn't corrupted.
                final long newIdent = Binder.clearCallingIdentity();
                if (ident != newIdent) {
                    Log.wtf(TAG, "Thread identity changed from 0x"
                            + Long.toHexString(ident) + " to 0x"
                            + Long.toHexString(newIdent) + " while dispatching to "
                            + msg.target.getClass().getName() + " "
                            + msg.callback + " what=" + msg.what);
                }

                msg.recycle();
            }
        }
    }
的確有一個while(true)的死循環一直在輪詢消息隊列。
代碼34行有通過msg.target.dispatchMessage(msg),這就是上面所說的target的作用回傳給Handler自己來處理消息,來看dispatchMessage函數
    public void dispatchMessage(Message msg) {
        if (msg.callback != null) {
            handleCallback(msg);
        } else {
            if (mCallback != null) {
                if (mCallback.handleMessage(msg)) {
                    return;
                }
            }
            handleMessage(msg);
        }
    }
這裡才是真正的處理消息的方法,裡面調用了我們復寫的handleMessage方法。從函數的處理邏輯看,首先檢查msg的callback(其實就是上面用到的一個runnable對象)是否為null,如果不為null執行,就執行他的run方法,如果為null,檢查我們的Handler的callback是否為空,不為空的時候,這就要涉及到我們上面的消息攔截的處理邏輯了。mCallback.handleMessage(msg)方法有一個返回值,放返回true的時候就不在執行我們handler的handleMessage方法了,只有返回false的時候才會執行handler的handleMessage方法。處理我們更新UI的邏輯操作了。這裡handler的發送消息的邏輯差不多跟著源代碼讀了一遍,其實也不難哈。
c.自定義與線程相關的Handler之引出HandlerThread的用法。
先看下面的一段代碼:
public class MainActivity extends Activity {
	private Handler handler;
	class MyThread extends Thread{
		public Looper looper;
		@Override
		public void run() {
			looper.prepare();
			System.out.println("current thread"+Thread.currentThread());
			looper.loop();
		}
	}

	@Override
	protected void onCreate(Bundle savedInstanceState) {
		super.onCreate(savedInstanceState);
		setContentView(R.layout.activity_main);

		MyThread thread = new MyThread();
		thread.start();

		Handler handler = new Handler(thread.looper){
			@Override
			public void handleMessage(Message msg) {
				System.out.println("handle message");
			}
		};

	}
}
我們創建自己的handler的時候,可以傳遞一個Looper對象,正如上面的實例而言,但是運行代碼我們會發現,會報空指針異常,log提示在代碼的21行出現空指針,thread不可能為空,因為thread的run方法執行了,那只有looper為空了,這就是多線程造成的困擾,有可能是當我們的handle在new出來的時候,子線程並沒有執行完成,looper就沒有成功生成,就會報空指針異常。
HandlerThread的用法:
package com.example.handlertest;

import android.app.Activity;
import android.os.Bundle;
import android.os.Handler;
import android.os.HandlerThread;
import android.os.Looper;
import android.os.Message;

public class MainActivity extends Activity {
	private Handler handler;
	@Override
	protected void onCreate(Bundle savedInstanceState) {
		super.onCreate(savedInstanceState);
		setContentView(R.layout.activity_main);

		HandlerThread thread = new HandlerThread("Handler Thread");
		thread.start();

		Handler handler = new Handler(thread.getLooper()){
			@Override
			public void handleMessage(Message msg) {
				System.out.println("handle message");
			}
		};

		handler.sendEmptyMessage(1);
	}
}
這樣就不會出現上面所說的空指針異常了。我們查看源代碼發現HandlerThread繼承Thread.
 public Looper getLooper() {
        if (!isAlive()) {
            return null;
        }

        // If the thread has been started, wait until the looper has been created.
        synchronized (this) {
            while (isAlive() && mLooper == null) {
                try {
                    wait();
                } catch (InterruptedException e) {
                }
            }
        }
        return mLooper;
    }
但是在HandlerThread的getLooper方法中其實是做了同步線程保護的處理的,只要looper為空,線程就處於等待狀態,再看看handlerThread的run方法
 @Override
    public void run() {
        mTid = Process.myTid();
        Looper.prepare();
        synchronized (this) {
            mLooper = Looper.myLooper();
            notifyAll();
        }
        Process.setThreadPriority(mPriority);
        onLooperPrepared();
        Looper.loop();
        mTid = -1;
    }
會調用notifyAll,喚醒所有的線程。
1.在Activity中調用runOnUiThread(runnable)方法,裡面傳遞一個Runnable對象,在他的run方法之後中進行更新UI的操作。其實這最終還是調用handler.post(runnable)方法
2.handler.post(runnable),
public final boolean post(Runnable r)
    {
       return  sendMessageDelayed(getPostMessage(r), 0);
    }
  private final Message getPostMessage(Runnable r) {
        Message m = Message.obtain();
        m.callback = r;
        return m;
    }
看了上面2段代碼片段其實質還是講runnable對象作為Message的callbakc對象。最後還是調用Handler的消息處理邏輯
 public void dispatchMessage(Message msg) {
        if (msg.callback != null) {
            handleCallback(msg);
        } else {
            if (mCallback != null) {
                if (mCallback.handleMessage(msg)) {
                    return;
                }
            }
            handleMessage(msg);
        }
    }
開始是檢查msg.callback是否為空,不為空就調用handleCallback(msg)方法。
 private final void handleCallback(Message message) {
        message.callback.run();
    }
其實就是調用Runnable對象的run方法。
3.handler的sendMessage方法,此方法我們經常使用,上面也講解到,所有不在多說了。
4,view.post(runnable)方法。舉例子TextView.post方法
  public boolean post(Runnable action) {
        final AttachInfo attachInfo = mAttachInfo;
        if (attachInfo != null) {
            return attachInfo.mHandler.post(action);
        }
        // Assume that post will succeed later
        ViewRootImpl.getRunQueue().post(action);
        return true;
    }
其實質還是handler的post方法。
非UI線程真的不能更新UI 嗎?
先看下列2段代碼:
import android.app.Activity;
import android.os.Bundle;
import android.widget.TextView;

public class MainActivity extends Activity {
	private TextView textview;
	@Override
	protected void onCreate(Bundle savedInstanceState) {
		super.onCreate(savedInstanceState);
		setContentView(R.layout.activity_main);

		textview = (TextView) findViewById(R.id.textView);
		new Thread(){
			public void run() {
				textview.setText("ok");
			};
		}.start();
	}
}
這個方法的確可以是textview上面顯示ok,不相信大家可以測試一下。
package com.example.handlertest;

import android.app.Activity;
import android.os.Bundle;
import android.widget.TextView;

public class MainActivity extends Activity {
	private TextView textview;
	@Override
	protected void onCreate(Bundle savedInstanceState) {
		super.onCreate(savedInstanceState);
		setContentView(R.layout.activity_main);

		textview = (TextView) findViewById(R.id.textView);
		new Thread(){
			public void run() {
				try {
					Thread.sleep(2000);
				} catch (Exception e) {
					e.printStackTrace();
				}
				textview.setText("ok");
			};
		}.start();
	}
}
而這段代碼執行的時候會使應用崩潰。提示“Only the original thread that created a view hierarchy can touch its views.”也就是我們通常所說的非UI線程不能更新UI。我們知道其實在textview最終更新內容的時候會調用其invilidate方法。最後其實調用viewParent的invidateChild,而Viewparent是個抽象類,他的實現了是ViewRootImpl。查看ViewRootImpl的invidateChild的方法
    public void invalidateChild(View child, Rect dirty) {
        checkThread();
        if (DEBUG_DRAW) Log.v(TAG, "Invalidate child: " + dirty);
        if (dirty == null) {
            // Fast invalidation for GL-enabled applications; GL must redraw everything
            invalidate();
            return;
        }
        if (mCurScrollY != 0 || mTranslator != null) {
            mTempRect.set(dirty);
            dirty = mTempRect;
            if (mCurScrollY != 0) {
               dirty.offset(0, -mCurScrollY);
            }
            if (mTranslator != null) {
                mTranslator.translateRectInAppWindowToScreen(dirty);
            }
            if (mAttachInfo.mScalingRequired) {
                dirty.inset(-1, -1);
            }
        }
        if (!mDirty.isEmpty() && !mDirty.contains(dirty)) {
            mAttachInfo.mSetIgnoreDirtyState = true;
            mAttachInfo.mIgnoreDirtyState = true;
        }
        mDirty.union(dirty);
        if (!mWillDrawSoon) {
            scheduleTraversals();
        }
    }
第一句就是checkThread方法。
 void checkThread() {
        if (mThread != Thread.currentThread()) {
            throw new CalledFromWrongThreadException(
                    "Only the original thread that created a view hierarchy can touch its views.");
        }
    }
看到所拋出的異常是否非常之熟悉呢,哈哈,就是上面所說的非UI線程不能更新UI。這裡是調用了ViewRootImpl中的invilidateChild方法,才會拋出這個異常,而我們的ViewRootImpl的初始化操作是在Activity中的onResume方法中進行的。我們這裡可以自己去跟蹤Activity的onResume方法的執行邏輯,看看HandleResumeActivity方法,再仔細跟蹤閱讀。在我的Acitivity源碼解讀藜麥也有講到。其實最後是調用了WindowManager的實現類WindowManagerImpl的addView方法中初始化了ViewRootImpl。
感覺這裡可以在面試的時候和面試官裝逼使用。運用得當可以加很大的印象分額。
 Android中的二維碼生成與掃描功能
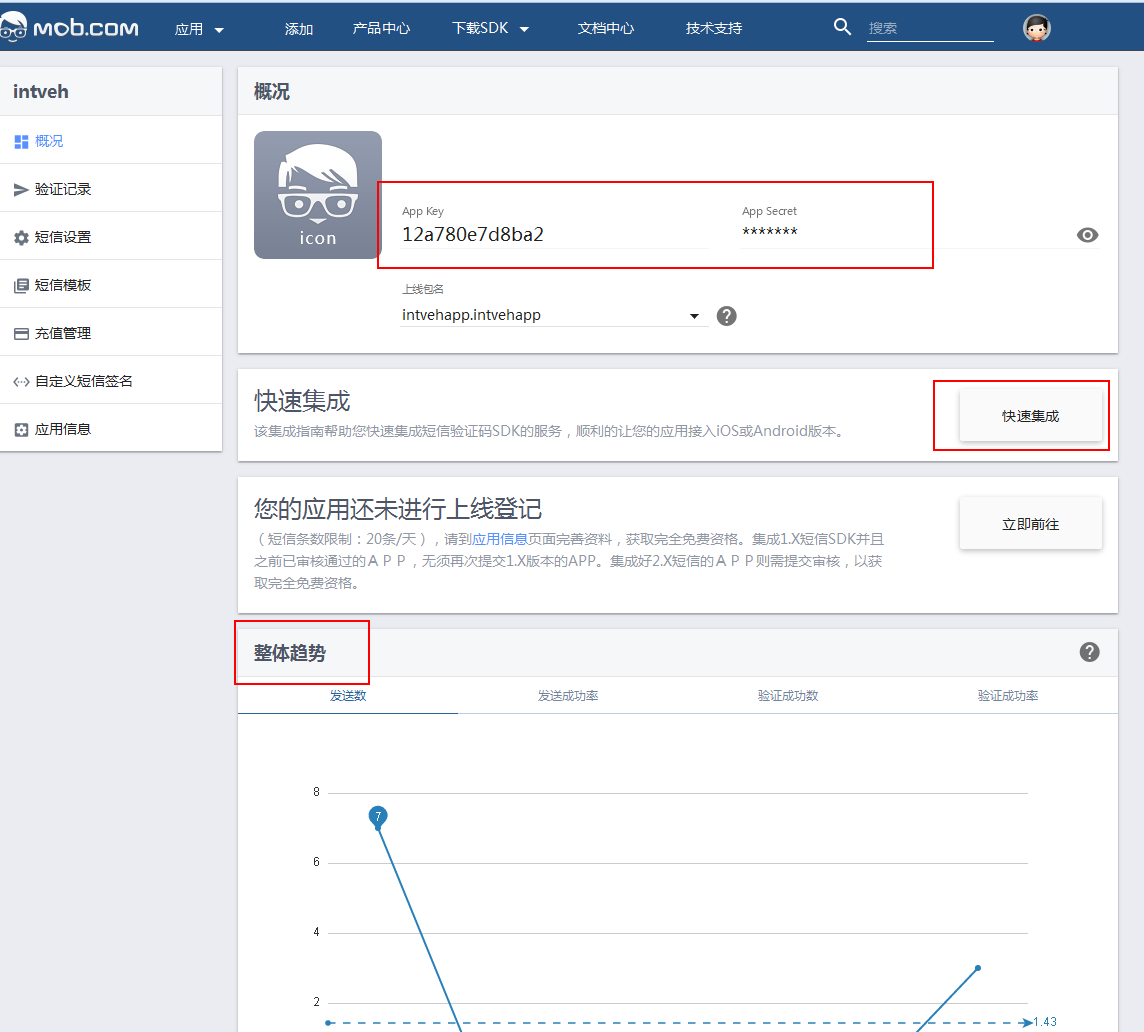
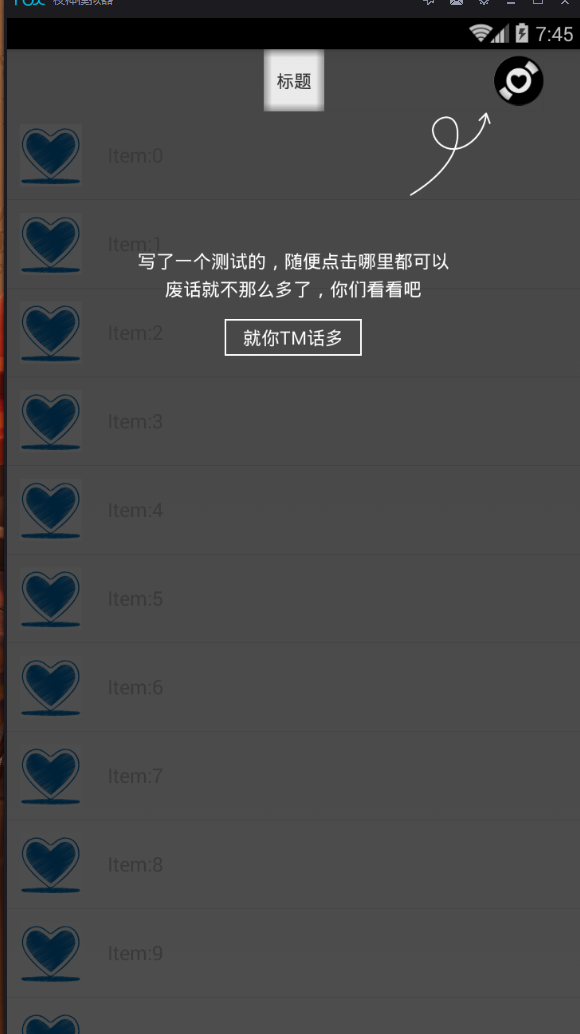
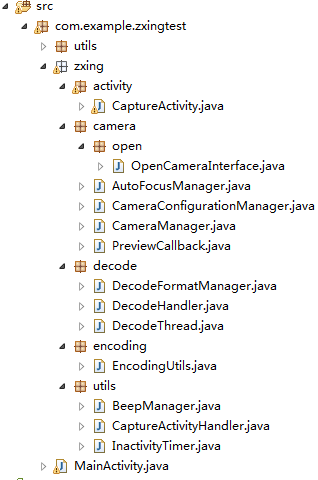
0. 前言今天這篇文章主要描述二維碼的生成與掃描,使用目前流行的Zxing,為什麼要講二維碼,因為二維碼太普遍了,隨便一個Android APP都會有二維碼掃描。本篇旨在
 Android編程之繪制文本(FontMetrics)實現方法
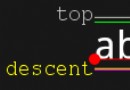
本文實例講述了Android編程之繪制文本(FontMetrics)實現方法。分享給大家供大家參考,具體如下:Canvas 作為繪制文本時,使用FontMetrics對象
 Android文件監控FileObserver介紹
在前面的Linux文件系統Inotify機制 中介紹了Linux對文件變更監控過程。Android系統在此基礎上封裝了一個FileObserver類來方便使用Inotif
 Android學習個人筆記-百度地圖定位sdk的使用
雖然自己已經完成了百度地圖的調用,但是在使用過程中產生很多的疑問,在不斷的百度各種大神的作品後才慢慢的調試出來,所以覺得作為新手自己應該把這個過程記錄下來。尤其是自己在找