編輯:關於Android編程
Looper類[system/core/libutils/Looper.cpp]提供了pollOnce(),wake()函數來完成睡眠等待,喚醒。
可以搜一下的pollOnce()函數,有很多地方在用。
InputDispatcher::dispatchOnce()[InputDispatcher.cpp]函數,
MessageQueue::waitMessage()[frameworks/native/services/surfaceflinger/MessageQueue.cpp]
SensorService::SensorEventAckReceiver::threadLoop()
[frameworks/native/services/sensorservice/SensorService.cpp]
可以看到InputDispatcher用到了Looper的pollOnce()和wakeup(),這也很好理解。因為在沒有按鍵輸入或者觸摸屏等輸入時間的時候,最好進入睡眠以減少開銷。但有輸入的時候,這個線程需要被喚醒把按鍵消息傳給WMS。
InputDispatcher::dispatchOnce()->mLooper->pollOnce(timeoutMillis)進入睡眠等待。
InputDispatcher::notifyKey()->mLooper->wake()中被喚醒。

InputDispatcher:notifyKey()的調用路徑:
InputReader::loopOnce()->InputReader::processEventsLocked()->
InputReader::processEventsForDeviceLocked()->
KeyboardInputMapper::process()[key的話]->
KeyboardInputMapper::processKey()->getListener()->notifyKey()
看了下InputDispatcher()是怎麼使用Looper來實現睡眠,喚醒的,那下面來Looper是怎麼實現睡眠喚醒功能的。
Looper是利用操作系統(Linux內核)的epoll機制來完成的。當被監控的文件(通過epoll_ctl的EPOLL_CTL_ADD添加進去)可I/O時,epoll_wait調用會從睡眠中醒來,這時,可以檢查是哪個(或哪些)文件描述符對應的文件可以進行I/O讀寫了,從而做出進一步處理。使用者利用它們就可以擁有睡眠等待和喚醒機制。(Input framework中EventHub也是使用epoll機制來檢查/dev/input下的輸入輸出設備的,這個在Input Framework內容中再詳細說~)
下面的代碼中可以看到,在Looper的構造函數中可以看到其創建pipe,初始化epoll fd。然後在pollOnce()->pollInner()中,用epoll_wait()函數在等待喚醒。然後也可以看到wakt()函數往一個pipe FD裡邊寫值來喚醒epoll_wait()。
Looper::Looper(bool allowNonCallbacks) :
        mAllowNonCallbacks(allowNonCallbacks), mSendingMessage(false),
        mResponseIndex(0), mNextMessageUptime(LLONG_MAX) {

    int wakeFds[2];
    int result = pipe(wakeFds);//創建pipe

    mWakeReadPipeFd = wakeFds[0];//管道讀端的文件描述符
    mWakeWritePipeFd = wakeFds[1];//管道寫端的文件描述符

    result = fcntl(mWakeReadPipeFd, F_SETFL, O_NONBLOCK);//??
    result = fcntl(mWakeWritePipeFd, F_SETFL, O_NONBLOCK);

    mIdling = false;

    mEpollFd = epoll_create(EPOLL_SIZE_HINT);//創建epoll fd!!
                    //static const int EPOLL_SIZE_HINT = 8;

    struct epoll_event eventItem;//初始化一個epoll_event,清零
    memset(& eventItem, 0, sizeof(epoll_event));

    eventItem.events = EPOLLIN;//讀事件監聽
    eventItem.data.fd = mWakeReadPipeFd;//指定監聽的fd

    //把epoll fd添加進去
    result = epoll_ctl(mEpollFd, EPOLL_CTL_ADD, mWakeReadPipeFd, & eventItem);
}
int Looper::pollInner(int timeoutMillis) {

    int result = POLL_WAKE;
    mResponses.clear();
    mResponseIndex = 0;

    // We are about to idle.
    mIdling = true;

    struct epoll_event eventItems[EPOLL_MAX_EVENTS];
    //阻塞?? 等待時間,,
    int eventCount = epoll_wait(mEpollFd, eventItems, EPOLL_MAX_EVENTS, timeoutMillis);

    //eventCount大於0,監控的fd有事件發生,
    for (int i = 0; i < eventCount; i++) {
        int fd = eventItems[i].data.fd;
        uint32_t epollEvents = eventItems[i].events;
        if (fd == mWakeReadPipeFd) {
            if (epollEvents & EPOLLIN) {//發生的時間是讀事件
                awoken();//去管道把數據讀完!!
            } else {
                ...
            }
        } else {
            ...
        }
    ...
    return result;
}
Looper的wake函數用於向管道中寫入字符,以喚醒pollOnce。
void Looper::wake() {
#if DEBUG_POLL_AND_WAKE
    ALOGD("%p ~ wake", this);
#endif

    ssize_t nWrite;
    do {
        nWrite = write(mWakeWritePipeFd, "W", 1);
    } while (nWrite == -1 && errno == EINTR);

    if (nWrite != 1) {
        if (errno != EAGAIN) {
            ALOGW("Could not write wake signal, errno=%d", errno);
        }
    }
}
Java層android.os.MessageQueue的next函數中取出下一個消息時,調用到native層實現的函數nativePollOnce時,實際就調用到上面說的C++實現的Looper的pollOnce(),進入睡眠等待。
static void android_os_MessageQueue_nativePollOnce(JNIEnv* env, jclass clazz,
        jlong ptr, jint timeoutMillis) {
    NativeMessageQueue* nativeMessageQueue = reinterpret_cast(ptr);
    nativeMessageQueue->pollOnce(env, timeoutMillis);
}

void NativeMessageQueue::pollOnce(JNIEnv* env, int timeoutMillis) {
    mInCallback = true;
    mLooper->pollOnce(timeoutMillis); //這個就是Looper.cpp中的pollOnce()函數
    mInCallback = false;
    if (mExceptionObj) {
        env->Throw(mExceptionObj);
        env->DeleteLocalRef(mExceptionObj);
        mExceptionObj = NULL;
    }
}
同樣,enqueueMessage函數也是寫完了消息之後,就會通過JNI調用Looper的wake函數喚醒。
下面來看一下Java層的Looper和MessageQueue,Handler等怎麼配合使用的~
以下是轉載的並加上勘誤~
Android的消息處理有三個核心類:Looper,Handler和Message。其實還有一個Message Queue(消息隊列),但是MQ被封裝到Looper裡面了,我們不會直接與MQ打交道,因此我沒將其作為核心類。下面一一介紹:
Looper的字面意思是“循環者”,它被設計用來使一個普通線程變成Looper線程。所謂Looper線程就是循環工作的線程。在程序開發中(尤其是GUI開發中),我們經常會需要一個線程不斷循環,一旦有新任務則執行,執行完繼續等待下一個任務,這就是Looper線程。使用Looper類創建Looper線程很簡單:
public class LooperThread extends Thread {
    @Override
    public void run() {
        // 將當前線程初始化為Looper線程
        Looper.prepare();

        // ...其他處理,如實例化handler
        mHandler = new Handler() {
           public void handleMessage(Message msg) {
                  //process incoming messages here
            }
       };
        // 開始循環處理消息隊列
        Looper.loop();
    }
}
通過上面兩行核心代碼,你的線程就升級為Looper線程了!!!是不是很神奇?讓我們放慢鏡頭,看看這兩行代碼各自做了什麼。
1) Looper.prepare()
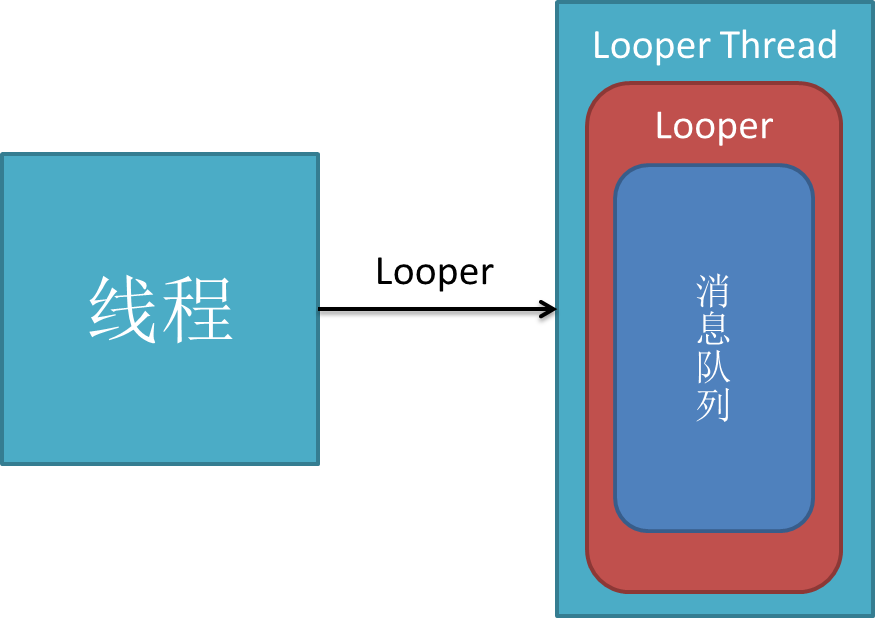
通過上圖可以看到,現在你的線程中有一個Looper對象,它的內部維護了一個消息隊列MQ。注意,一個Thread只能有一個Looper對象,為什麼呢?咱們來看源碼。
public class Looper {
    // 每個線程中的Looper對象其實是一個ThreadLocal,即線程本地存儲(TLS)對象
    private static final ThreadLocal sThreadLocal = new ThreadLocal();
    // Looper內的消息隊列
    final MessageQueue mQueue;
    // 當前線程
    Thread mThread;
    // 。。。其他屬性

    // 每個Looper對象中有它的消息隊列,和它所屬的線程
    private Looper() {
        mQueue = new MessageQueue();
        mRun = true;
        mThread = Thread.currentThread();
    }

    // 我們調用該方法會在調用線程的TLS中創建Looper對象
    public static final void prepare() {
        if (sThreadLocal.get() != null) {
            // 試圖在有Looper的線程中再次創建Looper將拋出異常
            throw new RuntimeException("Only one Looper may be created per thread");
        }
        sThreadLocal.set(new Looper());
    }
    // 其他方法
}
通過源碼,prepare()背後的工作方式一目了然,其核心就是將looper對象定義為ThreadLocal。如果你還不清楚什麼是ThreadLocal,請參考《理解ThreadLocal》。
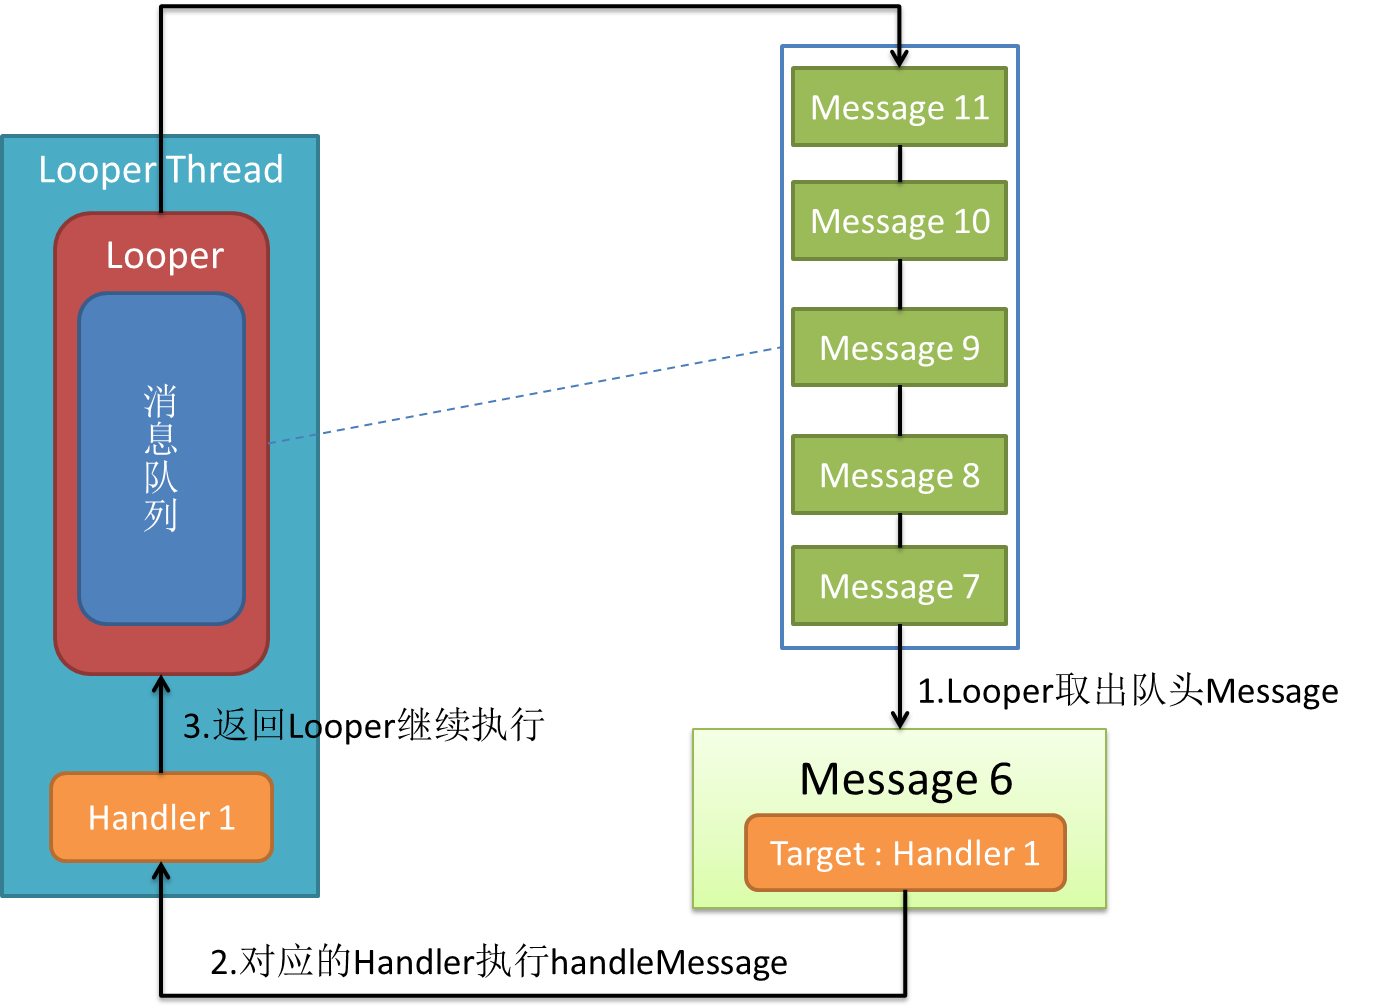
2)Looper.loop()
調用loop方法後,Looper線程就開始真正工作了,它不斷從自己的MQ中取出隊頭的消息(也叫任務)執行。其源碼分析如下:
public static final void loop() {
        Looper me = myLooper();  //得到當前線程Looper
        MessageQueue queue = me.mQueue;  //得到當前looper的MQ

        // 這兩行沒看懂= = 不過不影響理解
        Binder.clearCallingIdentity();
        final long ident = Binder.clearCallingIdentity();
        // 開始循環
        while (true) {
            Message msg = queue.next(); // 取出message
            if (msg != null) {
                if (msg.target == null) {
                    // message沒有target為結束信號,退出循環
                    return;
                }
                // 日志。。。
                if (me.mLogging!= null) me.mLogging.println(
                        ">>>>> Dispatching to " + msg.target + " "
                        + msg.callback + ": " + msg.what
                        );
                // 非常重要!將真正的處理工作交給message的target,即後面要講的handler
                msg.target.dispatchMessage(msg);
                // 還是日志。。。
                if (me.mLogging!= null) me.mLogging.println(
                        "<<<<< Finished to    " + msg.target + " "
                        + msg.callback);

                // 下面沒看懂,同樣不影響理解
                final long newIdent = Binder.clearCallingIdentity();
                if (ident != newIdent) {
                    Log.wtf("Looper", "Thread identity changed from 0x"
                            + Long.toHexString(ident) + " to 0x"
                            + Long.toHexString(newIdent) + " while dispatching to "
                            + msg.target.getClass().getName() + " "
                            + msg.callback + " what=" + msg.what);
                }
                // 回收message資源
                msg.recycle();
            }
        }
    }
除了prepare()和loop()方法,Looper類還提供了一些有用的方法,比如
Looper.myLooper()得到當前線程looper對象:
    public static final Looper myLooper() {
        // 在任意線程調用Looper.myLooper()返回的都是那個線程的looper
        return (Looper)sThreadLocal.get();
    }
getThread()得到looper對象所屬線程:
    public Thread getThread() {
        return mThread;
    }
quit()方法結束looper循環:
public void quit() {
        // 創建一個空的message,它的target為NULL,表示結束循環消息
        Message msg = Message.obtain();
        // 發出消息
        mQueue.enqueueMessage(msg, 0);
    }
到此為止,你應該對Looper有了基本的了解,總結幾點:
1.每個線程有且最多只能有一個Looper對象,它是一個ThreadLocal
2.Looper內部有一個消息隊列,loop()方法調用後線程開始不斷從隊列中取出消息執行
3.Looper使一個線程變成Looper線程。
那麼,我們如何往MQ上添加消息呢?下面看一下Handler!
什麼是handler?handler扮演了往MQ上添加消息和處理消息的角色(只處理由自己發出的消息),即通知MQ它要執行一個任務(sendMessage),並在loop到自己的時候執行該任務(handleMessage),整個過程是異步的。handler創建時會關聯一個looper,默認的構造方法將關聯當前線程的looper,不過這也是可以set的。默認的構造方法:
public class handler {

    final MessageQueue mQueue;  // 關聯的MQ
    final Looper mLooper;  // 關聯的looper
    final Callback mCallback;
    // 其他屬性

    public Handler() {
        // 沒看懂,直接略過,,,
        if (FIND_POTENTIAL_LEAKS) {
            final Class klass = getClass();
            if ((klass.isAnonymousClass() || klass.isMemberClass() || klass.isLocalClass()) &&
                    (klass.getModifiers() & Modifier.STATIC) == 0) {
                Log.w(TAG, "The following Handler class should be static or leaks might occur: " +
                    klass.getCanonicalName());
            }
        }
        // 默認將關聯當前線程的looper
        mLooper = Looper.myLooper();
        // looper不能為空,即該默認的構造方法只能在looper線程中使用
        if (mLooper == null) {
            throw new RuntimeException(
                "Can't create handler inside thread that has not called Looper.prepare()");
        }
        // 重要!!!直接把關聯looper的MQ作為自己的MQ,因此它的消息將發送到關聯looper的MQ上
        mQueue = mLooper.mQueue;
        mCallback = null;
    }

    // 其他方法
}
下面我們就可以為之前的LooperThread類加入Handler:
public class LooperThread extends Thread {
    private Handler handler1;
    private Handler handler2;

    @Override
    public void run() {
        // 將當前線程初始化為Looper線程
        Looper.prepare();

        // 實例化兩個handler
        handler1 = new Handler();
        handler2 = new Handler();

        // 開始循環處理消息隊列
        Looper.loop();
    }
}
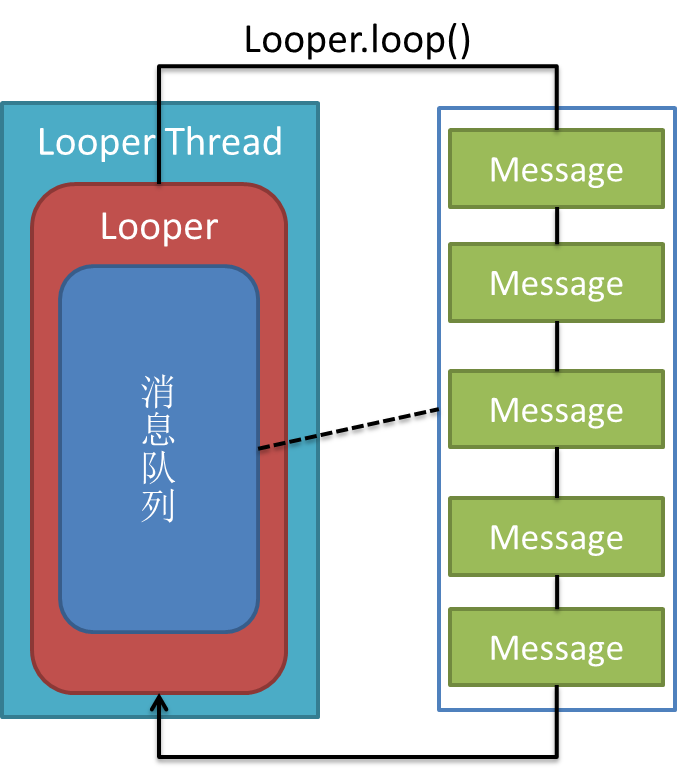
加入handler後的效果如下圖:
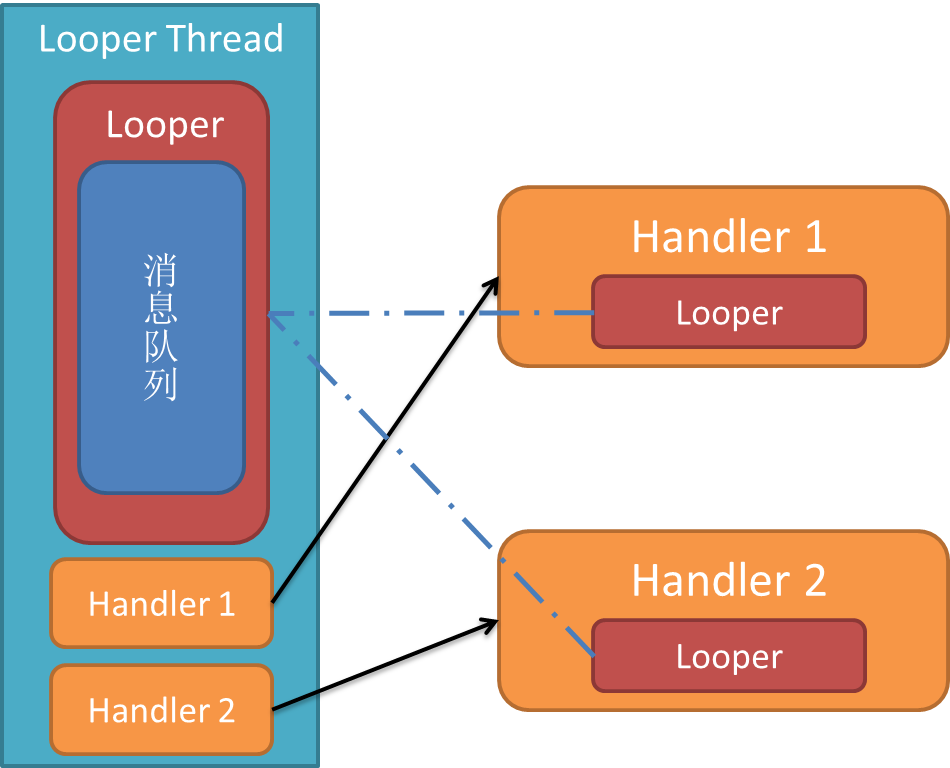
可以看到,一個線程可以有多個Handler,但是只能有一個Looper!
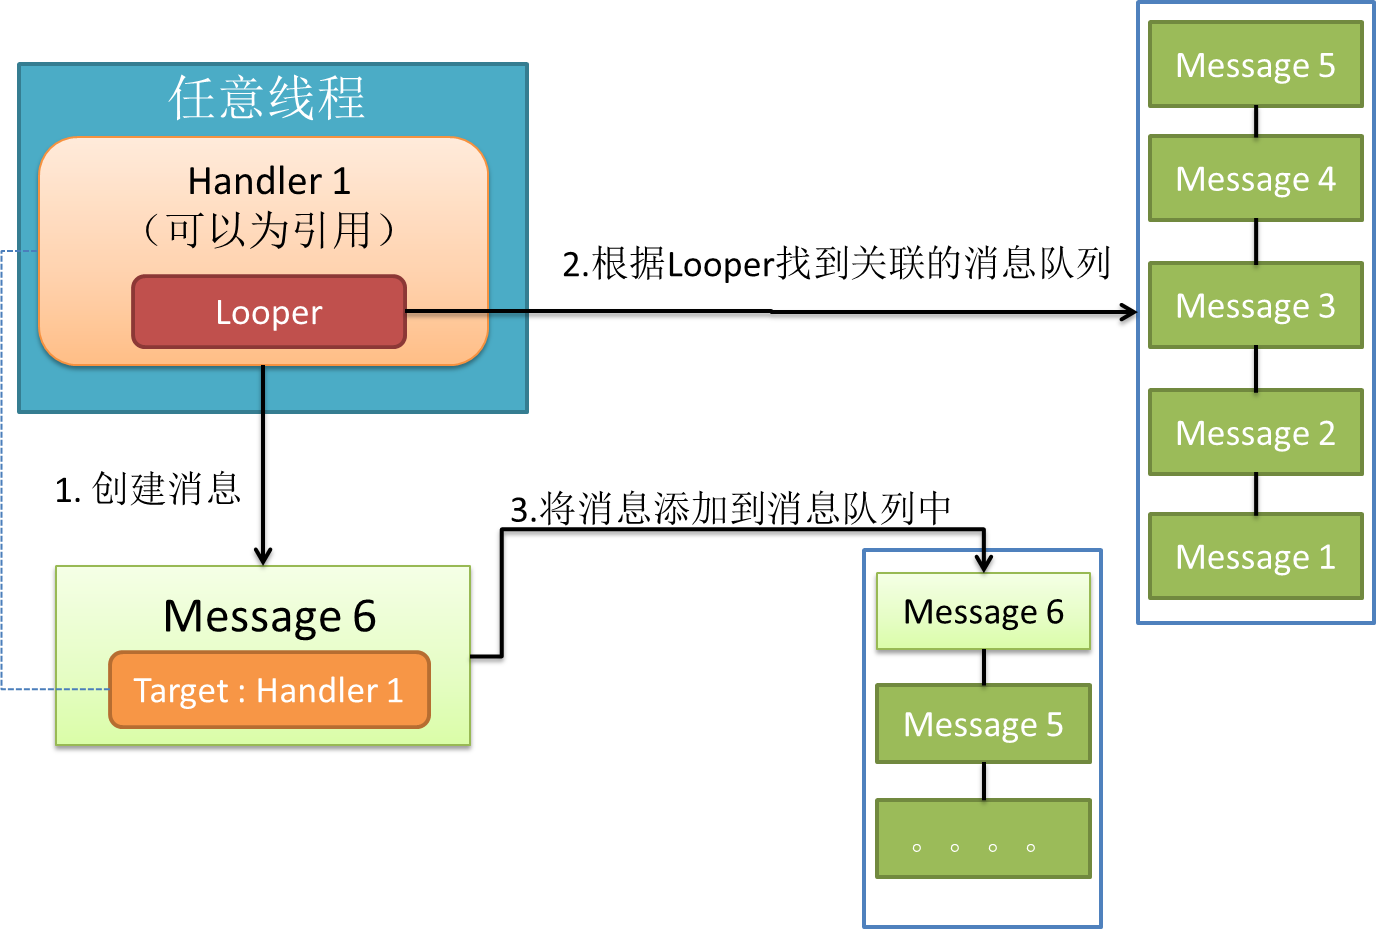
Handler發送消息
有了handler之後,我們就可以使用 post(Runnable), postAtTime(Runnable, long), postDelayed(Runnable, long), sendEmptyMessage(int), sendMessage(Message), sendMessageAtTime(Message, long)和 sendMessageDelayed(Message, long)這些方法向MQ上發送消息了。光看這些API你可能會覺得handler能發兩種消息,一種是Runnable對象,一種是message對象,這是直觀的理解,但其實post發出的Runnable對象最後都被封裝成message對象了,見源碼:
// 此方法用於向關聯的MQ上發送Runnable對象,它的run方法將在handler關聯的looper線程中執行
    public final boolean post(Runnable r)
    {
       // 注意getPostMessage(r)將runnable封裝成message
       return  sendMessageDelayed(getPostMessage(r), 0);
    }

    private final Message getPostMessage(Runnable r) {
        Message m = Message.obtain();  //得到空的message
        m.callback = r;  //將runnable設為message的callback,
        return m;
    }

    public boolean sendMessageAtTime(Message msg, long uptimeMillis)
    {
        boolean sent = false;
        MessageQueue queue = mQueue;
        if (queue != null) {
            msg.target = this;  // message的target必須設為該handler!
            sent = queue.enqueueMessage(msg, uptimeMillis);
        }
        else {
            RuntimeException e = new RuntimeException(
                this + " sendMessageAtTime() called with no mQueue");
            Log.w("Looper", e.getMessage(), e);
        }
        return sent;
    }
其他方法就不羅列了,總之通過handler發出的message有如下特點:
1.message.target為該handler對象,這確保了looper執行到該message時能找到處理它的handler,即loop()方法中的關鍵代碼
msg.target.dispatchMessage(msg);
1
2.post發出的message,其callback為Runnable對象
說完了消息的發送,再來看下handler如何處理消息。消息的處理是通過核心方法dispatchMessage(Message msg)與鉤子方法handleMessage(Message msg)完成的,見源碼
// 處理消息,該方法由looper調用
    public void dispatchMessage(Message msg) {
        if (msg.callback != null) {
            // 如果message設置了callback,即runnable消息,處理callback!
            handleCallback(msg);
        } else {
            // 如果handler本身設置了callback,則執行callback
            if (mCallback != null) {
                 /* 這種方法允許讓activity等來實現Handler.Callback接口,避免了自己編寫handler重寫handleMessage方法。見http://alex-yang-xiansoftware-com.iteye.com/blog/850865 */
                if (mCallback.handleMessage(msg)) {
                    return;
                }
            }
            // 如果message沒有callback,則調用handler的鉤子方法handleMessage
            handleMessage(msg);
        }
    }

    // 處理runnable消息
    private final void handleCallback(Message message) {
        message.callback.run();  //直接調用run方法!
    }
    // 由子類實現的鉤子方法
    public void handleMessage(Message msg) {
    }
可以看到,除了handleMessage(Message msg)和Runnable對象的run方法由開發者實現外(實現具體邏輯),handler的內部工作機制對開發者是透明的。這正是handler API設計的精妙之處!
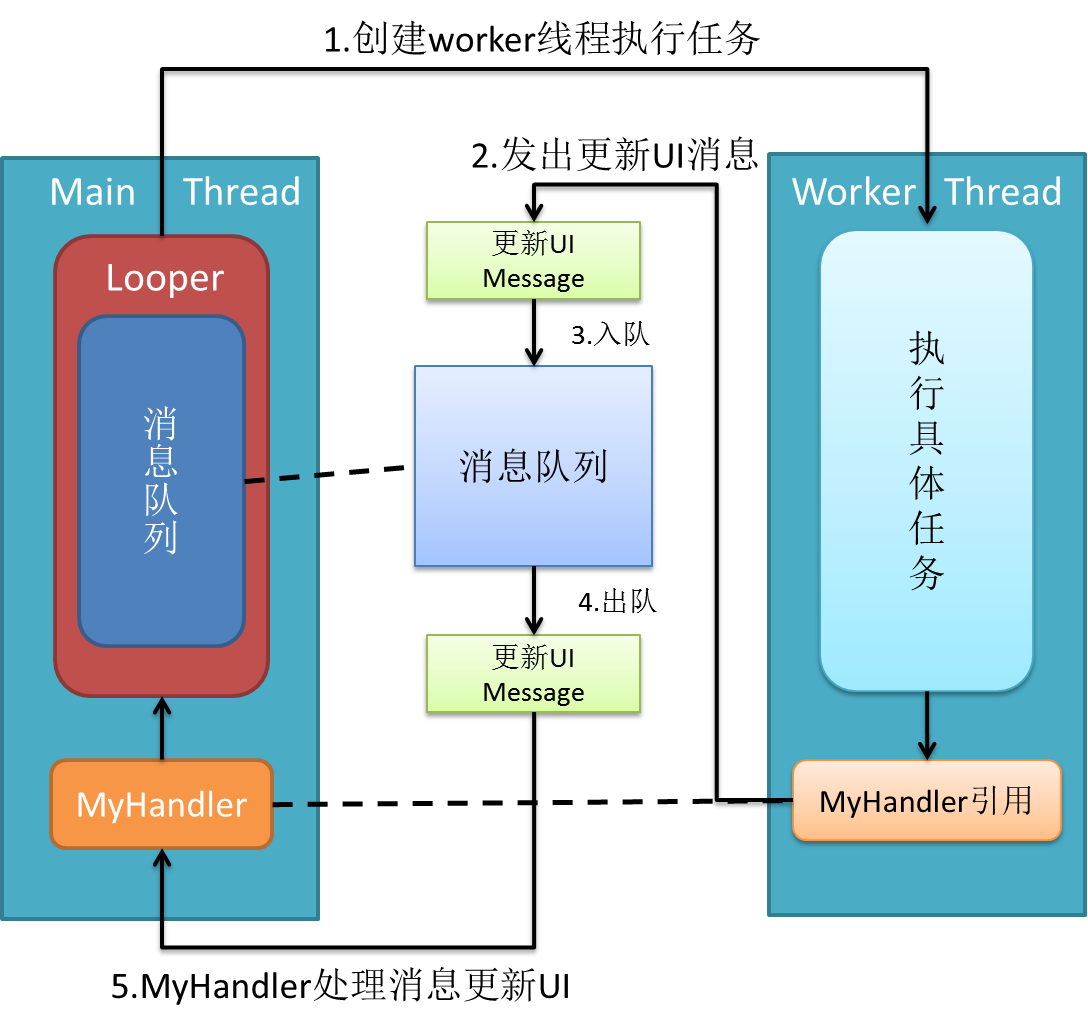
我在小標題中將handler描述為“異步處理大師”,這歸功於Handler擁有下面兩個重要的特點:
1.handler可以在任意線程發送消息,這些消息會被添加到關聯的MQ上。
2.handler是在它關聯的looper線程中處理消息的。
這就解決了android最經典的不能在其他非主線程中更新UI的問題。android的主線程也是一個looper線程(looper在android中運用很廣),我們在其中創建的handler默認將關聯主線程MQ。因此,利用handler的一個solution就是在activity中創建handler並將其引用傳遞給worker thread,worker thread執行完任務後使用handler發送消息通知activity更新UI。(過程如圖)
例子:
當然,handler能做的遠遠不僅如此,由於它能post Runnable對象,它還能與Looper配合實現經典的Pipeline
Thread(流水線線程)模式。請參考此文《Android Guts: Intro to Loopers and Handlers》
public class TestDriverActivity extends Activity {
    private TextView textview;

    @Override
    protected void onCreate(Bundle savedInstanceState) {
        super.onCreate(savedInstanceState);
        setContentView(R.layout.main);
        textview = (TextView) findViewById(R.id.textview);
        // 創建並啟動工作線程
        Thread workerThread = new Thread(new SampleTask(new MyHandler()));
        workerThread.start();
    }

    public void appendText(String msg) {
        textview.setText(textview.getText() + "\n" + msg);
    }

    class MyHandler extends Handler {
        @Override
        public void handleMessage(Message msg) {
            String result = msg.getData().getString("message");
            // 更新UI
            appendText(result);
        }
    }
}
public class SampleTask implements Runnable {
    private static final String TAG = SampleTask.class.getSimpleName();
    Handler handler;

    public SampleTask(Handler handler) {
        super();
        this.handler = handler;
    }

    @Override
    public void run() {
        try {  // 模擬執行某項任務,下載等
            Thread.sleep(5000);
            // 任務完成後通知activity更新UI
            Message msg = prepareMessage("task completed!");
            // message將被添加到主線程的MQ中
            handler.sendMessage(msg);
        } catch (InterruptedException e) {
            Log.d(TAG, "interrupted!");
        }

    }

    private Message prepareMessage(String str) {
        Message result = handler.obtainMessage();
        Bundle data = new Bundle();
        data.putString("message", str);
        result.setData(data);
        return result;
    }
}
在整個消息處理機制中,message又叫task,封裝了任務攜帶的信息和處理該任務的handler。message的用法比較簡單,這裡不做總結了。但是有這麼幾點需要注意(待補充):
1.盡管Message有public的默認構造方法,但是你應該通過Message.obtain()來從消息池中獲得空消息對象,以節省資源。
2.如果你的message只需要攜帶簡單的int信息,請優先使用Message.arg1和Message.arg2來傳遞信息,這比用Bundle更省內存
3.擅用message.what來標識信息,以便用不同方式處理message。
 Android提高之MediaPlayer播放網絡視頻的實現方法
前面講解了MediaPlayer播放網絡音頻,主要介紹了MediaPlayer關於網絡音頻的緩沖和進度條控制的方法,本文再來講解一下MediaPlayer播放網絡視頻的方
 Android加載網絡GIF完整解決方案
前言:加載並顯示gif是App常見的一個功能,像加載普通圖片一樣,大體應該包含以下幾項功能:1、自動下載GIF到本地文件作為緩存,第二次加載同一個url的圖片不需要下載第
 Android Mms之:接收信息流程(圖文詳解)
信息的接收工作是由底層來完成的,當有一個 新的信息時底層完成接收後會以Intent的方式來通知上層應用,信息的相關內容也包含在Intent當中,Android所支持的信息
 小米4如何刷Win10操作系統?小米4刷Win10教程
小米4絕對是小米的一個神機:至少是安卓手機中稍有的可以刷雙系統的,為發燒而生。微軟教程不是人看的!官方就放了句話,然後死都不給教程!坑死人不償命!!!!首先