編輯:關於Android編程
Activity:
package com.wkk.app8;

import android.annotation.TargetApi;
import android.app.Notification;
import android.app.NotificationManager;
import android.app.PendingIntent;
import android.content.Intent;
import android.os.Build;
import android.os.Bundle;
import android.support.v7.app.AppCompatActivity;
import android.support.v7.app.NotificationCompat;
import android.view.View;
import android.widget.Button;
import android.widget.RemoteViews;

public class MainActivity extends AppCompatActivity implements View.OnClickListener {

    private Button notification;
    private Button list;
    private Button myView;
    private Button big;
    private Button progress1;
    private Button progress2;
    private Button cancel;

    @Override
    protected void onCreate(Bundle savedInstanceState) {
        super.onCreate(savedInstanceState);
        setContentView(R.layout.activity_main);
        /*
        創建一個Notification必不可少的兩樣東西
        1.NotificationManager  控制Notification的展示和取消
        2.NotificationCompat.Builder  用於設置Notification的各種參數

        Notification點擊觸發的效果就是通過傳入的Intent來控制的
         */
        notification = (Button) findViewById(R.id.notification);
        list = (Button) findViewById(R.id.list);
        myView = (Button) findViewById(R.id.myView);
        big = (Button) findViewById(R.id.big);
        progress1 = (Button) findViewById(R.id.progress1);
        progress2 = (Button) findViewById(R.id.progress2);
        cancel = (Button) findViewById(R.id.cancel);

        notification.setOnClickListener(this);
        list.setOnClickListener(this);
        myView.setOnClickListener(this);
        big.setOnClickListener(this);
        progress1.setOnClickListener(this);
        progress2.setOnClickListener(this);
        cancel.setOnClickListener(this);
    }


    @Override
    public void onClick(View v) {
        switch (v.getId()) {
            case R.id.notification:
                notificationshow();
                break;
            case R.id.list:
                listNotification();
                break;
            case R.id.myView:
                myviewNotification();
                break;
            case R.id.big:
                bigNotification();
                break;
            case R.id.progress1:
                showprogress1();
                break;
            case R.id.progress2:
                showprogress2();
                break;
            case R.id.cancel:
                NotificationManager notificationManager = (NotificationManager) getSystemService(NOTIFICATION_SERVICE);
                notificationManager.cancelAll();
                notificationManager.cancelAll();
                break;
        }
    }

    /**
     * 展示普通的
     */
    private void notificationshow() {
        NotificationManager notificationManager = (NotificationManager) getSystemService(NOTIFICATION_SERVICE);
        NotificationCompat.Builder builder = new NotificationCompat.Builder(this);
        PendingIntent pendingIntent = PendingIntent.getActivity(this, 1, new Intent(), PendingIntent.FLAG_ONE_SHOT);
        builder.setContentTitle("測試")//標題
                .setContentText("測試")//文本
                .setContentIntent(pendingIntent)//啟動intent
                .setNumber(10)//這個只是設置通知上的一個值,並不是創建10條notificationmanager   顯示數量
                .setTicker("提示文字")//提示文字
                .setWhen(System.currentTimeMillis())//時間
                .setPriority(Notification.PRIORITY_DEFAULT)//設置該通知優先級
                .setAutoCancel(false)//是否點擊取消
                .setOngoing(false)//於設置是否常駐通知欄,即是否可以側滑取消/刪除
                .setDefaults(Notification.DEFAULT_ALL)//用於設置提示聲音閃爍燈以及震動等等,
                .setSmallIcon(R.mipmap.ic_launcher);//圖標
        // 1.id,可以通過id取消Notifiation     2.Notification對象
        notificationManager.notify(1, builder.build());
    }

    /**
     * 自定義視圖-小
     */
    private void myviewNotification() {
        NotificationManager notificationManager = (NotificationManager) getSystemService(NOTIFICATION_SERVICE);
        NotificationCompat.Builder builder = new NotificationCompat.Builder(this);
        PendingIntent pendingIntent = PendingIntent.getActivity(this, 1, new Intent(), PendingIntent.FLAG_ONE_SHOT);
        builder.setContentTitle("測試")//標題
                .setContentText("測試")//文本
                .setContentIntent(pendingIntent)//啟動intent
                .setAutoCancel(false)//是否點擊取消
                .setSmallIcon(R.mipmap.ic_launcher)
                .setContent(new RemoteViews(getPackageName(), R.layout.myview));
        notificationManager.notify(2, builder.build());
    }

    /**
     * 大列表視圖
     */
    public void listNotification() {
        NotificationManager notificationManager = (NotificationManager) getSystemService(NOTIFICATION_SERVICE);
        NotificationCompat.Builder builder = new NotificationCompat.Builder(this);
        builder.setSmallIcon(R.mipmap.ic_launcher);
        builder.setAutoCancel(true);
        NotificationCompat.InboxStyle inboxStyle = new NotificationCompat.InboxStyle();
        builder.setStyle(inboxStyle);
        inboxStyle.setBigContentTitle("測試大標題:");
        for (int i = 0; i < 10; i++) {
            inboxStyle.addLine(String.valueOf(i));
        }
        Intent intent = new Intent(MainActivity.this, MainActivity.class);
        PendingIntent pendingIntent = PendingIntent.getActivity(this, 1, intent, PendingIntent.FLAG_ONE_SHOT);
        builder.setContentIntent(pendingIntent);
        notificationManager.notify(3, builder.build());
    }

    /**
     * 自定義大視圖
     */
    @TargetApi(Build.VERSION_CODES.JELLY_BEAN)
    private void bigNotification() {
        NotificationManager notificationManager = (NotificationManager) getSystemService(NOTIFICATION_SERVICE);
        NotificationCompat.Builder builder = new NotificationCompat.Builder(this);
        //無論如何這句代碼時不可或缺的
        builder.setSmallIcon(R.mipmap.ic_launcher); // 設置頂部圖標
        //創建視圖,普通view不行
        RemoteViews remoteViews = new RemoteViews(getPackageName(), R.layout.layout);
        //點擊事件
        PendingIntent pendingIntent = PendingIntent.getActivity(this, 0, new Intent(this, MainActivity.class), PendingIntent.FLAG_UPDATE_CURRENT);
        remoteViews.setOnClickPendingIntent(R.id.button, pendingIntent);
        Notification notify = builder.build();
        notify.contentView = remoteViews; // 視圖
        notify.bigContentView = remoteViews; // 大視圖
        notify.flags = Notification.FLAG_ONGOING_EVENT;
        notificationManager.notify(4, notify);
    }

    /**
     * 不定長進度條
     */
    private void showprogress1() {
        NotificationManager notificationManager = (NotificationManager) getSystemService(NOTIFICATION_SERVICE);
        NotificationCompat.Builder builder = new NotificationCompat.Builder(this);
        PendingIntent pendingIntent = PendingIntent.getActivity(this, 1, new Intent(), PendingIntent.FLAG_ONE_SHOT);
        builder.setContentTitle("測試")//標題
                .setContentText("測試")//文本
                .setContentIntent(pendingIntent)//啟動intent
                .setNumber(10)//這個只是設置通知上的一個值,並不是創建10條notificationmanager   顯示數量
                .setTicker("提示文字")//提示文字
                .setWhen(System.currentTimeMillis())//時間
                .setPriority(Notification.PRIORITY_DEFAULT)//設置該通知優先級
                .setAutoCancel(false)//是否點擊取消
                .setOngoing(false)//於設置是否常駐通知欄,即是否可以側滑取消/刪除
                .setDefaults(Notification.DEFAULT_ALL)//用於設置提示聲音閃爍燈以及震動等等,
                .setSmallIcon(R.mipmap.ic_launcher)//圖標
                .setProgress(100, 30, true);
        // 1.id,可以通過id取消Notifiation     2.Notification對象
        notificationManager.notify(5, builder.build());
    }

    /**
     * 確定進度的進度條
     */
    private void showprogress2() {
        NotificationManager notificationManager = (NotificationManager) getSystemService(NOTIFICATION_SERVICE);
        NotificationCompat.Builder builder = new NotificationCompat.Builder(this);
        PendingIntent pendingIntent = PendingIntent.getActivity(this, 1, new Intent(), PendingIntent.FLAG_ONE_SHOT);
        builder.setContentTitle("測試")//標題
                .setContentText("測試")//文本
                .setContentIntent(pendingIntent)//啟動intent
                .setNumber(10)//這個只是設置通知上的一個值,並不是創建10條notificationmanager   顯示數量
                .setTicker("提示文字")//提示文字
                .setWhen(System.currentTimeMillis())//時間
                .setPriority(Notification.PRIORITY_DEFAULT)//設置該通知優先級
                .setAutoCancel(false)//是否點擊取消
                .setOngoing(false)//於設置是否常駐通知欄,即是否可以側滑取消/刪除
                .setDefaults(Notification.DEFAULT_ALL)//用於設置提示聲音閃爍燈以及震動等等,
                .setSmallIcon(R.mipmap.ic_launcher)//圖標
                .setProgress(100, 30, false);
        notificationManager.notify(6, builder.build());
        //如果要做下載就將 notificationManager和builder做成全局變量
        //在下載的過程中不斷調用builder.setProgress()和notificationManager.notify(1, builder.build());來更新進度
    }

}
xml:
權限
本案來還想寫點什麼,後來…忘記了…
全部代碼都在這裡了,就不上傳demo了
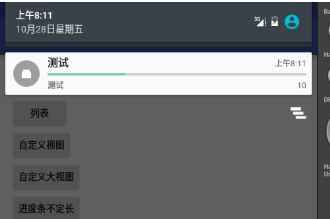
想起來忘了什麼了,效果圖…
普通:

列表:

自定義視圖:

自定義大視圖:

進度條不定長:

進度條定長:
end
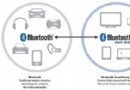 Android 開發中 iBeacon的使用
iBeacon的工作原理是基於Bluetooth Low Energy(BLE)低功耗藍牙傳輸技術,iBeacon基站不斷向四周發送藍牙信號,當智
 Android開發之assets目錄下資源使用總結
Android資源文件分類:Android資源文件大致可以分為兩種:第一種是res目錄下存放的可編譯的資源文件:這種資源文件系統會在R.java裡面自動生成該資源文件的I
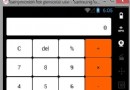 Android基礎知識(簡單實例計算器)
在做這個計算器的時候,我認為主要分為兩部分:界面設計,功能實現。(效果圖) 界面設計:其實界面設計和功能實現是相互聯系在一起的,我界面怎麼去設計,功
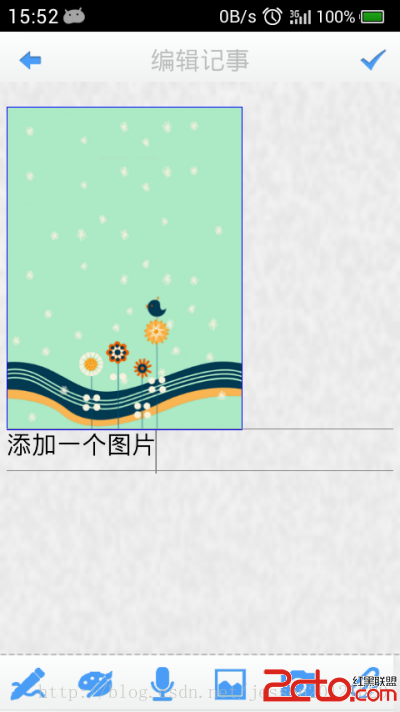 android項目 之 記事本(13) ----- 查看圖片及播放錄音
本文是自己學習所做筆記,歡迎轉載,但請注明出處:http://blog.csdn.net/jesson20121020 今天就來實現下查看圖片及