編輯:關於Android編程
在本篇博客中,我們分析一下Android中的APK是如何安裝的,以及PKMS在這個過程中進行了哪些工作。
APK的安裝方式有很多,我們先來看看如何用adb命令進行安裝。
我們從adb install開始分析,該命令有多個參數,這裡僅考慮最基本的adb install xxxx.apk。
一、adb命令
看看system/core/adb/commandline.cpp中的adb_commandline函數:
int adb_commandline(int argc, const char **argv) {
    ...........
    else if (!strcmp(argv[0], "install")) {
        if (argc < 2) return usage();
        FeatureSet features;
        std::string error;
        if (!adb_get_feature_set(&features, &error)) {
            fprintf(stderr, "error: %s\n", error.c_str());
            return 1;
        }

        if (CanUseFeature(features, kFeatureCmd)) {
            //支持FeatureCmd時調用install_app
            return install_app(transport_type, serial, argc, argv);
        }
        //否則,利用install_app_legacy
        return install_app_legacy(transport_type, serial, argc, argv);
    }
    ...........
}
1、install_app_legacy
我看先看看傳統的install_app_legacy:
static int install_app_legacy(TransportType transport, const char* serial, int argc, const char** argv) {
    //待安裝的APK目前還在源機器上,現在需要把APK的文件復制到手機裡
    //如果安裝在手機內部存儲,那麼目的地址為DATA_DEST
    //如果安裝在SD卡上,則目的地址為SD_DEST
    static const char *const DATA_DEST = "/data/local/tmp/%s";
    static const char *const SD_DEST = "/sdcard/tmp/%s";
    .........
    //默認安裝到手機內部
    const char* where = DATA_DEST;
    for (i = 1; i < argc; i++) {
        //攜帶參數-s時,才安裝到SD卡
        if (!strcmp(argv[i], "-s")) {
            where = SD_DEST;
        }
    }

    //解析參數,判斷adb命令中是否攜帶了有效的apk文件名
    ...........

    //取出apk名
    std::vector apk_file = {argv[last_apk]};
    //構造apk目的地址
    std::string apk_dest = android::base::StringPrintf(
            where, adb_basename(argv[last_apk]).c_str());

    //do_sync_push將此APK文件傳輸到手機的目標路徑,失敗的話將跳轉到clenaup_apk
    if (!do_sync_push(apk_file, apk_dest.c_str())) goto cleanup_apk;

    //執行pm_command
    result = pm_command(transport, serial, argc, argv);

cleanup_apk:
    //刪除剛才傳輸的文件
    //PKMS在安裝過程中會將該APK復制一份到/data/app目錄下,所有data/local/tmp目錄下對應的文件可以刪除
    delete_file(transport, serial, apk_dest);
    return result;
}
從代碼來看,傳統的安裝方式就是將源機器中的APK文件拷貝到目的手機的tmp目錄下,然後調用pm_command進行處理。
2、install_app
我們再看看支持FeatureCmd的機器,如何安裝APK:
static int install_app(TransportType transport, const char* serial, int argc, const char** argv) {
    //利用參數創建出本地文件的名稱
    const char* file = argv[argc - 1];

    //解析參數,判斷adb命令中是否攜帶了有效的apk文件名
    .........

    //adb_open中將創建出這個file對應的文件
    int localFd = adb_open(file, O_RDONLY);
    ............
    std::string cmd = "exec:cmd package";
    //添加cmd參數
    ............
    //連接源端,獲取源APK文件的描述符
    int remoteFd = adb_connect(cmd, &error);
    ............
    //將remoteFd中的數據寫入到localFd
    copy_to_file(localFd, remoteFd);
    //得到結果
    read_status_line(remoteFd, buf, sizeof(buf));

    adb_close(localFd);
    adb_close(remoteFd);
    ..........
    return 0;
}
從代碼來看install_app就是將源機器的文件復制到了目的機器中,並沒有進行額外的操作。猜想可能是支持特殊FeatureCmd的機器,PKMS能夠監聽到這個拷貝,然後觸發後續的掃描工作。這個過程沒有研究過對應代碼,暫時不做深入分析。
對於傳統的安裝方式,我們需要繼續往下看看pm_command。
二、pm_command
我們先看看pm_command函數:
static int pm_command(TransportType transport, const char* serial, int argc, const char** argv) {
    std::string cmd = "pm";

    //構造pm cmd
    while (argc-- > 0) {
        cmd += " " + escape_arg(*argv++);
    }

    //發送shell命令給adbd
    return send_shell_command(transport, serial, cmd, false);
}
我們跟進下send_shell_command:
// Connects to the device "shell" service with |command| and prints the
// resulting output.
static int send_shell_command(TransportType transport_type, const char* serial,
                              const std::string& command,
                              bool disable_shell_protocol,
                              std::string* output=nullptr,
                              std::string* err=nullptr) {
    ...........
    while (true) {
        bool attempt_connection = true;

        // Use shell protocol if it's supported and the caller doesn't explicitly disable it.
        if (!disable_shell_protocol) {
            .......
            if (adb_get_feature_set(&features, &error)) {
                //如果定義了feature,則替換shell protocol
                use_shell_protocol = CanUseFeature(features, kFeatureShell2);
            } else {
                // Device was unreachable.
                attempt_connection = false;
            }
        }

        if (attempt_connection) {
            std::string error;
            //此時command中攜帶的就是以pm開頭的命令
            std::string service_string = ShellServiceString(use_shell_protocol, "", command);

            //向shell服務發送命令
            fd = adb_connect(service_string, &error);
            if (fd >= 0) {
                break;
            }
        }
        ............
    }

    //讀取返回結果
    int exit_code = read_and_dump(fd, use_shell_protocol, output, err);
    if (adb_close(fd) < 0) {
        ..........
    }

    return int exit_code;
}
從上面的代碼來看,pm_command就是向shell服務發送pm命令。
pm是一個可執行腳本,我們在終端上調用adb shell,然後執行pm,可以得到以下結果:
root:/ # pm
usage: pm list packages [-f] [-d] [-e] [-s] [-3] [-i] [-u] [--user USER_ID] [FILTER]
       pm list permission-groups
       pm list permissions [-g] [-f] [-d] [-u] [GROUP]
       pm list instrumentation [-f] [TARGET-PACKAGE]
..........
pm腳本定義在frameworks/base/cmds/pm中:
base=/system
export CLASSPATH=$base/framework/pm.jar
exec app_process $base/bin com.android.commands.pm.Pm "$@"
在編譯system.img時,會根據Android.mk將該腳本復制到system/bin目錄下。
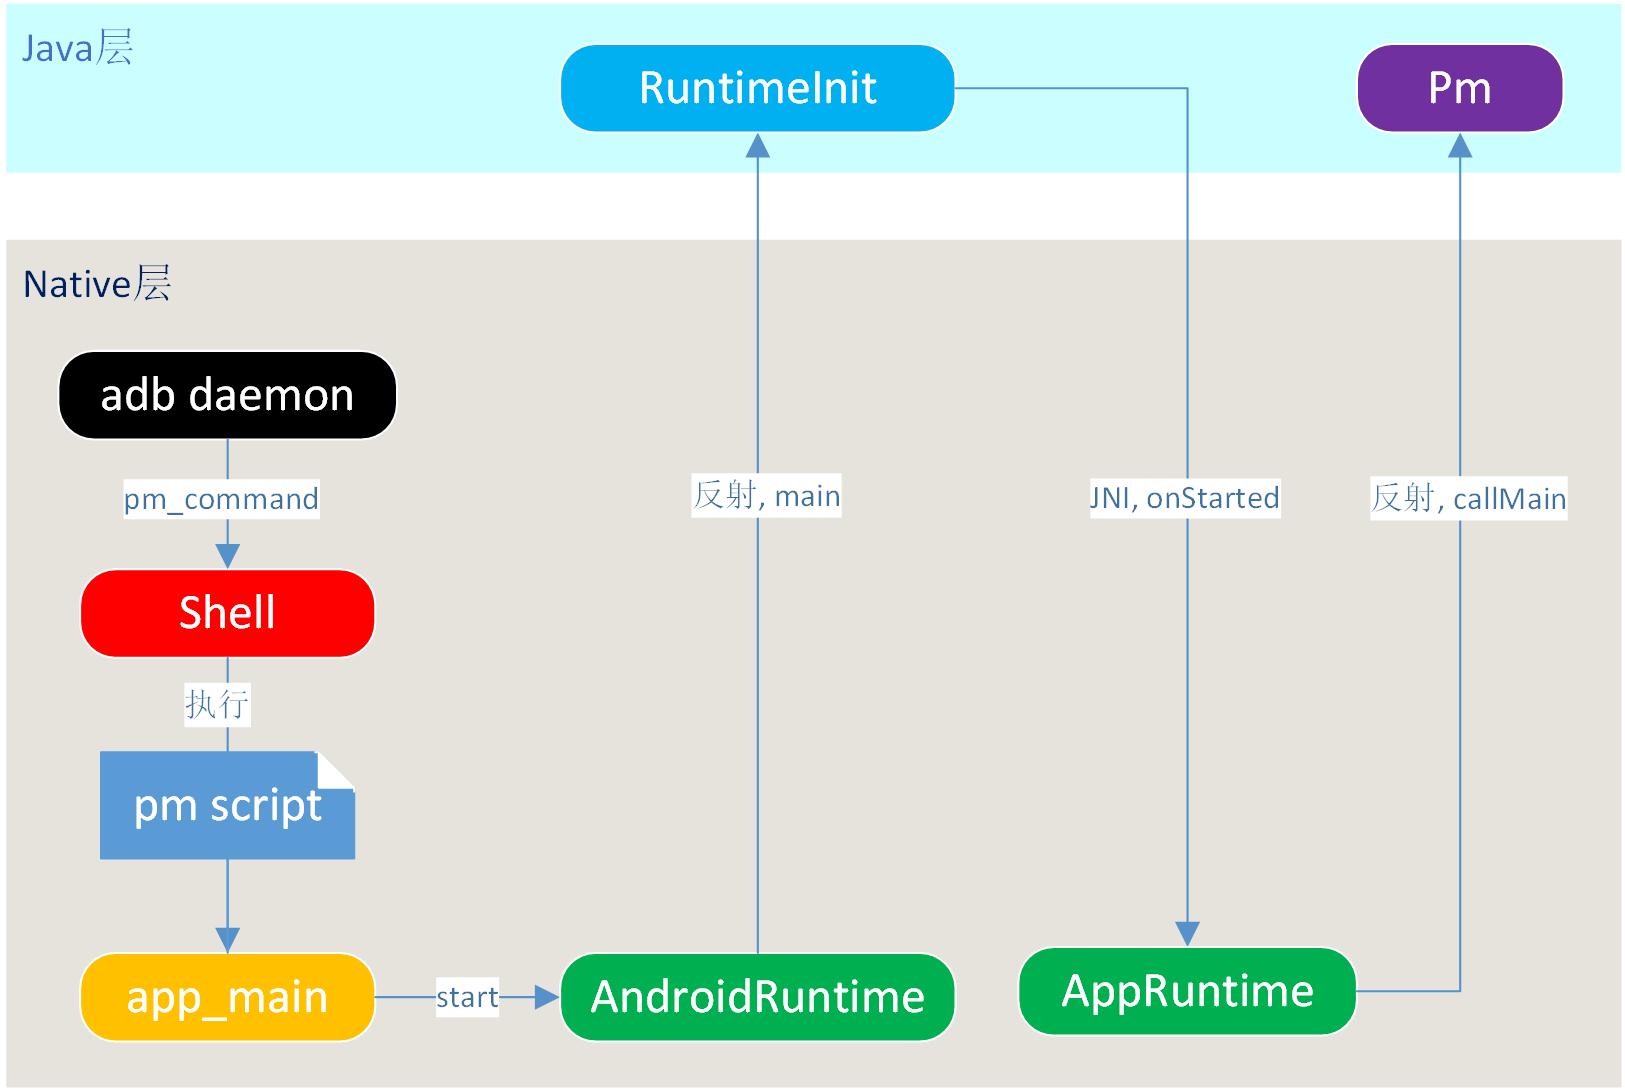
從腳本的內容來看,當調用pm時,將向app_process目錄的main函數傳入Pm對應的參數:
我們看看對應的定義於app_main.cpp的main函數(前面的博客分析過,這個其實也是zygote啟動的函數):
//app_process的main函數
int main(int argc, char* const argv[]) {
    ........
    //解析參數
    while (i < argc) {
        const char* arg = argv[i++];
        if (strcmp(arg, "--zygote") == 0) {
            zygote = true;
            niceName = ZYGOTE_NICE_NAME;
        } else if (strcmp(arg, "--start-system-server") == 0) {
            startSystemServer = true;
        } else if (strcmp(arg, "--application") == 0) {
            application = true;
        } else if (strncmp(arg, "--nice-name=", 12) == 0) {
            niceName.setTo(arg + 12);
        } else if (strncmp(arg, "--", 2) != 0) {
            //此時我們有參數,進入該分支設置className
            className.setTo(arg);
            break;
        } else {
            --i;
            break;
        }
    }
    ...........
    if (zygote) {
        runtime.start("com.android.internal.os.ZygoteInit", args, zygote);
    } else if (className) {
        //此時不再是啟動zygote,而是啟動className對應的類
        runtime.start("com.android.internal.os.RuntimeInit", args, zygote);
    } else {
        .........
    }
    ........
}
我們跟進AndroidRuntime.cpp的start函數:
void AndroidRuntime::start(const char* className, const Vector& options, bool zygote)
{
    ..........
    jmethodID startMeth = env->GetStaticMethodID(startClass, "main",
            "([Ljava/lang/String;)V");
    if (startMeth == NULL) {
        ALOGE("JavaVM unable to find main() in '%s'\n", className);
    } else {
        //反射調用main函數,從native層進入java世界
        env->CallStaticVoidMethod(startClass, startMeth, strArray);
    }
    .........
}
於是流程會進入到RuntimeInit的main函數:
public static final void main(String[] argv) {
    ........
    //進行一些常規的初始化工作
    commonInit();
    /*
    * Now that we're running in interpreted code, call back into native code
    * to run the system.
    */
    nativeFinishInit();
    .........
}
native函數定義在framework/base/core/jni/AndroidRuntime.cpp中,對應的函數為:
static void com_android_internal_os_RuntimeInit_nativeFinishInit(JNIEnv* env, jobject clazz)
{
    //gCurRuntime保存AndroidRuntime,實際上是AndroidRuntime的子類
    gCurRuntime->onStarted();
}
App_main.cpp中定義的AppRuntime繼承AndroidRuntime,實現了onStarted函數:
virtual void onStarted()
{
    //binder通信相關的
    sp proc = ProcessState::self();
    ALOGV("App process: starting thread pool.\n");
    proc->startThreadPool();

    AndroidRuntime* ar = AndroidRuntime::getRuntime();
    //調用AndroidRuntime.cpp的callMain函數,參數與Pm.java相關
    ar->callMain(mClassName, mClass, mArgs);

    IPCThreadState::self()->stopProcess();
}
status_t AndroidRuntime::callMain(const String8& className, jclass clazz,
        const Vector& args) {
    ..........
    env = getJNIEnv();
    ..........
    methodId = env->GetStaticMethodID(clazz, "main", "([Ljava/lang/String;)V");
    ..........
    const size_t numArgs = args.size();
    stringClass = env->FindClass("java/lang/String");
    strArray = env->NewObjectArray(numArgs, stringClass, NULL);

    for (size_t i = 0; i < numArgs; i++) {
        jstring argStr = env->NewStringUTF(args[i].string());
        env->SetObjectArrayElement(strArray, i, argStr);
    }
    ...........
    //最終調用了Pm.java的main函數
    env->CallStaticVoidMethod(clazz, methodId, strArray);
    return NO_ERROR;
}
這裡自己初次看時,認為這裡沒有fork新的進程,那麼APK安裝運行在zygote進程中。
實際上這是一個錯誤的理解,說明自己的理解還不到位。
init創建zygote進程時,是fork出一個子進程,然後才調用app_main中的函數,此時整個zygote嚴格來講只是一個native進程;當app_main函數最終通過AndroidRuntime等反射調用zygoteInit.java的main函數後,才演變成了Java層的zygote進程。
這裡的情況是類似的,adb進程發送消息給Shell服務,Shell服務執行Pm腳本,由於exec函數並未創建出新的進程,因此調用app_main後整個代碼仍然是運行在Shell服務對應的native進程中,同樣通過反射後演變為Java層中的進程。
這裡自己花了很多的筆墨來分析如何從執行腳本文件,到啟動Java進程。
主要是弄懂這個機制後,我們實際上完全可以學習pm的寫法,依葫蘆畫瓢寫一個腳本文件,然後定義對應的Java文件。
通過腳本命令,來讓Java層的進程提供服務。
最後,我們通過一個圖來總結一下這個過程:
三、Pm中的流程
現在我們進入了Pm.java的main函數:
public static void main(String[] args) {
    int exitCode = 1;
    try {
        //別被寫法欺騙了,Pm並沒有繼承Runnable
        exitCode = new Pm().run(args);
    } catch (Exception e) {
        .......
    }
    System.exit(exitCode);
}

//根據參數進行對應的操作,現在我們僅關注APK安裝
public int run(String[] args) throws RemoteException {
    ...........
    //利用Binder通信,得到PKMS服務端代理
    mPm = IPackageManager.Stub.asInterface(ServiceManager.getService("package"));

    //保存參數
    mArgs = args;
    String op = args[0];
    mNextArg = 1;

    ............
    //返回PKMS中保存的PackageInstallerService
    mInstaller = mPm.getPackageInstaller();
    ........
    if ("install".equals(op)) {
        //安裝APK將調用runInstall
        return runInstall();
    }
    .......
}
我們跟進runInstall函數:
private int runInstall() throws RemoteException {
    //根據參數創建InstallParams,其中包含了SessionParams,標志為MODE_FULL_INSTALL
    final InstallParams params = makeInstallParams();
    //1 創建Session
    final int sessionId = doCreateSession(params.sessionParams,
            params.installerPackageName, params.userId);
    try {
        //inPath對應於安裝的APK文件
        final String inPath = nextArg();
        .......
        //2 wirite session
        if (doWriteSession(sessionId, inPath, params.sessionParams.sizeBytes, "base.apk",
                false /*logSuccess*/) != PackageInstaller.STATUS_SUCCESS) {
            return 1;
        }
        //3 commit session
        if (doCommitSession(sessionId, false /*logSuccess*/)
                != PackageInstaller.STATUS_SUCCESS) {
            return 1;
        }
        System.out.println("Success");
        return 0;
    } finally {
        ........
    }
}
從上面的代碼來看,runInstall主要進行了三件事,即創建session、對session進行寫操作,最後提交session。
接下來,我們來看看每一步究竟在干些什麼:
1、 create session
private int doCreateSession(SessionParams params, String installerPackageName, int userId)
        throws RemoteException {
    //通過ActivityManagerService得到"runInstallCreate"(作為Context對應的字符串)對應的uid
    userId = translateUserId(userId, "runInstallCreate");
    if (userId == UserHandle.USER_ALL) {
        userId = UserHandle.USER_SYSTEM;
        params.installFlags |= PackageManager.INSTALL_ALL_USERS;
    }

    //通過PackageInstallerService創建session
    final int sessionId = mInstaller.createSession(params, installerPackageName, userId);
    return sessionId;
}
跟進一下PackageInstallerService的createSession函數:
@Override
public int createSession(SessionParams params, String installerPackageName, int userId) {
    try {
        return createSessionInternal(params, installerPackageName, userId);
    } catch (IOException e) {
        throw ExceptionUtils.wrap(e);
    }
}

private int createSessionInternal(SessionParams params, String installerPackageName, int userId)
        throws IOException {
    //安裝權限檢查
    .......
    //修改SessionParams的installFlags
    if ((callingUid == Process.SHELL_UID) || (callingUid == Process.ROOT_UID)) {
        params.installFlags |= PackageManager.INSTALL_FROM_ADB;
    } else {
        .........
    }
    ..........
    // Defensively resize giant app icons
    //調整app圖標大小,這裡應該是不同安裝方式共用的代碼
    //通過adb安裝apk時,應該還沒有解析到app圖標
    if (params.appIcon != null) {
        ........
    }

    //根據SessionParams的installFlags進行一些操作
    ..........
    } else {
        // For now, installs to adopted media are treated as internal from
        // an install flag point-of-view.
        //adb安裝應該進入這個分支(不添加參數指定安裝在sd card時),為SessionParams設置InstallInternal Flag,後文會用到
        params.setInstallFlagsInternal();
        ...........
    }

    final int sessionId;
    final PackageInstallerSession session;
    synchronized (mSessions) {
        // Sanity check that installer isn't going crazy
        //確保同一個uid沒有提交過多的Session,MAX_ACTIVE_SESSIONS為1024
        final int activeCount = getSessionCount(mSessions, callingUid);
        if (activeCount >= MAX_ACTIVE_SESSIONS) {
            throw new IllegalStateException(
                    "Too many active sessions for UID " + callingUid);
        }

        //同樣確保同一個uid沒有提交過多的Session,MAX_HISTORICAL_SESSIONS為1048576
        final int historicalCount = getSessionCount(mHistoricalSessions, callingUid);
        if (historicalCount >= MAX_HISTORICAL_SESSIONS) {
            throw new IllegalStateException(
                    "Too many historical sessions for UID " + callingUid);
        }
        ........
        //sessionId是個隨機值
        sessionId = allocateSessionIdLocked();

        // We're staging to exactly one location
        File stageDir = null;
        String stageCid = null;
        //根據installFlags,決定安裝目錄,前文已經提到,過默認將安裝到internal目錄下
        if ((params.installFlags & PackageManager.INSTALL_INTERNAL) != 0) {
            final boolean isEphemeral =
                    (params.installFlags & PackageManager.INSTALL_EPHEMERAL) != 0;
            //此處將會在臨時性的data目錄下創建出file,應該是作為copy的目的地址
            stageDir = buildStageDir(params.volumeUuid, sessionId, isEphemeral);
        } else {
            stageCid = buildExternalStageCid(sessionId);
        }

        session = new PackageInstallerSession(mInternalCallback, mContext, mPm,
                mInstallThread.getLooper(), sessionId, userId, installerPackageName, callingUid,
                params, createdMillis, stageDir, stageCid, false, false);
                mSessions.put(sessionId, session);
        mSessions.put(sessionId, session);
    }
    //進行回調
    mCallbacks.notifySessionCreated(session.sessionId, session.userId);
    //在mSessionsFile中進行記錄
    writeSessionsAsync();

    return sessionId;
}
從代碼來看,上述代碼的目的就是為APK安裝做好准備工作,例如權限檢查、目的臨時文件的創建等, 最終創建出PackageInstallerSession對象。PackageInstallerSession可以看做是”安裝APK”這個請求的封裝,其中包含了處理這個請求需要的一些信息。
這種設計方式,大致可以按照命令模式來理解。
實際上PackageInstallerSession不僅是分裝請求的對象,其自身還是個服務端:
public class PackageInstallerSession extends IPackageInstallerSession.Stub
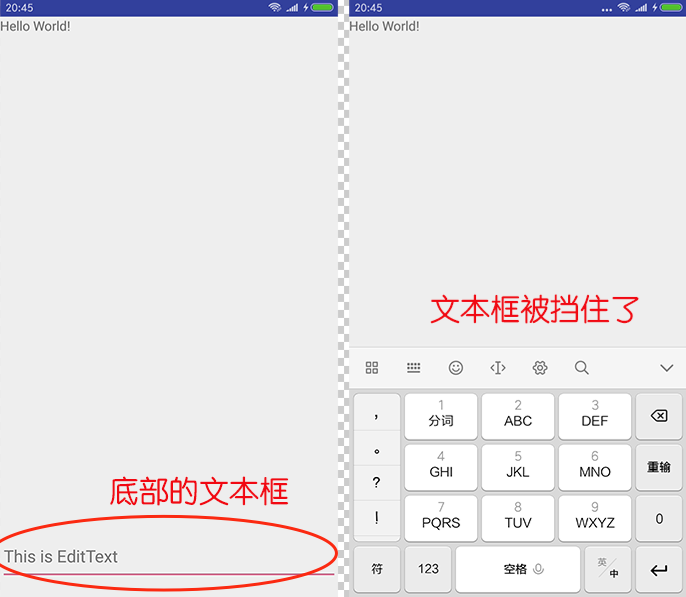 Android軟鍵盤擋住輸入框的終極解決方案
前言開發做得久了,總免不了會遇到各種坑。而在Android開發的路上,『軟鍵盤擋住了輸入框』這個坑,可謂是一個曠日持久的巨坑——來來來,我們慢慢看。入門篇最基本的情況,如
 android延時處理任務范例
今天要做一個任務,要求圖片做按鈕開關,點擊出發相應事件。點擊打開,圖片左邊顯示幾行字體,這幾行字體是延時顯示的。下面將主要代碼附上。以下是main.xml
 Android中使用ListView繪制自定義表格技巧分享
先上一下可以實現的效果圖 要實現的效果有幾方面 1、列不固定:可以根據數據源的不同生成不同的列數 2、表格內容可以根據數據源的定義合並列 3、要填寫的單元格可
 Android View系統解析(上)