編輯:關於Android編程
說到自定義view就不得提到LayoutInflater,雖然我們在代碼中可以直接用new方法構造出各種View,然後再添加各種屬性去控制View的大小和位置等布局,但是這是很復雜繁瑣的,細節優化更麻煩困難,面對復雜布局,用代碼構造更顯得無力。這時我們必須借助於LayoutInflater這個神器了。
LayoutInflater的作用就是能夠將value/layout目錄下的xml布局文件,實例化成相應的View。它的好處是顯而易見的,xml布局文件我們可以可視化構造。要使用LayoutInflater,首先要得到LayoutInflater的實例對象,有下面三種方法:
方法一:
在activity裡調用:
LayoutInflater inflater = getLayoutInflater();
方法二:
LayoutInflater inflater = LayoutInflater.from(mContext);
方法三:
LayoutInflaterinflater = (LayoutInflater)mContext.getSystemService(Context.LAYOUT_INFLATER_SERVICE);
如果查看android源碼可以知道前面兩個方法最後都是調用到第三個方法。有了LayoutInflater對象就可以調用它
的inflate方法把xml布局文件變成view了。
下面我們就通過一個非常簡單的小例子,來更加直觀地看一下LayoutInflater的用法。比如說當前項目MainActivity對應的布局文件叫做activity_main.xml,代碼如下所示:
代碼很簡單,就只有一個RelativeLayout,裡面什麼控件都不放,我們再建一個layout_textview.xml,代碼如下:
  @Override
    protected void onCreate(Bundle savedInstanceState) {
        super.onCreate(savedInstanceState);
        setContentView(R.layout.activity_main);
        mContext = this;
        RelativeLayout mainLayout = (RelativeLayout) findViewById(R.id.root_layout);
        LayoutInflater inflater = (LayoutInflater)mContext.getSystemService(Context.LAYOUT_INFLATER_SERVICE);
        TextView textView = (TextView) inflater.inflate(R.layout.layout_textview,null);
        mainLayout.addView(textView);
    }
這裡使用了LayoutInflater的inflate(int resource, ViewGroup root),進入步看看源碼實際上是調用了:
    public View inflate(@LayoutRes int resource, @Nullable ViewGroup root) {
        return inflate(resource, root, root != null);
    }

    public View inflate(@LayoutRes int resource, @Nullable ViewGroup root, boolean attachToRoot) {
        final Resources res = getContext().getResources();
        if (DEBUG) {
            Log.d(TAG, "INFLATING from resource: \"" + res.getResourceName(resource) + "\" ("
                    + Integer.toHexString(resource) + ")");
        }

        final XmlResourceParser parser = res.getLayout(resource);
        try {
            return inflate(parser, root, attachToRoot);
        } finally {
            parser.close();
        }
    }
從上面可以看出來,inflate方法實際有三個參數:
resource : int型,將被實例化的布局文件
root : ViewGroup型,根布局或父布局,如果這個參數不為空,則傳入的viewgroup是將被實例化的View的根布局。
attachToRoot : boolean型,是否依附到傳入的根布局上
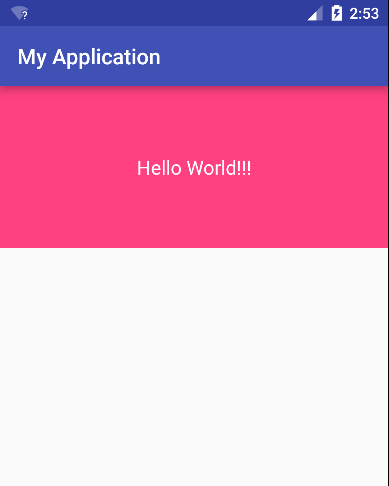
先不多說,我們先看看上面的代碼的效果:
通過inflater.inflate(R.layout.layout_textview,null)方法,說明確實把TextView實例化出來了,當想我們修改下TextView的大小,布局文件做如下修改:
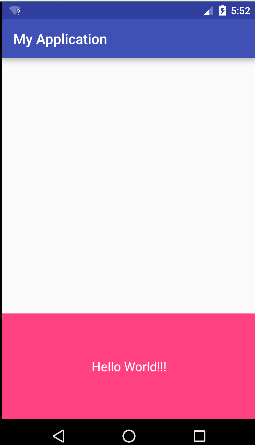
我們修改了layout_width把wrap_content改成了match_parent,讓寬度充滿全屏,也增加了layout_height的高度,再運行,看看效果:
OH,NO!竟然沒有變化,不是我們設想的寬度會充滿全屏,我們設置的layout_width和layout_height沒有起到一點作用。回到上面inflate方法,它有三個參數,前面root參數我們傳進去的是null,我們修改下這個參數,看看是不是它的問題,我們將activity代碼裡的inflater.inflate(R.layout.layout_textview,null)改成:inflater.inflate(R.layout.layout_textview,mainLayout,false); 再運行,效果如下:
哈哈,終於達到了我們想要的效果,這說明使用inflate時,傳入的布局文件“最外層”的layout_height和layout_width是要有root布局才能生效,這樣也說明其實layout_height和layout_width是跟父布局有關,xml布局裡也並沒有設置view的height和width兩個屬性。
再回來看看inflate的第三個參數attachToRoot,它其實代表實例化view後,是否將這個view依附添加到傳入的第二個參數的root父布局裡。即如果為true,省去了我們手動再調用addView()方法了。
下面我們分析下inflate的源碼:
    public View inflate(@LayoutRes int resource, @Nullable ViewGroup root, boolean attachToRoot) {
        final Resources res = getContext().getResources();
        //生成xml解析器
        final XmlResourceParser parser = res.getLayout(resource);
        try {
            return inflate(parser, root, attachToRoot);
        } finally {
            parser.close();
        }
    }

 public View inflate(XmlPullParser parser, @Nullable ViewGroup root, boolean attachToRoot) {

         final Context inflaterContext = mContext;
         final AttributeSet attrs = Xml.asAttributeSet(parser);//獲取xml裡面屬性
         View result = root;

         final String name = parser.getName(); //得到布局xml裡的根布局的名稱,這裡是textview

         if (TAG_MERGE.equals(name)) {//如果是merge布局文件
              if (root == null || !attachToRoot) { //這裡attachToRoot必須為true
                        throw new InflateException(" can be used only with a valid "
                                + "ViewGroup root and attachToRoot=true");
              }
              rInflate(parser, root, inflaterContext, attrs, false);
         } else {
              //這裡先生成上面傳入的布局文件裡的根View,我們上面只傳入了一個TextView
              // Temp is the root view that was found in the xml
              final View temp = createViewFromTag(root, name, inflaterContext, attrs);

              ViewGroup.LayoutParams params = null;
              if (root != null) {
                  //如果root不為空,這裡會根據root生成layoutParams
                  params = root.generateLayoutParams(attrs);
                  if (!attachToRoot) {
                        //如果attachToRoot為false,將上面生成的params賦值給生成的View
                        temp.setLayoutParams(params);
                  }
               }
               //上面生成了根View,再生成它的子View
               rInflateChildren(parser, temp, attrs, true);

               if (root != null && attachToRoot) {
                   root.addView(temp, params); //加入的傳入的root布局裡
               }

               if (root == null || !attachToRoot) {
                    result = temp;
               }
            return result;
        }
    }
從上面源碼可以看出inflate()方法裡會根據傳入的root父布局生成相應的layoutParams,然後在賦值給新的View.比如root布局是RelativeLayout,則會生成RelativeLayout.LayoutParams屬性,那麼我們再修改下我們的布局文件驗證下我們的分析:
我們這次加入了layout_alignParentBottom參數,這個參數只有在RelativeLayout裡才有用,在我們這裡看看有沒有作用:
這裡起到了作用,說明確實是根據父控件生成了相應的LayoutParams。順便提下我們在activity裡面setContentView設置布局文件,最終也是調用到了LayoutInflater類的inflate方法。
下面總結下:
inflate方法有三個參數:
resource : int型, 傳入將被實例化的布局文件
root : ViewGroup型,根布局或父布局,如果這個參數不為空,則會為生成的view加上root相應的layoutParams參數
attachToRoot : boolean型,是否依附到傳入的root根布局上
 Android開發:仿微信圖片選擇器
Android 仿微信 圖片選擇器采用項目的框架上采用mvp模式,並用了我自己寫的一套lib,地址ndileber首先先定義了數據源,數據源可能來自於網絡也可能來自於本地
 android greenDao SQLite數據庫操作工具類使用
上一篇介紹了如何建立類生成工程,現在介紹如何使用。 以下是ExampleDaoGenerator工程代碼,做了一些修改 /* * Copyright (C) 2011
 Android開發本地及網絡Mp3音樂播放器(十四)網絡音樂下載功能實現
實現功能:實現網絡音樂搜索功能實現網絡音樂下載功能下載好的音樂目前不在播放器內,可以通過文件浏覽器查看。後續將博文,將實現歌詞和下載音樂掃描功能。經過將近4天,才發布這一
 Android操作系統的架構設計分析
之前一直在Android應用層上做工作,最近開始研究Android平台上的東東了,主要是在Android Frameworks層和系統庫層進行研究。以下是我自己的理解,領