編輯:關於Android編程
作為一只安卓自學的小白,今天第一天發表微博還是有點小激動的,好了,廢話少說下面開始我的安卓自定義控件知識總結。我的demo是一個自定義的TopBar,左邊一個Button按鈕,中間是一個標題,右邊也是一個Button按鈕。在安卓開發中自定義控件的技術是一個項目中不可缺少的一部分,下面我就用我的小demo一步步詳細介紹,麻雀雖小五髒俱全,相信看完這篇文章對自定義控件肯定會有一個很好的掌握。
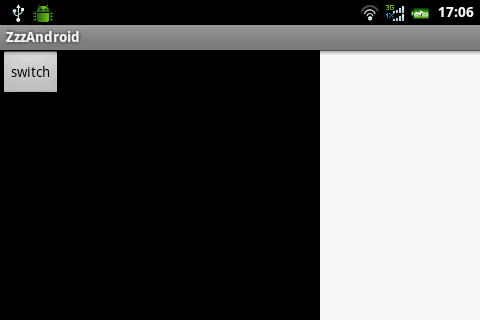
首先來看一下我的demo的效果圖:

安卓自定義控件基本可以分為三大步驟:
1、在xml文件中設計控件需要的屬性 2、定義一個類獲取xml的屬性實現View 3、引用自定義View首先在res/values目錄下新建一個xml文件atts.xml。代碼如下
         //中間標題的文本內容。 format中文意思是格式,也就是我們所說的類型
         //中間標題文本大小
           //中間標題文本顏色
            //左邊按鈕的文本顏色
           //左邊按鈕的背景
           //左邊按鈕的文本
            //右邊按鈕的文本顏色
          // 右邊按鈕的背景
           //右邊按鈕的文本
新建一個類名稱為TopBar並繼承RelativeLayout 實現構造函數 public TopBar(Context context, AttributeSet attrs),
這裡一定要注意構造函數有兩個參數代碼如下:
package com.example.test;

import android.annotation.SuppressLint;
import android.content.Context;
import android.content.res.TypedArray;
import android.graphics.drawable.Drawable;
import android.util.AttributeSet;
import android.view.Gravity;
import android.view.View;
import android.view.ViewGroup;
import android.widget.Button;
import android.widget.RelativeLayout;
import android.widget.TextView;

public class TopBar extends RelativeLayout {
    // 定義顯示的控件
    private Button leftButton, rightButton;
    private TextView tvTittle;

    // 左邊Button的屬性
    private int leftTextColor;
    private Drawable leftBackground;
    private String leftText;

    // 右邊Button的屬性
    private int rightTextColor;
    private Drawable rightBackground;
    private String rightText;

    // 中間Title的屬性
    private String tittle;
    private float tittleTextSize;
    private int tittleTextColor;
    // 設置三個控件的格式 或者說是布局  LayoutParams可以設置左右按鈕和中間文本的布局
    private LayoutParams leftParams, rightParams, tittleParams;


    /**
     * 在構造函數中完成控件的初始化 獲取xml中的屬性  並將xml中的屬性賦值給我們在類中定義的與之對應的變量
     *
     * @param context
     * @param attrs
     */
    @SuppressLint("NewApi")
    public TopBar(Context context, AttributeSet attrs) {
        super(context, attrs);
        //重要的數據結構   通過TypedArray我們可以獲取到atts.xml文件中的屬性內容
        TypedArray ta = context.obtainStyledAttributes(attrs,
                R.styleable.TopBar);                          *//R.styleable.TopBar就是xml文件中定義的名稱*
        leftTextColor = ta.getColor(R.styleable.TopBar_leftTextColor, 0);   *//TopBar_leftTextColor:安卓系統自動把我們atts.xml中定義的屬性重新命名  命名規則:控件名稱+下劃線+屬性名稱*
        leftBackground = ta.getDrawable(R.styleable.TopBar_leftBackground);
        leftText = ta.getString(R.styleable.TopBar_leftText);

        rightTextColor = ta.getColor(R.styleable.TopBar_rightTextColor, 0);
        rightBackground = ta.getDrawable(R.styleable.TopBar_rightBackground);
        rightText = ta.getString(R.styleable.TopBar_rightText);

        tittle = ta.getString(R.styleable.TopBar_tittle);
        tittleTextColor = ta.getColor(R.styleable.TopBar_tittleTextColor, 0);
        tittleTextSize = ta.getDimension(R.styleable.TopBar_tittleTextSize, 0);

        ta.recycle();//回收系統資源


        *//因為不是Activity不能用findViewById(),   所以我們new出三個控件*
        leftButton = new Button(context);
        rightButton = new Button(context);
        tvTittle = new TextView(context);

        //為左邊Button設置我們在xml文件中自定義的屬性
        leftButton.setTextColor(leftTextColor);
        leftButton.setBackground(leftBackground);
        leftButton.setText(leftText);

        //為右邊Button設置我們在xml文件中自定義的屬性
        rightButton.setTextColor(rightTextColor);
        rightButton.setBackground(rightBackground);
        rightButton.setText(rightText);

        //為中間Tittle設置我們在xml文件中自定義的屬性
        tvTittle.setText(tittle);
        tvTittle.setTextColor(tittleTextColor);
        tvTittle.setTextSize(tittleTextSize);
        tvTittle.setGravity(Gravity.CENTER);    //布局為居中

        setBackgroundColor(0xFFF59563);   //設置TopBar的背景顏色

        // 設置左邊Button的布局
        // 寬:WRAP_CONTENT 高:WRAP_CONTENT 布局:居左對齊
        //addRule()方法可以設置Button的布局
        leftParams = new LayoutParams(ViewGroup.LayoutParams.WRAP_CONTENT,
                ViewGroup.LayoutParams.WRAP_CONTENT);
        leftParams.addRule(RelativeLayout.ALIGN_PARENT_LEFT, TRUE);
        addView(leftButton, leftParams);

        // 右邊按鈕的屬性
        // 寬:WRAP_CONTENT 高:WRAP_CONTENT 布局:居右對齊
        rightParams = new LayoutParams(ViewGroup.LayoutParams.WRAP_CONTENT,
                ViewGroup.LayoutParams.WRAP_CONTENT);
        rightParams.addRule(RelativeLayout.ALIGN_PARENT_RIGHT, TRUE);
        addView(rightButton, rightParams);

        // 中間Tittle的屬性
        tittleParams = new LayoutParams(ViewGroup.LayoutParams.WRAP_CONTENT,
                ViewGroup.LayoutParams.MATCH_PARENT);
        tittleParams.addRule(RelativeLayout.CENTER_IN_PARENT, TRUE);
        addView(tvTittle, tittleParams);


    }

}
在上述兩步中,我們就已經完成了自定義控件,下邊最重要的就是該怎麼用它了,其實用法和我們平時基本的View用法是一樣的,在activity_main.xml文件中只需要我們加上一點東西即可。還是看代碼:
**//開始使用自定義View,注意要加上完整的類名 注意是類名**
好了,到這裡我相信你的app就應該已經能夠跑起來了 哈哈 是不是很簡單,,,下一篇我會進階繼續講一下如何給自定義控件設置監聽事件,用接口回調機制完成Button的onClick()方法。加油!
 struts2動態方法調用
本來不想寫關於struts2的學習筆記了,由於感覺關於struts2的理論知識比較簡單,所以才打算不寫,但是在學習過程中,特別是在Myeclipse中編碼練習的時候,遇到
 淺談Android數據庫版本升級及數據的遷移
概述Android開發涉及到的數據庫采用的是輕量級的SQLite3,而在實際開發中,在存儲一些簡單的數據,使用SharedPreferences就足夠了,只有在存儲數據結
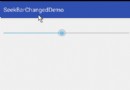 Android 自定義SeekBar動態改變硬件音量大小實現和音量鍵的同步(推薦)
1,上圖:2,代碼:MainActivity.Javapackage com.hero.zhaoq.seekbarchangeddemo;import android.c
 Android中直播視頻技術探究之---基礎核心類ByteBuffer解析
一、前言前一篇文章我們介紹了Android中直播視頻技術的基礎大綱知識,這裡就開始一一講解各個知識點,首先主要來看一下視頻直播中的一個重要的基礎核心類:ByteBuffe