編輯:關於Android編程
百度了下,好像都沒找到想要的,或許是我百度錯了關鍵字吧。我這就介紹一種我現在剛學的方法。
首先web端費給我們一個接口文檔。我這就接觸到兩塊內容:
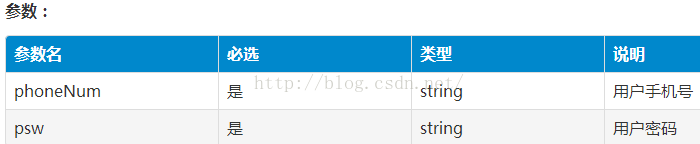
(1)通過接口傳遞單純的數字,例如登錄啊,我把用戶輸的賬號密碼獲取 傳給服務器,它會返回給我成功或失敗。
我現在的登錄接口參數如下:
服務器返回給我的參數:
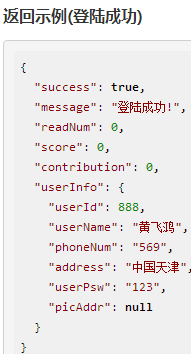
其他的參數不用在意,我這登錄只用到userInfo裡的phoneNum和userPsw(賬號和密碼)。
把裡面的userInfo抽出來形成一個類(例:UserInfo.java。名字要跟接口是一樣的,沒試過是不是必須的..)
UserInfo.java:(也就是對著參數一堆get set方法+構造函數)
package xxxxxxx;
public class UserInfo {
    public UserInfo(int userId, String userName, String phoneNum, String address, String userPsw, String picAddr) {
        this.userId = userId;
        this.userName = userName;
        this.phoneNum = phoneNum;
        this.address = address;
        this.userPsw = userPsw;
        this.picAddr = picAddr;
    }
    private int userId;
    private String userName;
    private String phoneNum;
    private String address;
    private String userPsw;
    private String picAddr;

    public int getUserId() {
        return userId; }
    public void setUserId(int userId) {
        this.userId = userId; }
    public String getUserName() {
        return userName; }
    public void setUserName(String userName) {
        this.userName = userName;}
    public String getPhoneNum() {
        return phoneNum; }
    public void setPhoneNum(String phoneNum) {
        this.phoneNum = phoneNum; }
    public String getAddress() {
        return address;}
    public void setAddress(String address) {
        this.address = address;}
    public String getUserPsw() {
        return userPsw; }
    public void setUserPsw(String userPsw) {
        this.userPsw = userPsw;}
    public String getPicAddr() {
        return picAddr;}
    public void setPicAddr(String picAddr) {
        this.picAddr = picAddr;}
}
LoginModel.java:(恩,這也是一堆get set方法.注意下UserInfo,我們前面已經把它抽成一個類了)
package xxxxxx;
public class LoginModel {
    private boolean success;
    private String message;
    private int readNum;
    private int score;
    private int contribution;

    public LoginModel(boolean success, String message, int readNum, int score, int contribution, UserInfo userInfo) {
        this.success = success;
        this.message = message;
        this.readNum = readNum;
        this.score = score;
        this.contribution = contribution;
        this.userInfo = userInfo;
    }
    private UserInfo userInfo;
    public boolean isSuccess() {
        return success; }
    public void setSuccess(boolean success) {
        this.success = success; }
    public String getMessage() {
        return message; }
    public void setMessage(String message) {
        this.message = message; }
    public int getReadNum() {
        return readNum; }
    public void setReadNum(int readNum) {
        this.readNum = readNum; }
    public int getScore() {
        return score; }
    public void setScore(int score) {
        this.score = score; }
    public int getContribution() {
        return contribution; }
    public void setContribution(int contribution) {
        this.contribution = contribution; }
    public UserInfo getUserInfo() {
        return userInfo; }
    public void setUserInfo(UserInfo userInfo) {
        this.userInfo = userInfo; }
}
LoginActivity.java:
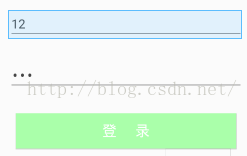
如下是我的一個布局:
package xxxxx;
import xxxx;(這導一堆的包 我就不敘述了 as功能強大)

public class LoginActivity extends Activity {
    EditText et_phone;
    EditText et_pwd;
    Button btn_login;

    public static String phone;
    String pwd;

    String url = xxxx; //這是web端提供給你的url
    public static LoginModel myModel;

    protected void onCreate(Bundle savedInstanceState){
        super.onCreate(savedInstanceState);
        setContentView(R.layout.activity_login);  //這是我的一個布局

        btn_login = (Button) findViewById(R.id.btn_login);
        et_phone = (EditText) findViewById(R.id.et_phone);
        et_pwd = (EditText) findViewById(R.id.et_pwd);

        btn_login.setOnClickListener(new View.OnClickListener() {
            @Override
            public void onClick(View v) {
                phone = et_phone.getText().toString().trim();
                pwd = et_pwd.getText().toString().trim();
                loadData();
            }
        });
    }
    //這就是通過接口獲取數據庫中的數據的核心
    private void loadData() {
        RequestParams params = new RequestParams();
        params.addBodyParameter("phoneNum", phone);   //phoneNum要跟接口中的參數名一致
        params.addBodyParameter("psw", pwd);
        HttpUtils http = new HttpUtils();

        http.send(HttpRequest.HttpMethod.POST, url, params, new RequestCallBack() {
            @Override
            public void onSuccess(ResponseInfo responseInfo) {
                Gson gson = new Gson();
                myModel = gson.fromJson(responseInfo.result, LoginModel.class);
                //成功的話,跳轉另一個界面
                if (myModel.isSuccess()) {
                    Intent intent = new Intent(LoginActivity.this,BookCrossingMain.class);
                    //因為我隊友要一些數據,所以我把從數據庫獲得的數據通過Intent傳給他
                    UserInfo myInfo = myModel.getUserInfo();
                    intent.putExtra("userId",myInfo.getUserId());
                    intent.putExtra("phoneNum",phone);
                    intent.putExtra("pwd",pwd);
                    startActivity(intent);
                    LoginActivity.this.finish();
                }else if(!myModel.isSuccess()){
                   Toast.makeText(LoginActivity.this,myModel.getMessage(),Toast.LENGTH_SHORT).show();
                }
            }
            @Override
            public void onFailure(HttpException error, String msg) {
                Toast.makeText(LoginActivity.this, "網絡出錯", Toast.LENGTH_SHORT).show();
            }
        });
    }
}
(2)通過接口獲取listview中數據(栗子:獲取評論)
我現在的評論接口參數如下:
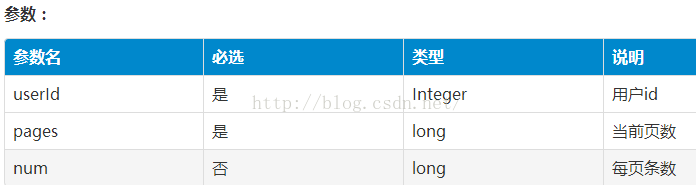
服務器返回給我的參數:
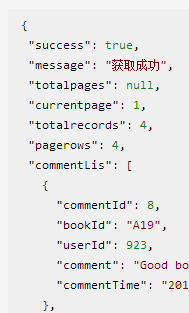
首先還是將commentLis抽成一個類出來,我這就不抽出來啦,將model和commentLis寫一起
BookCommentModel.java:
package xxxxxx;
import java.util.List;

public class BookCommentModel {
    public BookCommentModel(boolean success, String message, Object totalpages, int currentpage, int totalrecords, int pagerows, List commentLis) {
        this.success = success;
        this.message = message;
        this.totalpages = totalpages;
        this.currentpage = currentpage;
        this.totalrecords = totalrecords;
        this.pagerows = pagerows;
        this.commentLis = commentLis;
    }

    private boolean success;
    private String message;
    private Object totalpages;
    private int currentpage;
    private int totalrecords;
    private int pagerows;

    private List commentLis;

    public boolean isSuccess() {
        return success; }
    public void setSuccess(boolean success) {
        this.success = success;}
    public String getMessage() {
        return message; }
    public void setMessage(String message) {
        this.message = message; }
    public Object getTotalpages() {
        return totalpages;}
    public void setTotalpages(Object totalpages) {
        this.totalpages = totalpages; }
    public int getCurrentpage() {
        return currentpage; }
    public void setCurrentpage(int currentpage) {
        this.currentpage = currentpage; }
    public int getTotalrecords() {
        return totalrecords; }
    public void setTotalrecords(int totalrecords) {
        this.totalrecords = totalrecords; }
    public int getPagerows() {
        return pagerows; }
    public void setPagerows(int pagerows) {
        this.pagerows = pagerows; }
    public List getCommentLis() {
        return commentLis; }
    public void setCommentLis(List commentLis) {
        this.commentLis = commentLis; }
    public static class CommentLis {
        private int commentId;
        private String bookId;
        private int userId;
        private String comment;
        private String commentTime;

        public int getCommentId() {
            return commentId; }
        public void setCommentId(int commentId) {
            this.commentId = commentId;  }
        public String getBookId() {
            return bookId; }
        public void setBookId(String bookId) {
            this.bookId = bookId; }
        public int getUserId() {
            return userId; }
        public void setUserId(int userId) {
            this.userId = userId;  }
        public String getComment() {
            return comment; }
        public void setComment(String comment) {
            this.comment = comment;  }
        public String getCommentTime() {
            return commentTime;  }
        public void setCommentTime(String commentTime) {
            this.commentTime = commentTime; }
    }
}
TabFragmentSecond.java:(這是個fragment,跟activity也一樣)
首先這是我的dynamic_list_item.xml

fragment_tab_second:裡面只有一個listview
package xxxxxxx;
import xxxxx;
public class TabFragmentSecond extends Fragment {
    private ListView lv;

    BookCommentModel myModel;
    String url = URL_ADDR.DYNAMIN_URL;

    View v;
    private List mViews = new ArrayList<>();
    //頭像
    private int[] mImgs = {R.drawable.icon_book_head1, R.drawable.icon_book_head2, R.drawable.icon_book_head3,R.drawable.icon_book_head4,R.drawable.icon_book_head5,R.drawable.icon_book_head6};
    //人名
    private int[] mNames={1,2,3,4};
    //評論
    private String[] mOpinion={"1111111","2222222222222","3333333333","444444444"};
    //
    private int count;
    //評論列表
    private ListView mListView;
    //
    private List> list_data;

    private TextView dynamic_title;
    private TextView dynamic_comment;
    private final String DYNAMIC_PINGLUN="評論 ";

    @Override
    public View onCreateView(LayoutInflater inflater, ViewGroup container, Bundle savedInstanceState) {
        v = inflater.inflate(R.layout.fragment_tab_second,container,false);
        init();
        return v;
    }
    private void init(){
        mListView=(ListView)v.findViewById(R.id.lv_dynamic);
        mListView.setOnItemClickListener(new AdapterView.OnItemClickListener() {
            @Override
            public void onItemClick(AdapterView parent, View view, int position, long id) {
                //listview條目 的點擊事件
            }
        });
        LoadData();
        InitData();
    }

    private void LoadData() {
        RequestParams params = new RequestParams();
        params.addBodyParameter("userId","888");
        params.addBodyParameter("pages","1");
        params.addBodyParameter("num","4");

        HttpUtils http=new HttpUtils();
        http.send(HttpRequest.HttpMethod.POST,url, params, new RequestCallBack() {
            @Override
            public void onSuccess(ResponseInfo responseInfo) {
                Gson gson=new Gson();
                BookCommentModel mComment=gson.fromJson(responseInfo.result,BookCommentModel.class);

                if (mComment.isSuccess()) {
                    count=4;
                    mNames=new int[count];
                    mOpinion=new String[count];
                    for (int i = 0; i < count; i++)
                    {
                        mNames[i]=mComment.getCommentLis().get(i).getUserId();
                        mOpinion[i]=mComment.getCommentLis().get(i).getComment();
                    }
                    InitData();
                }
                else
                {
                    Log.i("comment user link","fail");
                    InitData();
                }
            }
            @Override
            public void onFailure(HttpException error, String msg) {
                Log.i("comment user onFailure",error.toString());
                InitData();
            }
        });
    }
    private void InitData()
    {
        list_data=new ArrayList<>();
        Map map_item;
        for(int i=0;i<4;i++)
        {
            map_item=new HashMap<>();
            map_item.put("image",mImgs[i]);
            map_item.put("title",mNames[i]);
            map_item.put("comment",mOpinion[i]);
            list_data.add(map_item);
        }
        SimpleAdapter simpleAdapter=new SimpleAdapter(getActivity(),list_data,
                R.layout.dynamic_list_item,new String[]{"image","title","comment"},
                new int[]{R.id.iv_dynamic_icon, R.id.iv_dynamic_title,R.id.iv_dynamic_content});
        mListView.setAdapter(simpleAdapter);
    }
 android Setting中隱藏項實現原理與代碼
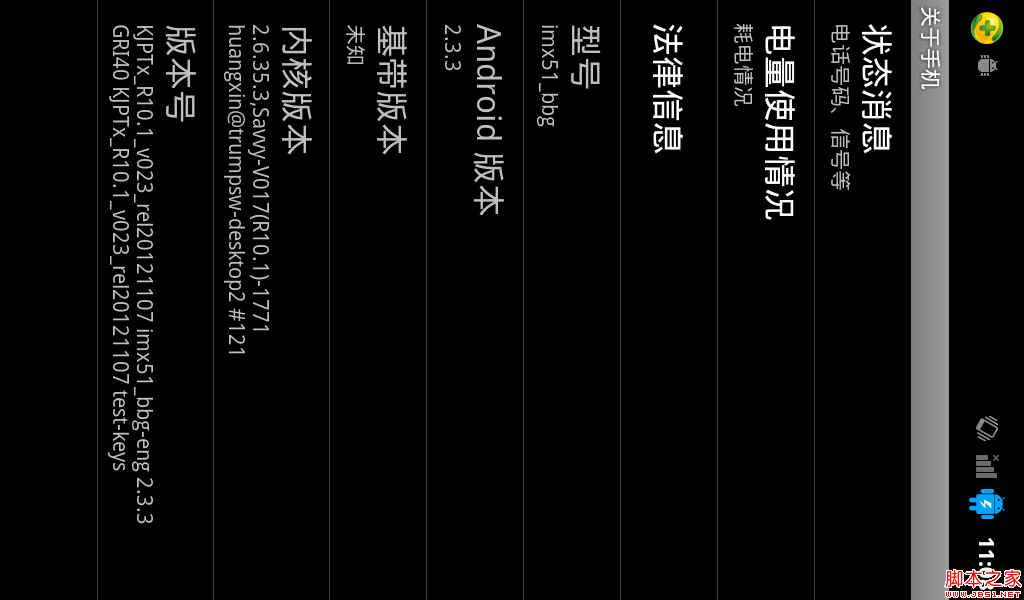
我們都知道做程序員有時會惡搞,就像android中,程序員在setting中就隱藏這樣一項:我們可以找到“關於手機這一項在裡面有“android版本”這一項,如圖:當我們
 Android如何防止apk程序被反編譯(尊重勞動成果)
作為Android應用開發者,不得不面對一個尴尬的局面,就是自己辛辛苦苦開發的應用可以被別人很輕易的就反編譯出來。Google似乎也發現了這個問題,從SDK2.3開始我們
 Android Scroll滑動效果實例
相對於在Android2.x版本上出現的長按、點擊事件的效果,不得不說,滑動操作具有
 Android shape和selector 結合使用實例代碼
shape和selector是Android UI設計中經常用到的,比如我們要自定義一個圓角Button,點擊Button有些效果的變化,就要用到shape和select