編輯:關於Android編程
本文實例講述了Android編程重寫ViewGroup實現卡片布局的方法。分享給大家供大家參考,具體如下:
實現效果如圖:

實現思路
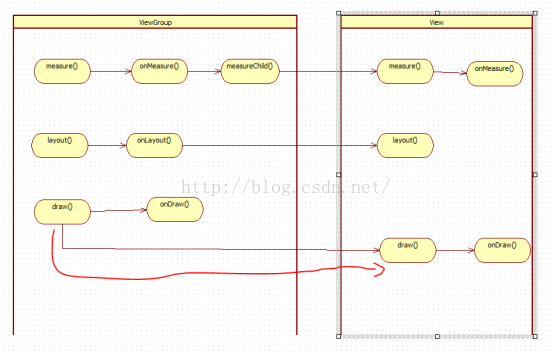
1. 重寫onMeasure(int widthMeasureSpec, int heightMeasureSpec)設置每個子View的大小
2. 重寫onLayout(boolean changed, int l, int t, int r, int b) 設置每個子View的位置
第一步:新建FlowLayout繼承ViewGroup
package com.rong.activity;
import android.content.Context;
import android.util.AttributeSet;
import android.view.View;
import android.view.ViewGroup;
/**
 * 卡片布局
 *
 * @author 徐榮
 *
 */
public class FlowLayout extends ViewGroup {
  public FlowLayout(Context context, AttributeSet attrs) {
    super(context, attrs);
  }
  @Override
  protected void onLayout(boolean changed, int l, int t, int r, int b) {
    // 當前子View的數量
    int childSize = getChildCount();
    // 獲取行寬
    int lineWidth = getMeasuredWidth();
    // 當前是第幾行
    int lines = 1;
    // 當前累加的行寬
    int nowLineWidth = 0;
    for (int i = 0; i < childSize; i++) {
      View view = getChildAt(i);
      // 子View的寬度
      int childWidth = view.getMeasuredWidth();
      // 子View的高度
      int childHeight = view.getMeasuredHeight();
      // 如果當前的nowLineWidth+childWidth>= lineWidth 則換行
      if (nowLineWidth + childWidth >= lineWidth) {
        nowLineWidth = 0;
        lines = lines + 1;
      }
      // 設置子View的位置
      view.layout(nowLineWidth, childHeight * (lines - 1), nowLineWidth + childWidth, childHeight * lines);
      nowLineWidth = nowLineWidth + childWidth;
      // 如果nowLineWidth >= lineWidth 則換行
      if (nowLineWidth >= lineWidth) {
        nowLineWidth = 0;
        lines = lines + 1;
      }
    }
  }
  @Override
  protected void onMeasure(int widthMeasureSpec, int heightMeasureSpec) {
    super.onMeasure(widthMeasureSpec, heightMeasureSpec);
    // 設置自己View的大小
    setMeasuredDimension(widthMeasureSpec, heightMeasureSpec);
    for (int i = 0; i < getChildCount(); i++) {
      View view = getChildAt(i);
      // 設置每個子View的大小
      view.measure(view.getMeasuredWidth(), view.getMeasuredHeight());
    }
  }
}
第二步:新建布局文件
<?xml version="1.0" encoding="utf-8"?>
<RelativeLayout xmlns:android="http://schemas.android.com/apk/res/android"
  android:layout_width="match_parent"
  android:layout_height="match_parent"
  android:background="@android:color/black"
  android:orientation="vertical" >
  <com.rong.activity.FlowLayout
    android:layout_width="match_parent"
    android:layout_height="match_parent"
    android:background="#ffffff" >
    <Button
      android:layout_width="wrap_content"
      android:layout_height="wrap_content"
      android:text="Apple" />
    <Button
      android:layout_width="wrap_content"
      android:layout_height="wrap_content"
      android:text="Button" />
    <Button
      android:layout_width="wrap_content"
      android:layout_height="wrap_content"
      android:text="Cup" />
    <Button
      android:layout_width="wrap_content"
      android:layout_height="wrap_content"
      android:text="Double" />
    <Button
      android:layout_width="wrap_content"
      android:layout_height="wrap_content"
      android:text="Ear" />
    <Button
      android:layout_width="wrap_content"
      android:layout_height="wrap_content"
      android:text="Flower" />
    <Button
      android:layout_width="wrap_content"
      android:layout_height="wrap_content"
      android:text="Game" />
    <Button
      android:layout_width="wrap_content"
      android:layout_height="wrap_content"
      android:text="Hotdog" />
    <Button
      android:layout_width="wrap_content"
      android:layout_height="wrap_content"
      android:text="interseting" />
    <Button
      android:layout_width="wrap_content"
      android:layout_height="wrap_content"
      android:text="joker" />
    <Button
      android:layout_width="wrap_content"
      android:layout_height="wrap_content"
      android:text="king" />
    <Button
      android:layout_width="wrap_content"
      android:layout_height="wrap_content"
      android:text="mother" />
    <Button
      android:layout_width="wrap_content"
      android:layout_height="wrap_content"
      android:text="lost" />
    <Button
      android:layout_width="wrap_content"
      android:layout_height="wrap_content"
      android:text="noting" />
    <Button
      android:layout_width="wrap_content"
      android:layout_height="wrap_content"
      android:text="orange" />
    <Button
      android:layout_width="wrap_content"
      android:layout_height="wrap_content"
      android:text="poker" />
    <Button
      android:layout_width="wrap_content"
      android:layout_height="wrap_content"
      android:text="qustion" />
    <Button
      android:layout_width="wrap_content"
      android:layout_height="wrap_content"
      android:text="ring" />
    <Button
      android:layout_width="wrap_content"
      android:layout_height="wrap_content"
      android:text="string" />
    <Button
      android:layout_width="wrap_content"
      android:layout_height="wrap_content"
      android:text="type" />
    <Button
      android:layout_width="wrap_content"
      android:layout_height="wrap_content"
      android:text="unit" />
    <Button
      android:layout_width="wrap_content"
      android:layout_height="wrap_content"
      android:text="vertion" />
    <Button
      android:layout_width="wrap_content"
      android:layout_height="wrap_content"
      android:text="west" />
    <Button
      android:layout_width="wrap_content"
      android:layout_height="wrap_content"
      android:text="x" />
    <Button
      android:layout_width="wrap_content"
      android:layout_height="wrap_content"
      android:text="young" />
    <Button
      android:layout_width="wrap_content"
      android:layout_height="wrap_content"
      android:text="zip" />
  </com.rong.activity.FlowLayout>
</RelativeLayout>
運行!
更多關於Android相關內容感興趣的讀者可查看本站專題:《Android開發入門與進階教程》、《Android基本組件用法總結》、《Android視圖View技巧總結》、《Android布局layout技巧總結》及《Android控件用法總結》
希望本文所述對大家Android程序設計有所幫助。
 Android 淺談MatrixCursor
如果想得到一個Cursor, 而此時又沒有數據庫返回一個Cursor,此時可以通過MatrixCursor來返回一個Cursor 具體使用方法,請見下文: 假如
 Android Handler消息傳遞機制
Handler消息傳遞機制 Android的消息處理有四個核心類:Handler、Looper、Message、MessageQueue,都在android.o
 Android MVP
前言前段時間,公司由個同事分享的時候,提到了MVP模式,自己之前也了解過,但是真正在自己的編碼過程中使用的非常少。最近在幫助一個朋友做畢業設計,心想這是一個很好的機會練習
 Android帶清除功能的輸入框控件EditTextWithDel
記錄下一個很實用的小控件EditTextWithDel,就是在Android系統的輸入框右邊加入一個小圖標,點擊小圖標可以清除輸入框裡面的內容,由於Android原生Ed