編輯:關於Android編程
Appwidget就是手機應用中常常放在桌面(即home)上的一些應用程序,比如說鬧鐘等。這種應用程序的特點是它上面顯示的內容能夠根據系統內部的數據進行更新,不需要我們進入到程序的內部去,比如說鬧鐘指針的擺動等。
首先,在res目錄下新建一個名為xml的文件夾,在該文件夾下新建一個xml文件,例如example_appwidget_info.xml,該xml文件的根標簽為appwidget-provider. 該xml文件主要是對所建立的appwidget的一個屬性設置,其中比較常見的屬性有appwidget更新的時間,其初始的布局文件等等。
res/xml/example_appwidget_info下內容如:
android:widgetCategory="home_screen|keyguard">
系統自帶的更新設置最短也得半個小時才會更新一次,而如果我們需要更短時間更新時,可以把android:updatePeriodMillis="0"置為0,然後自定義一個Service在onCreate方法中定義一個定時器Timer去實現更新;而在自定義的widget的AppWidgetProvider類型java類中的onEnabled和onUpdate方法中開啟Service,在onDisabled方法中結束Service。
其次, 定義一個類,例如ExampleAppWidgetProvider.java繼承AppWidgetProvider,同時要在清單文件AndroidManifest.xml中進行配置。配置如下所示
android:resource - 詳述AppWidgetProviderInfo資源的位置,在res目錄下新建一個文件xml,在xml文件夾下自定義一個widget屬性集的xml文件,
該類能實現所建立的widget的全部功能,其中比較重要的功能是接收廣播消息來更新widget的內容。該類能復寫父類的所有方法,例如onReceive方法,但widget還具備自身的方法,例如onEnabled,onUpdate,onDeleted,onDisabled等方法。
其中onDeleted()方法是當appwidget刪除時被執行,
onDisabled()是當最後一個appwidget被刪除時執行,
onEnabled()為當第一個appwidget被建立時執行,
onReceive()為當接收到了相應的廣播信息後被執行(在每次添加或者刪除widget時都會執行,且在其它方法執行的前面該方法也會被執行,其實本質上該方法不是AppWidgetProvider這個類的生命周期函數),
onUpdate()為到達了appwidget的更新時間或者一個appwidget被建立時執行。
appwidget中本身裡面就有程序(有activity),但是在桌面上添加一個appwidget後也相當於一個程序,這2個程序本身不是在同一個進程當中,而是在各自單獨的進程中。
widget本質上是一個BroadcastReceiver,所以Receiver有的方法widget都有例如OnReceiver方,widget還有自身具備的方法:
//第一次添加widget時調用此方法
例一:
實驗說明:
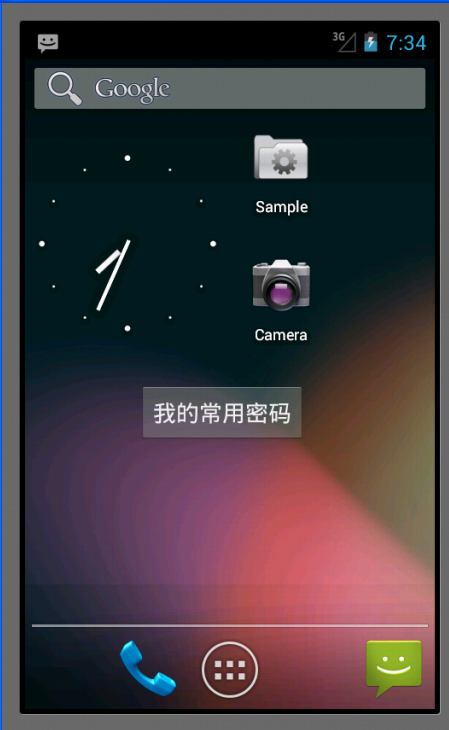
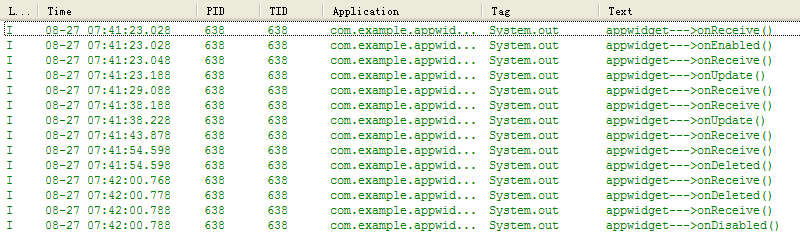
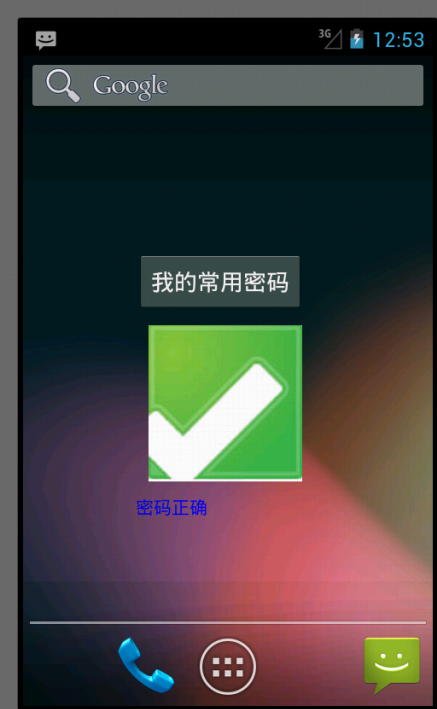
這個例子實現一個最簡單的appwidget,即我們的appwidget只有一個按鈕,按鈕上面寫著“我的常用密碼字樣”,沒有其它功能,呵呵。然後我們在appwidget的java類的程序中,每個生命周期函數都在後台打印出一句話,內容是與該生命周期函數名相對應的。
實驗結果:
往桌面添加自己創建的一個appwidget效果如下所示:
該實驗室先後在桌面上放2個appwidget,然後依次刪除2個appwidget,則程序後台的輸出結果如下所示:
實驗主要代碼及注釋(附錄有實驗工程code下載鏈接):
MainActivity.java不用更改任何代碼,采用默認的就行了,這裡就不貼出來了。
my_passward_provider.java(Appwidget功能實現):
package com.example.appwidget1;

import android.appwidget.AppWidgetManager;
import android.appwidget.AppWidgetProvider;
import android.content.Context;
import android.content.Intent;

public class my_password_provider extends AppWidgetProvider {

    @Override
    public void onDeleted(Context context, int[] appWidgetIds) {
        // TODO Auto-generated method stub
        System.out.println("appwidget--->onDeleted()");
        super.onDeleted(context, appWidgetIds);
    }

    @Override
    public void onDisabled(Context context) {
        // TODO Auto-generated method stub
        System.out.println("appwidget--->onDisabled()");
        super.onDisabled(context);
    }

    @Override
    public void onEnabled(Context context) {
        // TODO Auto-generated method stub
        System.out.println("appwidget--->onEnabled()");
        super.onEnabled(context);
    }

    @Override
    public void onReceive(Context context, Intent intent) {
        // TODO Auto-generated method stub
        System.out.println("appwidget--->onReceive()");
        super.onReceive(context, intent);
    }

    @Override
    public void onUpdate(Context context, AppWidgetManager appWidgetManager,
            int[] appWidgetIds) {
        // TODO Auto-generated method stub
        System.out.println("appwidget--->onUpdate()");
        super.onUpdate(context, appWidgetManager, appWidgetIds);
    }

}
res/xml/my_password.xml:
res/layout/my_password_initilayout.xml:
例二:
該實驗的目的主要是學會在appwidget中使用PendingIntent和RemoteViews這2個類,並最終對它們有一定的了解。
實驗說明:
這個例子在上面的例子中多增加了一個功能,即當我們把appwidget添加到桌面上的時候(上面那個例子是個按鈕),單擊這個按鈕,這個時候程序會從home界面跳轉到其它activity界面。那麼怎麼實現監聽appwidget上的按鈕控件呢?這裡實現該過程與在activity中的方法不同。在此之前,我們需要了解2個概念。
PendingIntent:
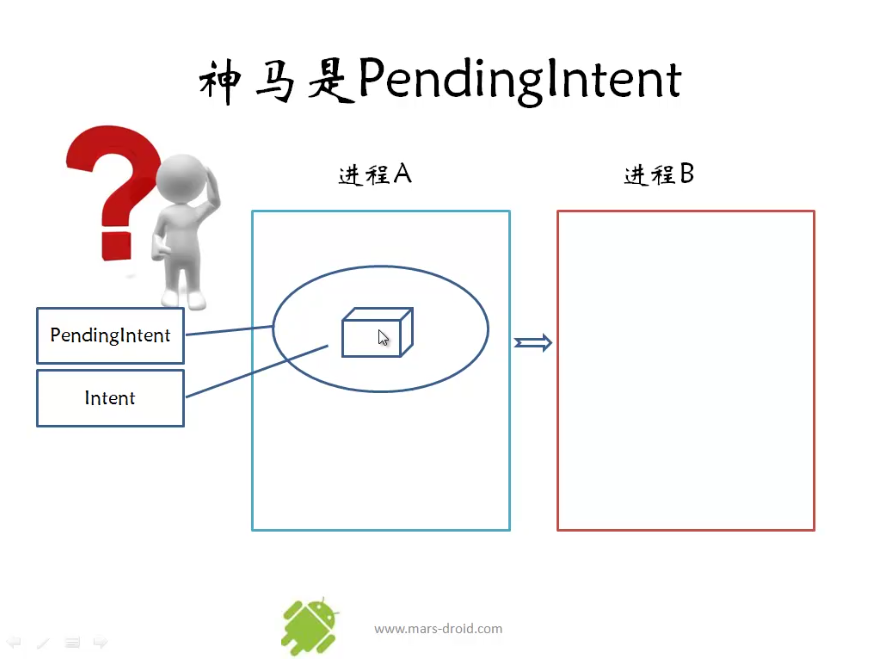
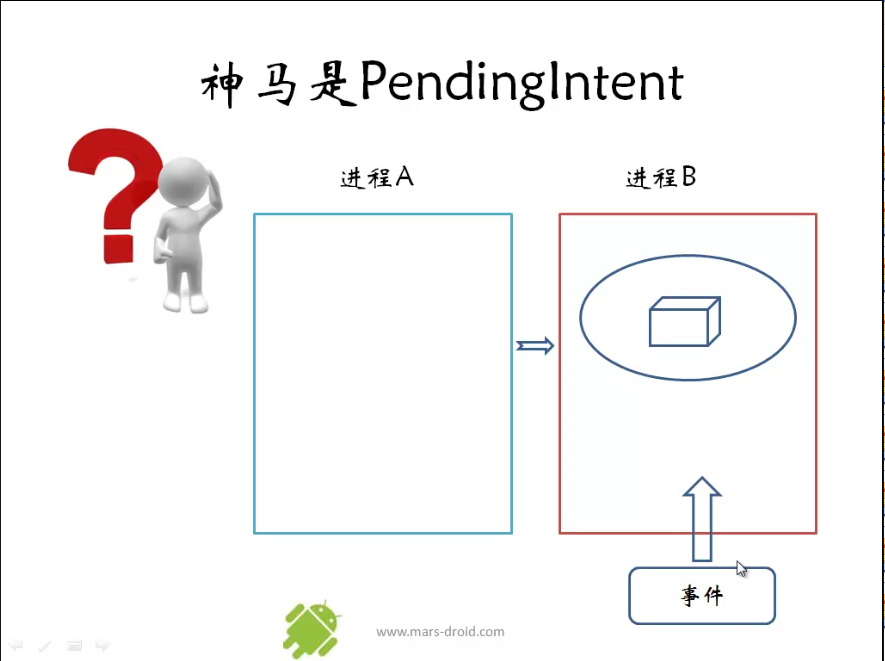
PendingIntent與以前我們的Intent不同,以前我們新建一個intent時,立刻就用它啟動一個activity,或者啟動一個service,亦或是發送一個broadcast。這裡我們新建一個PendingIntent後,按照字面意思並不馬上使用它,而是當我們需要使用它的時候再啟動,比如說當某一事件需要響應時,我們這時候可以使用建立好了的PendingIntent了。一個PendingIntent中包含了一個intent。Mars老師把PendingIntent比作成三國中的“精囊妙計”,從下面mars老師的2張示意圖中可以更深一步了解PendingIntent。
建立PendingIntent示意圖:
響應PendingIntent示意圖:
RemoteViews:
RemoteView代表了與調用它的那個activity不在同一個進程的view,因此叫做”遠程view”。在appWidget中使用這個類就可以實現當對appwidget的那個進程進行操作時響應其它進程中的activity。而RemoteViews則表示了一系列的RemoteView。
實驗結果與例一一樣,只不過是在單擊appwidget上的按鈕時,會自動跳轉到相應的activity上。這裡就不截圖看效果了。
實驗主要部分及代碼(附錄有實驗工程code下載鏈接):
其它部分與例一都差不多,只不過是在appwidget生命周期的onUpdate()函數不同,下面是對應其文件的java代碼:
package com.example.appwidget1;

import android.app.PendingIntent;
import android.appwidget.AppWidgetManager;
import android.appwidget.AppWidgetProvider;
import android.content.Context;
import android.content.Intent;
import android.widget.RemoteViews;

public class my_password_provider extends AppWidgetProvider {

    @Override
    public void onDeleted(Context context, int[] appWidgetIds) {
        // TODO Auto-generated method stub
        System.out.println("appwidget--->onDeleted()");
        super.onDeleted(context, appWidgetIds);
    }

    @Override
    public void onDisabled(Context context) {
        // TODO Auto-generated method stub
        System.out.println("appwidget--->onDisabled()");
        super.onDisabled(context);
    }

    @Override
    public void onEnabled(Context context) {
        // TODO Auto-generated method stub
        System.out.println("appwidget--->onEnabled()");
        super.onEnabled(context);
    }

    @Override
    public void onReceive(Context context, Intent intent) {
        // TODO Auto-generated method stub
        System.out.println("appwidget--->onReceive()");
        super.onReceive(context, intent);
    }

    @Override
    public void onUpdate(Context context, AppWidgetManager appWidgetManager,
            int[] appWidgetIds) {
        // TODO Auto-generated method stub
    //    System.out.println("appwidget--->onUpdate()");
        for(int i = 0; i < appWidgetIds.length; i++)
        {
            System.out.println(appWidgetIds[i]);
            //該構造函數之間把跳轉的2個activity給聯系起來了
            Intent intent =  new Intent(context, MyPasswordActivity.class);
            //創建一個PendingIntent
            PendingIntent pendint_intent = PendingIntent.getActivity(context, 0, intent, 0);
            //創建一個remoteview對象,第2個參數為appwidget的初始布局文件
            RemoteViews remote_views = new RemoteViews(context.getPackageName(), R.layout.my_password_initillayout);
            //為RemoteViews中的button按鈕添加監聽器,第二個參數為PendingIntent類型,當事件觸發時才執行
            remote_views.setOnClickPendingIntent(R.id.my_password, pendint_intent);
            //更新appwidget
            appWidgetManager.updateAppWidget(appWidgetIds[i], remote_views);
        }
        super.onUpdate(context, appWidgetManager, appWidgetIds);
    }

}
例三:
實驗說明:
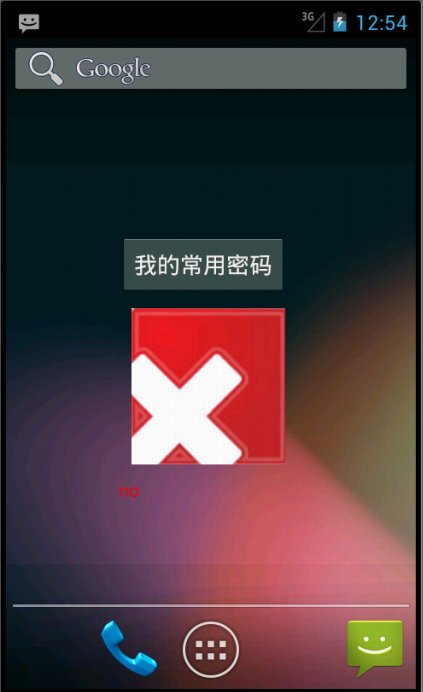
這個例子在例二的基礎上增加一些功能,即利用appwidget的onUpdate()方法中發送廣播信息,然後在onReceive()方法中來接收廣播消息,從而來更改appwidget的外觀,這裡是更改它的圖片和文本顯示。
這個例子不像上面那樣采用getActivity來創建PendingI,而是采用的getBroadcast,因為這裡需要的是發送廣播信息,而不是跳轉到另一個activity。
同樣的,需要啊manifest.xml文件中隊appwidget這個類來注冊它的接收器,action過濾時采用的是自己定義的action,名字可以自己隨便取,保證不和系統提供的action名字相同即可,該程序中采用的是"my.action.APPWIDGET_UPDATE"這個名字。
Appwidget中有1個按鈕,一個ImageView,一個TextView。程序實現的是這麼一個功能:appwidget在桌面被創建時,imageview和textview都有各自的內容,當按鈕按下時,這2個控件的內容都會發生變化,這種變化都是通過RemotViews的方法實現的。其中imageview是用的setImageViewResource()函數,textview是用的setTextViewText()函數。
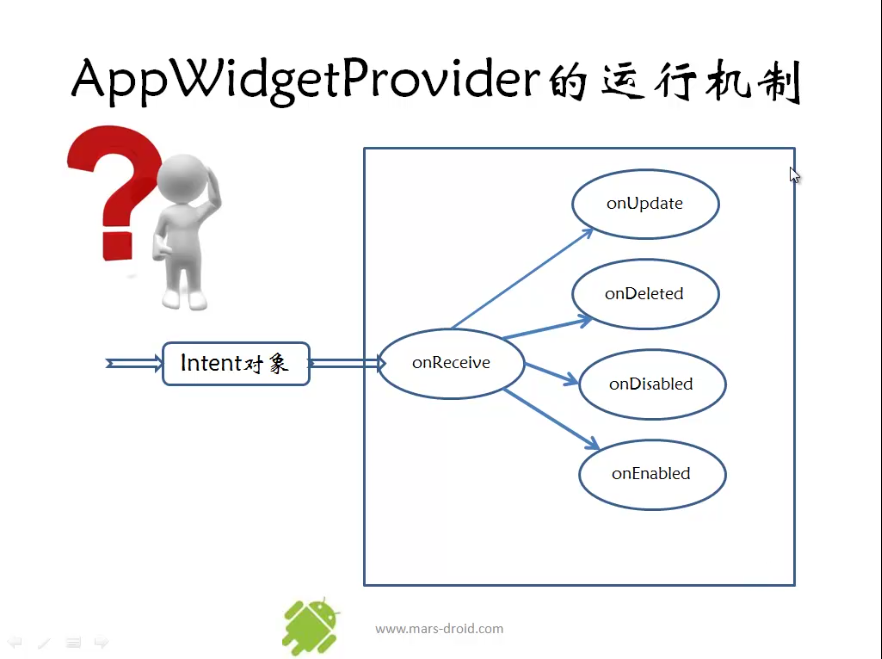
從上面的解釋可以看到,為什麼在同一個類(這裡指繼承AppWidgetProvide的那個類)中,從onUpdate()函數發送出去的廣播能夠在onReceiver()函數裡接收呢?這是因為AppWidgetProvider的其它4個生命周期函數的執行都是由onReceiver分發下去的。由mars老師提供的這張示意圖可以看出它們之間的關系:
實驗結果:
桌面上創建appwidget時顯示如下:
單擊按鈕後,顯示如下:
實驗主要部分代碼即注釋(附錄有實驗工程code下載鏈接):
AndriodManifest.xml:
my_password_provider.java(裡面有appwidget的生命周期函數):
package com.example.appwidget1;

import android.app.PendingIntent;
import android.appwidget.AppWidgetManager;
import android.appwidget.AppWidgetProvider;
import android.content.ComponentName;
import android.content.Context;
import android.content.Intent;
import android.graphics.Color;
import android.widget.RemoteViews;

public class my_password_provider extends AppWidgetProvider {

    private static final String MY_ACTION = "my.action.APPWIDGET_UPDATE";
    @Override
    public void onDeleted(Context context, int[] appWidgetIds) {
        // TODO Auto-generated method stub
        System.out.println("appwidget--->onDeleted()");
        super.onDeleted(context, appWidgetIds);
    }

    @Override
    public void onDisabled(Context context) {
        // TODO Auto-generated method stub
        System.out.println("appwidget--->onDisabled()");
        super.onDisabled(context);
    }

    @Override
    public void onEnabled(Context context) {
        // TODO Auto-generated method stub
        System.out.println("appwidget--->onEnabled()");
        super.onEnabled(context);
    }

    @Override
    public void onReceive(Context context, Intent intent) {
        String action = intent.getAction();
        if(MY_ACTION.equals(action))
        {
            RemoteViews remote_views = new RemoteViews(context.getPackageName(), R.layout.my_password_initillayout);
            //更改appwidget界面中的圖片
            remote_views.setImageViewResource(R.id.my_image, R.drawable.no);
            //更改appwidget界面中textview中的文字內容
            remote_views.setTextViewText(R.id.my_text, "no");
            remote_views.setTextColor(R.id.my_text, Color.RED);
            //獲得本context的AppWidgetManager
            AppWidgetManager appwidget_manager = AppWidgetManager.getInstance(context);
            //新建一個ComponentName,該ComponentName指的是針對appwidget整體而言的;而RemoteViews是針對appwidget
            //中各個部件之和而言的,這兩者有些區別
            ComponentName component_name = new ComponentName(context, my_password_provider.class);
            //上面2句代碼是為下面更新appwidget做准備的
            appwidget_manager.updateAppWidget(component_name, remote_views);
        }
        else
            super.onReceive(context, intent);
    }

    @Override
    public void onUpdate(Context context, AppWidgetManager appWidgetManager,
            int[] appWidgetIds) {
        // TODO Auto-generated method stub
        Intent intent = new Intent();
        intent.setAction(MY_ACTION);
        //以發送廣播消息的方式創建PendingIntent.
        PendingIntent pending_intent = PendingIntent.getBroadcast(context, 0, intent, 0);
        //創建一個remoteviews,其布局文件為appwidget的初始布局文件
        RemoteViews remote_views = new RemoteViews(context.getPackageName(), R.layout.my_password_initillayout);
        //為按鈕添加監聽器
        remote_views.setOnClickPendingIntent(R.id.my_password, pending_intent);
        //更新appwidget
        appWidgetManager.updateAppWidget(appWidgetIds, remote_views);

        super.onUpdate(context, appWidgetManager, appWidgetIds);
    }

}
res/layout/my_password_initillayout.xml(appwidget的布局文件):
<!--?xml version="1.0" encoding="utf-8"?-->
<linearlayout xmlns:android="http://schemas.android.com/apk/res/android" android:layout_width="match_parent" android:layout_height="match_parent" android:orientation="vertical">

    <button android:id="@+id/my_password" android:layout_width="wrap_content" android:layout_height="wrap_content" android:text="@string/my_appwidget">

    <imageview android:id="@+id/my_image" android:layout_width="wrap_content" android:layout_height="wrap_content" android:layout_margin="10dip" android:src="@drawable/yes">
    <textview android:id="@+id/my_text" android:layout_width="wrap_content" android:layout_height="wrap_content" android:text="@string/yes" android:textcolor="#0000ff">

</textview></imageview></button></linearlayout>
Res/xml/my_password.xml(appwidget的屬性設置xml文件):
<!--?xml version="1.0" encoding="utf-8"?-->
<linearlayout xmlns:android="http://schemas.android.com/apk/res/android" android:layout_width="match_parent" android:layout_height="match_parent" android:orientation="vertical">

    <button android:id="@+id/my_password" android:layout_width="wrap_content" android:layout_height="wrap_content" android:text="@string/my_appwidget">

    <imageview android:id="@+id/my_image" android:layout_width="wrap_content" android:layout_height="wrap_content" android:layout_margin="10dip" android:src="@drawable/yes">
    <textview android:id="@+id/my_text" android:layout_width="wrap_content" android:layout_height="wrap_content" android:text="@string/yes" android:textcolor="#0000ff">

</textview></imageview></button></linearlayout>
總結:通過這幾個例子,可以初步了解創建一個appwidget的整個流程,並且學會了簡單的是appwidget和其它的進程間進行通信。
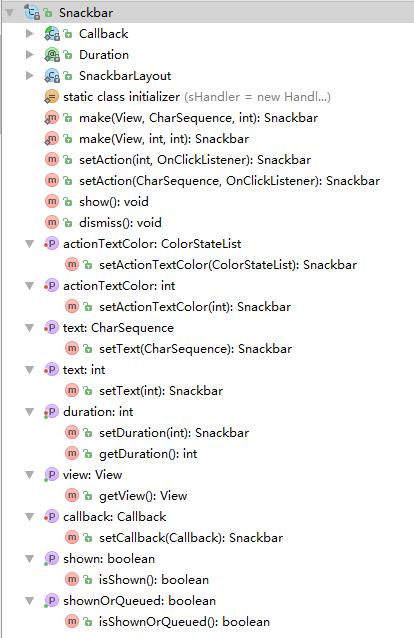 (Android 基礎(十一)) Snackbar
介紹Snackbars provide lightweight feedback about an operation. They show a brief messag
 Android QQ新用戶注冊界面繪制
先看看效果圖:問題: 1、下拉列表(因為還沒看到這裡...) 2、標題欄顯示問題 3、按鈕的 Enable 設置 ....
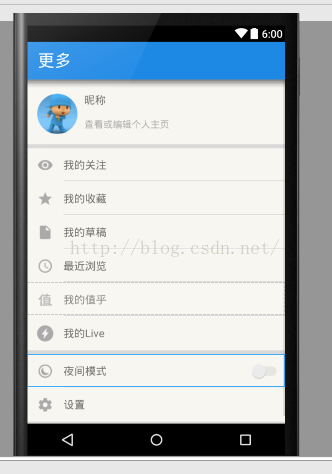 高仿知乎項目制作流程詳解---第一解:自定義組件的使用
首先來看一下我實現的效果圖: 從”我的關注”開始,每一個條目都是一個自定義組合控件.下面,我來講解一下具體實現步驟: 一.根據
 Android開發Tips
介紹一些, 在Android開發中, 會經常使用的小知識點.1. Download文件夾絕對路徑/storage/emulated/0/Download/xxx遍歷