編輯:關於Android編程
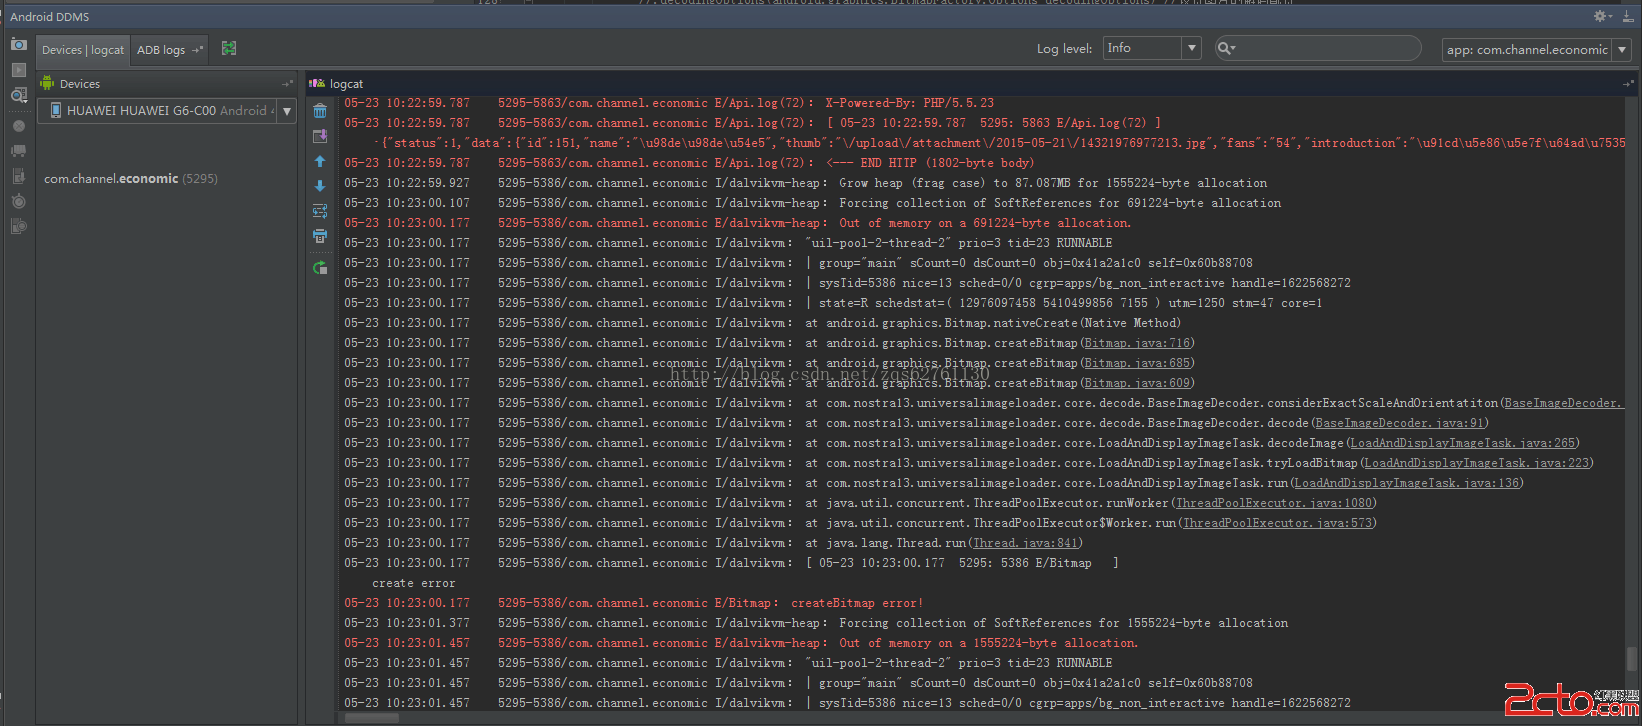
1 View viewScreen = getWindow().getDecorView();
2 viewScreen.setDrawingCacheEnabled(true);
3 viewScreen.buildDrawingCache();
4 Bitmap bitmap = Bitmap.createBitmap(viewScreen.getDrawingCache(),0,0,windowWidth,windowHeight);
5 viewScreen.destroyDrawingCache();
6 imgScreen.setImageBitmap(bitmap);
其中,viewScreen.getDrawingCache()方法獲取屏幕信息,通過ImageView對象imgScreen顯示出來,效果如下:
 可以看出,截取的部分只是為當前應用的界面,狀態欄信息無法獲取。中間的圖案為imgView的初始顯示內容,為手機桌面。
順便提一下,桌面獲取與ImageView視圖顯示為:
1 imgScreen.setImageDrawable(getWallpaper());
這其實從調用方法也可以知道,getWindow().getDecorView()是針對當前視圖(View)的,並不是針對手機整個屏幕的。
2、接下來看一段比較有誘惑性的代碼,
可以看出,截取的部分只是為當前應用的界面,狀態欄信息無法獲取。中間的圖案為imgView的初始顯示內容,為手機桌面。
順便提一下,桌面獲取與ImageView視圖顯示為:
1 imgScreen.setImageDrawable(getWallpaper());
這其實從調用方法也可以知道,getWindow().getDecorView()是針對當前視圖(View)的,並不是針對手機整個屏幕的。
2、接下來看一段比較有誘惑性的代碼,
 1 public void screenShot() throws InterruptedException
 2 {
 3     Process sh;
 4     try
 5     {
 6         sh = Runtime.getRuntime().exec("su", null, null);
 7         OutputStream os = sh.getOutputStream();
 8         os.write(("/system/bin/screencap -p " + "/sdcard/Image.png").getBytes("ASCII"));
 9         os.flush();
10         os.close();
11         sh.waitFor();
12     }
13     catch (IOException e)
14     {
15         // TODO Auto-generated catch block
16         e.printStackTrace();
17     }
18
19 }
個人沒有在Linux下進行測試,如果哪位朋友有這方面的開發經驗,還望分享與指點。 但從代碼來看,如果沒有其他約束(如手機權限、應用簽名等)的話,是多麼簡單明了。 3、舊版本的Android API其實是有關於截屏的接口,只不過被Google隱藏了,所以還是不能輕易使用。 資料中也提到不少API中的截屏函數:screenshot()。 4、而在新版本中,Google在Examples中給出了一個樣例:ScreenCapture工程,環境為Android Studio。 本人的API版本為22,工程路徑為“Android\sdk\samples\android-22\media\ScreenCapture”。 找到時確實激動一番,馬上導入、運行,應用界面成功出現了,點擊 開始按鈕,效果如下: 結果又很有趣,出現了一直截取的現象。很眼熟,在前後牆都裝上鏡子就會出現同樣的場景了。 樣例的實現是點擊START就開始不斷截屏,點擊STOP就停止。 到手機文件管理中去找了一通,沒發現有任何新的圖片保存下來,起初以為Google只是沒有做將屏幕數據保存為圖片這一步。 去看源碼之前還是抱有希望的,想著自己可以馬上實現從data-->image的這一步。 5、程序中用到了Fragment,FragmentActivity。 將截取下來的屏幕信息顯示在Fragment對象中,而該對象又作為主視圖的一部分,及上圖中的上半部分為主Activity視圖,下半部分為Fragment部分。 主Activity中做的事情就是打開繼承自Fragment類ScreenCaptureFragment的事務:
 1 @Override
 2 protected void onCreate(Bundle savedInstanceState) {
 3      super.onCreate(savedInstanceState);
 4      setContentView(R.layout.activity_main);
 5      if (savedInstanceState == null) {
 6          FragmentTransaction transaction = getSupportFragmentManager().beginTransaction();
 7          ScreenCaptureFragment fragment = new ScreenCaptureFragment(); 8          transaction.replace(R.id.sample_content_fragment, fragment);
 9          transaction.commit();
10         }
11     }
關鍵類ScreenCaptureFragment的實現代碼為:
  1 package com.example.android.screencapture;
  2
  3 import android.annotation.TargetApi;
  4 import android.app.Activity;
  5 import android.content.Context;
  6 import android.content.Intent;
  7 import android.hardware.display.DisplayManager;
  8 import android.hardware.display.VirtualDisplay;
  9 import android.media.Image;
 10 import android.media.ImageReader;
 11 import android.media.projection.MediaProjection;
 12 import android.media.projection.MediaProjectionManager;
 13 import android.os.Build;
 14 import android.os.Bundle;
 15 import android.support.annotation.Nullable;
 16 import android.support.v4.app.Fragment;
 17 import android.util.DisplayMetrics;
 18 import android.util.Log;
 19 import android.view.LayoutInflater;
 20 import android.view.Surface;
 21 import android.view.SurfaceHolder;
 22 import android.view.SurfaceView;
 23 import android.view.View;
 24 import android.view.ViewGroup;
 25 import android.widget.Button;
 26 import android.widget.Toast;
 27 import java.io.IOException;
 28
 29 public class ScreenCaptureFragment extends Fragment implements View.OnClickListener {
 30
 31     private static final String TAG = "ScreenCaptureFragment";
 32
 33     private static final String STATE_RESULT_CODE = "result_code";
 34     private static final String STATE_RESULT_DATA = "result_data";
 35
 36     private static final int REQUEST_MEDIA_PROJECTION = 1;
 37
 38     private int mScreenDensity;
 39
 40     private int mResultCode;
 41     private Intent mResultData;
 42
 43     private Surface mSurface;
 44     private MediaProjection mMediaProjection;
 45     private VirtualDisplay mVirtualDisplay;
 46     private MediaProjectionManager mMediaProjectionManager;
 47     private Button mButtonToggle;
 48     private SurfaceView mSurfaceView;
 49
 50     @Override
 51     public void onCreate(Bundle savedInstanceState) {
 52         super.onCreate(savedInstanceState);
 53         if (savedInstanceState != null) {
 54             mResultCode = savedInstanceState.getInt(STATE_RESULT_CODE);
 55             mResultData = savedInstanceState.getParcelable(STATE_RESULT_DATA);
 56         }
 57     }
 58
 59     @Nullable
 60     @Override
 61     public View onCreateView(LayoutInflater inflater, ViewGroup container, Bundle savedInstanceState) {
 62         return inflater.inflate(R.layout.fragment_screen_capture, container, false);
 63     }
 64
 65     @Override
 66     public void onViewCreated(View view, Bundle savedInstanceState) {
 67         mSurfaceView = (SurfaceView) view.findViewById(R.id.surface);
 68         mSurface = mSurfaceView.getHolder().getSurface();
 69         mButtonToggle = (Button) view.findViewById(R.id.toggle);
 70         mButtonToggle.setOnClickListener(this);
 71     }
 72
 73     @Override
 74     public void onActivityCreated(Bundle savedInstanceState) {
 75         super.onActivityCreated(savedInstanceState);
 76         Activity activity = getActivity();
 77         DisplayMetrics metrics = new DisplayMetrics();
 78         activity.getWindowManager().getDefaultDisplay().getMetrics(metrics);
 79         mScreenDensity = metrics.densityDpi;
 80         mMediaProjectionManager = (MediaProjectionManager)
 81                 activity.getSystemService(Context.MEDIA_PROJECTION_SERVICE);
 82     }
 83
 84     @Override
 85     public void onSaveInstanceState(Bundle outState) {
 86         super.onSaveInstanceState(outState);
 87         if (mResultData != null) {
 88             outState.putInt(STATE_RESULT_CODE, mResultCode);
 89             outState.putParcelable(STATE_RESULT_DATA, mResultData);
 90         }
 91     }
 92
 93     @Override
 94     public void onClick(View v) {
 95         switch (v.getId()) {
 96             case R.id.toggle:
 97                 if (mVirtualDisplay == null) {
 98                     try {
 99                         startScreenCapture();
100                     } catch (IOException e) {
101                         e.printStackTrace();
102                     }
103                 } else {
104                     stopScreenCapture();
105                 }
106                 break;
107         }
108     }
109
110     @Override
111     public void onActivityResult(int requestCode, int resultCode, Intent data) {
112         if (requestCode == REQUEST_MEDIA_PROJECTION) {
113             if (resultCode != Activity.RESULT_OK) {
114                 Toast.makeText(getActivity(), R.string.user_cancelled, Toast.LENGTH_SHORT).show();
115                 return;
116             }
117             Activity activity = getActivity();
118             if (activity == null) {
119                 return;
120             }
121
122             mResultCode = resultCode;
123             mResultData = data;
124             setUpMediaProjection();
125             try {
126                 setUpVirtualDisplay();
127             } catch (IOException e) {
128                 e.printStackTrace();
129             }
130         }
131     }
132
133     @Override
134     public void onPause() {
135         super.onPause();
136         stopScreenCapture();
137     }
138
139     @Override
140     public void onDestroy() {
141         super.onDestroy();
142         tearDownMediaProjection();
143     }
144
145     @TargetApi(Build.VERSION_CODES.LOLLIPOP)
146     private void setUpMediaProjection() {
147         mMediaProjection = mMediaProjectionManager.getMediaProjection(mResultCode, mResultData);
148     }
149
150     @TargetApi(Build.VERSION_CODES.LOLLIPOP)
151     private void tearDownMediaProjection() {
152         if (mMediaProjection != null) {
153             mMediaProjection.stop();
154             mMediaProjection = null;
155         }
156     }
157
158     @TargetApi(Build.VERSION_CODES.LOLLIPOP)
159     private void startScreenCapture() throws IOException {
160         Activity activity = getActivity();
161         if (mSurface == null || activity == null) {
162             return;
163         }
164         if (mMediaProjection != null) {
165             setUpVirtualDisplay();
166         } else if (mResultCode != 0 && mResultData != null) {
167             setUpMediaProjection();
168             setUpVirtualDisplay();
169         } else {
170             startActivityForResult(
171                     mMediaProjectionManager.createScreenCaptureIntent(),
172                     REQUEST_MEDIA_PROJECTION);
173         }
174     }
175
176     @TargetApi(Build.VERSION_CODES.LOLLIPOP)
177     private void setUpVirtualDisplay() throws IOException {
178
179         mVirtualDisplay = mMediaProjection.createVirtualDisplay("ScreenCapture",
180                 mSurfaceView.getWidth(), mSurfaceView.getHeight(), mScreenDensity,
181                 DisplayManager.VIRTUAL_DISPLAY_FLAG_AUTO_MIRROR,
182                 mSurface, null, null);
183
184         mButtonToggle.setText(R.string.stop);
185     }
186
187     private void stopScreenCapture() {
188         if (mVirtualDisplay == null) {
189             return;
190         }
191         mVirtualDisplay.release();
192         mVirtualDisplay = null;
193         mButtonToggle.setText(R.string.start);
194     }
195
196 }
上面高亮的代碼作用是將截屏信息顯示在界面下方Fragment的SurfaceView中,完全沒有data的影子。 6、繼續查資料,在老外的文章中找到了一些零散的建議與代碼,總結之後,實現代碼如下:
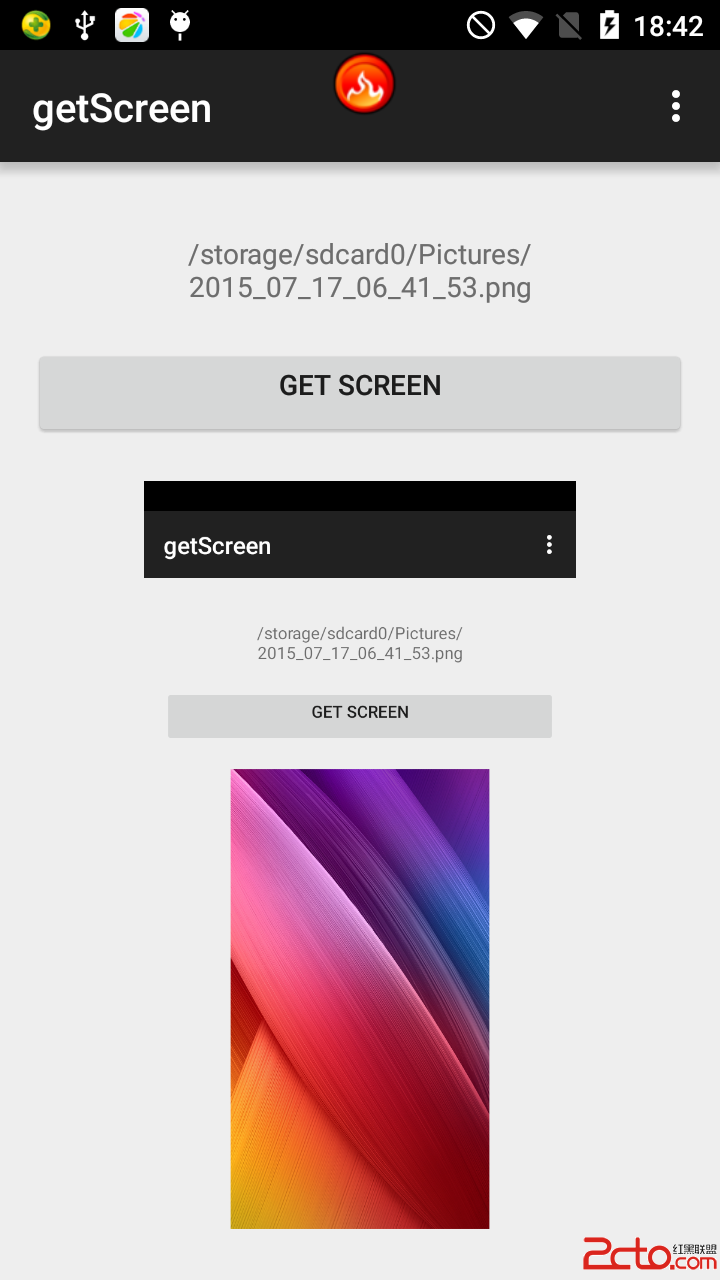
 1 public void takeScreenshot2(View v){
 2         MediaProjectionManager projectionManager = (MediaProjectionManager) getSystemService(Context.MEDIA_PROJECTION_SERVICE);
 3         Intent intent = projectionManager.createScreenCaptureIntent();
 4         startActivity(intent);
 5
 6         int mWidth = mWindowManager.getDefaultDisplay().getWidth();
 7         int mHeight = mWindowManager.getDefaultDisplay().getHeight();
 8         ImageReader mImageReader = ImageReader.newInstance(mWidth, mHeight, ImageFormat.RGB_565, 2);
 9         DisplayMetrics metrics = new DisplayMetrics();
10         mWindowManager.getDefaultDisplay().getMetrics(metrics);
11         int mScreenDensity = metrics.densityDpi;
12
13         MediaProjection mProjection = projectionManager.getMediaProjection(1, intent);
14         final VirtualDisplay virtualDisplay = mProjection.createVirtualDisplay("screen-mirror",
15                 mWidth, mHeight, mScreenDensity, DisplayManager.VIRTUAL_DISPLAY_FLAG_AUTO_MIRROR,
16                 mImageReader.getSurface(), null, null);
17         Image image = mImageReader.acquireLatestImage();
18         final Image.Plane[] planes = image.getPlanes();
19         final ByteBuffer buffer = planes[0].getBuffer();
20         int offset = 0;
21         int pixelStride = planes[0].getPixelStride();
22         int rowStride = planes[0].getRowStride();
23         int rowPadding = rowStride - pixelStride * mWidth;
24         Bitmap bitmap = Bitmap.createBitmap(mWidth+rowPadding/pixelStride, mHeight, Bitmap.Config.RGB_565);
25         bitmap.copyPixelsFromBuffer(buffer);
26         image.close();
27
28         SimpleDateFormat dateFormat = new SimpleDateFormat("yyyy_MM_dd_hh_mm_ss");
29         String strDate = dateFormat.format(new java.util.Date());
30         String pathImage = Environment.getExternalStorageDirectory().getPath()+"/Pictures/";
31         String nameImage = pathImage+strDate+".png";
32         if(bitmap != null) {
33             try{
34                 File fileImage = new File(nameImage);
35                 if(!fileImage.exists()){
36                     fileImage.createNewFile();
37                 }
38                 FileOutputStream out = new FileOutputStream(fileImage);
39                 if(out != null){
40                     bitmap.compress(Bitmap.CompressFormat.PNG, 100, out);
41                     out.flush();
42                     out.close();
43                     Toast.makeText(this,"get phone's screen succeed",Toast.LENGTH_SHORT).show();
44                     Intent media = new Intent(Intent.ACTION_MEDIA_SCANNER_SCAN_FILE);
45                     Uri contentUri = Uri.fromFile(fileImage);
46                     media.setData(contentUri);
47                     getApplicationContext().sendBroadcast(media);
48                 }
49             }catch(FileNotFoundException e) {
50                 e.printStackTrace();
51             }catch (IOException e){
52                 e.printStackTrace();
53             }
54         }
55         else{
56             Toast.makeText(this,"cannot get phone's screen",Toast.LENGTH_SHORT).show();
57         }
58     }
理想中,這段代碼可以實現的功能有: a、截取手機整個屏幕信息; b、將屏幕信息利用ImageReader的acquireLatestImage()保存入Image對象; c、通過緩存讀取方式賦給Bitmap對象; d、有了Bitmap,接下來就不解釋了; 但是,一運行就出現異常,還沒來得及截程序就終止了。 希望有興趣的朋友可以一起交流與學習,有已經實現了該功能的大神那就最好了,求教。
 qq空間直播怎麼提現 qq空間直播提現教程
當你在QQ空間直播開啟直播後,會收到粉絲們的禮物,也就是星星。這些星星可以兌換成收益直接提現嗎?其實這些都是可以提取出來的現金,那麼下面小編教大家QQ空間直
 Android帶動畫效果的彈窗
在網絡加載數據的時候通常需要很多時間,這個時候程序裡面經常需要寫一個提示正在加載數據的彈窗,這篇文章用兩種方式實現帶動畫效果的Dialog:幀動畫實現和GIF動態圖實現,
 [Android源碼分析]inquiry result引起的上層變化分析
在上一篇文章中,我們詳細分析了android是如何解析藍牙反饋上來的搜索到的設備信息,本文將會繼續分析這些信息到了上層之後是如何處理。 8、inquiry result引
 Android框架分析系列之Android traces.txt文件
Android的traces.txt文件記錄了進程的堆棧情況,對於分析應用響應慢,以及ANR的原因很有幫助。traces.txt文件的位置位於/data/anr/。1.