編輯:關於Android編程
之前我聽到過一則新聞,就是說Ipone中的AssistiveTouch的設計初衷是給殘疾人使用的。而這一功能在亞洲(中國)的使用最為頻繁。
雖不知道這新聞的可靠性,但無庸置疑的是它的確給我們操作手機帶來了很大的便捷。在這個設計之前,可能比較容易想到的就是建立快捷方式,而快捷方式的操作結果還是要去加載界面(有時可能是繁重的界面)。一旦走上了這條路,那距離快捷操作的方向可能就漸行漸遠了。
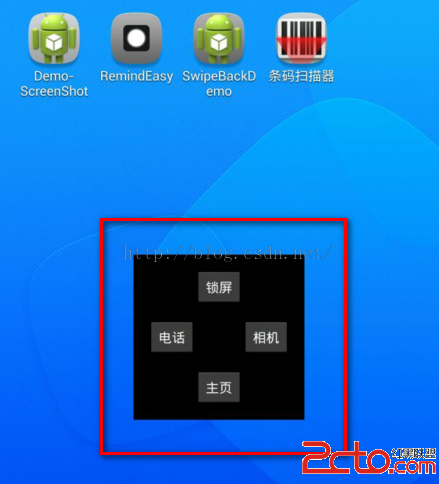
AssistiveTouch的設計的確很贊。Android也是值得擁有這一棒棒的功能,下面我就來簡單說明一下在Android上要如何實現這一功能。
一眼看到這樣的功能,我們可能困惑的是在Android中要怎麼在系統桌面的上方添加控件。是的,這是一個難點。從大小上,可能你想到了Dialog,不過Android中的Dialog可不能在系統的桌面上顯示。那你可能又會說不是一種是針對Activity的Dialog主題的模式嗎?是的,這樣的確是解決了在系統桌面的上方彈出窗口了。可是,我們又要對控件進行隨意拖拽,這一點可能對於Android而言並非易事。
但是,Android中允許我們在WindowManager上添加View。Android中的窗口機制就是基於WindowManager實現的。WindowManager的作用就是添加View到屏幕,或是從屏幕中移除View。它是顯示View的最底層。
好了,的確是這樣的。WindowManger就是實現的關鍵。下面就來實現它吧。
不過還有一點需要注意,就我們的EasyTouchView是要基於一個常在的Context來創建,如果EasyTouchView基於了像Activity這樣的短生命周期的Context創建,那麼EasyTouchView就會很快隨著Activity的暫停或是銷毀而消失。
EasyTouchView:
package com.bumblebee.remindeasy.widgets;

import java.util.Timer;
import java.util.TimerTask;

import com.bumblebee.remindeasy.R;

import android.content.Context;
import android.graphics.Color;
import android.graphics.drawable.BitmapDrawable;
import android.os.Handler;
import android.os.Message;
import android.view.Gravity;
import android.view.LayoutInflater;
import android.view.MotionEvent;
import android.view.View;
import android.view.WindowManager;
import android.view.WindowManager.LayoutParams;
import android.widget.Button;
import android.widget.ImageView;
import android.widget.PopupWindow;
import android.widget.Toast;

public class EasyTouchView extends View {
    private Context mContext;
    private WindowManager mWManager;
    private WindowManager.LayoutParams mWMParams;
    private View mTouchView;
    private ImageView mIconImageView = null;
    private PopupWindow mPopuWin;
    private ServiceListener mSerLisrener;
    private View mSettingTable;
    private int mTag = 0;
    private int midX;
    private int midY;
    private int mOldOffsetX;
    private int mOldOffsetY;

    private Toast mToast;
    private Timer mTimer = null;
    private TimerTask mTask = null;

    public EasyTouchView(Context context, ServiceListener listener) {
        super(context);
        mContext = context;
        mSerLisrener = listener;
    }

    public void initTouchViewEvent() {
        initEasyTouchViewEvent();

        initSettingTableView();
    }

    private void initEasyTouchViewEvent() {
        // 設置載入view WindowManager參數
        mWManager = (WindowManager) mContext.getSystemService(Context.WINDOW_SERVICE);
        midX = mWManager.getDefaultDisplay().getWidth() / 2 - 25;
        midY = mWManager.getDefaultDisplay().getHeight() / 2 - 44;
        mTouchView = LayoutInflater.from(mContext).inflate(R.layout.easy_touch_view, null);
        mIconImageView = (ImageView) mTouchView.findViewById(R.id.easy_touch_view_imageview);
        mTouchView.setBackgroundColor(Color.TRANSPARENT);

        mTouchView.setOnTouchListener(mTouchListener);
        WindowManager wm = mWManager;
        WindowManager.LayoutParams wmParams = new WindowManager.LayoutParams();
        mWMParams = wmParams;
        wmParams.type = 2003; // 這裡的2002表示系統級窗口,你也可以試試2003。
        wmParams.flags = 40; // 設置桌面可控
        wmParams.width = 100;
        wmParams.height = 100;
        wmParams.format = -3; // 透明
        wm.addView(mTouchView, wmParams);
    }

    private void initSettingTableView() {
        mSettingTable = LayoutInflater.from(mContext).inflate(R.layout.show_setting_table, null);
        Button commonUseButton = (Button) mSettingTable.findViewById(R.id.show_setting_table_item_common_use_button);
        Button screenLockButton = (Button) mSettingTable.findViewById(R.id.show_setting_table_item_screen_lock_button);
        Button notificationButton = (Button) mSettingTable.findViewById(R.id.show_setting_table_item_notification_button);

        Button phoneButton = (Button) mSettingTable.findViewById(R.id.show_setting_table_item_phone_button);
        Button pageButton = (Button) mSettingTable.findViewById(R.id.show_setting_table_item_page_button);
        Button cameraButton = (Button) mSettingTable.findViewById(R.id.show_setting_table_item_camera_button);

        Button backButton = (Button) mSettingTable.findViewById(R.id.show_setting_table_item_back_button);
        Button homeButton = (Button) mSettingTable.findViewById(R.id.show_setting_table_item_home_button);
        Button exitTouchButton = (Button) mSettingTable.findViewById(R.id.show_setting_table_item_exit_touch_button);

        commonUseButton.setOnClickListener(mClickListener);
        screenLockButton.setOnClickListener(mClickListener);
        notificationButton.setOnClickListener(mClickListener);

        phoneButton.setOnClickListener(mClickListener);
        pageButton.setOnClickListener(mClickListener);
        cameraButton.setOnClickListener(mClickListener);

        backButton.setOnClickListener(mClickListener);
        homeButton.setOnClickListener(mClickListener);
        exitTouchButton.setOnClickListener(mClickListener);
    }

    private OnClickListener mClickListener = new OnClickListener() {
        @Override
        public void onClick(View v) {
            switch (v.getId()) {
            case R.id.show_setting_table_item_common_use_button:
                hideSettingTable(常用);
                break;
            case R.id.show_setting_table_item_screen_lock_button:
                hideSettingTable(鎖屏);
                break;
            case R.id.show_setting_table_item_notification_button:
                hideSettingTable(通知);
                break;

            case R.id.show_setting_table_item_phone_button:
                hideSettingTable(電話);
                break;
            case R.id.show_setting_table_item_page_button:
                hideSettingTable(1);
                break;
            case R.id.show_setting_table_item_camera_button:
                hideSettingTable(相機);
                break;

            case R.id.show_setting_table_item_back_button:
                hideSettingTable(返回);
                break;
            case R.id.show_setting_table_item_home_button:
                hideSettingTable(主頁);
                break;
            case R.id.show_setting_table_item_exit_touch_button:
                quitTouchView();
                break;
            }

        }
    };

    private void quitTouchView() {
        hideSettingTable(退出);

        mWManager.removeView(mTouchView);
        mSerLisrener.OnCloseService(true);

        clearTimerThead();
    }

    private OnTouchListener mTouchListener = new OnTouchListener() {
        float lastX, lastY;
        int paramX, paramY;

        public boolean onTouch(View v, MotionEvent event) {
            final int action = event.getAction();

            float x = event.getRawX();
            float y = event.getRawY();

            if (mTag == 0) {
                mOldOffsetX = mWMParams.x; // 偏移量
                mOldOffsetY = mWMParams.y; // 偏移量
            }

            switch (action) {
            case MotionEvent.ACTION_DOWN:
                motionActionDownEvent(x, y);
                break;

            case MotionEvent.ACTION_MOVE:
                motionActionMoveEvent(x, y);
                break;

            case MotionEvent.ACTION_UP:
                motionActionUpEvent(x, y);
                break;

            default:
                break;
            }

            return true;
        }

        private void motionActionDownEvent(float x, float y) {
            lastX = x;
            lastY = y;
            paramX = mWMParams.x;
            paramY = mWMParams.y;
        }

        private void motionActionMoveEvent(float x, float y) {
            int dx = (int) (x - lastX);
            int dy = (int) (y - lastY);
            mWMParams.x = paramX + dx;
            mWMParams.y = paramY + dy;
            mTag = 1;

            // 更新懸浮窗位置
            mWManager.updateViewLayout(mTouchView, mWMParams);
        }

        private void motionActionUpEvent(float x, float y) {
            int newOffsetX = mWMParams.x;
            int newOffsetY = mWMParams.y;
            if (mOldOffsetX == newOffsetX && mOldOffsetY == newOffsetY) {
                mPopuWin = new PopupWindow(mSettingTable, LayoutParams.WRAP_CONTENT, LayoutParams.WRAP_CONTENT);
                mPopuWin.setTouchInterceptor(new OnTouchListener() {

                    public boolean onTouch(View v, MotionEvent event) {
                        if (event.getAction() == MotionEvent.ACTION_OUTSIDE) {
                            hideSettingTable();
                            return true;
                        }
                        return false;
                    }
                });

                mPopuWin.setBackgroundDrawable(new BitmapDrawable());
                mPopuWin.setTouchable(true);
                mPopuWin.setFocusable(true);
                mPopuWin.setOutsideTouchable(true);
                mPopuWin.setContentView(mSettingTable);

                if (Math.abs(mOldOffsetX) > midX) {
                    if (mOldOffsetX > 0) {
                        mOldOffsetX = midX;
                    } else {
                        mOldOffsetX = -midX;
                    }
                }

                if (Math.abs(mOldOffsetY) > midY) {
                    if (mOldOffsetY > 0) {
                        mOldOffsetY = midY;
                    } else {
                        mOldOffsetY = -midY;
                    }
                }

                mPopuWin.setAnimationStyle(R.style.AnimationPreview);
                mPopuWin.setFocusable(true);
                mPopuWin.update();
                mPopuWin.showAtLocation(mTouchView, Gravity.CENTER, -mOldOffsetX, -mOldOffsetY);

                if (mTimer == null) {
                    catchSettingTableDismiss();
                }
            } else {
                mTag = 0;
            }
        }
    };

    private void catchSettingTableDismiss() {
        mTimer = new Timer();
        mTask = new TimerTask() {

            @Override
            public void run() {
                if (mPopuWin == null || !mPopuWin.isShowing()) {
                    handler.sendEmptyMessage(0x0);
                } else {
                    handler.sendEmptyMessage(0x1);
                }
            }
        };

        mTimer.schedule(mTask, 0, 100);
    }

    private void clearTimerThead() {
        if (mTask != null) {
            mTask.cancel();
            mTask = null;
        }

        if (mTimer != null) {
            mTimer.cancel();
            mTimer = null;
        }
    }

    Handler handler = new Handler() {
        public void handleMessage(Message msg) {
            if (msg.what == 0x0) {
                mIconImageView.setBackgroundDrawable(getResources().getDrawable(R.drawable.touch_ic));
            } else if (msg.what == 0x1) {
                mIconImageView.setBackgroundDrawable(getResources().getDrawable(R.drawable.transparent));
            }
        };
    };

    public void showToast(Context context, String text) {
        if (mToast == null) {
            mToast = Toast.makeText(context, text, Toast.LENGTH_SHORT);
        } else {
            mToast.setText(text);
            mToast.setDuration(Toast.LENGTH_SHORT);
        }
        mToast.show();
    }

    private void hideSettingTable(String content) {
        hideSettingTable();
        showToast(mContext, content);
    }

    private void hideSettingTable() {
        if (null != mPopuWin) {
            mPopuWin.dismiss();
        }
    }

    public interface ServiceListener {
        public void OnCloseService(boolean isClose);
    }
}
public class AuxiliaryService extends Service implements ServiceListener {
    private Intent mIntent;

    @Override
    public IBinder onBind(Intent intent) {
        return null;
    }

    public void onCreate() {
        super.onCreate();
        new EasyTouchView(this, this).initTouchViewEvent();
    }

    @Override
    public int onStartCommand(Intent intent, int flags, int startId) {
        mIntent = intent;
        return super.onStartCommand(intent, flags, startId);
    }

    @Override
    public void OnCloseService(boolean isClose) {
        stopService(mIntent);
    }
}
這裡有一點需要注意一下。大家可以通過上面的代碼看出,我們啟動EasyTouchView是通過Service來啟動的。一般的EasyTouch都會提供一個鎖屏的功能。要使用一鍵鎖屏就需要激活設備管理器,就要去跳轉到系統的一些界面,而這些界面的啟動不可以是基於Service的,需要基於Activity來做處理。基於Service啟動的過程是閃爍一下後就消失了。
這裡我們可以在Service中啟動一個我們自己的Activity,然後在這個Activity中啟動這個設置設備管理器的界面。
代碼如下:
public class AuxiliaryActivity extends Activity {

    @Override
    protected void onCreate(Bundle savedInstanceState) {
        super.onCreate(savedInstanceState);
        requestWindowFeature(Window.FEATURE_NO_TITLE);
        lockScreen();
    }

    private void lockScreen() {
        DevicePolicyManager mDevicePolicyManager;
        ComponentName mComponentName;

        mDevicePolicyManager = (DevicePolicyManager) getSystemService(Context.DEVICE_POLICY_SERVICE);
        mComponentName = new ComponentName(this, LockReceiver.class);

        // 判斷是否有權限
        if (mDevicePolicyManager.isAdminActive(mComponentName)) {
            mDevicePolicyManager.lockNow();
            finish();
        } else {
            activeManager(mComponentName);
        }
    }

    /**
     * 激活設備管理器獲取權限
     */
    private void activeManager(ComponentName componentName) {
        Intent intent = new Intent(DevicePolicyManager.ACTION_ADD_DEVICE_ADMIN);
        intent.putExtra(DevicePolicyManager.EXTRA_DEVICE_ADMIN, componentName);
        intent.putExtra(DevicePolicyManager.EXTRA_ADD_EXPLANATION, One key lock the screen);
        startActivity(intent);
        finish();
    }
}

TouchView
ShowTableView
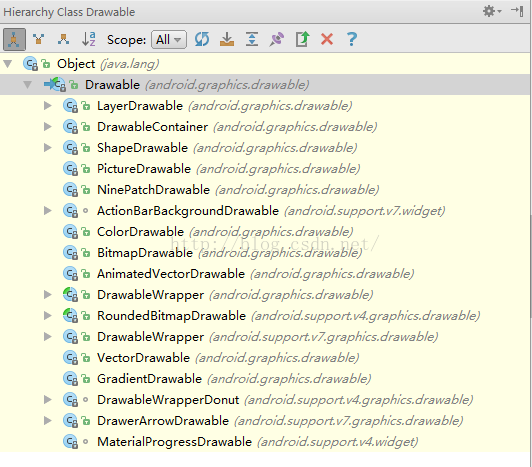 玩轉Android之Drawable的使用
Drawable天天用,可你是否對Drawable家族有一個完整的認知?今天我們就來系統的學習一下Drawable的使用。1.概述用過Drawable的筒子都知道Draw
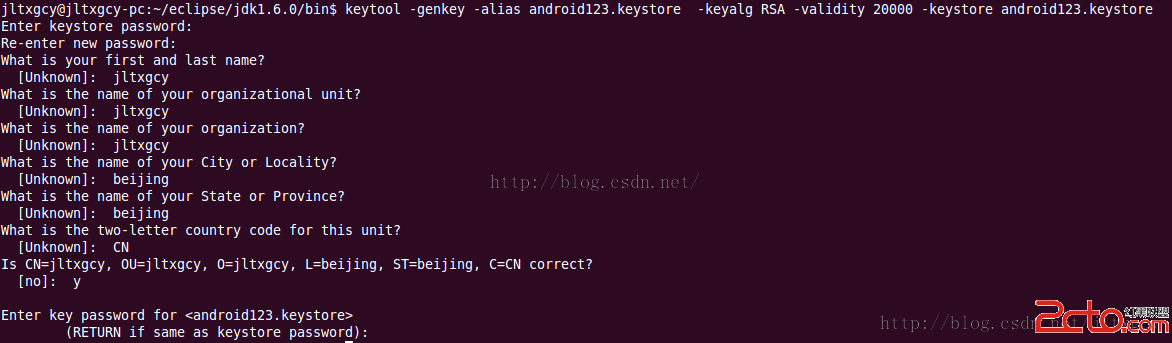 Android 簽名機制
1、如何對APK簽名(1)、創建數字證書,android123.keystore keytool -genkey -alias android123.keyst
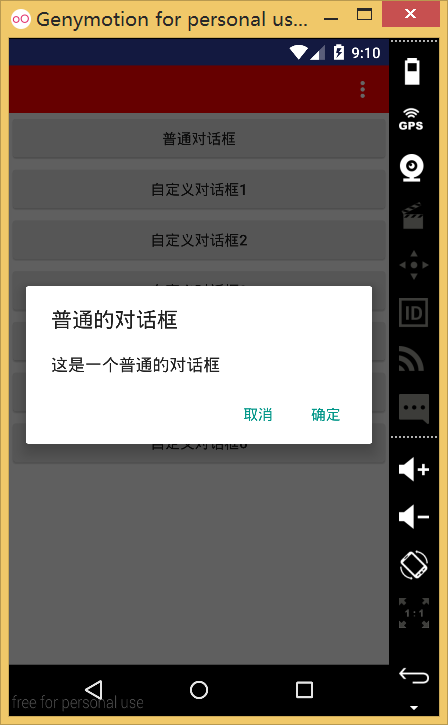 詳解Android中Dialog的使用
在Android中經常要使用Dialog來實現一些提示以及一些特殊的效果,而且樣式也不一樣,每次都得查一大堆資料,還不一定能解決,這裡總結一些常用的Dialog的實踐。普
 androidUI性能優化
1、adapter 和adapterview 復用歷史緩存(item布局和數據緩存)。 2、數據分頁顯示(利用操作引導用戶) 3、優化布局文件xml。(layout盡量不