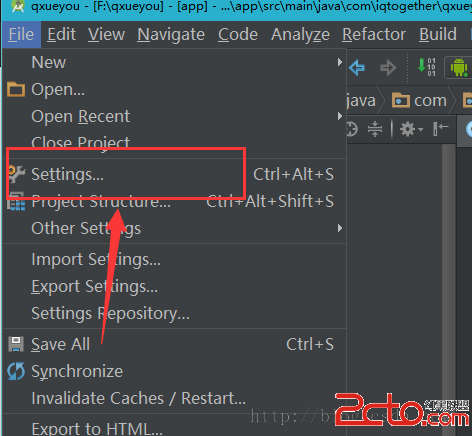
編輯:關於Android編程
Gradle:com.nostra13.universalimageloader universal-image-loader1.9.3
compile 'com.nostra13.universalimageloader:universal-image-loader:1.9.3'
// Create global configuration and initialize ImageLoader with this config
        ImageLoaderConfiguration config = new ImageLoaderConfiguration.Builder(this)
            ...
            .build();
        ImageLoader.getInstance().init(config);
http://site.com/image.png // from Web
file:///mnt/sdcard/image.png // from SD card
file:///mnt/sdcard/video.mp4 // from SD card (video thumbnail)
content://media/external/images/media/13 // from content provider
content://media/external/video/media/13 // from content provider (video thumbnail)
assets://image.png // from assets
drawable:// + R.drawable.img // from drawables (non-9patch images)
NOTE: Use drawable:// only if you really need it! Always consider the native way to load drawables - ImageView.setImageResource(...) instead of using of ImageLoader.
imageLoader.displayImage(imageUri, imageView);
imageLoader.loadImage(imageUri, new SimpleImageLoadingListener() {
    @Override
    public void onLoadingComplete(String imageUri, View view, Bitmap loadedImage) {
        // Do whatever you want with Bitmap
    }
});
// Load image, decode it to Bitmap and return Bitmap synchronously
Bitmap bmp = imageLoader.loadImageSync(imageUri);
// Load image, decode it to Bitmap and return Bitmap to callback
ImageSize targetSize = new ImageSize(80, 50); // result Bitmap will be fit to this size
imageLoader.loadImage(imageUri, targetSize, options, new SimpleImageLoadingListener() {
    @Override
    public void onLoadingComplete(String imageUri, View view, Bitmap loadedImage) {
        // Do whatever you want with Bitmap
    }
});
// Load image, decode it to Bitmap and return Bitmap synchronously
ImageSize targetSize = new ImageSize(80, 50); // result Bitmap will be fit to this size
Bitmap bmp = imageLoader.loadImageSync(imageUri, targetSize, options);
還可以通過ImageLoadingProgressListener監聽進度。
// DON'T COPY THIS CODE TO YOUR PROJECT! This is just example of ALL options using.
// See the sample project how to use ImageLoader correctly.
File cacheDir = StorageUtils.getCacheDirectory(context);
ImageLoaderConfiguration config = new ImageLoaderConfiguration.Builder(context)
        .memoryCacheExtraOptions(480, 800) // default = device screen dimensions 推薦
        .diskCacheExtraOptions(480, 800, null) //.推薦diskCacheExtraOptions(480, 800, null)
        .taskExecutor(...)
        .taskExecutorForCachedImages(...)
        .threadPoolSize(3) // default 推薦1-5
        .threadPriority(Thread.NORM_PRIORITY - 2) // default
        .tasksProcessingOrder(QueueProcessingType.FIFO) // default
        .denyCacheImageMultipleSizesInMemory()  //設置內存緩存不允許緩存一張圖片的多個尺寸,默認允許。
        .memoryCache(new LruMemoryCache(2 * 1024 * 1024)) //使用強引用的緩存使用它,不過推薦使用weak與strong引用結合的UsingFreqLimitedMemoryCache或者使用全弱引用的WeakMemoryCache
        .memoryCacheSize(2 * 1024 * 1024)
        .memoryCacheSizePercentage(13) // default
        .diskCache(new UnlimitedDiscCache(cacheDir)) // default
        .diskCacheSize(50 * 1024 * 1024)
        .diskCacheFileCount(100)
        .diskCacheFileNameGenerator(new HashCodeFileNameGenerator()) // default
        .imageDownloader(new BaseImageDownloader(context)) // default
        .imageDecoder(new BaseImageDecoder()) // default
        .defaultDisplayImageOptions(DisplayImageOptions.createSimple()) // default
        .writeDebugLogs()
        .build();
File cacheDir = StorageUtils.getOwnCacheDirectory(getApplicationContext(), imageloader/Cache);
.diskCache(new UnlimitedDiscCache(cacheDir))//自定義緩存路徑
// DON'T COPY THIS CODE TO YOUR PROJECT! This is just example of ALL options using.
// See the sample project how to use ImageLoader correctly.
DisplayImageOptions options = new DisplayImageOptions.Builder()
        .showImageOnLoading(R.drawable.ic_stub) // resource or drawable
        .showImageForEmptyUri(R.drawable.ic_empty) // resource or drawable
        .showImageOnFail(R.drawable.ic_error) // resource or drawable
        .resetViewBeforeLoading(false)  // default
        .delayBeforeLoading(1000)
        .cacheInMemory(false) // default
        .cacheOnDisk(false) // default
        .preProcessor(...)
        .postProcessor(...)
        .extraForDownloader(...)
        .considerExifParams(false) // default
        .imageScaleType(ImageScaleType.IN_SAMPLE_POWER_OF_2) // default 推薦.imageScaleType(ImageScaleType.EXACTLY) 節省內存
        .bitmapConfig(Bitmap.Config.ARGB_8888) // default 推薦.bitmapConfig(Bitmap.Config.RGB_565)節省內存
        .decodingOptions(...)
        .displayer(new SimpleBitmapDisplayer()) // default //推薦使用RoundedBitmapDisplayer (Displays bitmap with rounded corners)和FadeInBitmapDisplayer (Displays image with fade in animation
        .handler(new Handler()) // default
        .build();
以上配置中的:
// Create default options which will be used for every
//  displayImage(...) call if no options will be passed to this method
DisplayImageOptions defaultOptions = new DisplayImageOptions.Builder()
        ...
        .cacheInMemory(true)
        .cacheOnDisk(true)
boolean pauseOnScroll = false; // or true boolean pauseOnFling = true; // or false PauseOnScrollListener listener = new PauseOnScrollListener(imageLoader, pauseOnScroll, pauseOnFling); listView.setOnScrollListener(listener);
// Then later, when you want to display image
ImageLoader.getInstance().displayImage(imageUrl, imageView); // Default options will be used
或者通過如下方式:
DisplayImageOptions options = new DisplayImageOptions.Builder()
        ...
        .cacheInMemory(true)
        .cacheOnDisk(true)
        ...
        .build();
ImageLoader.getInstance().displayImage(imageUrl, imageView, options); // Incoming options will be used
2、為了防止list(listview,grid等)滾動遲鈍,可以使用PauseOnScrollListenerboolean pauseOnScroll = false; // or true boolean pauseOnFling = true; // or false PauseOnScrollListener listener = new PauseOnScrollListener(imageLoader, pauseOnScroll, pauseOnFling); listView.setOnScrollListener(listener);
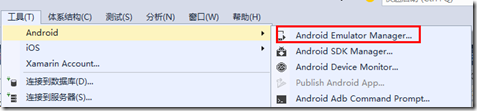 如何快速創建Android模擬器
調試手機應用程序一般先用模擬器來實現,只是因為每次都發布到手機上調試太麻煩了。當應用程序在模擬器上調試沒錯後,再發布到手機運行驗證就行了。一、模擬器創建方式為了在模擬器中
 Android中檢查、設置默認程序詳解
Android作為一個偉大的系統,自然提供了設置默認打開程序的實現.在這篇文章中,我會介紹如何在Android系統中設置默認的程序. 在設置默認程序之前,無非有兩種情況,
 android項目 之 記事本(12) ----- 圖片的等比例縮放及給圖片添加邊框
本文是自己學習所做筆記,歡迎轉載,但請注明出處:http://blog.csdn.net/jesson20121020 在Android的UI開發中經常會遇
 48.Android 標簽TextView的點擊技巧
48.Android 標簽TextView的點擊技巧Android 標簽TextView的點擊技巧 前言 ClickableSpan源碼 自定義ClickableSpan