編輯:關於Android編程
package com.bn.Sample5_1;

import android.opengl.Matrix;

//存儲系統矩陣狀態的類
public class MatrixState
{
	private static float[] mProjMatrix = new float[16];//4x4矩陣 投影用
    private static float[] mVMatrix = new float[16];//攝像機位置朝向9參數矩陣
    private static float[] mMVPMatrix;//最後起作用的總變換矩陣

    //設置攝像機
    public static void setCamera
    (
    		float cx,	//攝像機位置x
    		float cy,   //攝像機位置y
    		float cz,   //攝像機位置z
    		float tx,   //攝像機目標點x
    		float ty,   //攝像機目標點y
    		float tz,   //攝像機目標點z
    		float upx,  //攝像機UP向量X分量
    		float upy,  //攝像機UP向量Y分量
    		float upz   //攝像機UP向量Z分量
    )
    {
    	Matrix.setLookAtM
        (
        		mVMatrix,
        		0,
        		cx,
        		cy,
        		cz,
        		tx,
        		ty,
        		tz,
        		upx,
        		upy,
        		upz
        );
    }

    //設置正交投影參數
    public static void setProjectOrtho
    (
    	float left,		//near面的left
    	float right,    //near面的right
    	float bottom,   //near面的bottom
    	float top,      //near面的top
    	float near,		//near面距離
    	float far       //far面距離
    )
    {
    	Matrix.orthoM(mProjMatrix, 0, left, right, bottom, top, near, far);
    }

    //獲取具體物體的總變換矩陣
    public static float[] getFinalMatrix(float[] spec)
    {
    	mMVPMatrix=new float[16];
    	Matrix.multiplyMM(mMVPMatrix, 0, mVMatrix, 0, spec, 0);
        Matrix.multiplyMM(mMVPMatrix, 0, mProjMatrix, 0, mMVPMatrix, 0);
        return mMVPMatrix;
    }
}
package com.bn.Sample5_1;
import android.opengl.GLSurfaceView;
import android.view.MotionEvent;
import android.opengl.GLES20;
import javax.microedition.khronos.egl.EGLConfig;
import javax.microedition.khronos.opengles.GL10;
import android.content.Context;

class MySurfaceView extends GLSurfaceView
{
	private final float TOUCH_SCALE_FACTOR = 180.0f/320;//角度縮放比例
    private SceneRenderer mRenderer;//場景渲染器

	private float mPreviousY;//上次的觸控位置Y坐標
    private float mPreviousX;//上次的觸控位置X坐標

	public MySurfaceView(Context context) {
        super(context);
        this.setEGLContextClientVersion(2); //設置使用OPENGL ES2.0
        mRenderer = new SceneRenderer();	//創建場景渲染器
        setRenderer(mRenderer);				//設置渲染器
        setRenderMode(GLSurfaceView.RENDERMODE_CONTINUOUSLY);//設置渲染模式為主動渲染
    }

	//觸摸事件回調方法
    @Override
    public boolean onTouchEvent(MotionEvent e) {
        float y = e.getY();
        float x = e.getX();
        switch (e.getAction()) {
        case MotionEvent.ACTION_MOVE:
            float dy = y - mPreviousY;//計算觸控筆Y位移
            float dx = x - mPreviousX;//計算觸控筆X位移
            for(SixPointedStar h:mRenderer.ha)
            {
            	h.yAngle += dx * TOUCH_SCALE_FACTOR;//設置六角星數組中的各個六角星繞y軸旋轉角度
                h.xAngle+= dy * TOUCH_SCALE_FACTOR;//設置六角星數組中的各個六角星繞x軸旋轉角度
            }
        }
        mPreviousY = y;//記錄觸控筆位置
        mPreviousX = x;//記錄觸控筆位置
        return true;
    }

	private class SceneRenderer implements GLSurfaceView.Renderer
    {
    	SixPointedStar[] ha=new SixPointedStar[6];//六角星數組

        public void onDrawFrame(GL10 gl)
        {
        	//清除深度緩沖與顏色緩沖
            GLES20.glClear( GLES20.GL_DEPTH_BUFFER_BIT | GLES20.GL_COLOR_BUFFER_BIT);
            //繪制六角星數組中的各個六角星
            for(SixPointedStar h:ha)
            {
            	h.drawSelf();
            }
        }

        public void onSurfaceChanged(GL10 gl, int width, int height) {
            //設置視窗大小及位置
        	GLES20.glViewport(0, 0, width, height);
        	//計算GLSurfaceView的寬高比
        	float ratio= (float) width / height;
            //設置平行投影
        	MatrixState.setProjectOrtho(-ratio, ratio, -1, 1, 1, 10);

            //調用此方法產生攝像機9參數位置矩陣
			MatrixState.setCamera(
					0, 0, 3f,
					0, 0, 0f,
					0f, 1.0f, 0.0f
					);
        }

        public void onSurfaceCreated(GL10 gl, EGLConfig config) {
            //設置屏幕背景色RGBA
            GLES20.glClearColor(0.5f,0.5f,0.5f, 1.0f);
            //創建六角星數組中的各個對象
            for(int i=0;ipackage com.bn.Sample5_1;

import java.io.ByteArrayOutputStream;
import java.io.InputStream;

import android.content.res.Resources;
import android.opengl.GLES20;
import android.util.Log;

//加載頂點Shader與片元Shader的工具類
public class ShaderUtil
{
   //加載制定shader的方法
   public static int loadShader
   (
		 int shaderType, //shader的類型  GLES20.GL_VERTEX_SHADER   GLES20.GL_FRAGMENT_SHADER
		 String source   //shader的腳本字符串
   )
   {
	    //創建一個新shader
        int shader = GLES20.glCreateShader(shaderType);
        //若創建成功則加載shader
        if (shader != 0)
        {
        	//加載shader的源代碼
            GLES20.glShaderSource(shader, source);
            //編譯shader
            GLES20.glCompileShader(shader);
            //存放編譯成功shader數量的數組
            int[] compiled = new int[1];
            //獲取Shader的編譯情況
            GLES20.glGetShaderiv(shader, GLES20.GL_COMPILE_STATUS, compiled, 0);
            if (compiled[0] == 0)
            {//若編譯失敗則顯示錯誤日志並刪除此shader
                Log.e("ES20_ERROR", "Could not compile shader " + shaderType + ":");
                Log.e("ES20_ERROR", GLES20.glGetShaderInfoLog(shader));
                GLES20.glDeleteShader(shader);
                shader = 0;
            }
        }
        return shader;
    }

   //創建shader程序的方法
   public static int createProgram(String vertexSource, String fragmentSource)
   {
	    //加載頂點著色器
        int vertexShader = loadShader(GLES20.GL_VERTEX_SHADER, vertexSource);
        if (vertexShader == 0)
        {
            return 0;
        }

        //加載片元著色器
        int pixelShader = loadShader(GLES20.GL_FRAGMENT_SHADER, fragmentSource);
        if (pixelShader == 0)
        {
            return 0;
        }

        //創建程序
        int program = GLES20.glCreateProgram();
        //若程序創建成功則向程序中加入頂點著色器與片元著色器
        if (program != 0)
        {
        	//向程序中加入頂點著色器
            GLES20.glAttachShader(program, vertexShader);
            checkGlError("glAttachShader");
            //向程序中加入片元著色器
            GLES20.glAttachShader(program, pixelShader);
            checkGlError("glAttachShader");
            //鏈接程序
            GLES20.glLinkProgram(program);
            //存放鏈接成功program數量的數組
            int[] linkStatus = new int[1];
            //獲取program的鏈接情況
            GLES20.glGetProgramiv(program, GLES20.GL_LINK_STATUS, linkStatus, 0);
            //若鏈接失敗則報錯並刪除程序
            if (linkStatus[0] != GLES20.GL_TRUE)
            {
                Log.e("ES20_ERROR", "Could not link program: ");
                Log.e("ES20_ERROR", GLES20.glGetProgramInfoLog(program));
                GLES20.glDeleteProgram(program);
                program = 0;
            }
        }
        return program;
    }

   //檢查每一步操作是否有錯誤的方法
   public static void checkGlError(String op)
   {
        int error;
        while ((error = GLES20.glGetError()) != GLES20.GL_NO_ERROR)
        {
            Log.e("ES20_ERROR", op + ": glError " + error);
            throw new RuntimeException(op + ": glError " + error);
        }
   }

   //從sh腳本中加載shader內容的方法
   public static String loadFromAssetsFile(String fname,Resources r)
   {
   	String result=null;
   	try
   	{
   		InputStream in=r.getAssets().open(fname);
			int ch=0;
		    ByteArrayOutputStream baos = new ByteArrayOutputStream();
		    while((ch=in.read())!=-1)
		    {
		      	baos.write(ch);
		    }
		    byte[] buff=baos.toByteArray();
		    baos.close();
		    in.close();
   		result=new String(buff,"UTF-8");
   		result=result.replaceAll("\\r\\n","\n");
   	}
   	catch(Exception e)
   	{
   		e.printStackTrace();
   	}
   	return result;
   }
}


package com.bn.Sample5_1;
import static com.bn.Sample5_1.ShaderUtil.createProgram;

import java.nio.ByteBuffer;
import java.nio.ByteOrder;
import java.nio.FloatBuffer;
import java.util.ArrayList;
import java.util.List;

import android.opengl.GLES20;
import android.opengl.Matrix;

//六角星
public class SixPointedStar
{
	int mProgram;//自定義渲染管線著色器程序id
    int muMVPMatrixHandle;//總變換矩陣引用
    int maPositionHandle; //頂點位置屬性引用
    int maColorHandle; //頂點顏色屬性引用
    String mVertexShader;	//頂點著色器代碼腳本
    String mFragmentShader;	//片元著色器代碼腳本
    static float[] mMMatrix = new float[16];	//具體物體的3D變換矩陣,包括旋轉、平移、縮放

	FloatBuffer   mVertexBuffer;//頂點坐標數據緩沖
	FloatBuffer   mColorBuffer;//頂點著色數據緩沖
    int vCount=0;
    float yAngle=0;//繞y軸旋轉的角度
    float xAngle=0;//繞z軸旋轉的角度
    final float UNIT_SIZE=1;

    public SixPointedStar(MySurfaceView mv,float r,float R,float z)
    {
    	//調用初始化頂點數據的initVertexData方法
    	initVertexData(R,r,z);
    	//調用初始化著色器的intShader方法
    	initShader(mv);
    }

    //自定義初始化頂點數據的initVertexData方法
    public void initVertexData(float R,float r,float z)
    {
		List flist=new ArrayList();
		float tempAngle=360/6;
		for(float angle=0;angle<360;angle+=tempAngle)
		{
			//第一個三角形
			//第一個中心點
			flist.add(0f);
			flist.add(0f);
			flist.add(z);
			//第二個點
			flist.add((float) (R*UNIT_SIZE*Math.cos(Math.toRadians(angle))));
			flist.add((float) (R*UNIT_SIZE*Math.sin(Math.toRadians(angle))));
			flist.add(z);
			//第三個點
			flist.add((float) (r*UNIT_SIZE*Math.cos(Math.toRadians(angle+tempAngle/2))));
			flist.add((float) (r*UNIT_SIZE*Math.sin(Math.toRadians(angle+tempAngle/2))));
			flist.add(z);

			//第二個三角形
			//第一個中心點
			flist.add(0f);
			flist.add(0f);
			flist.add(z);
			//第二個點
			flist.add((float) (r*UNIT_SIZE*Math.cos(Math.toRadians(angle+tempAngle/2))));
			flist.add((float) (r*UNIT_SIZE*Math.sin(Math.toRadians(angle+tempAngle/2))));
			flist.add(z);
			//第三個點
			flist.add((float) (R*UNIT_SIZE*Math.cos(Math.toRadians(angle+tempAngle))));
			flist.add((float) (R*UNIT_SIZE*Math.sin(Math.toRadians(angle+tempAngle))));
			flist.add(z);
		}
		vCount=flist.size()/3;
		float[] vertexArray=new float[flist.size()];
		for(int i=0;i<vcount;i++) 1="" 3="=0){//中心點為白色" begin="===========================" "="" bytebuffer="" cbb="ByteBuffer.allocateDirect(colorArray.length*4);" colorarray="new" gles20.glvertexattribpointer="" i="0;ipackage com.bn.Sample5_1;
import android.app.Activity;
import android.content.pm.ActivityInfo;
import android.os.Bundle;
import android.view.Window;
import android.view.WindowManager;

public class Sample5_1_Activity extends Activity {
	private MySurfaceView mGLSurfaceView;
    @Override
    protected void onCreate(Bundle savedInstanceState)
    {
        super.onCreate(savedInstanceState);
        //設置為全屏
        requestWindowFeature(Window.FEATURE_NO_TITLE);
		getWindow().setFlags(WindowManager.LayoutParams.FLAG_FULLSCREEN ,
		              WindowManager.LayoutParams.FLAG_FULLSCREEN);
		//設置為橫屏模式
		setRequestedOrientation(ActivityInfo.SCREEN_ORIENTATION_PORTRAIT);

		//初始化GLSurfaceView
        mGLSurfaceView = new MySurfaceView(this);

		//切換到主界面
		setContentView(mGLSurfaceView);

        mGLSurfaceView.requestFocus();//獲取焦點
        mGLSurfaceView.setFocusableInTouchMode(true);//設置為可觸控

    }

    @Override
    protected void onResume() {
        super.onResume();
        mGLSurfaceView.onResume();
    }

    @Override
    protected void onPause() {
        super.onPause();
        mGLSurfaceView.onPause();
    }
}
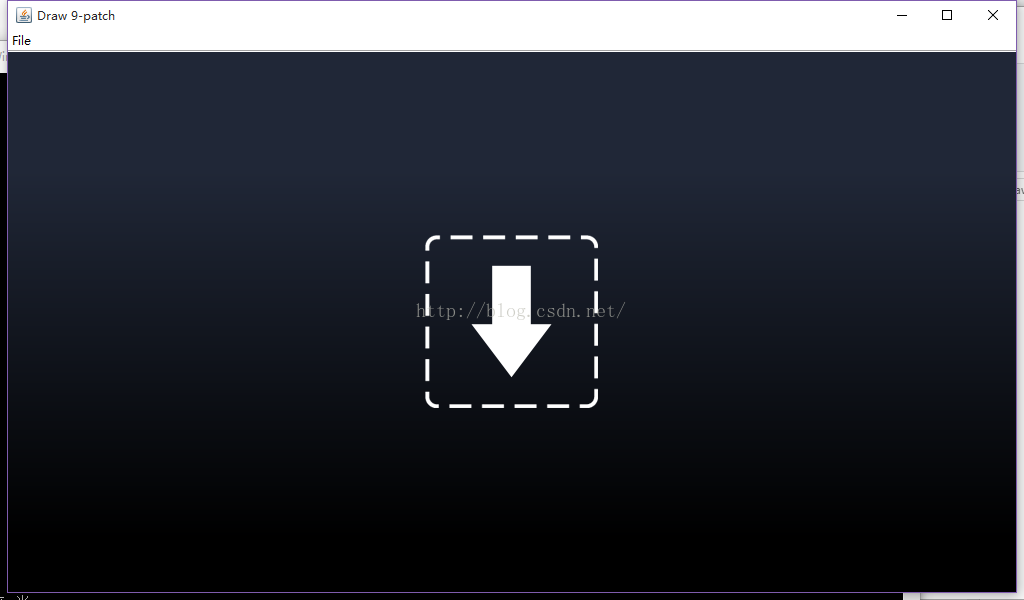 安卓 .9.png圖片寫聊天對話框的 詳細教程
最近在學Android 學的不好 然後看到了用.9.png寫對話框的哪裡,但是書上寫的太簡單 感覺做出來和書上的不一樣 然後就去各種百度 感覺網上關於這個東西的資料都是粘
 Android手把手教大家制作APP首頁(下拉刷新、自動加載)
一、概述作為一名三年Android開發經驗的程序員,今天和大家一起實戰一款APP的首頁功能,這個首頁在我們平時接觸中還是很常見的,雖然頁面簡單,但是裡面涉及的功能點還是挺
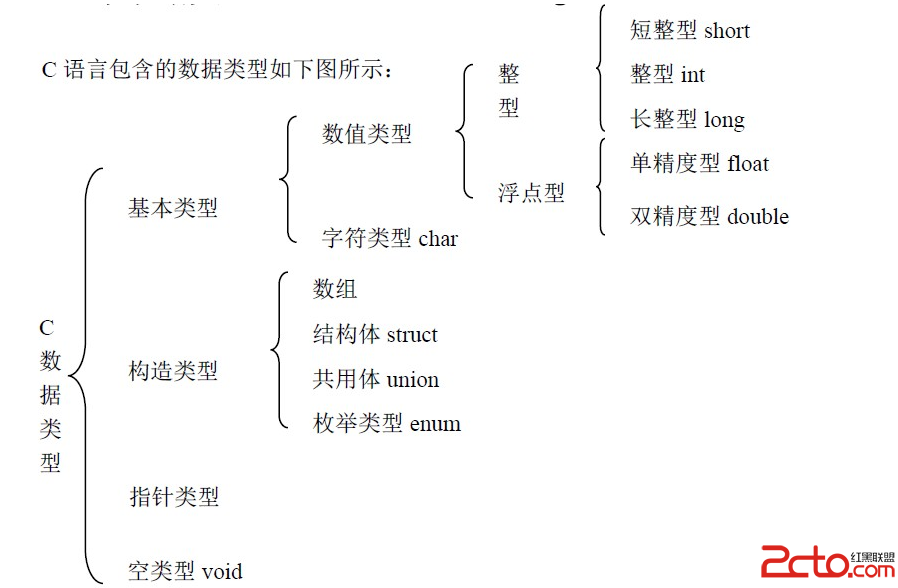 Android For JNI(二)——C語言中的數據類型,輸出,輸入函數以及操作內存地址,內存修改器
Android For JNI(二)——C語言中的數據類型,輸出,輸入函數以及操作內存地址,內存修改器 當我們把Hello World寫完之後,我
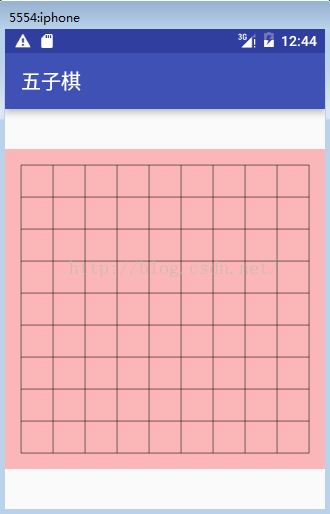 Android - 五子連珠
繪制棋盤面板:MainActivity.javapackage com.xbmu.wuziqi;import android.support.v7.app.AppComp