編輯:關於Android編程
我們常見的桌面小插件,例如一個桌面上系統setgings開關組合,可以控制藍牙,wifi是否開啟,例如一個桌面的小天氣等等;這些都是Appwidget的使用例子。
下面介紹如何使用Appwidget;
在使用的過程中涉及到一些關鍵類,下面一一列舉:
該類是BroadcastReceiver的子類,裡面的onReceive方法裡實現了對幾個常用的action的監聽;
例如:
AppWidgetManager.ACTION_APPWIDGET_UPDATE
AppWidgetManager.ACTION_APPWIDGET_DELETED
AppWidgetManager.ACTION_APPWIDGET_OPTIONS_CHANGED
AppWidgetManager.ACTION_APPWIDGET_ENABLED
AppWidgetManager.ACTION_APPWIDGET_DISABLED
AppWidgetManager.ACTION_APPWIDGET_RESTORED
當接收到其中一個時,會調用對應的空的實現方法,你可以在你繼承該AppWidgetProvider的類中
有選擇的重寫如下方法:
onReceive(Context, Intent):
除了上面的幾種action監聽外,你還可以自己定義一些來監聽。
void onUpdate(Context context, AppWidgetManager appWidgetManager, int[] appWidgetIds):
當需要提供RemoteViews時調用
void onDeleted(Context context, int[] appWidgetIds)
當widget實例被刪除時調用
void onAppWidgetOptionsChanged(Context context, AppWidgetManager appWidgetManager,
int appWidgetId, Bundle newOptions)
當widget的大小發生改變時調用,
void onEnabled(Context context)
當第一個widget被實例化時調用,
void onDisabled(Context context)
最後一個widget實例被刪除時調用,
void onRestored(Context context, int[] oldWidgetIds, int[] newWidgetIds)
當widget實例備份恢復時調用,
用來更新widiget的狀態和獲取已經安裝的widget的信息,AppWidgetManager getInstance(Context context)獲取實例。
該類中也有一些方法可以看看
updateAppWidget(int[] appWidgetIds, RemoteViews views)可以在ACTION_APPWIDGET_UPDATE執行
其中views裡面的view持有的bitmap所占內存不能超過screen width x screen height x 4 x 1.5字節
notifyAppWidgetViewDataChanged(int[] appWidgetIds, int viewId)
更新數據
List getInstalledProviders()
獲取已經安裝的AppWidget
AppWidgetProviderInfo getAppWidgetInfo(int appWidgetId)
根據id獲取Info
一些常用屬性介紹:
resizeMode :RESIZE_NONE,RESIZE_HORIZONTAL,RESIZE_VERTICAL,RESIZE_BOTH:在某些方向上的大小是否可調
widgetCategory:WIDGET_CATEGORY_HOME_SCREEN,WIDGET_CATEGORY_KEYGUARD:在桌面或者鎖屏界面顯示
ComponentName:對應的是widget在manifest中的name屬性
minWidth,minHeight:最小寬和高,單位dp
minResizeWidth 和 minResizeHeight :
使用這兩個屬性,可以允許用戶重新調整 widget 的大小,使 widget 的大小可以小於 minWidth 和 minHeight。
updatePeriodMillis,更新頻率,單位ms,最好設置為不要比1小時更短的時間,如果短於30分鐘,系統還是只會30分鐘一次。這個使系統實現的更新機制。
如果我們要更短的話,就只有使用service,AlarmManager
initialLayout,widget添加到桌面時的初始布局
initialKeyguardLayout,widget在添加到鎖屏界面的初始布局,只有當category是在鎖屏類型時有效。
configure:定義了 widget 的配置 Activity
previewImage:  指定預覽圖,該預覽圖在用戶選擇 widget 時出現,如果沒有提供,則會顯示應用的圖標
默認情況下(即不設置android:widgetCategory屬性),Android是將widget添加到 home screen 中。但在Android 4.2中,若用戶希望 widget 可以被添加到lock screen中,可以通過設置 widget 的 android:widgetCategory 屬性包含keyguard來完成。
當你把 widget 添加到lock screen中時,你可能對它進行定制化操作,以區別於添加到home screen中的情況。 你能夠通過 getAppWidgetOptions() 來進行判斷 widget 是被添加到lock screen中,還是home screen中。通過 getApplicationOptions() 獲取 Bundle對象,然後讀取 Bundle 的OPTION_APPWIDGET_HOST_CATEGORY值:若值為 WIDGET_CATEGORY_HOME_SCREEN, 則表示該 widget 被添加到home screen中; 若值為 WIDGET_CATEGORY_KEYGUARD,則表示該 widget 被添加到lock screen中。
布局中的問題:
布局時要留有widget的margin,padding
大小設置:70 × n ? 30,n為多少行或列
支持的根布局:
FrameLayout
LinearLayout
RelativeLayout
GridLayout
支持的控件:
AnalogClock
Button
Chronometer
ImageButton
ImageView
ProgressBar
TextView
ViewFlipper
ListView
GridView
StackView
AdapterViewFlipper
首先要定義一個AppWidgetProvider ,這裡繼承該類;
ExampleAppWidgetProvider.java
package com.example.sample;

import java.util.HashSet;
import java.util.Iterator;
import java.util.Set;

import android.annotation.SuppressLint;
import android.app.PendingIntent;
import android.appwidget.AppWidgetManager;
import android.appwidget.AppWidgetProvider;
import android.content.Context;
import android.content.Intent;
import android.net.Uri;
import android.os.Bundle;
import android.util.Log;
import android.widget.RemoteViews;
import android.widget.Toast;

@SuppressLint("NewApi")
public class ExampleAppWidgetProvider extends AppWidgetProvider {
	// 保存 widget 的id的HashSet,每新建一個 widget 都會為該 widget 分配一個 id。
	private static Set idsSet = new HashSet();
	// 按鈕信息
	private static final int BUTTON_SHOW = 1;
	// 圖片數組
	private static final int[] ARR_IMAGES = { R.drawable.sample_0,
			R.drawable.sample_1, R.drawable.sample_2, R.drawable.sample_3,
			R.drawable.sample_4, R.drawable.sample_5, R.drawable.sample_6,
			R.drawable.sample_7, };
	private static final String TAG = "Provider";
	private static Intent intent;

	// 第一個widget被創建時調用
	@Override
	public void onEnabled(Context context) {
		Log.d(TAG, "onEnabled");
		// 在第一個 widget 被創建時,開啟服務
		intent = new Intent(context, ExampleAppWidgetService.class);
		context.startService(intent);
	}

	// 最後一個widget被刪除時調用
	@Override
	public void onDisabled(Context context) {
		Log.d(TAG, "onDisabled");

		// 在最後一個 widget 被刪除時,終止服務
		context.stopService(intent);
	}

	@Override
	public void onReceive(Context context, Intent intent) {
		super.onReceive(context, intent);
		final String action = intent.getAction();
		Log.d(TAG, "OnReceive:Action: " + action);
		if (ExampleAppWidgetService.UPDATE_WIDGET_ACTION.equals(action)) {
			// “更新”廣播
			updateAllAppWidgets(context, AppWidgetManager.getInstance(context),
					idsSet);
		} else if (intent.hasCategory(Intent.CATEGORY_ALTERNATIVE)) {
			// “按鈕點擊”廣播
			Uri data = intent.getData();
			int buttonId = Integer.parseInt(data.getSchemeSpecificPart());
			if (buttonId == BUTTON_SHOW) {
				Log.d(TAG, "Button wifi clicked");
				Toast.makeText(context, "Button Clicked", Toast.LENGTH_SHORT)
						.show();
			}
		}
	}

	// onUpdate() 在更新 widget 時,被執行,
	@Override
	public void onUpdate(Context context, AppWidgetManager appWidgetManager,
			int[] appWidgetIds) {
		Log.d(TAG, "onUpdate(): appWidgetIds.length=" + appWidgetIds.length);
		// 每次 widget 被創建時,對應的將widget的id添加到set中
		for (int appWidgetId : appWidgetIds) {
			idsSet.add(Integer.valueOf(appWidgetId));
		}
		prtSet();
	}

	// 當 widget 被初次添加 或者 當 widget 的大小被改變時,被調用
	@Override
	public void onAppWidgetOptionsChanged(Context context,
			AppWidgetManager appWidgetManager, int appWidgetId,
			Bundle newOptions) {
		super.onAppWidgetOptionsChanged(context, appWidgetManager, appWidgetId,
				newOptions);
	}

	// widget被刪除時調用
	@Override
	public void onDeleted(Context context, int[] appWidgetIds) {
		Log.d(TAG, "onDeleted(): appWidgetIds.length=" + appWidgetIds.length);

		// 當 widget 被刪除時,對應的刪除set中保存的widget的id
		for (int appWidgetId : appWidgetIds) {
			idsSet.remove(Integer.valueOf(appWidgetId));
		}
		prtSet();

	}

	// 更新所有的 widget
	private void updateAllAppWidgets(Context context,
			AppWidgetManager appWidgetManager, Set set) {

		Log.d(TAG, "updateAllAppWidgets(): size=" + set.size());

		// widget 的id
		int appID;
		// 迭代器,用於遍歷所有保存的widget的id
		Iterator it = set.iterator();

		while (it.hasNext()) {
			appID = ((Integer) it.next()).intValue();
			// 隨機獲取一張圖片
			int index = (new java.util.Random().nextInt(ARR_IMAGES.length));

			Log.d(TAG, "onUpdate(): index=" + index);
			// 獲取 example_appwidget.xml 對應的RemoteViews
			RemoteViews remoteView = new RemoteViews(context.getPackageName(),
					R.layout.example_appwidget);

			// 設置顯示圖片
			remoteView.setImageViewResource(R.id.iv_show, ARR_IMAGES[index]);

			// 設置點擊按鈕對應的PendingIntent:即點擊按鈕時,發送廣播。
			remoteView.setOnClickPendingIntent(R.id.btn_show,
					getPendingIntent(context, BUTTON_SHOW));

			// 更新 widget
			appWidgetManager.updateAppWidget(appID, remoteView);
		}
	}

	private PendingIntent getPendingIntent(Context context, int buttonId) {
		Intent intent = new Intent();
		intent.setClass(context, ExampleAppWidgetProvider.class);
		intent.addCategory(Intent.CATEGORY_ALTERNATIVE);
		intent.setData(Uri.parse("custom:" + buttonId));
		PendingIntent pi = PendingIntent.getBroadcast(context, 0, intent, 0);
		return pi;
	}

	// 調試用:遍歷set
	private void prtSet() {
		int index = 0;
		int size = idsSet.size();
		Iterator it = idsSet.iterator();
		Log.d(TAG, "total:" + size);
		while (it.hasNext()) {
			Log.d(TAG, index + " -- " + ((Integer) it.next()).intValue());
		}
	}
}
接著在res下建立xml文件夾,在文件夾下定義一個文件來描述該provider
example_appwidget_info.xml
provider隊友的布局;example_appwidget.xml
接著定義一個服務service,來更新provider;
ExampleAppWidgetService.java
package com.example.sample;

import android.app.Service;
import android.content.Intent;
import android.os.IBinder;

public class ExampleAppWidgetService extends Service {

	public static final String UPDATE_WIDGET_ACTION = "com.example.sample.ExampleAppWidgetProvider.UPDATE_ACTION";
	private Thread mUpdateThread;

	@Override
	public IBinder onBind(Intent intent) {
		return null;
	}

	@Override
	public void onCreate() {
		super.onCreate();
		updateWidget();
	}

	@Override
	public void onDestroy() {
		super.onDestroy();
		// 中斷線程,即結束線程。
		if (mUpdateThread != null) {
			mUpdateThread.interrupt();
		}
	}

	private void updateWidget() {
		mUpdateThread = new Thread() {
			public void run() {
				while (true) {
					try {
						Thread.sleep(5 * 1000); //每隔5s更新一次
					} catch (InterruptedException e) {
						e.printStackTrace();
					}
					sendBroadcast(new Intent(UPDATE_WIDGET_ACTION));
				}
			};
		};
		mUpdateThread.start();
	}

}
接著在manifest裡聲明,provider,service
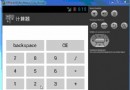 從零開始學android實現計算器功能示例分享(計算器源碼)
下面是效果展示:復制代碼 代碼如下:<?xml version=1.0 encoding=utf-8?><LinearLayout xmlns:andr
 Android實現閱讀APP平移翻頁效果
自己做的一個APP需要用到翻頁閱讀,網上看過立體翻頁效果,不過bug太多了還不兼容。看了一下多看閱讀翻頁是采用平移翻頁的,於是就仿寫了一個平移翻頁的控件。效果如下:在翻頁
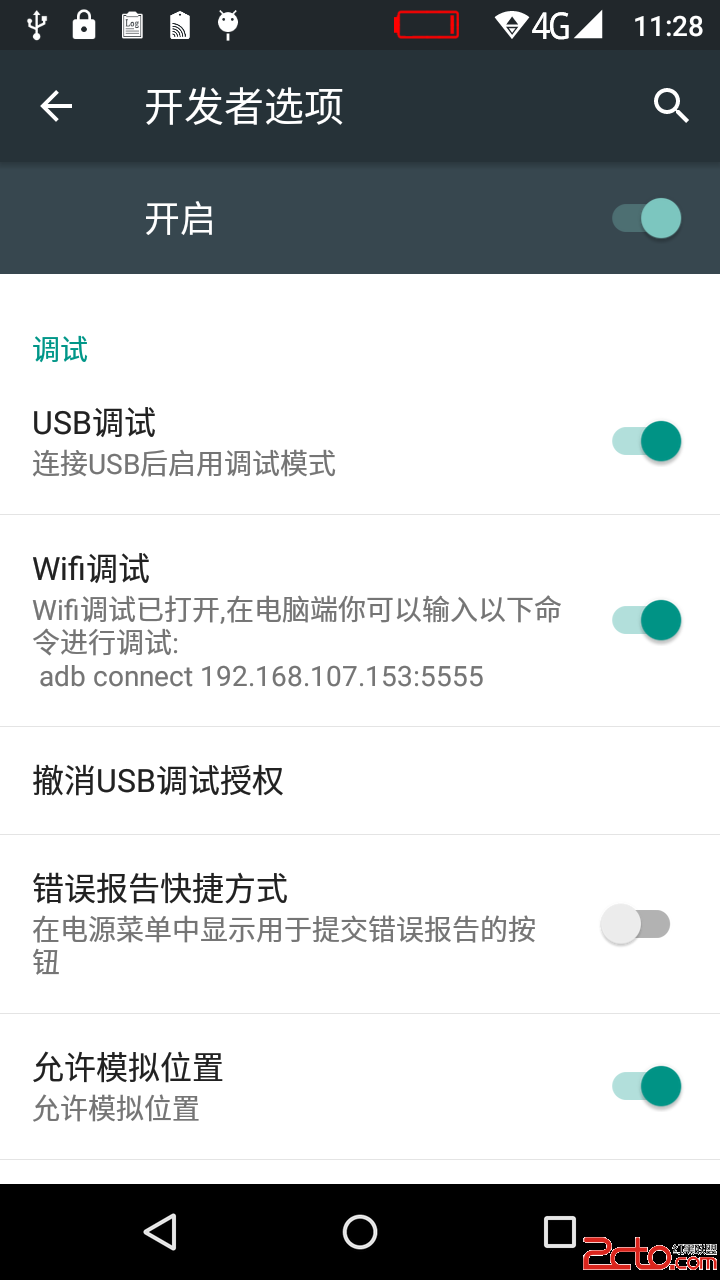 Android系統移植與調試之-------)如何添加一個adb wifi無線調試的功能【開發者選項】-【Wifi調試】
首先弄懂怎麼設置adb wifi無線調試的功能,如下所示。1. 手機端開啟adb tcp連接端口:/$setprop service.adb.tcp.port 5555:
 Android Template(模板) 編寫(二)
上篇文章介紹的方法只能創建類模板,不能創建xml文件等資源文件以及配置文件等,這篇文章來介紹創建可以一次創建多個文件多種類型文件的方法。 我們在使用AndroidStu