編輯:關於Android編程
也是忙忙碌碌好幾天,今天又有時間了,繼續這個文章的編寫。今天是這篇文章的最後一部分。主要內容包括以下幾點:
1.將中文名字轉化成拼音,並提取首字母,進行排序。
2.實現分組列表Adapter模板。
3.將列表與索引結合在一起。
pinyin4j是一個將中文轉化成拼音的高效工具,我的源碼中帶了這個依賴包。通過這個工具,可以先獲取一個中文的拼音。
    public static String getLetter(String name) {
        StringBuilder sb = new StringBuilder();
        for (int i = 0; i < name.length(); i++) {
            char c = name.charAt(i);
            String[] str = PinyinHelper.toHanyuPinyinStringArray(c);
            if (str != null && str.length >= 1) {
                sb.append(str[0].charAt(0));
            } else {
                sb.append(c);
            }

        }
        return sb.toString();
    }
上面的步驟,已經可以將中文轉化成拼音簡寫了,下面,要做的是什麼呢?
下面的思路是這樣的:
1.先對列表數據按字母順序排序。
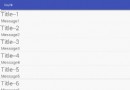
2.adapter的每一個itemView都是帶字母分組頭和內容的。只是,只有在一組中文開頭的首個位置才顯示。也就是說,張三豐,張君寶等,排在第一個的顯示頭部,也就是z,其他的隱藏頭部。所以這個位置要計算出來。
3.因為每一個item包含了頭部,所以,點擊事件需要在真實內容區域,不在頭部。因此,ListView的點擊事件需要禁用,把事件寫在adapter的內容控件上。
1.1.先對字母排序,排序需要知道排序的內容,先定義一個接口:
package com.mjc.contactlistdemo.sort_by_letter;

/**
 * Created by mjc on 2016/5/24.
 */
public interface ISort {
    String getSortName();
}
之後,我們需要使用的數據,只要繼承他,就可以使用我的帶字母索引列表。
1.2.自定義排序方法:
排序的方法,需要我們借助Collections的sorts方法來排序:
/**
     * 按照字母排序
     *
     * @param list
     * @return
     */
    public static  void sortByLetter(ArrayList list) {
        Collections.sort(list, new Comparator() {
            @Override
            public int compare(T lhs, T rhs) {
                String l = getLetter(lhs.getSortName());
                String r = getLetter(rhs.getSortName());
                int minLength = Math.min(l.length(), r.length());
                int result = 0;
                for (int i = 0; i < minLength; i++) {
                    if (l.charAt(i) < r.charAt(i)) {
                        result = -1;
                        break;
                    } else if (l.charAt(i) > r.charAt(i)) {
                        result = 1;
                        break;
                    } else {
                        result = 0;
                        continue;
                    }

                }

                if (result == 0) {
                    return l.length() > r.length() ? 1 : -1;
                }
                return result;
            }
        });
    }
2.1.Adapter的實現。
我將計算都提取到了一個BaseSortByLetterAdapter裡面,但是在子Adapter裡面,需要調用BaseSortByLetterAdapter的方法,得到第一個分組的位置。
package com.mjc.contactlistdemo.sort_by_letter; import android.widget.BaseAdapter; import android.widget.SectionIndexer; import java.util.ArrayList; /** * Created by mjc on 2016/5/24. */ public abstract class BaseSortByLetterAdapterimplements SectionIndexer,這個東西不是重點,他的作用是,當你開啟ListView的快速滑動後,拖動滑動條是可以顯示當前所處的數據的字母。只不過我這裡實現方式,和系統的原理差不多,因此也是實現了這個接口,之後用到我們的IndexView上就好。extends BaseAdapter implements SectionIndexer { protected String[] sections; protected ArrayList datas; public BaseSortByLetterAdapter(ArrayList datas) { sections = new String[]{ "A", "B", "C", "D", "E", "F", "G", "H", "I", "J", "K", "L", "M", "N", "O", "P", "Q", "R", "S", "T", "U", "V", "W", "X", "Y", "Z","#"}; this.datas = datas; } @Override public String[] getSections() { return sections; } //需要進行排序的字符串 protected abstract String getSortString(T bean); //通過section位置,獲取首個position位置 @Override public int getPositionForSection(int sectionIndex) { String section = sections[sectionIndex]; //todo ListView的數據要按照字母順序排列 for (int i = 0; i < getCount(); i++) { T bean = datas.get(i); String headerLetter = SortUtil.getLetter(getSortString(bean)); if (String.valueOf(headerLetter.charAt(0)).equalsIgnoreCase(section)) { return i; } else if (sectionIndex == 0) { return 0; } } return -1; } //通過位置獲取sectionIndex位置 @Override public int getSectionForPosition(int position) { T bean = datas.get(position); String name = getSortString(bean); String letter = SortUtil.getLetter(name); String header = String.valueOf(letter.charAt(0)); for (int i = 0; i < sections.length; i++) { if (sections[i].equalsIgnoreCase(header)) { return i; } } return 0; } public int getSectionIndex(String section) { for (int i = 0; i < sections.length; i++) { if (section.equalsIgnoreCase(sections[i])) { return i; } } return 0; } }
這裡面重要的一點是:我們需要知道第一個字母出現的位置,以便於我們現實這個位置的title字母,其他位置隱藏。這樣我們的分組效果就能實現了。 為了獲取這個位置,我們的邏輯是這樣的:通過位置獲取當前位置的字母,再通過這個字母獲取這個字母在列表中的第一個位置,如果第一個位置和當前位置相同則表示是第一個位置。上面的主要兩個方法就是為這個服務的。
通過位置獲取對應的字母字母的位置,原理很簡單,先獲取當前數據的排序字母,然後和字母列表比較,得到字母的位置。
  @Override
    public int getSectionForPosition(int position) {
        T bean = datas.get(position);
        String name = getSortString(bean);
        String letter = SortUtil.getLetter(name);
        String header = String.valueOf(letter.charAt(0));
        for (int i = 0; i < sections.length; i++) {
            if (sections[i].equalsIgnoreCase(header)) {
                return i;
            }
        }
        return 0;
    }
再通過字母的位置,獲取列表中第一個數據的位置,之後在getView中將這個位置和當前位置做比較,如果相等,就顯示title,不相等就隱藏。
 //通過section位置,獲取首個position位置
    @Override
    public int getPositionForSection(int sectionIndex) {
        String section = sections[sectionIndex];
        //todo ListView的數據要按照字母順序排列
        for (int i = 0; i < getCount(); i++) {
            T bean = datas.get(i);
            String headerLetter = SortUtil.getLetter(getSortString(bean));

            if (String.valueOf(headerLetter.charAt(0)).equalsIgnoreCase(section)) {
                return i;
            } else if (sectionIndex == 0) {
                return 0;
            }
        }
        return -1;
    }
到這裡,基本是結束了,接下來是使用方法:
1.定義一個實體類,實現Isort接口。
2.定義一個Adpater,繼承BaseSortByLetterAdapter
3.Activity中,setAdapter之前,先使用SortUtil對數據進行排序。
ContactEntity.class
package com.mjc.contactlistdemo.core.contact.entity;


import com.mjc.contactlistdemo.sort_by_letter.ISort;

/**
 * Created by mjc on 2016/5/12.
 */
public class ContactEntity implements ISort {
    private String name;

    public String getName() {
        return name;
    }

    public void setName(String name) {
        this.name = name;
    }

    @Override
    public String getSortName() {
        return name;
    }
}
package com.mjc.contactlistdemo.core.contact; import android.view.LayoutInflater; import android.view.View; import android.view.ViewGroup; import android.widget.TextView; import com.mjc.contactlistdemo.R; import com.mjc.contactlistdemo.core.contact.entity.ContactEntity; import com.mjc.contactlistdemo.sort_by_letter.BaseSortByLetterAdapter; import java.util.ArrayList; /** * Created by mjc on 2016/5/24. */ public class ContactAdapter extends BaseSortByLetterAdapter{ public ContactAdapter(ArrayList datas) { super(datas); } @Override protected String getSortString(ContactEntity bean) { return bean.getSortName(); } @Override public int getCount() { return datas.size(); } @Override public Object getItem(int position) { return null; } @Override public long getItemId(int position) { return 0; } @Override public View getView(int position, View convertView, ViewGroup parent) { Holder mHolder; if (convertView == null) { mHolder = new Holder(); convertView = LayoutInflater.from(parent.getContext()).inflate(R.layout.item_contact, null); mHolder.mNameTv = (TextView) convertView.findViewById(R.id.tv_name); mHolder.mIndexTv = (TextView) convertView.findViewById(R.id.tv_index); convertView.setTag(mHolder); } else { mHolder = (Holder) convertView.getTag(); } //強轉需要注意原來的類型 ContactEntity bean = datas.get(position); //獲取對應字母的位置 int index = getSectionForPosition(position); //比較列表中第一個字母的位置和這個位置是否相等 if (getPositionForSection(index) == position) { mHolder.mIndexTv.setVisibility(View.VISIBLE); mHolder.mIndexTv.setText(sections[index]); } else { mHolder.mIndexTv.setVisibility(View.GONE); } mHolder.mNameTv.setText(bean.getName()); return convertView; } class Holder { public TextView mNameTv; public TextView mIndexTv; } }
item_contact.xml
package com.mjc.contactlistdemo.core.contact;

import android.support.v7.app.AppCompatActivity;
import android.os.Bundle;
import android.widget.ListView;

import com.mjc.contactlistdemo.R;
import com.mjc.contactlistdemo.core.contact.entity.ContactEntity;
import com.mjc.contactlistdemo.sort_by_letter.IndexView;
import com.mjc.contactlistdemo.sort_by_letter.LetterWindow;
import com.mjc.contactlistdemo.sort_by_letter.SortUtil;

import java.util.ArrayList;


public class MainActivity extends AppCompatActivity implements IndexView.OnCharTouchEvent {

    private LetterWindow mLetterWindow;
    private ContactAdapter mContactAdapter;
    private IndexView mIndexView;
    private ListView mList;
    @Override
    protected void onCreate(Bundle savedInstanceState) {
        super.onCreate(savedInstanceState);
        setContentView(R.layout.activity_main);
        mList = (ListView) findViewById(R.id.list);
        mIndexView = (IndexView) findViewById(R.id.civ);
        mIndexView.setOnLetterTouchedListener(this);
        mLetterWindow = new LetterWindow(this);
        ArrayList list = new ArrayList<>();
        ContactEntity bean1 = new ContactEntity();
        bean1.setName("單熊信");

        ContactEntity bean2 = new ContactEntity();
        bean2.setName("謝天華");

        ContactEntity bean3 = new ContactEntity();
        bean3.setName("李自成");

        ContactEntity bean4 = new ContactEntity();
        bean4.setName("段天涯");

        ContactEntity bean5 = new ContactEntity();
        bean5.setName("張無忌");

        ContactEntity bean6 = new ContactEntity();
        bean6.setName("小紅");

        ContactEntity bean7 = new ContactEntity();
        bean7.setName("李尋歡");

        ContactEntity bean8 = new ContactEntity();
        bean8.setName("王小亞");

        ContactEntity bean9 = new ContactEntity();
        bean9.setName("夏冬青");

        ContactEntity bean10 = new ContactEntity();
        bean10.setName("上官錦");

        ContactEntity bean11 = new ContactEntity();
        bean11.setName("炎亞綸");


        ContactEntity bean12 = new ContactEntity();
        bean12.setName("劉德華");

        ContactEntity bean13 = new ContactEntity();
        bean13.setName("陳浩民");

        ContactEntity bean14 = new ContactEntity();
        bean14.setName("馬雲");

        ContactEntity bean15 = new ContactEntity();
        bean15.setName("雷軍");


        ContactEntity bean16 = new ContactEntity();
        bean16.setName("周宏偉");

        ContactEntity bean17 = new ContactEntity();
        bean17.setName("李易峰");

        ContactEntity bean18 = new ContactEntity();
        bean18.setName("鹿晗");


        ContactEntity bean19 = new ContactEntity();
        bean19.setName("鄧超");

        ContactEntity bean20 = new ContactEntity();
        bean20.setName("李晨");

        ContactEntity bean21 = new ContactEntity();
        bean21.setName("張翰");

        ContactEntity bean22 = new ContactEntity();
        bean22.setName("鄧麗君");


        ContactEntity bean23 = new ContactEntity();
        bean23.setName("曾志偉");


        ContactEntity bean24 = new ContactEntity();
        bean24.setName("阿甘");

        ContactEntity bean25 = new ContactEntity();
        bean25.setName("爸比");

        ContactEntity bean26 = new ContactEntity();
        bean26.setName("東方彧卿");

        ContactEntity bean27 = new ContactEntity();
        bean27.setName("方世玉");

        ContactEntity bean28 = new ContactEntity();
        bean28.setName("高芳");

        ContactEntity bean29 = new ContactEntity();
        bean29.setName("海大富");

        ContactEntity bean30 = new ContactEntity();
        bean30.setName("江離");

        ContactEntity bean31 = new ContactEntity();
        bean31.setName("康輝");

        ContactEntity bean32 = new ContactEntity();
        bean32.setName("牛郎");

        ContactEntity bean33 = new ContactEntity();
        bean33.setName("謝天華");

        ContactEntity bean34 = new ContactEntity();
        bean34.setName("單雄心");

        ContactEntity bean35 = new ContactEntity();
        bean35.setName("賽華佗");


        list.add(bean1);
        list.add(bean2);
        list.add(bean3);
        list.add(bean4);
        list.add(bean5);
        list.add(bean6);
        list.add(bean7);
        list.add(bean8);
        list.add(bean9);
        list.add(bean10);
        list.add(bean11);
        list.add(bean12);
        list.add(bean13);
        list.add(bean14);
        list.add(bean15);
        list.add(bean16);
        list.add(bean17);
        list.add(bean18);
        list.add(bean19);
        list.add(bean20);
        list.add(bean21);
        list.add(bean22);
        list.add(bean23);
        list.add(bean24);
        list.add(bean25);
        list.add(bean26);
        list.add(bean27);
        list.add(bean28);
        list.add(bean29);
        list.add(bean30);
        list.add(bean31);
        list.add(bean32);
        list.add(bean33);
        list.add(bean34);
        list.add(bean35);


        SortUtil.sortByLetter(list);

        mContactAdapter = new ContactAdapter(list);
        mList.setAdapter(mContactAdapter);
    }

    @Override
    public void onTouch(String s) {
        mLetterWindow.show(s);
        int index = mContactAdapter.getSectionIndex(s);
        int position = mContactAdapter.getPositionForSection(index);
        if (position != -1)
            mList.setSelection(position);
    }

    @Override
    public void onLetterChanged(String preLetter, String letter) {
        mLetterWindow.update(letter);
        int index = mContactAdapter.getSectionIndex(letter);
        int position = mContactAdapter.getPositionForSection(index);
        if (position != -1)
            mList.setSelection(position);
    }

    @Override
    public void onRelease() {
        mLetterWindow.hide();
    }
}
    <framelayout android:layout_height="0dp" android:layout_weight="1" android:layout_width="match_parent">


    </framelayout>
到這裡,這個字母索引排序就算是寫完了,謝謝!
 [Android編譯(二)] 從谷歌官網下載android 6.0源碼、編譯並刷入nexus 6p手機
1 前言經過一周的奮戰,終於從谷歌官網上下載最新的android 6.0.1_r62源碼,編譯成功,並成功的刷入nexus6p,接著root完畢,現寫下這篇博客記錄一下實
 Android解決WebView的定位功能、視頻全屏播放、下載功能、頁面Url的處理、進度條處理
事先說明:定位功能在安卓6.0需要用戶手動確認權限後才能使用若需在安卓6.0適配WebView的定位功能,則需要在WebView中手動增加用戶權限訪問詳細可百度安卓6.0
 Android項目將生成的jar包混淆
又是一個不眠夜 問題來了,我們寫個android項目部分代碼想生成jar包,並且將jar包做混淆,不被別人切! 首先講要代碼生成jar包,這個就不多說了。然後找到找到SD
 Android使用listview實現分頁刷新(線程休眠模擬)
當要顯示的數據過多時,為了更好的提升用戶感知,在很多APP中都會使用分頁刷新顯示,比如浏覽新聞,向下滑動到當前ListView的最後一條信息(item)時,會提示刷新加載