編輯:關於Android編程
1、旋轉攝像機,使攝像機圍繞茶壺旋轉,達到茶壺自轉的效果!
2、旋轉環境光,
3、旋轉物體自身,直接使茶壺自轉。
.h文件
#ifndef __HELLOWORLD_SCENE_H__
#define __HELLOWORLD_SCENE_H__

#include "cocos2d.h"
USING_NS_CC;
class HelloWorld : public cocos2d::Layer
{
public:
    static cocos2d::Scene* createScene();
    virtual bool init();
	virtual void onEnter();
	virtual void onExit();
    CREATE_FUNC(HelloWorld);
	Sprite3D * pSprite3D;
	Camera* pCamera;
	Camera* pCamera01;
	//GLProgramState* state;
	void onTouchesBegan(const std::vector& touches, cocos2d::Event  *event);
	void onTouchesMoved(const std::vector& touches, cocos2d::Event  *event);
	void onTouchesEnded(const std::vector& touches, cocos2d::Event  *event);
	float m_fAngle;
};

#endif // __HELLOWORLD_SCENE_H__
#include "HelloWorldScene.h"
#include "DrawNode3D.h"


Scene* HelloWorld::createScene()
{
    // 'scene' is an autorelease object
    auto scene = Scene::create();

    // 'layer' is an autorelease object
    auto layer = HelloWorld::create();

    // add layer as a child to scene
    scene->addChild(layer);

    // return the scene
    return scene;
}

// on "init" you need to initialize your instance
bool HelloWorld::init()
{
    if (!Layer::init())
    {
        return false;
    }
	////////////////
	Size size = Director::getInstance()->getWinSize();
	pCamera01 = Camera::createPerspective(30.0f, size.width / size.height, 1.0f, 1000);//(60.0f, size.width / size.height, 0.1f, 1000)
	pCamera01->setCameraFlag(CameraFlag::USER1);
	pCamera01->setPosition3D(Vec3(size.width / 2, size.height / 2, 0.0f));
	//m_pCamera->lookAt(Vec3(20, 200, 0));//(480, 320, 0))
	pCamera01->lookAt(Vec3(0,0, 0), Vec3(0.0f, 1.0f, 0.0f));
	this->addChild(pCamera01);
	//創建茶壺模型
		pSprite3D = Sprite3D::create("teapot.c3b");
		pSprite3D->setPosition3D(Vec3(0, 0, 0));
	pSprite3D->setRotation3D(Vec3(-90, 0,0));
	pSprite3D->setScale(12.0f);
	pSprite3D->setCameraMask(2);
	this->addChild(pSprite3D);

	///////
	m_fAngle = 1.0f;//一定要賦初始值,否則旋轉不了!
	auto listener = EventListenerTouchAllAtOnce::create();
	listener->onTouchesBegan = CC_CALLBACK_2(HelloWorld::onTouchesBegan, this);
	listener->onTouchesMoved = CC_CALLBACK_2(HelloWorld::onTouchesMoved, this);
	listener->onTouchesEnded = CC_CALLBACK_2(HelloWorld::onTouchesEnded, this);

	_eventDispatcher->addEventListenerWithSceneGraphPriority(listener, this);
	return true;
}

void HelloWorld::onEnter()
{
	Layer::onEnter();

	auto	pGLProgram = GLProgram::createWithFilenames("Diffuse.vsh", "Diffuse.fsh");
	auto	state = GLProgramState::create(pGLProgram);

	long offset = 0;
	auto attributeCount = pSprite3D->getMesh()->getMeshVertexAttribCount();
	for (int k = 0; k < attributeCount; k++)
	{
		auto meshattribute = pSprite3D->getMesh()->getMeshVertexAttribute(k);
		state->setVertexAttribPointer(
			s_attributeNames[meshattribute.vertexAttrib],
			meshattribute.size,
			meshattribute.type,
			GL_FALSE,
			pSprite3D->getMesh()->getVertexSizeInBytes(),
			(GLvoid*)offset
			);

		offset += meshattribute.attribSizeBytes;
	}
	Camera*		pCamera = Director::getInstance()->getRunningScene()->getDefaultCamera();
	Vec3		pos = pCamera->getPosition3D();
	Vec3		target = Vec3(-10, -10, -10);//(480, 320, 0);

	state->setUniformVec3("v_eyepos", pos - target);

	pSprite3D->setGLProgramState(state);


}
void HelloWorld::onTouchesBegan(const std::vector& touches, cocos2d::Event  *event)
{

}

void HelloWorld::onTouchesMoved(const std::vector& touches, cocos2d::Event  *event)
{
	if (touches.size())
	{
		auto touch = touches[0];
		auto delta = touch->getDelta();
		m_fAngle -= CC_DEGREES_TO_RADIANS(delta.x);
		//pSprite3D->setPosition3D(Vec3(100.0f * sinf(m_fAngle), 15.0f, 100.0f * cosf(m_fAngle)));
		//pCamera01->setPosition3D(Vec3(100.0f * sinf(m_fAngle), 500.0f, 100.0f * cosf(m_fAngle)));
		pCamera01->lookAt(Vec3(0, 0, 0), Vec3(0.0f,1.0f, 0.0f));

		pSprite3D->setRotation3D(Vec3(-90.0f, 100.0f * m_fAngle,0.0f ));
	}
}

void HelloWorld::onTouchesEnded(const std::vector& touches, cocos2d::Event  *event)
{

}
void HelloWorld::onExit()
{
	Layer::onExit();
}
 Android監聽程序自身被卸載
概述:如果不是一些特殊的情況,我想大家很少會接觸到這個需求。其實Android的Java部分沒有提供相應的接口,這裡需要去調用C的代碼,也就是說要寫JNI了。關於JNI的
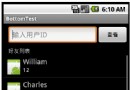 listview Button始終放在底部示例
android實現底部布局往往使用RelativeLayout的布局方式,並且設置android:layout_alignParentBottom=”true”,這樣很容
 Android實現自定義標題欄的方法
本文要講自己定義一個標題欄,能加事件。然後可以移值到不同的手機上,基本上不用改什麼,調用也很簡單在layout文件夾下,新建一個XML。名字叫做layout_title_
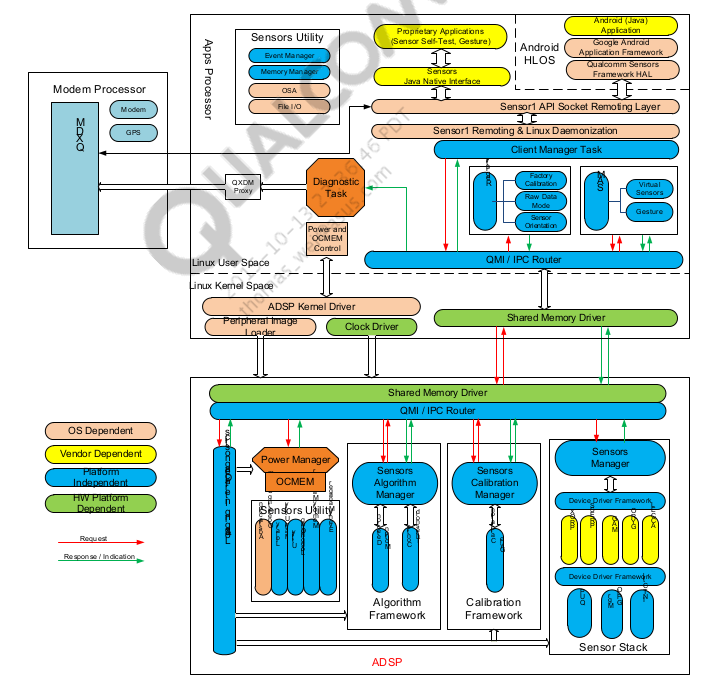 Android Sensor詳解(1)簡介與架構
序最近在學習有關如何porting sensor的東西,僅借此機會寫博客來督促自己進步,當然如果,有人對博客提出不同的理解,我覺得這是極好的,大家可以共同進步。在這一期的