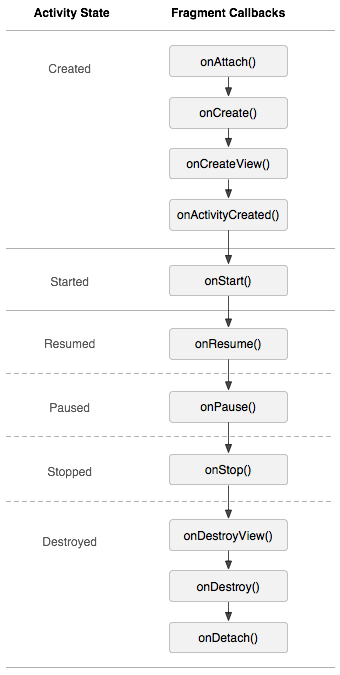
編輯:關於Android編程
廢話不多說,先上效果圖:

布局文件:
實現方式 JAVA代碼
package com.example.circleview;

import android.content.Context;
import android.content.res.TypedArray;
import android.graphics.Bitmap;
import android.graphics.BitmapShader;
import android.graphics.Canvas;
import android.graphics.Color;
import android.graphics.Matrix;
import android.graphics.Paint;
import android.graphics.RectF;
import android.graphics.Shader;
import android.graphics.drawable.BitmapDrawable;
import android.graphics.drawable.ColorDrawable;
import android.graphics.drawable.Drawable;
import android.util.AttributeSet;
import android.widget.ImageView;

public class CircleImageView extends ImageView {
	/**
	 * 圖片尺寸及質量
	 */
	private static final int COLORDRAWABLE_DIMENSION = 1;
	private static final Bitmap.Config BITMAP_CONFIG = Bitmap.Config.ARGB_8888;

	/**
	 * 圓形圖片填充類型
	 */
	private static final ScaleType SCALE_TYPE = ScaleType.CENTER_CROP;
	/**
	 * 默認邊框的大小和顏色
	 */
	private static final int DEFAULT_BORDER_WIDTH = 0;
	private static final int DEFAULT_BORDER_COLOR = Color.WHITE;
	/**
	 * 實際邊框的大小和顏色
	 */
	private int mBorderWidth;
	private int mBorderColor;
	/**
	 * 圖片渲染方式
	 */
	private BitmapShader mBitmapShader;
	private Paint mBitmapPaint = new Paint();
	private Paint mBorderPaint = new Paint();
	/**
	 * 要繪制的圖片以及自身寬高
	 */
	private Bitmap mBitmap;
	private int mBitmapHeight;
	private int mBitmapWidth;

	private RectF mBorderRect = new RectF();
	private float mBorderRadius;
	private RectF mDrawableRect = new RectF();
	private float mDrawableRadius;
	private Matrix mShaderMatrix = new Matrix();
	private boolean mReady;
	private boolean mSetupPending;

	public CircleImageView(Context context) {
		super(context);
	}

	public CircleImageView(Context context, AttributeSet attrs) {
		this(context, attrs, 0);
	}

	public CircleImageView(Context context, AttributeSet attrs, int defStyle) {
		super(context, attrs, defStyle);
		super.setScaleType(SCALE_TYPE);
		TypedArray arr = context.obtainStyledAttributes(attrs,
				R.styleable.CircleImageView, defStyle, 0);
		mBorderWidth = arr.getDimensionPixelSize(
				R.styleable.CircleImageView_border_width, DEFAULT_BORDER_WIDTH);
		mBorderColor = arr.getColor(R.styleable.CircleImageView_border_color,
				DEFAULT_BORDER_COLOR);
		arr.recycle();
		mReady = true;
		if (mSetupPending) {
			setup();
			mSetupPending = false;
		}
	}

	@Override
	public ScaleType getScaleType() {
		return SCALE_TYPE;
	}

	@Override
	public void setScaleType(ScaleType scaleType) {
		if (scaleType != SCALE_TYPE) {
			throw new IllegalArgumentException(String.format(
					ScaleType %s not supported., scaleType));
		}
	}

	@Override
	protected void onDraw(Canvas canvas) {
		if (getDrawable() == null) {
			return;
		}
		canvas.drawCircle(getWidth() / 2, getHeight() / 2, mDrawableRadius,
				mBitmapPaint);
		canvas.drawCircle(getWidth() / 2, getHeight() / 2, mBorderRadius,
				mBorderPaint);
	}

	@Override
	protected void onSizeChanged(int w, int h, int oldw, int oldh) {
		super.onSizeChanged(w, h, oldw, oldh);
		setup();
	}

	@Override
	public void setImageBitmap(Bitmap bm) {
		super.setImageBitmap(bm);
		mBitmap = bm;
		setup();
	}

	@Override
	public void setImageDrawable(Drawable drawable) {
		super.setImageDrawable(drawable);
		mBitmap = getBitmapFromDrawable(drawable);
		setup();
	}

	@Override
	public void setImageResource(int resId) {
		super.setImageResource(resId);
		mBitmap = getBitmapFromDrawable(getDrawable());
		setup();
	}

	private Bitmap getBitmapFromDrawable(Drawable drawable) {
		if (drawable == null) {
			return null;
		}

		if (drawable instanceof BitmapDrawable) {
			return ((BitmapDrawable) drawable).getBitmap();
		}

		try {
			Bitmap bitmap;

			if (drawable instanceof ColorDrawable) {
				bitmap = Bitmap.createBitmap(COLORDRAWABLE_DIMENSION,
						COLORDRAWABLE_DIMENSION, BITMAP_CONFIG);
			} else {
				bitmap = Bitmap.createBitmap(drawable.getIntrinsicWidth(),
						drawable.getIntrinsicHeight(), BITMAP_CONFIG);
			}

			Canvas canvas = new Canvas(bitmap);
			drawable.setBounds(0, 0, canvas.getWidth(), canvas.getHeight());
			drawable.draw(canvas);
			return bitmap;
		} catch (OutOfMemoryError e) {
			return null;
		}
	}

	public void setBorderColor(int borderColor) {
		if (borderColor == mBorderColor) {
			return;
		}

		mBorderColor = borderColor;
		mBorderPaint.setColor(mBorderColor);
		invalidate();
	}

	public int getBorderWidth() {
		return mBorderWidth;
	}

	public void setBorderWidth(int borderWidth) {
		if (borderWidth == mBorderWidth) {
			return;
		}

		mBorderWidth = borderWidth;
		setup();
	}

	private void setup() {

		if (!mReady) {
			mSetupPending = true;
			return;
		}

		if (mBitmap == null) {
			return;
		}
		mBitmapShader = new BitmapShader(mBitmap, Shader.TileMode.CLAMP,
				Shader.TileMode.CLAMP);

		mBitmapPaint.setAntiAlias(true); // 是否有鋸齒
		mBitmapPaint.setShader(mBitmapShader);

		mBitmapHeight = mBitmap.getHeight();
		mBitmapWidth = mBitmap.getWidth();

		mBorderPaint.setStyle(Paint.Style.STROKE);
		mBorderPaint.setAntiAlias(true);
		mBorderPaint.setColor(mBorderColor);
		mBorderPaint.setStrokeWidth(mBorderWidth);

		mBorderRect.set(0, 0, getWidth(), getHeight());
		mBorderRadius = Math.min((mBorderRect.height() - mBorderWidth) / 2,
				(mBorderRect.width() - mBorderWidth) / 2);

		mDrawableRect.set(mBorderWidth, mBorderWidth, mBorderRect.width()
				- mBorderWidth, mBorderRect.height() - mBorderWidth);
		mDrawableRadius = Math.min(mDrawableRect.height() / 2,
				mDrawableRect.width() / 2);

		updateShaderMatrix();
		invalidate();
	}

	private void updateShaderMatrix() {
		float scale;
		float dx = 0;
		float dy = 0;

		mShaderMatrix.set(null);

		if (mBitmapWidth * mDrawableRect.height() > mDrawableRect.width()
				* mBitmapHeight) {
			scale = mDrawableRect.height() / (float) mBitmapHeight;
			dx = (mDrawableRect.width() - mBitmapWidth * scale) * 0.5f;
		} else {
			scale = mDrawableRect.width() / (float) mBitmapWidth;
			dy = (mDrawableRect.height() - mBitmapHeight * scale) * 0.5f;
		}

		mShaderMatrix.setScale(scale, scale);
		mShaderMatrix.postTranslate((int) (dx + 0.5f) + mBorderWidth,
				(int) (dy + 0.5f) + mBorderWidth);
		mBitmapShader.setLocalMatrix(mShaderMatrix);
	}

}
 TextView實戰
寫在前面的話對於TextView,我想大家都已經熟的不能再熟了。但是它的用法我們真的熟麼?為了避免總是一言不合就去翻官方文檔,在這裡我總結一下我也可能是你容易忽視的一些細
 Android自定義控件系列案例【四】
案例效果:模擬器上運行有些鋸齒,真機上和預期一樣好案例分析: 看效果,第一直覺肯定是Android原生態控件中沒有這樣的控件實現這種效果,自然想到應該需要自定義控件了,沒
 Android doc|Getting Started| Training部分 --翻譯 Working with System Permissions
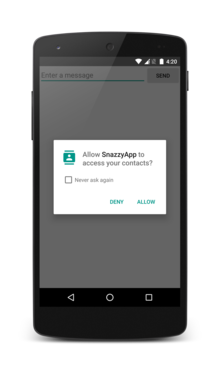
Working with System PermissionsTo protect the system’s integrity and the user&r
 Android利用動畫實現背景逐漸變暗
前言之前寫了一篇Android-實現底部彈出PopupWindow並讓背景逐漸變暗,介紹利用Handler動態改變背景透明度從而達到變暗的效果。現在補充一種方法,使用動畫