編輯:關於Android編程
文件權限修改無法實現 : 如果 沒有 root 權限, 就不能改變二進制文件的文件權限;
-- 將busybox推送到Android系統中 : 使用 adb push 命令, 將 busybox 傳入到 sd 卡中, 注意, 上傳到內存中無法實現;
-- 上傳到sd卡成功 : 使用 adb push 文件名 手機中的文件全路徑名 命令;
octopus@octopus:~/csdn$ adb push busybox-armv7l /sdcard/octopus/busybox
3256 KB/s (1109128 bytes in 0.332s)
-- 上傳到內存失敗 : 使用 adb push 上傳到內存中失敗, 因為 adb 使用的是 system 用戶, 只有 root 用戶才有權限向內存中寫入數據;
octopus@octopus:~/csdn$ adb push busybox-armv7l /data/busybox
failed to copy 'busybox-armv7l' to '/data/busybox': Permission denied
-- 查看並修改busybox權限失敗 : system 用戶沒有修改 sd 卡文件模式的權限;
shell@android:/sdcard/octopus $ ll
-rw-rw-r-- root     sdcard_rw  1109128 2014-07-08 19:49 busybox
shell@android:/sdcard/octopus $ chmod 755 busybox
Unable to chmod busybox: Operation not permitted
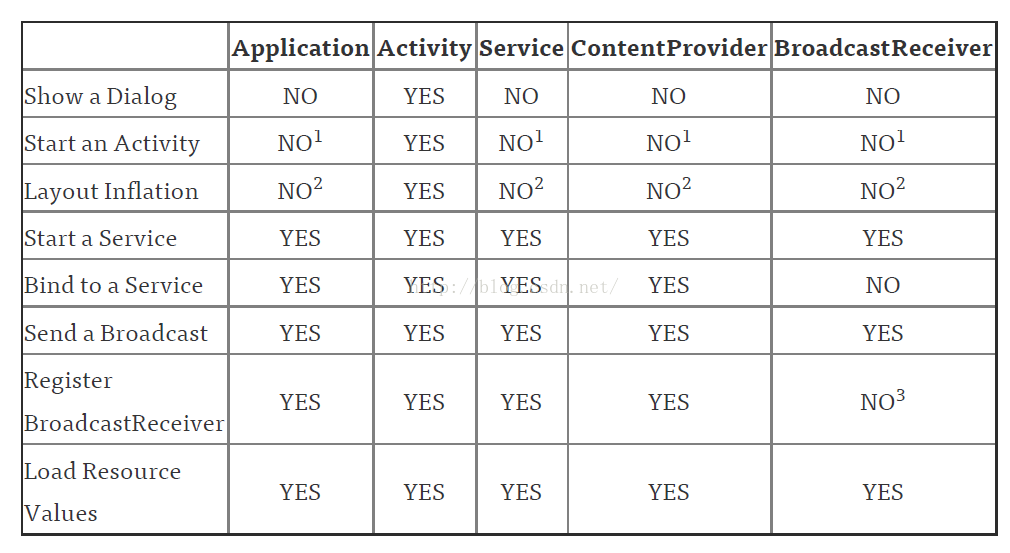
應用程序解決方案 :
-- 應用程序專屬用戶 : Android 操作系統會為每個應用程序設置一個用戶, 這個用戶對其安裝目錄(/data/data/包名/)下的文件有完整的權限;
-- 將可執行二進制文件拷貝到安裝目錄中 : 將交叉編譯好的 busybox 放到 工程目錄下的 res/assets/ 目錄下;
文件初始放置 : 將 交叉編譯好的 busybox 文件放在 工程目錄的 /res/assets/ 目錄下;
文件拷貝 : 將該 二進制文件 拷貝到 app 的安裝目錄的 files 目錄下, 即 /data/data/包名/files/下;
修改文件權限 : 使用命令可以直接修改該目錄下的權限, 注意這個操作是可以執行的;
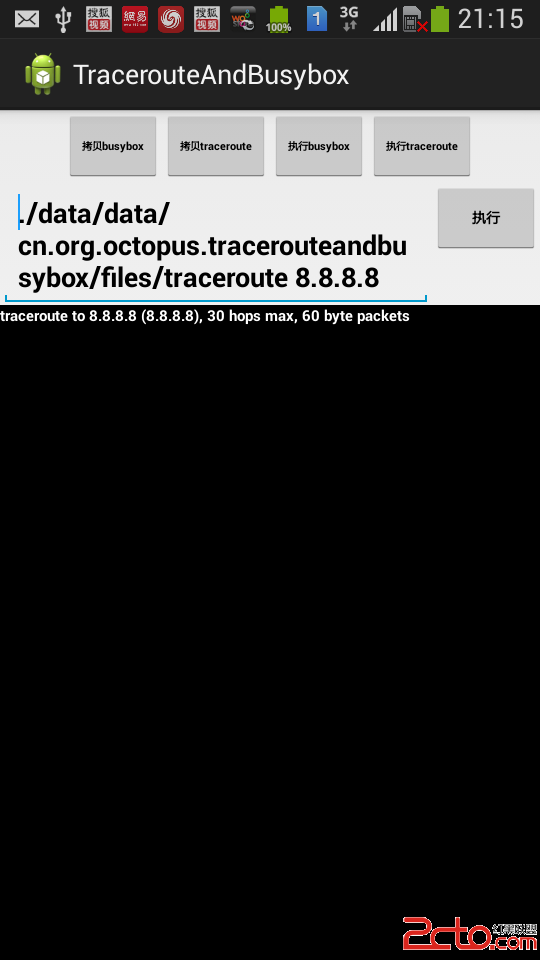
執行busybox : 在代碼中執行 ./data/data/包名/files/busybox ;
獲取執行結果 :
InputStream is = context.getAssets().open(source);-- 獲取AssetsManager : 調用 Context 上下文對象的 context.getAssets() 即可獲取 AssetsManager對象;
-- 獲取輸入流 : 調用 AssetsManager 的 open(String fileName) 即可獲取對應文件名的輸入流;
根據輸入流獲取文件大小 : 調用輸入流的 inputStream.available() 方法;
int size = is.available();
byte[] buffer = new byte[size];
is.read(buffer);
is.close();
將文件寫到內存中 : 調用上下文對象的 openFileOutput(絕對路徑名, 權限), 即可創建一個文件的輸出流;
FileOutputStream output = context.openFileOutput(destination, Context.MODE_PRIVATE);
output.write(buffer);
output.close();
獲取app絕對安裝路徑 : 調用 上下文對象的 getFilesDir().getAbsolutePath() 方法;
String filesPath = context.getFilesDir().getAbsolutePath();
創建 Process 對象, 並使用該 process 執行shell腳本命令 :
Runtime runtime = Runtime.getRuntime();
process = runtime.exec(cmd);
            InputStream is = process.getInputStream();
            BufferedReader br = new BufferedReader(new InputStreamReader(is));
            String line = null;
            while ((line = br.readLine()) != null) {
                processList.add(line);
            }
            br.close();
MainActivity 主程序代碼 :
package cn.org.octopus.tracerouteandbusybox;

import java.io.BufferedReader;
import java.io.FileNotFoundException;
import java.io.FileOutputStream;
import java.io.IOException;
import java.io.InputStream;
import java.io.InputStreamReader;
import java.util.ArrayList;
import java.util.List;

import android.content.Context;
import android.os.Bundle;
import android.support.v7.app.ActionBarActivity;
import android.view.View;
import android.widget.EditText;
import android.widget.TextView;

/** 看不懂注釋我就吃半斤狗糧 :-) */
public class MainActivity extends ActionBarActivity {

	private EditText et_cmd;
	private String app_path;
	private TextView tv_result;

	@Override
	protected void onCreate(Bundle savedInstanceState) {
		super.onCreate(savedInstanceState);
		setContentView(R.layout.home_activity);

		/*初始化控件*/
		et_cmd = (EditText) findViewById(R.id.et_cmd);
		tv_result = (TextView) findViewById(R.id.tv_result);
		/* 獲取app安裝路徑 */
		app_path = getApplicationContext().getFilesDir().getAbsolutePath();

	}


	/** 按鈕點擊事件 */
	public void onClick(View view) {
		int id = view.getId();
		switch (id) {
		case R.id.copy_busybox: /* 拷貝busybox可執行文件 */
			varifyFile(getApplicationContext(), busybox);
			break;
		case R.id.copy_traceroute:/* 拷貝traceroute可執行文件 */
			varifyFile(getApplicationContext(), traceroute);
			break;
		case R.id.exe_busybox:/* 將busybox命令添加到Editext中 */
			String cmd = . + app_path + /busybox;
			System.out.println(et_cmd);
			et_cmd.setText(cmd);
			break;
		case R.id.exe_traceroute:/* 將traceroute命令添加到Editext中 */
			cmd = . + app_path + /traceroute 8.8.8.8;
			et_cmd.setText(cmd);
			break;
		case R.id.exe: /* 執行Editext中的命令 */
			cmd = et_cmd.getText().toString();
			/* 執行腳本命令 */
			List results = exe(cmd);
			String result = ;
			/* 將結果轉換成字符串, 輸出到 TextView中 */
			for(String line : results){
				result += line +
;
			}
			tv_result.setText(result);
			break;

		default:
			break;
		}
	}

	/** 驗證文件是否存在, 如果不存在就拷貝 */
	private void varifyFile(Context context, String fileName) {


        try {
        	/* 查看文件是否存在, 如果不存在就會走異常中的代碼 */
        	context.openFileInput(fileName);
        } catch (FileNotFoundException notfoundE) {
            try {
            	/* 拷貝文件到app安裝目錄的files目錄下 */
                copyFromAssets(context, fileName, fileName);
                /* 修改文件權限腳本 */
                String script = chmod 700  + app_path + / + fileName;
                /* 執行腳本 */
                exe(script);
            } catch (Exception e) {
                e.printStackTrace();
            }
        }
    }

	/** 將文件從assets目錄中拷貝到app安裝目錄的files目錄下 */
	private void copyFromAssets(Context context, String source,
			String destination) throws IOException {
		/* 獲取assets目錄下文件的輸入流 */
		InputStream is = context.getAssets().open(source);
		/* 獲取文件大小 */
		int size = is.available();
		/* 創建文件的緩沖區 */
		byte[] buffer = new byte[size];
		/* 將文件讀取到緩沖區中 */
		is.read(buffer);
		/* 關閉輸入流 */
		is.close();
		/* 打開app安裝目錄文件的輸出流 */
		FileOutputStream output = context.openFileOutput(destination,
				Context.MODE_PRIVATE);
		/* 將文件從緩沖區中寫出到內存中 */
		output.write(buffer);
		/* 關閉輸出流 */
		output.close();
	}

	/** 執行 shell 腳本命令 */
	private List exe(String cmd) {
		/* 獲取執行工具 */
		Process process = null;
		/* 存放腳本執行結果 */
        List list = new ArrayList();
        try {
        	/* 獲取運行時環境 */
        	Runtime runtime = Runtime.getRuntime();
        	/* 執行腳本 */
            process = runtime.exec(cmd);
            /* 獲取腳本結果的輸入流 */
            InputStream is = process.getInputStream();
            BufferedReader br = new BufferedReader(new InputStreamReader(is));
            String line = null;
            /* 逐行讀取腳本執行結果 */
            while ((line = br.readLine()) != null) {
                list.add(line);
            }
            br.close();
        } catch (IOException e) {
            e.printStackTrace();
        }
        return list;
	}

}
home_activity.xml 布局文件代碼 :
執行 busybox 程序 :

執行 traceroute 程序 :
示例代碼下載 :
-- CSDN : http://download.csdn.net/detail/han1202012/7639253;
-- GitHub : https://github.com/han1202012/TracerouteAndBusybox ;
作者 : 萬境絕塵
轉載請著名出處 : http://blog.csdn.net/shulianghan/article/details/36438365
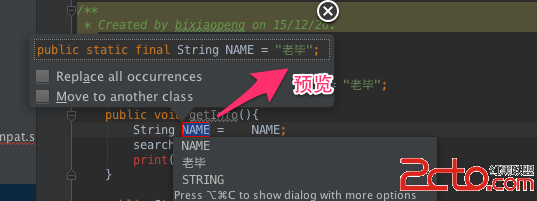 《AndroidStudio每日一貼》11. 重構之提煉為常量
提煉為常量是從臨時變量快速提煉出靜態常量,這也是我們常用的重構手段.操作步驟:? 菜單欄: Refactor —> Extract —>
 android 自定義對話框
新建一個布局文件 my_dialog.xml 以下是strings.xml文件: demo091801 Sett
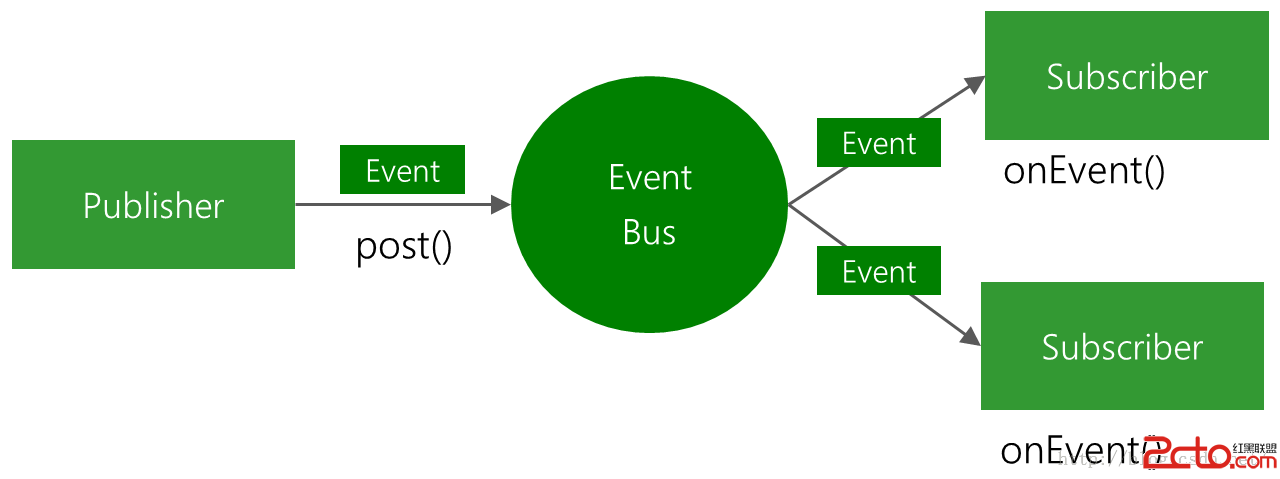 消息總線EventBus的基本使用(二十)
(一).前言:今天我們的項目繼續更新,今天我們主要講解消息總線EventBus的基本使用方法,後面一篇我們會從源碼的角度稍微分析一下實現過程。Fa
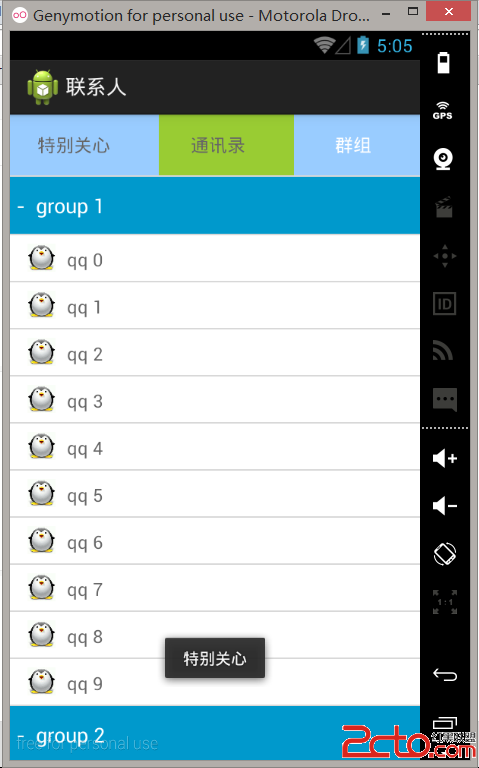 Android UI設計: 仿QQ好友列表分組懸停,自定義Header,下拉刷新結合Demo
之前學習了Pulltorefresh,pinnedheaderexpanablelistview 但是結合起來還是有點麻煩的。尤其是像QQ這種。他不是單純的第一個當做分組