編輯:關於Android編程
剛接觸Android開發的時候,對touch、key事件的處理總是一知半解,一會是Activity裡的方法,一會是各種View
中的,自己始終不清楚到底哪個在先哪個在後,總之對整個處理流程沒能很好的把握。每次寫這部分代碼的時候都有些心虛,
因為我不是很清楚什麼時候、以什麼樣的順序被調用,大都是打下log看看,沒問題就算ok了。但隨著時間流逝,這種感覺一直
折磨著我。期間也在網上搜索了相關資料,但總感覺不是那麼令人滿意。自打開始研究Android源碼起,這部分內容的分析早就
被列在我的TODO list上了。因為弄懂這部分處理邏輯對明明白白地寫android程序實在是太重要了,所以今天我就帶領大家看看
這部分的處理邏輯。touch事件的處理我將放在另一篇博客中介紹(相比KeyEvent,大體都一樣,只是稍微復雜些)。
為了突出本文的重點,我們直接從事件被派發到View層次結構的根節點DecorView開始分析,這裡我們先來看看DecorView#
dispatchKeyEvent方法,代碼如下:
    @Override
    public boolean dispatchKeyEvent(KeyEvent event) {
        final int keyCode = event.getKeyCode();
        final int action = event.getAction();
        final boolean isDown = action == KeyEvent.ACTION_DOWN;

        /// 1. 第一次down事件的時候,處理panel的快捷鍵
        if (isDown && (event.getRepeatCount() == 0)) {
            // First handle chording of panel key: if a panel key is held
            // but not released, try to execute a shortcut in it.
            if ((mPanelChordingKey > 0) && (mPanelChordingKey != keyCode)) {
                boolean handled = dispatchKeyShortcutEvent(event);
                if (handled) {
                    return true;
                }
            }

            // If a panel is open, perform a shortcut on it without the
            // chorded panel key
            if ((mPreparedPanel != null) && mPreparedPanel.isOpen) {
                if (performPanelShortcut(mPreparedPanel, keyCode, event, 0)) {
                    return true;
                }
            }
        }

        /// 2. 這裡是我們本文的重點,當window沒destroy且其Callback非空的話,交給其Callback處理
        if (!isDestroyed()) { // Activity、Dialog都是Callback接口的實現
            final Callback cb = getCallback(); // mFeatureId < 0 表示是application的DecorView,比如Activity、Dialog
            final boolean handled = cb != null && mFeatureId < 0 ? cb.dispatchKeyEvent(event) // 派發給callback的方法
                    : super.dispatchKeyEvent(event); // 否則直接派發到ViewGroup#dispatchKeyEvent(View層次結構)
            if (handled) {
                return true; // 如果被上面的步驟處理了則直接返回true,不再往下傳遞
            }
        }

        /// 3. 這是key事件的最後一步,如果到這一步還沒處理掉,則派發到PhoneWindow對應的onKeyDown, onKeyUp方法
        return isDown ? PhoneWindow.this.onKeyDown(mFeatureId, event.getKeyCode(), event)
                : PhoneWindow.this.onKeyUp(mFeatureId, event.getKeyCode(), event);
    }
接下來我們按照這個派發順序依次來看看相關方法的實現,這裡先看看Activity(Callback)的dispatchKeyEvent實現:
    /**
     * Called to process key events.  You can override this to intercept all
     * key events before they are dispatched to the window.  Be sure to call
     * this implementation for key events that should be handled normally.
     *
     * @param event The key event.
     *
     * @return boolean Return true if this event was consumed.
     */
    @Override
    public boolean dispatchKeyEvent(KeyEvent event) {
        /// 2.1. 回調接口,實際開發中用處不大,你感興趣可以參看其方法doc
        onUserInteraction();
        Window win = getWindow();
        /// 2.2. 從這裡事件的處理交給了與之相關的window對象,實質是派發到了view層次結構
        if (win.superDispatchKeyEvent(event)) {
            return true;
        }
        View decor = mDecor;
        if (decor == null) decor = win.getDecorView();
        /// 2.3. 到這裡如果view層次結構沒處理則交給KeyEvent本身的dispatch方法,Activity的各種回調方法會被觸發
        return event.dispatch(this, decor != null
                ? decor.getKeyDispatcherState() : null, this);
    }
緊接著我們看看,Window#superDispatchKeyEvent方法,相關代碼如下:
    /**
     * Used by custom windows, such as Dialog, to pass the key press event
     * further down the view hierarchy. Application developers should
     * not need to implement or call this.
     *
     */
    public abstract boolean superDispatchKeyEvent(KeyEvent event);


    @Override
    public boolean superDispatchKeyEvent(KeyEvent event) {
        return mDecor.superDispatchKeyEvent(event);
    }


  public boolean superDispatchKeyEvent(KeyEvent event) {
            /// 2.2.1. 進入view層次結構了,即調用ViewGroup的對應實現了。。。
            if (super.dispatchKeyEvent(event)) {
                return true; // 如果被view層次結構處理了則直接返回true。
            }

            // Not handled by the view hierarchy, does the action bar want it
            // to cancel out of something special?
            /// 2.2.2. ActionBar對BACK key的特殊處理
            if (event.getKeyCode() == KeyEvent.KEYCODE_BACK) {
                final int action = event.getAction();
                // Back cancels action modes first.
                if (mActionMode != null) {
                    if (action == KeyEvent.ACTION_UP) {
                        mActionMode.finish();
                    }
                    return true;
                }

                // Next collapse any expanded action views.
                if (mActionBar != null && mActionBar.hasExpandedActionView()) {
                    if (action == KeyEvent.ACTION_UP) {
                        mActionBar.collapseActionView();
                    }
                    return true;
                }
            }
            /// 2.2.3. 最後返回false表示沒處理掉,會接著2.3.步驟處理
            return false;
        }
然後我們接著看看2.2.1.包括的小步驟,即ViewGroup#dispatchKeyEvent的實現,代碼如下:
    @Override
    public boolean dispatchKeyEvent(KeyEvent event) {
        /// 2.2.1.1. keyevent一致性檢測用的,可忽略。。。
        if (mInputEventConsistencyVerifier != null) {
            mInputEventConsistencyVerifier.onKeyEvent(event, 1);
        }

        if ((mPrivateFlags & (PFLAG_FOCUSED | PFLAG_HAS_BOUNDS))
                == (PFLAG_FOCUSED | PFLAG_HAS_BOUNDS)) {
            /// 2.2.1.2. 如果此ViewGroup是focused或者具體的大小被設置了,則交給他處理,即調用View的實現
            if (super.dispatchKeyEvent(event)) {
                return true;
            }
        } else if (mFocused != null && (mFocused.mPrivateFlags & PFLAG_HAS_BOUNDS)
                == PFLAG_HAS_BOUNDS) {
            /// 2.2.1.3. 否則,如果此ViewGroup中有focused的child,且child有具體的大小,則交給mFocused處理
            if (mFocused.dispatchKeyEvent(event)) { // 注意這裡可能是個遞歸調用
                return true; // 我們可以看到並不是每個child都能響應key事件,前提必須是focused child才有機會響應
            }
        }

        if (mInputEventConsistencyVerifier != null) {
            mInputEventConsistencyVerifier.onUnhandledEvent(event, 1);
        }
        /// 2.2.1.4. 最後都沒被處理返回false,2.2.2.步驟會接著執行。。。
        return false;
    }
這裡我們可以看出對KeyEvent來說在View層次結構中,如果ViewGroup條件滿足則會優先處理事件而不是先派發給其孩子view,
這一點和touch事件有所不同。這裡我們看看View的dispatchKeyEvent實現:
    /**
     * Dispatch a key event to the next view on the focus path. This path runs
     * from the top of the view tree down to the currently focused view. If this
     * view has focus, it will dispatch to itself. Otherwise it will dispatch
     * the next node down the focus path. This method also fires any key
     * listeners.
     *
     * @param event The key event to be dispatched.
     * @return True if the event was handled, false otherwise.
     */
    public boolean dispatchKeyEvent(KeyEvent event) {
        if (mInputEventConsistencyVerifier != null) {
            mInputEventConsistencyVerifier.onKeyEvent(event, 0);
        }

        // Give any attached key listener a first crack at the event.
        //noinspection SimplifiableIfStatement
        ListenerInfo li = mListenerInfo;
        /// 2.2.1.2(3).1. 調用onKeyListener,如果它非空且view是ENABLED狀態,監聽器優先觸發
        if (li != null && li.mOnKeyListener != null && (mViewFlags & ENABLED_MASK) == ENABLED
                && li.mOnKeyListener.onKey(this, event.getKeyCode(), event)) {
            return true;
        }

        /// 2.2.1.2(3).2. 調用KeyEvent.dispatch方法,並將view對象本身作為參數傳遞進去,view的各種callback方法在這裡被觸發
        if (event.dispatch(this, mAttachInfo != null
                ? mAttachInfo.mKeyDispatchState : null, this)) {
            return true;
        }

        if (mInputEventConsistencyVerifier != null) {
            mInputEventConsistencyVerifier.onUnhandledEvent(event, 0);
        }
        /// 2.2.1.2(3).3. 還沒處理掉返回false,接著2.2.1.4.執行
        return false;
    }
不管是這裡的2.2.1.2(3).2.步驟還是前面Activity裡的2.3.步驟,都調到了KeyEvent.dispatch方法,不過在看其代碼之前我們
先來看看這裡用到的mAttachInfo.mKeyDispatchState對象是咋來的,代碼如下:
// 這句代碼位於View.AttachInfo類裡
final KeyEvent.DispatcherState mKeyDispatchState
                = new KeyEvent.DispatcherState();

/**
     * Return the global {@link KeyEvent.DispatcherState KeyEvent.DispatcherState}
     * for this view's window.  Returns null if the view is not currently attached
     * to the window.  Normally you will not need to use this directly, but
     * just use the standard high-level event callbacks like
     * {@link #onKeyDown(int, KeyEvent)}.
     */
    public KeyEvent.DispatcherState getKeyDispatcherState() {
        return mAttachInfo != null ? mAttachInfo.mKeyDispatchState : null;
    }

// KeyEvent.DispatcherState類
    /**
     * Use with {@link KeyEvent#dispatch(Callback, DispatcherState, Object)}
     * for more advanced key dispatching, such as long presses.
     */
    public static class DispatcherState {
        int mDownKeyCode;
        Object mDownTarget;
        SparseIntArray mActiveLongPresses = new SparseIntArray();

        /**
         * Reset back to initial state.
         */
        public void reset() { // 清空內部狀態
            if (DEBUG) Log.v(TAG, "Reset: " + this);
            mDownKeyCode = 0;
            mDownTarget = null;
            mActiveLongPresses.clear();
        }

        /**
         * Stop any tracking associated with this target.
         */
        public void reset(Object target) { // 清空target對應的內部狀態
            if (mDownTarget == target) { // 只有相同時才清空,否則啥也不做
                if (DEBUG) Log.v(TAG, "Reset in " + target + ": " + this);
                mDownKeyCode = 0;
                mDownTarget = null;
            }
        }

        /**
         * Start tracking the key code associated with the given event.  This
         * can only be called on a key down.  It will allow you to see any
         * long press associated with the key, and will result in
         * {@link KeyEvent#isTracking} return true on the long press and up
         * events.
         *
         * This is only needed if you are directly dispatching events, rather
         * than handling them in {@link Callback#onKeyDown}.
         */
        public void startTracking(KeyEvent event, Object target) {
            if (event.getAction() != ACTION_DOWN) { // 狀態檢測
                throw new IllegalArgumentException(
                        "Can only start tracking on a down event");
            }
            if (DEBUG) Log.v(TAG, "Start trackingt in " + target + ": " + this);
            mDownKeyCode = event.getKeyCode(); // 賦值,表示正在track某個keycode
            mDownTarget = target;
        }

        /**
         * Return true if the key event is for a key code that is currently
         * being tracked by the dispatcher.
         */
        public boolean isTracking(KeyEvent event) {
            return mDownKeyCode == event.getKeyCode();
        }

        /**
         * Keep track of the given event's key code as having performed an
         * action with a long press, so no action should occur on the up.
         * This is only needed if you are directly dispatching events, rather
         * than handling them in {@link Callback#onKeyLongPress}.
         */
        public void performedLongPress(KeyEvent event) {// 用來記錄發生了生理長按事件
            mActiveLongPresses.put(event.getKeyCode(), 1);
        }

        /**
         * Handle key up event to stop tracking.  This resets the dispatcher state,
         * and updates the key event state based on it.
         * This is only needed if you are directly dispatching events, rather
         * than handling them in {@link Callback#onKeyUp}.
         */
        public void handleUpEvent(KeyEvent event) {
            final int keyCode = event.getKeyCode();
            if (DEBUG) Log.v(TAG, "Handle key up " + event + ": " + this);
            int index = mActiveLongPresses.indexOfKey(keyCode);
            if (index >= 0) { // 如果發生過生理長按則設置event.mFlags為CACELED,這樣在接下來的receiver.onKeyUp中有些處理就不會發生了
                if (DEBUG) Log.v(TAG, "  Index: " + index); // 因為事件被標記為CANCELED了
                event.mFlags |= FLAG_CANCELED | FLAG_CANCELED_LONG_PRESS;
                mActiveLongPresses.removeAt(index);
            }
            if (mDownKeyCode == keyCode) {
                if (DEBUG) Log.v(TAG, "  Tracking!");
                event.mFlags |= FLAG_TRACKING; // 設置event正確的mFlags,接下來的receiver.onKeyUp可能會檢測此狀態
                mDownKeyCode = 0; // reset,表示此keycode的tracking到此結束了
                mDownTarget = null;
            }
        }
    }
大概了解了KeyEvent.DispatcherState類,我們就可以來看看KeyEvent.dispatch方法了,代碼如下:
    /**
     * Deliver this key event to a {@link Callback} interface.  If this is
     * an ACTION_MULTIPLE event and it is not handled, then an attempt will
     * be made to deliver a single normal event.
     *
     * @param receiver The Callback that will be given the event.
     * @param state State information retained across events.
     * @param target The target of the dispatch, for use in tracking.
     *
     * @return The return value from the Callback method that was called.
     */
    public final boolean dispatch(Callback receiver, DispatcherState state,
            Object target) {
        switch (mAction) {
            case ACTION_DOWN: { // DOWN事件
                mFlags &= ~FLAG_START_TRACKING; //先清掉START_TRACKING標記
                if (DEBUG) Log.v(TAG, "Key down to " + target + " in " + state
                        + ": " + this);
                boolean res = receiver.onKeyDown(mKeyCode, this); // 回調Callback接口的onKeyDown方法,View和Activity都是此接口的實現者
                if (state != null) { // 一般都成立
                    if (res && mRepeatCount == 0 && (mFlags&FLAG_START_TRACKING) != 0) {
                        if (DEBUG) Log.v(TAG, "  Start tracking!"); // receiver.onKeyDown返回true了且不是repeated
                        state.startTracking(this, target); // 並且也沒有開始tracking,則開始tracking當前的KeyEvent和target
                    } else if (isLongPress() && state.isTracking(this)) { // 處理生理長按
                        try { // 檢測到生理長按則調用receiver.onKeyLongPress方法
                            if (receiver.onKeyLongPress(mKeyCode, this)) {
                                if (DEBUG) Log.v(TAG, "  Clear from long press!");
                                state.performedLongPress(this); // 記錄此event已經有生理long press發生了。。。
                                res = true; // 設置為處理了
                            }
                        } catch (AbstractMethodError e) {
                        }
                    }
                }
                return res; // 返回down事件處理的結果
            }
            case ACTION_UP: // UP事件
                if (DEBUG) Log.v(TAG, "Key up to " + target + " in " + state
                        + ": " + this);
                if (state != null) {
                    state.handleUpEvent(this); // reset state的內部狀態,也改變了KeyEvent的某些狀態
                }
                return receiver.onKeyUp(mKeyCode, this); // 最後調用receiver.onKeyUp方法
            case ACTION_MULTIPLE: // 這裡可以忽略掉
                final int count = mRepeatCount;
                final int code = mKeyCode;
                if (receiver.onKeyMultiple(code, count, this)) {
                    return true;
                }
                if (code != KeyEvent.KEYCODE_UNKNOWN) {
                    mAction = ACTION_DOWN;
                    mRepeatCount = 0;
                    boolean handled = receiver.onKeyDown(code, this);
                    if (handled) {
                        mAction = ACTION_UP;
                        receiver.onKeyUp(code, this);
                    }
                    mAction = ACTION_MULTIPLE;
                    mRepeatCount = count;
                    return handled;
                }
                return false;
        }
        return false;
    }
看完了KeyEvent的具體實現,我們接著看看receiver(Callback接口)的onKeyDown、onKeyUp實現,先來看View相關的,代碼如下:
/**
     * Default implementation of {@link KeyEvent.Callback#onKeyDown(int, KeyEvent)
     * KeyEvent.Callback.onKeyDown()}: perform press of the view
     * when {@link KeyEvent#KEYCODE_DPAD_CENTER} or {@link KeyEvent#KEYCODE_ENTER}
     * is released, if the view is enabled and clickable.
     *
     * Key presses in software keyboards will generally NOT trigger this listener,
     * although some may elect to do so in some situations. Do not rely on this to
     * catch software key presses.
     *
     * @param keyCode A key code that represents the button pressed, from
     *                {@link android.view.KeyEvent}.
     * @param event   The KeyEvent object that defines the button action.
     */
public boolean onKeyDown(int keyCode, KeyEvent event) {
        boolean result = false;

        if (KeyEvent.isConfirmKey(keyCode)) { // 只處理KEYCODE_DPAD_CENTER、KEYCODE_ENTER這2個按鍵
            if ((mViewFlags & ENABLED_MASK) == DISABLED) {
                return true; // 針對disabled View直接返回true表示處理過了
            }
            // Long clickable items don't necessarily have to be clickable
            if (((mViewFlags & CLICKABLE) == CLICKABLE ||
                    (mViewFlags & LONG_CLICKABLE) == LONG_CLICKABLE) &&
                    (event.getRepeatCount() == 0)) { // clickable或者long_clickable且是第一次down事件
                setPressed(true); // 標記pressed,你可能設置了View不同的background,這時候就會有所體現(比如高亮效果)
                checkForLongClick(0); // 啟動View的long click檢測
                return true; // 到達這一步就表示KeyEvent被處理掉了
            }
        }
        return result;
    }

/**
     * Default implementation of {@link KeyEvent.Callback#onKeyUp(int, KeyEvent)
     * KeyEvent.Callback.onKeyUp()}: perform clicking of the view
     * when {@link KeyEvent#KEYCODE_DPAD_CENTER} or
     * {@link KeyEvent#KEYCODE_ENTER} is released.
     * Key presses in software keyboards will generally NOT trigger this listener,
     * although some may elect to do so in some situations. Do not rely on this to
     * catch software key presses.
     *
     * @param keyCode A key code that represents the button pressed, from
     *                {@link android.view.KeyEvent}.
     * @param event   The KeyEvent object that defines the button action.
     */
    public boolean onKeyUp(int keyCode, KeyEvent event) {
        if (KeyEvent.isConfirmKey(keyCode)) { // 同onKeyDown,默認也只處理confirm key
            if ((mViewFlags & ENABLED_MASK) == DISABLED) {
                return true; // 同樣的邏輯,如果是DISABLED view,直接返回true表示處理過了
            }
            if ((mViewFlags & CLICKABLE) == CLICKABLE && isPressed()) {
                setPressed(false); // 重置pressed狀態

                if (!mHasPerformedLongPress) { // 長按沒發生的話,
                    // This is a tap, so remove the longpress check
                    removeLongPressCallback(); // 當up事件發生的時候,移除這些已經沒用的callback
                    return performClick(); // 調用單擊onClick監聽器
                }
            }
        }
        return false; // 其他所有的Key默認不處理
    }

/**
     * Sets the pressed state for this view.
     *
     * @see #isClickable()
     * @see #setClickable(boolean)
     *
     * @param pressed Pass true to set the View's internal state to "pressed", or false to reverts
     *        the View's internal state from a previously set "pressed" state.
     */
    public void setPressed(boolean pressed) {
        final boolean needsRefresh = pressed != ((mPrivateFlags & PFLAG_PRESSED) == PFLAG_PRESSED);

        if (pressed) {
            mPrivateFlags |= PFLAG_PRESSED;
        } else {
            mPrivateFlags &= ~PFLAG_PRESSED;
        }

        if (needsRefresh) {
            refreshDrawableState(); // 這行代碼會刷新View的顯示狀態
        }
        dispatchSetPressed(pressed);
    }

private void checkForLongClick(int delayOffset) {
        if ((mViewFlags & LONG_CLICKABLE) == LONG_CLICKABLE) { // 必須得是LONG_CLICKABLE的View
            mHasPerformedLongPress = false; // 設置初始值

            if (mPendingCheckForLongPress == null) { // 只非空的時候才new一個
                mPendingCheckForLongPress = new CheckForLongPress();
            }
            mPendingCheckForLongPress.rememberWindowAttachCount();
            postDelayed(mPendingCheckForLongPress, // post一個Runnable,注意延遲是個差值,而不是delayOffset
                    ViewConfiguration.getLongPressTimeout() - delayOffset);
        }
    }

class CheckForLongPress implements Runnable {

        private int mOriginalWindowAttachCount;

        public void run() {
            if (isPressed() && (mParent != null) // 當時間到了,此Runnable沒被移除掉的話,並且這些條件都滿足的時候,
                    && mOriginalWindowAttachCount == mWindowAttachCount) {
                if (performLongClick()) { // 客戶端定義的onLongClickListener監聽器被觸發
                    mHasPerformedLongPress = true; // 只有當被上面的方法處理掉了,才表示LongPress發生過了
                }
            }
        }

        public void rememberWindowAttachCount() {
            mOriginalWindowAttachCount = mWindowAttachCount;
        }
    }

/**
     * Call this view's OnLongClickListener, if it is defined. Invokes the context menu if the
     * OnLongClickListener did not consume the event.
     *
     * @return True if one of the above receivers consumed the event, false otherwise.
     */
    public boolean performLongClick() {
        sendAccessibilityEvent(AccessibilityEvent.TYPE_VIEW_LONG_CLICKED);

        boolean handled = false;
        ListenerInfo li = mListenerInfo;
        if (li != null && li.mOnLongClickListener != null) { // 優先觸發監聽器
            handled = li.mOnLongClickListener.onLongClick(View.this);
        }
        if (!handled) { // 如果還沒處理,顯示ContextMenu如果定義了的話
            handled = showContextMenu();
        }
        if (handled) {
            performHapticFeedback(HapticFeedbackConstants.LONG_PRESS);
        }
        return handled; // 返回處理結果
    }
接下來,看看Activity對應的onKeyDown,onKeyUp方法:
    /**
     * Called when a key was pressed down and not handled by any of the views
     * inside of the activity. So, for example, key presses while the cursor
     * is inside a TextView will not trigger the event (unless it is a navigation
     * to another object) because TextView handles its own key presses.
     *
     * If the focused view didn't want this event, this method is called.
     *
     * The default implementation takes care of {@link KeyEvent#KEYCODE_BACK}
     * by calling {@link #onBackPressed()}, though the behavior varies based
     * on the application compatibility mode: for
     * {@link android.os.Build.VERSION_CODES#ECLAIR} or later applications,
     * it will set up the dispatch to call {@link #onKeyUp} where the action
     * will be performed; for earlier applications, it will perform the
     * action immediately in on-down, as those versions of the platform
     * behaved.
     *
     * Other additional default key handling may be performed
     * if configured with {@link #setDefaultKeyMode}.
     *
     * @return Return true to prevent this event from being propagated
     * further, or false to indicate that you have not handled
     * this event and it should continue to be propagated.
     * @see #onKeyUp
     * @see android.view.KeyEvent
     */
    public boolean onKeyDown(int keyCode, KeyEvent event)  {
        if (keyCode == KeyEvent.KEYCODE_BACK) {
            if (getApplicationInfo().targetSdkVersion
                    >= Build.VERSION_CODES.ECLAIR) {
                event.startTracking();
            } else {
                onBackPressed();
            }
            return true;
        }

        if (mDefaultKeyMode == DEFAULT_KEYS_DISABLE) {
            return false;
        } else if (mDefaultKeyMode == DEFAULT_KEYS_SHORTCUT) {
            if (getWindow().performPanelShortcut(Window.FEATURE_OPTIONS_PANEL,
                    keyCode, event, Menu.FLAG_ALWAYS_PERFORM_CLOSE)) {
                return true;
            }
            return false;
        } else {
            // Common code for DEFAULT_KEYS_DIALER & DEFAULT_KEYS_SEARCH_*
            boolean clearSpannable = false;
            boolean handled;
            if ((event.getRepeatCount() != 0) || event.isSystem()) {
                clearSpannable = true;
                handled = false;
            } else {
                handled = TextKeyListener.getInstance().onKeyDown(
                        null, mDefaultKeySsb, keyCode, event);
                if (handled && mDefaultKeySsb.length() > 0) {
                    // something useable has been typed - dispatch it now.

                    final String str = mDefaultKeySsb.toString();
                    clearSpannable = true;

                    switch (mDefaultKeyMode) {
                    case DEFAULT_KEYS_DIALER:
                        Intent intent = new Intent(Intent.ACTION_DIAL,  Uri.parse("tel:" + str));
                        intent.addFlags(Intent.FLAG_ACTIVITY_NEW_TASK);
                        startActivity(intent);
                        break;
                    case DEFAULT_KEYS_SEARCH_LOCAL:
                        startSearch(str, false, null, false);
                        break;
                    case DEFAULT_KEYS_SEARCH_GLOBAL:
                        startSearch(str, false, null, true);
                        break;
                    }
                }
            }
            if (clearSpannable) {
                mDefaultKeySsb.clear();
                mDefaultKeySsb.clearSpans();
                Selection.setSelection(mDefaultKeySsb,0);
            }
            return handled;
        }
    }

/**
     * Called when a key was released and not handled by any of the views
     * inside of the activity. So, for example, key presses while the cursor
     * is inside a TextView will not trigger the event (unless it is a navigation
     * to another object) because TextView handles its own key presses.
     *
     * The default implementation handles KEYCODE_BACK to stop the activity
     * and go back.
     *
     * @return Return true to prevent this event from being propagated
     * further, or false to indicate that you have not handled
     * this event and it should continue to be propagated.
     * @see #onKeyDown
     * @see KeyEvent
     */
    public boolean onKeyUp(int keyCode, KeyEvent event) {
        if (getApplicationInfo().targetSdkVersion
                >= Build.VERSION_CODES.ECLAIR) {
            if (keyCode == KeyEvent.KEYCODE_BACK && event.isTracking()
                    && !event.isCanceled()) {
                onBackPressed();
                return true;
            }
        }
        return false;
    }
最後是3.步驟,回到一開始DecorView.dispatchKeyEvent的最後幾行代碼,我們來看看PhoneWindow對應的onKeyDown,onKeyUp方法:
/**
     * A key was pressed down and not handled by anything else in the window.
     *
     * @see #onKeyUp
     * @see android.view.KeyEvent
     */
    protected boolean onKeyDown(int featureId, int keyCode, KeyEvent event) {
        /* ****************************************************************************
         * HOW TO DECIDE WHERE YOUR KEY HANDLING GOES.
         *
         * If your key handling must happen before the app gets a crack at the event,
         * it goes in PhoneWindowManager.
         *
         * If your key handling should happen in all windows, and does not depend on
         * the state of the current application, other than that the current
         * application can override the behavior by handling the event itself, it
         * should go in PhoneFallbackEventHandler.
         *
         * Only if your handling depends on the window, and the fact that it has
         * a DecorView, should it go here.
         * ****************************************************************************/

        final KeyEvent.DispatcherState dispatcher =
                mDecor != null ? mDecor.getKeyDispatcherState() : null;
        //Log.i(TAG, "Key down: repeat=" + event.getRepeatCount()
        //        + " flags=0x" + Integer.toHexString(event.getFlags()));

        switch (keyCode) {
            case KeyEvent.KEYCODE_VOLUME_UP: // key event處理中的最後一步,
            case KeyEvent.KEYCODE_VOLUME_DOWN:
            case KeyEvent.KEYCODE_VOLUME_MUTE: { // 處理音量調節鍵
                // Similar code is in PhoneFallbackEventHandler in case the window
                // doesn't have one of these.  In this case, we execute it here and
                // eat the event instead, because we have mVolumeControlStreamType
                // and they don't.
                getAudioManager().handleKeyDown(event, mVolumeControlStreamType);
                return true;
            }

            case KeyEvent.KEYCODE_MENU: {
                onKeyDownPanel((featureId < 0) ? FEATURE_OPTIONS_PANEL : featureId, event);
                return true;
            }

            case KeyEvent.KEYCODE_BACK: {
                if (event.getRepeatCount() > 0) break;
                if (featureId < 0) break;
                // Currently don't do anything with long press.
                if (dispatcher != null) {
                    dispatcher.startTracking(event, this);
                }
                return true;
            }

        }

        return false;
    }

/**
     * A key was released and not handled by anything else in the window.
     *
     * @see #onKeyDown
     * @see android.view.KeyEvent
     */
    protected boolean onKeyUp(int featureId, int keyCode, KeyEvent event) {
        final KeyEvent.DispatcherState dispatcher =
                mDecor != null ? mDecor.getKeyDispatcherState() : null;
        if (dispatcher != null) {
            dispatcher.handleUpEvent(event);
        }
        //Log.i(TAG, "Key up: repeat=" + event.getRepeatCount()
        //        + " flags=0x" + Integer.toHexString(event.getFlags()));

        switch (keyCode) {
            case KeyEvent.KEYCODE_VOLUME_UP:
            case KeyEvent.KEYCODE_VOLUME_DOWN:
            case KeyEvent.KEYCODE_VOLUME_MUTE: {
                // Similar code is in PhoneFallbackEventHandler in case the window
                // doesn't have one of these.  In this case, we execute it here and
                // eat the event instead, because we have mVolumeControlStreamType
                // and they don't.
                getAudioManager().handleKeyUp(event, mVolumeControlStreamType);
                return true;
            }

            case KeyEvent.KEYCODE_MENU: {
                onKeyUpPanel(featureId < 0 ? FEATURE_OPTIONS_PANEL : featureId,
                        event);
                return true;
            }

            case KeyEvent.KEYCODE_BACK: {
                if (featureId < 0) break;
                if (event.isTracking() && !event.isCanceled()) {
                    if (featureId == FEATURE_OPTIONS_PANEL) {
                        PanelFeatureState st = getPanelState(featureId, false);
                        if (st != null && st.isInExpandedMode) {
                            // If the user is in an expanded menu and hits back, it
                            // should go back to the icon menu
                            reopenMenu(true);
                            return true;
                        }
                    }
                    closePanel(featureId);
                    return true;
                }
                break;
            }

            case KeyEvent.KEYCODE_SEARCH: {
                /*
                 * Do this in onKeyUp since the Search key is also used for
                 * chording quick launch shortcuts.
                 */
                if (getKeyguardManager().inKeyguardRestrictedInputMode()) {
                    break;
                }
                if (event.isTracking() && !event.isCanceled()) {
                    launchDefaultSearch();
                }
                return true;
            }
        }

        return false;
    }
至此所有按鍵事件的處理就分析完畢了,鑒於篇幅略長,我們最後稍微總結下。主要有這麼幾點:
1. View的各種KeyEvent.Callback接口早於Activity的對應接口被調用;
2. 整個處理環節中只要有一處表明處理掉了,則處理結束,不在往下傳遞;
3. 各種Callback接口的處理優先級低於監聽器,也就是說各種onXXXListener的方法優先被調用。
 android中動畫的實現
1.Animation 動畫類型Android的animation由四種類型組成:XML中 alph 漸變透明度動畫效果 scale 漸變尺寸伸縮動畫效果 tr
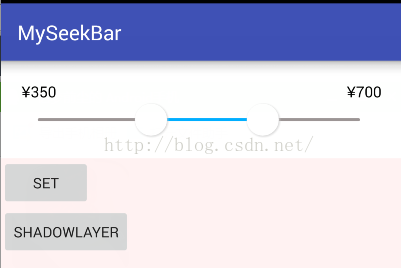 Android 自定義雙向滑動SeekBar
Android 自定義雙向滑動SeekBar ,一些需要價格區間選擇的App可能需要用到1. 自定義MySeekBar 繼承 View,先給一張效果圖。2.原理:自定義a
 Android編程實現自定義手勢的方法詳解
本文實例講述了Android編程實現自定義手勢的方法。分享給大家供大家參考,具體如下:之前介紹過如何在Android程序中使用手勢,主要是系統默認提供的幾個手勢,這次介紹
 使用Android Studio進行JNI開發 - Mac篇
對於入門級Android菜鳥的我來說,從配置到開發JNI是一個煎熬的過程,但還是取得了最終的成功。這裡主要是整個過程進行了整理,讓其他跟我一樣受煎熬的人盡早跳出來,繼續