編輯:關於Android編程
 vcnotqjG5Mq109DBvdbWt73KvaOs1NpBUEnOxLW11tDLtcP3tcS3vcq9yOfPwqO6PHVsPldpZGdldC5Qcm9ncmVzc0Jhci5Ib3Jpem9udGFsV2lkZ2V0LlByb2dyZXNzQmFyLlNtYWxsV2lkZ2V0LlByb2dyZXNzQmFyLkxhcmdlV2lkZ2V0LlByb2dyZXNzQmFyLkludmVyc2VXaWRnZXQuUHJvZ3Jlc3NCYXIuU21hbGwuSW52ZXJzZVdpZGdldC5Qcm9ncmVzc0Jhci5MYXJnZS5JbnZlcnNlICAgIMq508O1xMqxuvK/ydLU1eLR+aO6c3R5bGU9"@android:style/Widget.ProgressBar.Small"。另外還有一種方式就是使用系統的attr,上面的方式是系統的style:
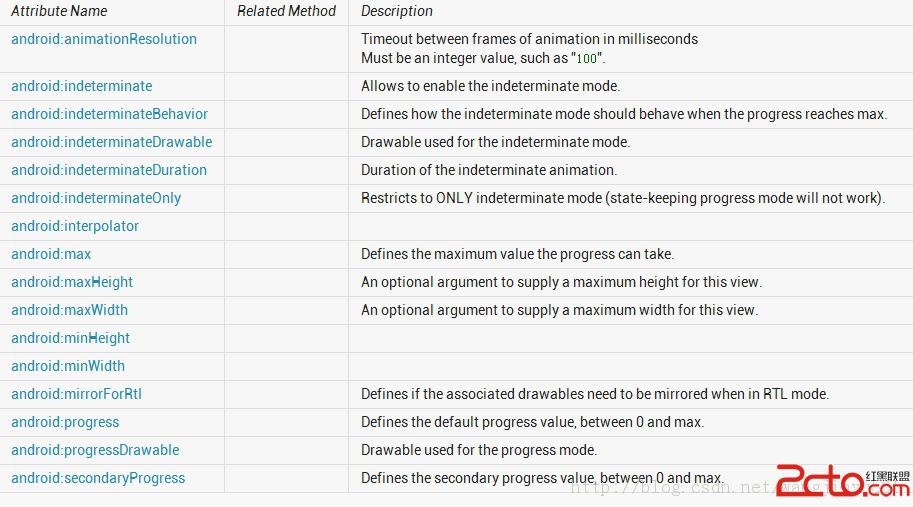
雖然沒有設置android:indeterminateDrawable,但是樣式Widget.ProgressBar.Horizontal已經幫我們設置好了。查看源碼如下:
先看一下progress_horizontal,源碼如下:
可以看到,系統使用的是圖層方式,以覆蓋的方式進行的。所以如果需要其他的樣式的話,改變系統默認的值即可,或者參考一下系統自帶的樣式設置就行了。
  /**
     * Create a new progress bar with range 0...100 and initial progress of 0.
     * @param context the application environment
     */
    public ProgressBar(Context context) {
        this(context, null);
    }

    public ProgressBar(Context context, AttributeSet attrs) {
        this(context, attrs, com.android.internal.R.attr.progressBarStyle);
    }

    public ProgressBar(Context context, AttributeSet attrs, int defStyle) {
        this(context, attrs, defStyle, 0);
    }

    /**
     * @hide
     */
    public ProgressBar(Context context, AttributeSet attrs, int defStyle, int styleRes) {
        super(context, attrs, defStyle);
        mUiThreadId = Thread.currentThread().getId();
        initProgressBar();

        TypedArray a =
            context.obtainStyledAttributes(attrs, R.styleable.ProgressBar, defStyle, styleRes);

        mNoInvalidate = true;

        Drawable drawable = a.getDrawable(R.styleable.ProgressBar_progressDrawable);
        if (drawable != null) {
            drawable = tileify(drawable, false);
            // Calling this method can set mMaxHeight, make sure the corresponding
            // XML attribute for mMaxHeight is read after calling this method
            setProgressDrawable(drawable);
        }


        mDuration = a.getInt(R.styleable.ProgressBar_indeterminateDuration, mDuration);

        mMinWidth = a.getDimensionPixelSize(R.styleable.ProgressBar_minWidth, mMinWidth);
        mMaxWidth = a.getDimensionPixelSize(R.styleable.ProgressBar_maxWidth, mMaxWidth);
        mMinHeight = a.getDimensionPixelSize(R.styleable.ProgressBar_minHeight, mMinHeight);
        mMaxHeight = a.getDimensionPixelSize(R.styleable.ProgressBar_maxHeight, mMaxHeight);

        mBehavior = a.getInt(R.styleable.ProgressBar_indeterminateBehavior, mBehavior);

        final int resID = a.getResourceId(
                com.android.internal.R.styleable.ProgressBar_interpolator,
                android.R.anim. linear_interpolator); // default to linear interpolator
        if (resID > 0) {
            setInterpolator(context, resID);
        }

        setMax(a.getInt(R.styleable.ProgressBar_max, mMax));

        setProgress(a.getInt(R.styleable.ProgressBar_progress, mProgress));

        setSecondaryProgress(
                a.getInt(R.styleable.ProgressBar_secondaryProgress, mSecondaryProgress));

        drawable = a.getDrawable(R.styleable.ProgressBar_indeterminateDrawable);
        if (drawable != null) {
            drawable = tileifyIndeterminate(drawable);
            setIndeterminateDrawable(drawable);
        }

        mOnlyIndeterminate = a.getBoolean(
                R.styleable.ProgressBar_indeterminateOnly, mOnlyIndeterminate);

        mNoInvalidate = false;

        setIndeterminate( mOnlyIndeterminate || a.getBoolean(
                R.styleable.ProgressBar_indeterminate, mIndeterminate));

        mMirrorForRtl = a.getBoolean(R.styleable.ProgressBar_mirrorForRtl, mMirrorForRtl);

        a.recycle();
    }
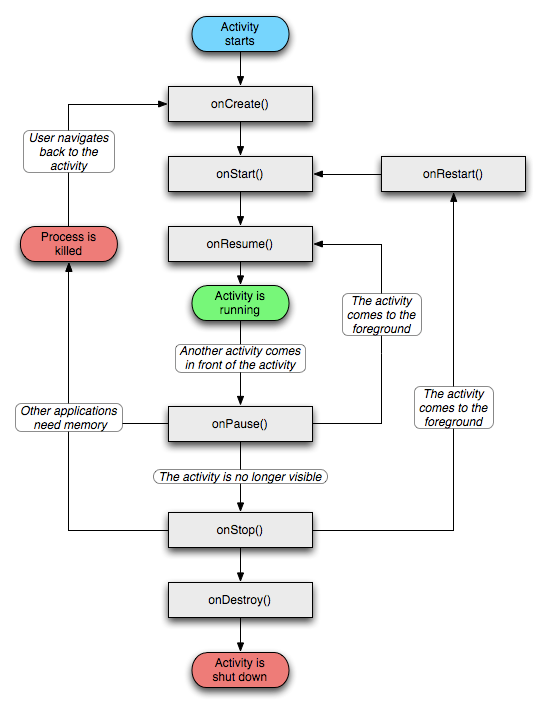
樣式文件如下:R.styleable.Progre:ProgressBar把三個構造方法都列出來了,並使用了遞歸調用的方式,還有一個方式就是分別在每一個構造方法中都調用初始化的代碼,個人覺得還是此處比較正規。然後看一下第三個構造方法,在這裡主要做了兩件事情,一個是從attrs文件中讀取設置的屬性;一個是initProgressBar()方法,為ProgressBar設置一些默認的屬性值。
  private void initProgressBar() {
        mMax = 100;
        mProgress = 0;
        mSecondaryProgress = 0;
        mIndeterminate = false;
        mOnlyIndeterminate = false;
        mDuration = 4000;
        mBehavior = AlphaAnimation.RESTART;
        mMinWidth = 24;
        mMaxWidth = 48;
        mMinHeight = 24;
        mMaxHeight = 48;
    }
這就是默認的屬性值。這在自定義View中算是最基礎的了,不多說,不過在這裡需要注意兩個地方。一是mUiThreadId,他是干嘛的呢,它獲取的是當前UI線程的id,然後在更新ProgressBar進度的時候進行一個判斷,如果是UI線程,那麼直接進行更新,如果不是就post出去,使用Handler等進行更新。二是tileify(drawable, false)方法和tileifyIndeterminate(drawable)方法。這兩個方法主要是對Drawable進行一個解析、轉換的過程。在這裡需要重點強調一下,在ProgressBar中,最重要的部分就是Drawable的使用了,因為不僅是它的背景包括進度等都是使用Drawable來完成的,所以在源碼中也可以看到基本上百分之七八十的代碼都是和Drawable有關的。因為這一部分篇幅較多,所以就不詳細介紹了,下面重點說一下如何繪制ProgressBar,首先看onMeasure()方法, @Override
protected synchronized void onMeasure( int widthMeasureSpec, int heightMeasureSpec) {
Drawable d = mCurrentDrawable;
int dw = 0;
int dh = 0;
if (d != null) {
dw = Math. max(mMinWidth , Math.min( mMaxWidth, d.getIntrinsicWidth()));
dh = Math. max(mMinHeight , Math.min( mMaxHeight, d.getIntrinsicHeight()));
}
updateDrawableState();
dw += mPaddingLeft + mPaddingRight;
dh += mPaddingTop + mPaddingBottom;
setMeasuredDimension( resolveSizeAndState(dw, widthMeasureSpec, 0),
resolveSizeAndState(dh, heightMeasureSpec, 0));
}
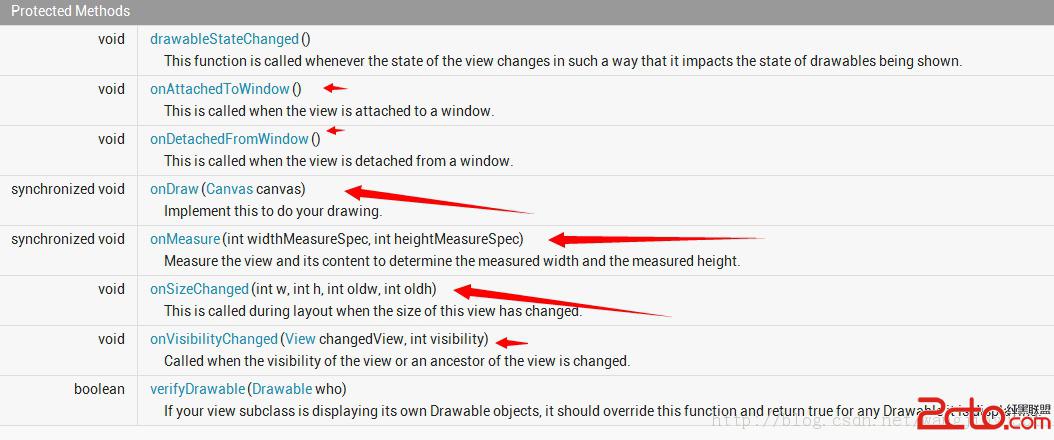
這是測量View大小的方法,也就是ProgressBar的大小,因為每一個ProgressBar默認都會使用Drawable。所以ProgressBar的大小即是Drawable的大小加上Padding的大小,如果沒有Padding,那很顯然就是Drawable的大小。最後使用setMeasuredDimension()方法設置ProgressBar的大小。 按照正常的流程,有些朋友可能會想到重寫onLayout()方法了,但是這裡ProgressBar只是一個View,不需要進行位置的處理。所以直接進入onDraw()方法,在 @Override
protected synchronized void onDraw(Canvas canvas) {
super.onDraw(canvas);
Drawable d = mCurrentDrawable;
if (d != null) {
// Translate canvas so a indeterminate circular progress bar with padding
// rotates properly in its animation
canvas.save();
if(isLayoutRtl() && mMirrorForRtl) {
canvas.translate(getWidth() - mPaddingRight, mPaddingTop);
canvas.scale(-1.0f, 1.0f);
} else {
canvas.translate(mPaddingLeft, mPaddingTop);
}
long time = getDrawingTime();
if ( mHasAnimation) {
mAnimation.getTransformation(time, mTransformation);
float scale = mTransformation.getAlpha();
try {
mInDrawing = true;
d.setLevel(( int) (scale * MAX_LEVEL));
} finally {
mInDrawing = false;
}
postInvalidateOnAnimation();
}
d.draw(canvas);
canvas.restore();
if ( mShouldStartAnimationDrawable && d instanceof Animatable) {
((Animatable) d).start();
mShouldStartAnimationDrawable = false ;
}
} 首先也是先獲取當前的Drawable對象,如果不為空就開始繪圖,先是一個判斷,根據布局的方向來轉移畫布,isLayoutRtl()是View類的方法, public boolean isLayoutRtl() {
return (getLayoutDirection() == LAYOUT_DIRECTION_RTL);
} 這個LAYOUT_DIRECTION_RTL是LayoutDirection的一個常量,package android.util;
/**
* A class for defining layout directions. A layout direction can be left-to-right (LTR)
* or right-to-left (RTL). It can also be inherited (from a parent) or deduced from the default
* language script of a locale.
*/
public final class LayoutDirection {
// No instantiation
private LayoutDirection() {}
/**
* Horizontal layout direction is from Left to Right.
*/
public static final int LTR = 0;
/**
* Horizontal layout direction is from Right to Left.
*/
public static final int RTL = 1;
/**
* Horizontal layout direction is inherited.
*/
public static final int INHERIT = 2;
/**
* Horizontal layout direction is deduced from the default language script for the locale.
*/
public static final int LOCALE = 3;
} 然後再判斷有沒有動畫,如果有的話,就調用View類的postInvalidateOnAnimation()方法去執行一個動畫。最後調用Drawable對象去畫出來d.draw(canvas)。 總的來說,系統的ProgressBar是和Drawable緊密相關的,所以說,如果我們自定義的ProgressBar和Drawable有關,那麼完全可以繼承於系統的ProgressBar來開發即可。如果你的自定義ProgressBar和Drawable關系不大,比如是這樣的, 其實,就不需要Drawable了,完全可以直接繼承於View類開發。 那下面就從兩個方面來自定義ProgressBar,一、繼承於系統ProgressBar 首先看一下上面給出的進度條其中的一個,
 思路: Mini ProgressBar在原生ProgressBar的基礎上加入了一個指示器,並且有文字顯示。實現的時候可以這樣,
 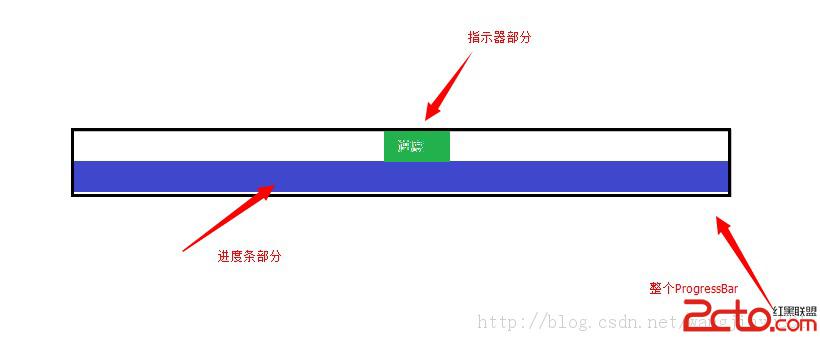 也就是說,自定義的ProgressBar包含了兩個部分,一部分是默認的;另一部分是新添加的指示器。其實指示器就是一個Drawable和文本的組合,而且直接畫在系統ProgressBar的上面即可。接著,關於自定義的ProgressBar的屬性也要定義一下,比如Drawable、比如文本、比如間隔等。所以attrs文件可以這樣來寫了:
ps:我發現eclipse在寫declare-styleable不會自動提示,不清楚什麼原因,知道的朋友望告知。 之後我們新建一個類繼承於ProgressBar,
/**
 * @author kince
 *
 */
public class IndicatorProgressBar extends ProgressBar {

     public IndicatorProgressBar(Context context) {
           this(context, null);

     }

     public IndicatorProgressBar(Context context, AttributeSet attrs) {
           this(context, attrs, 0);

     }

     public IndicatorProgressBar(Context context, AttributeSet attrs,
               int defStyle) {
           super(context, attrs, defStyle);

     }


}
然後在第三個構造方法中初始化數據,因為用到了文本以及Drawable,所以還需要聲明全局變量,初始化完畢後代碼如下: /**
*
*/
package com.example.indicatorprogressbar.widget;
import com.example.indicatorprogressbar.R;
import android.content.Context;
import android.content.res.TypedArray;
import android.graphics.Color;
import android.graphics.Paint;
import android.graphics.Paint.Align;
import android.graphics.drawable.Drawable;
import android.text.TextPaint;
import android.util.AttributeSet;
import android.widget.ProgressBar;
/**
* @author kince
*
*/
public class IndicatorProgressBar extends ProgressBar {
private TextPaint mTextPaint;
private Drawable mDrawableIndicator;
private int offset=5;
public IndicatorProgressBar(Context context) {
this(context, null);
}
public IndicatorProgressBar(Context context, AttributeSet attrs) {
this(context, attrs, 0);
mTextPaint=new TextPaint(Paint.ANTI_ALIAS_FLAG);
mTextPaint.density=getResources().getDisplayMetrics().density;
mTextPaint.setColor(Color.WHITE);
mTextPaint.setTextSize(10);
mTextPaint.setTextAlign(Align.CENTER);
mTextPaint.setFakeBoldText(true);
}
public IndicatorProgressBar(Context context, AttributeSet attrs,
int defStyle) {
super(context, attrs, defStyle);
TypedArray array=context.obtainStyledAttributes(attrs, R.styleable.IndicatorProgressBar, defStyle, 0);
if(array!=null){
mDrawableIndicator=array.getDrawable(R.styleable.IndicatorProgressBar_progressIndicator);
offset=array.getInt(R.styleable.IndicatorProgressBar_offset, 0);
array.recycle();
}
}
} 然後,為全局變量設置set、get方法,方便在程序中調用。 public Drawable getmDrawableIndicator() {
return mDrawableIndicator ;
}
public void setmDrawableIndicator(Drawable mDrawableIndicator) {
this.mDrawableIndicator = mDrawableIndicator;
}
public int getOffset() {
return offset ;
}
public void setOffset(int offset) {
this.offset = offset;
}
接下來,就是重寫onMeasure()、onDraw()方法了。在onMeasure()中,需要對進度條計算好具體大小,那根據上面的圖示,這個進度條的寬度和系統進度條的寬度是一樣的,也就是getMeasuredWidth();高度的話,因為加了一個指示器,所以高度是指示器的高度加上系統進度條的高度。因此在onMeasure()方法中就可以這樣來寫: @Override
protected synchronized void onMeasure(int widthMeasureSpec,
int heightMeasureSpec) {
// TODO Auto-generated method stub
super.onMeasure(widthMeasureSpec, heightMeasureSpec);
if(mDrawableIndicator!=null){
//獲取系統進度條的寬度 這個寬度也是自定義進度條的寬度 所以在這裡直接賦值
final int width=getMeasuredWidth();
final int height=getMeasuredHeight()+getIndicatorHeight();
setMeasuredDimension(width, height);
}
}
/**
* @category 獲取指示器的高度
* @return
*/
private int getIndicatorHeight(){
if(mDrawableIndicator==null){
return 0;
}
Rect r=mDrawableIndicator.copyBounds();
int height=r.height();
return height;
} 然後是onDraw()方法,因為在onMeasure()方法中增加了進度條的高度,所以在畫的時候需要將系統進度條與指示器分隔開來。在進度條的樣式文件中,我們是這樣配置的:在android:progressDrawable的屬性中,使用的drawable是這樣的:
可以發現,是一個layer類型的drawable,所以在計算大小的時候,需要特別考慮這個情況。代碼如下:
 if (m_indicator != null) {
               if (progressDrawable != null
                        && progressDrawable instanceof LayerDrawable) {
                   LayerDrawable d = (LayerDrawable) progressDrawable;

                    for (int i = 0; i < d.getNumberOfLayers(); i++) {
                        d.getDrawable(i).getBounds(). top = getIndicatorHeight();
                        d.getDrawable(i).getBounds(). bottom = d.getDrawable(i)
                                  .getBounds().height()
                                  + getIndicatorHeight();
                   }
              } else if (progressDrawable != null) {
                   progressDrawable.getBounds(). top = m_indicator
                             .getIntrinsicHeight();
                   progressDrawable.getBounds(). bottom = progressDrawable
                             .getBounds().height() + getIndicatorHeight();
              }
          }
然後需要更新進度條的位置,private void updateProgressBar () {
Drawable progressDrawable = getProgressDrawable();
if (progressDrawable != null
&& progressDrawable instanceof LayerDrawable) {
LayerDrawable d = (LayerDrawable) progressDrawable;
final float scale = getScale(getProgress());
// 獲取進度條 更新它的大小
Drawable progressBar = d.findDrawableByLayerId(R.id.progress );
final int width = d.getBounds(). right - d.getBounds().left ;
if (progressBar != null) {
Rect progressBarBounds = progressBar.getBounds();
progressBarBounds. right = progressBarBounds.left
+ ( int ) (width * scale + 0.5f);
progressBar.setBounds(progressBarBounds);
}
// 獲取疊加的圖層
Drawable patternOverlay = d.findDrawableByLayerId(R.id.pattern );
if (patternOverlay != null) {
if (progressBar != null) {
// 使疊加圖層適應進度條大小
Rect patternOverlayBounds = progressBar.copyBounds();
final int left = patternOverlayBounds.left ;
final int right = patternOverlayBounds.right ;
patternOverlayBounds. left = (left + 1 > right) ? left
: left + 1;
patternOverlayBounds. right = (right > 0) ? right - 1
: right;
patternOverlay.setBounds(patternOverlayBounds);
} else {
// 沒有疊加圖層
Rect patternOverlayBounds = patternOverlay.getBounds();
patternOverlayBounds. right = patternOverlayBounds.left
+ ( int ) (width * scale + 0.5f);
patternOverlay.setBounds(patternOverlayBounds);
}
}
}
}
最後,需要把指示器畫出來,if (m_indicator != null) {
canvas.save();
int dx = 0;
// 獲取系統進度條最右邊的位置 也就是頭部的位置
if (progressDrawable != null
&& progressDrawable instanceof LayerDrawable) {
LayerDrawable d = (LayerDrawable) progressDrawable;
Drawable progressBar = d.findDrawableByLayerId(R.id.progress );
dx = progressBar.getBounds(). right;
} else if (progressDrawable != null) {
dx = progressDrawable.getBounds().right ;
}
//加入offset
dx = dx - getIndicatorWidth() / 2 - m_offset + getPaddingLeft();
// 移動畫筆位置
canvas.translate(dx, 0);
// 畫出指示器
m_indicator .draw(canvas);
// 畫出進度數字
canvas.drawText(
m_formatter != null ? m_formatter .getText(getProgress())
: Math.round(getScale(getProgress()) * 100.0f)
+ "%" , getIndicatorWidth() / 2,
getIndicatorHeight() / 2 + 1, m_textPaint );
// restore canvas to original
canvas.restore();
}
源碼下載: Android使用AChartEngine制作動態心電圖效果
AChartEngine是一個很強大的圖表引擎,我在上學的時候就接觸過,並且利用它做了一個傳感器的應用,想想現在也很久遠了,今天就把這個app的源碼貼出來供其他人研究這款
 Android - Handler is abstract, cannot be instantiated.
Android使用Handler進行實例化(new)時, 如: private Handler handler = new Handler(); 會報錯Ha
 Android statusbar 透明後 toolbar與之重疊問題的解決方法
之前想要給statusbar和toolbar實現這樣的效果:為使得statusbar變為透明,在自定義theme中給statusbar添加了以下屬性: &l
 Android 帶你從源碼的角度解析Scroller的滾動實現原理
轉帖請注明本文出自xiaanming的博客(http://blog.csdn.net/xiaanming/article/details/17483273),請尊重他人的