編輯:關於Android編程
前些天在github上得到一個關於圖像處理的源碼(地址找不到了),挺全面,閒了分享一下。感謝開源。
對於圖片的反轉,傾斜,縮放之類的操作就不提了,網上太多了。大多都是用的Matrix現成方法。
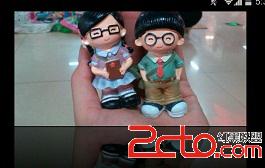
原圖:

一:圓角處理
效果:

代碼:
public static Bitmap getRoundedCornerBitmap(Bitmap bitmap, float roundPx)
	{

		Bitmap output = Bitmap.createBitmap(bitmap.getWidth(),
				bitmap.getHeight(), Config.ARGB_8888);
		Canvas canvas = new Canvas(output);

		final int color = 0xff424242;
		final Paint paint = new Paint();
		final Rect rect = new Rect(0, 0, bitmap.getWidth(), bitmap.getHeight());
		final RectF rectF = new RectF(rect);

		paint.setAntiAlias(true);
		canvas.drawARGB(0, 0, 0, 0);
		paint.setColor(color);
		canvas.drawRoundRect(rectF, roundPx, roundPx, paint);

		paint.setXfermode(new PorterDuffXfermode(Mode.SRC_IN));
		canvas.drawBitmap(bitmap, rect, rect, paint);

		return output;
	}
理解:
這個就簡單了,實際上是在原圖片上畫了一個圓角遮罩。對於paint.setXfermode(new PorterDuffXfermode(Mode.SRC_IN));方法我剛看到也是一知半解Mode.SRC_IN參數是個畫圖模式,該類型是指只顯示兩層圖案的交集部分,且交集部位只顯示上層圖像。實際就是先畫了一個圓角矩形的過濾框,於是形狀有了,再將框中的內容填充為圖片。該參數總過有十八種:
是區分不同的畫圖疊加效果,這個人的博客講的很清楚:http://www.cnblogs.com/sank615/archive/2013/03/12/2955675.html。我也沒做demo,所以不啰嗦了。
二:灰白處理
效果:

代碼:
public static Bitmap toGrayscale(Bitmap bmpOriginal)
	{
		int width, height;
		height = bmpOriginal.getHeight();
		width = bmpOriginal.getWidth();

		Bitmap bmpGrayscale = Bitmap.createBitmap(width, height,
				Bitmap.Config.RGB_565);
		Canvas c = new Canvas(bmpGrayscale);
		Paint paint = new Paint();
		ColorMatrix cm = new ColorMatrix();
		cm.setSaturation(0);
		ColorMatrixColorFilter f = new ColorMatrixColorFilter(cm);
		paint.setColorFilter(f);
		c.drawBitmap(bmpOriginal, 0, 0, paint);
		return bmpGrayscale;
	}
理解:
這個也沒什麼好說的,就是利用了ColorMatrix 類自帶的設置飽和度的方法setSaturation()。不過其方法內部實現的更深一層是利用顏色矩陣的乘法實現的,對於顏色矩陣的乘法下面還有使用。
三 黑白處理
效果:

代碼:
public static Bitmap toHeibai(Bitmap mBitmap)
	{
		int mBitmapWidth = 0;
		int mBitmapHeight = 0;

		mBitmapWidth = mBitmap.getWidth();
		mBitmapHeight = mBitmap.getHeight();
		Bitmap bmpReturn = Bitmap.createBitmap(mBitmapWidth, mBitmapHeight,
				Bitmap.Config.ARGB_8888);
		int iPixel = 0;
		for (int i = 0; i < mBitmapWidth; i++)
		{
			for (int j = 0; j < mBitmapHeight; j++)
			{
				int curr_color = mBitmap.getPixel(i, j);

				int avg = (Color.red(curr_color) + Color.green(curr_color) + Color
						.blue(curr_color)) / 3;
				if (avg >= 100)
				{
					iPixel = 255;
				}
				else
				{
					iPixel = 0;
				}
				int modif_color = Color.argb(255, iPixel, iPixel, iPixel);

				bmpReturn.setPixel(i, j, modif_color);
			}
		}
		return bmpReturn;
	}
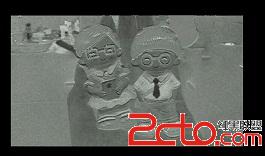
理解:
其實看圖片效果就能看出來,這張圖片不同於灰白處理的那張,不同之處是灰白處理雖然沒有了顏色,但是黑白的程度層次依然存在,而此張圖片連層次都沒有了,只有兩個區別十分明顯的黑白顏色。實現的算法也很簡單,對於每個像素的rgb值求平均數,如果高於100算白色,低於100算黑色。不過感覺100這個標准值太大了,導致圖片白色區域太多,把它降低點可能效果會更好。(作者代碼方法命名竟然是漢語拼音,原來是國人寫的,是不是github也記不清了,我尊重原創,但是下載地址真的忘了。另外我把作者圖片換了,額……)
四:鏡像處理
效果:
代碼:
public static Bitmap createReflectionImageWithOrigin(Bitmap bitmap)
	{
		final int reflectionGap = 4;
		int width = bitmap.getWidth();
		int height = bitmap.getHeight();

		Matrix matrix = new Matrix();
		matrix.preScale(1, -1);

		Bitmap reflectionImage = Bitmap.createBitmap(bitmap, 0, height / 2,
				width, height / 2, matrix, false);

		Bitmap bitmapWithReflection = Bitmap.createBitmap(width,
				(height + height / 2), Config.ARGB_8888);

		Canvas canvas = new Canvas(bitmapWithReflection);
		canvas.drawBitmap(bitmap, 0, 0, null);
		Paint deafalutPaint = new Paint();
		canvas.drawRect(0, height, width, height + reflectionGap, deafalutPaint);

		canvas.drawBitmap(reflectionImage, 0, height + reflectionGap, null);

		Paint paint = new Paint();
		LinearGradient shader = new LinearGradient(0, bitmap.getHeight(), 0,
				bitmapWithReflection.getHeight() + reflectionGap, 0x70ffffff,
				0x00ffffff, TileMode.CLAMP);
		paint.setShader(shader);
		// Set the Transfer mode to be porter duff and destination in
		paint.setXfermode(new PorterDuffXfermode(Mode.DST_IN));
		// Draw a rectangle using the paint with our linear gradient
		canvas.drawRect(0, height, width, bitmapWithReflection.getHeight()
				+ reflectionGap, paint);

		return bitmapWithReflection;
	}
理解:
記得去年android入門時做過gallery的倒影特效,當時感覺很漂亮,想著需要作出反轉和傾斜就可以了,原來他也是這麼做的。原理就是將原圖片反轉一下,調整一 下它的顏色作出倒影效果,再將兩張圖片續加在一起,不過如果在反轉的同時再利用Matrix加上一些傾斜角度就更好了,不過那樣做的話加工後的圖片的高度需要同比例計算出來,不能簡單的相加了,否則就圖片大小就容不下現有的像素內容。
五:加舊處理
效果:

代碼:
public static Bitmap testBitmap(Bitmap bitmap)
    {
        Bitmap output = Bitmap.createBitmap(bitmap.getWidth(),
                bitmap.getHeight(), Config.RGB_565);

        Canvas canvas = new Canvas(output);

        Paint paint = new Paint();
        ColorMatrix cm = new ColorMatrix();
        float[] array = {1,0,0,0,50,
                0,1,0,0,50,
                0,0,1,0,0,
                0,0,0,1,0};
        cm.set(array);
        paint.setColorFilter(new ColorMatrixColorFilter(cm));

        canvas.drawBitmap(bitmap, 0, 0, paint);
        return output;
    }
理解:
其實每張圖片的存儲都是存的每個像素的rgba值,而對其操作的時候又將其四個數值定位一個5行1列的矩陣,最後一行值為1,這樣一來利用矩陣對其操作確實方便了好多,矩陣的乘法可以輕松的實現某個或全部分量按比例或加常熟的增加或減少。 比如現有一張圖片,其每個point的rgba值為{100,100,100,255}也就是灰色全圖,我們希望其紅色部位增加一倍,剩余部分增加十。就可以將其值虛擬為五行一列矩陣:{100 ,100,100,255,1} 再讓這個矩陣:{2,0,0,0,0換行 0,1,0,0,10換行 0,0,1,0,10換行 0,,0,0,1,10} 乘以它。得到{ 200,110,100,100} 。 這個泛黃照片的處理算法原理就是讓每個像素點rg值增加50,rg值相混合就得到了黃色。
如圖: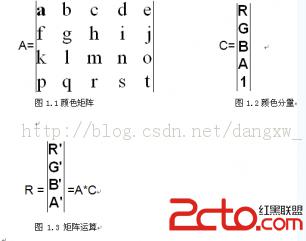
詳細參見:別人的博客
六:哈哈鏡處理
效果:

代碼:
jintArray Java_com_spore_meitu_jni_ImageUtilEngine_toHahajing
  (JNIEnv* env,jobject thiz, jintArray buf, jint width, jint height,jint centerX, jint centerY, jint radius, jfloat multiple)
{
	jint * cbuf;
		cbuf = (*env)->GetIntArrayElements(env, buf, 0);

		int newSize = width * height;
		jint rbuf[newSize];

		float xishu = multiple;
		int real_radius = (int)(radius / xishu);

		int i = 0, j = 0;
		for (i = 0; i < width; i++)
		{
			for (j = 0; j < height; j++)
			{
				int curr_color = cbuf[j * width + i];

				int pixR = red(curr_color);
				int pixG = green(curr_color);
				int pixB = blue(curr_color);
				int pixA = alpha(curr_color);

				int newR = pixR;
				int newG = pixG;
				int newB = pixB;
				int newA = pixA;

				int distance = (int) ((centerX - i) * (centerX - i) + (centerY - j) * (centerY - j));
				if (distance < radius * radius)
				{

					int src_x = (int) ((float) (i - centerX) / xishu);
					int src_y = (int) ((float) (j - centerY) / xishu);
					src_x = (int)(src_x * (sqrt(distance) / real_radius));
					src_y = (int)(src_y * (sqrt(distance) / real_radius));
					src_x = src_x + centerX;
					src_y = src_y + centerY;

					int src_color = cbuf[src_y * width + src_x];
					newR = red(src_color);
					newG = green(src_color);
					newB = blue(src_color);
					newA = alpha(src_color);
				}

				newR = min(255, max(0, newR));
				newG = min(255, max(0, newG));
				newB = min(255, max(0, newB));
				newA = min(255, max(0, newA));

				int modif_color = ARGB(newA, newR, newG, newB);
				rbuf[j * width + i] = modif_color;
			}
		}

		jintArray result = (*env)->NewIntArray(env, newSize);
		(*env)->SetIntArrayRegion(env, result, 0, newSize, rbuf);
		(*env)->ReleaseIntArrayElements(env, buf, cbuf, 0);
		return result;
}
理解:
搞不懂一個圖片處理,為什麼作者要加到jni那層去,速度能提升多少,赤裸裸的嘲諷我們的技術。純c代碼真懶得看,心情好的時候再看,看完了再來更新,猜測實現原理是根據哈哈鏡的半徑,以中心點為圓心,每個像素點的坐標位移並擴展,離中心點越近的就擴展越大。
七:放大鏡處理
直接給代碼吧:
jintArray Java_com_spore_meitu_jni_ImageUtilEngine_toFangdajing
  (JNIEnv* env,jobject thiz, jintArray buf, jint width, jint height,jint centerX, jint centerY, jint radius, jfloat multiple)
{
	jint * cbuf;
	cbuf = (*env)->GetIntArrayElements(env, buf, 0);

	int newSize = width * height;
	jint rbuf[newSize]; // 鏂板浘鍍忓儚绱犲?

	float xishu = multiple;
	int real_radius = (int)(radius / xishu);

	int i = 0, j = 0;
	for (i = 0; i < width; i++)
	{
		for (j = 0; j < height; j++)
		{
			int curr_color = cbuf[j * width + i];

			int pixR = red(curr_color);
			int pixG = green(curr_color);
			int pixB = blue(curr_color);
			int pixA = alpha(curr_color);

			int newR = pixR;
			int newG = pixG;
			int newB = pixB;
			int newA = pixA;

			int distance = (int) ((centerX - i) * (centerX - i) + (centerY - j) * (centerY - j));
			if (distance < radius * radius)
			{
				// 鍥懼儚鏀懼ぇ鏁堟灉
				int src_x = (int)((float)(i - centerX) / xishu + centerX);
				int src_y = (int)((float)(j - centerY) / xishu + centerY);

				int src_color = cbuf[src_y * width + src_x];
				newR = red(src_color);
				newG = green(src_color);
				newB = blue(src_color);
				newA = alpha(src_color);
			}

			newR = min(255, max(0, newR));
			newG = min(255, max(0, newG));
			newB = min(255, max(0, newB));
			newA = min(255, max(0, newA));

			int modif_color = ARGB(newA, newR, newG, newB);
			rbuf[j * width + i] = modif_color;
		}
	}

	jintArray result = (*env)->NewIntArray(env, newSize);
	(*env)->SetIntArrayRegion(env, result, 0, newSize, rbuf);
	(*env)->ReleaseIntArrayElements(env, buf, cbuf, 0);
	return result;
}
八:浮雕處理
效果:
代碼:
public static Bitmap toFuDiao(Bitmap mBitmap)
	{


		int mBitmapWidth = 0;
		int mBitmapHeight = 0;

		mBitmapWidth = mBitmap.getWidth();
		mBitmapHeight = mBitmap.getHeight();
		Bitmap bmpReturn = Bitmap.createBitmap(mBitmapWidth, mBitmapHeight,
				Bitmap.Config.RGB_565);
		int preColor = 0;
		int prepreColor = 0;
		preColor = mBitmap.getPixel(0, 0);

		for (int i = 0; i < mBitmapWidth; i++)
		{
			for (int j = 0; j < mBitmapHeight; j++)
			{
				int curr_color = mBitmap.getPixel(i, j);
				int r = Color.red(curr_color) - Color.red(prepreColor) +127;
				int g = Color.green(curr_color) - Color.red(prepreColor) + 127;
				int b = Color.green(curr_color) - Color.blue(prepreColor) + 127;
				int a = Color.alpha(curr_color);
				int modif_color = Color.argb(a, r, g, b);
				bmpReturn.setPixel(i, j, modif_color);
				prepreColor = preColor;
				preColor = curr_color;
			}
		}

		Canvas c = new Canvas(bmpReturn);
		Paint paint = new Paint();
		ColorMatrix cm = new ColorMatrix();
		cm.setSaturation(0);
		ColorMatrixColorFilter f = new ColorMatrixColorFilter(cm);
		paint.setColorFilter(f);
		c.drawBitmap(bmpReturn, 0, 0, paint);

		return bmpReturn;
	}
理解:
觀察浮雕就不難發現,其實浮雕的特點就是在顏色有跳變的地方就刻條痕跡。127,127,127為深灰色,近似於石頭的顏色,此處取該顏色為底色。算法是將上一個點的rgba值減去當前點的rgba值然後加上127得到當前點的顏色。
九:底片處理
效果:

代碼:
jintArray Java_com_spore_meitu_jni_ImageUtilEngine_toDipian
  (JNIEnv* env,jobject thiz, jintArray buf, jint width, jint height)
{
	jint * cbuf;
	cbuf = (*env)->GetIntArrayElements(env, buf, 0);
	LOGE(Bitmap Buffer %d %d,cbuf[0],cbuf[1]);

	int newSize = width * height;
	jint rbuf[newSize];

	int count = 0;
	int preColor = 0;
	int prepreColor = 0;
	int color = 0;
	preColor = cbuf[0];

	int i = 0;
	int j = 0;
	int iPixel = 0;
	for (i = 0; i < width; i++) {
		for (j = 0; j < height; j++) {
			int curr_color = cbuf[j * width + i];

			int r = 255 - red(curr_color);
			int g = 255 - green(curr_color);
			int b = 255 - blue(curr_color);
			int a = alpha(curr_color);
			int modif_color = ARGB(a, r, g, b);
			rbuf[j * width + i] = modif_color;
		}
	}
	jintArray result = (*env)->NewIntArray(env, newSize);
	(*env)->SetIntArrayRegion(env, result, 0, newSize, rbuf);
	(*env)->ReleaseIntArrayElements(env, buf, cbuf, 0);
	return result;
}
理解:
算法實現是每個點grb值取為255之差,效果也真是底片效果,但是沒有想通為什麼這樣運算就可以得到底片,回頭更新。
十:油畫處理
效果:

代碼:
public static Bitmap toYouHua(Bitmap bmpSource)
	{
		Bitmap bmpReturn = Bitmap.createBitmap(bmpSource.getWidth(),
				bmpSource.getHeight(), Bitmap.Config.RGB_565);
		int color = 0;
		int Radio = 0;
		int width = bmpSource.getWidth();
		int height = bmpSource.getHeight();

		Random rnd = new Random();
		int iModel = 10;
		int i = width - iModel;
		while (i > 1)
		{
			int j = height - iModel;
			while (j > 1)
			{
				int iPos = rnd.nextInt(100000) % iModel;
				color = bmpSource.getPixel(i + iPos, j + iPos);
				bmpReturn.setPixel(i, j, color);
				j = j - 1;
			}
			i = i - 1;
		}
		return bmpReturn;
	}
理解:
贊一下這個算法,其實應該說鄙視下自己,在看到效果圖的時候,我會先猜一下原理,但是這個始終沒有想出來。其實油畫因為是用畫筆畫的,彩筆畫的時候沒有那麼精確會將本該這點的顏色滑到另一個點處。算法實現就是取一個一定范圍內的隨機數,每個點的顏色是該點減去隨機數坐標後所得坐標的顏色。
十一:模糊處理
效果:

代碼:
public static Bitmap toMohu(Bitmap bmpSource, int Blur)
	{
		int mode = 5;
		Bitmap bmpReturn = Bitmap.createBitmap(bmpSource.getWidth(),
				bmpSource.getHeight(), Bitmap.Config.ARGB_8888);
		int pixels[] = new int[bmpSource.getWidth() * bmpSource.getHeight()];
		int pixelsRawSource[] = new int[bmpSource.getWidth()
				* bmpSource.getHeight() * 3];
		int pixelsRawNew[] = new int[bmpSource.getWidth()
				* bmpSource.getHeight() * 3];

		bmpSource.getPixels(pixels, 0, bmpSource.getWidth(), 0, 0,
				bmpSource.getWidth(), bmpSource.getHeight());

        for (int k = 1; k <= Blur; k++)
        {

			for (int i = 0; i < pixels.length; i++)
			{
				pixelsRawSource[i * 3 + 0] = Color.red(pixels[i]);
				pixelsRawSource[i * 3 + 1] = Color.green(pixels[i]);
				pixelsRawSource[i * 3 + 2] = Color.blue(pixels[i]);
			}

			int CurrentPixel = bmpSource.getWidth() * 3 + 3;

			for (int i = 0; i < bmpSource.getHeight() - 3; i++)
			{
				for (int j = 0; j < bmpSource.getWidth() * 3; j++)
				{
					CurrentPixel += 1;
					int sumColor = 0;
					sumColor = pixelsRawSource[CurrentPixel
							- bmpSource.getWidth() * 3];
					sumColor = sumColor + pixelsRawSource[CurrentPixel - 3];
					sumColor = sumColor + pixelsRawSource[CurrentPixel + 3];
					sumColor = sumColor
							+ pixelsRawSource[CurrentPixel
									+ bmpSource.getWidth() * 3];
					pixelsRawNew[CurrentPixel] = Math.round(sumColor / 4);
				}
			}

			for (int i = 0; i < pixels.length; i++)
			{
				pixels[i] = Color.rgb(pixelsRawNew[i * 3 + 0],
						pixelsRawNew[i * 3 + 1], pixelsRawNew[i * 3 + 2]);
			}
		}

		bmpReturn.setPixels(pixels, 0, bmpSource.getWidth(), 0, 0,
				bmpSource.getWidth(), bmpSource.getHeight());
		return bmpReturn;
	}
理解:
算法實現其實是取每三點的平均值做為當前點顏色,這樣看上去就變得模糊了。這個算法是三點的平均值,如果能夠將范圍擴大,並且不是單純的平均值,而是加權平均肯定效果會更好。不過處理速度實在是太慢了,而Muzei這種軟件在處理的時候,不僅僅速度特別快,而且還有逐漸變模糊的變化過程,顯然人家不是用這種算法實現的。他們的實現方法正在猜測中,實現後也來更新。
 Android實現圖片輪播效果
本文實例講述了JaAndroid實現圖片輪播效果代碼,分享給大家供大家參考。具體如下:運行效果截圖如下:具體代碼如下:首先看下一下布局文件:<RelativeLay
 Android App仿QQ制作Material Design風格沉浸式狀態欄
一、概述近期注意到QQ新版使用了沉浸式狀態欄,ok,先聲明一下效果圖:恩,接下來正題。首先只有大於等於4.4版本支持這個半透明狀態欄的效果,但是4.4和5.0的顯示效果有
 Android 自定義ViewGroup之實現FlowLayout-標簽流容器
本篇文章講的是Android 自定義ViewGroup之實現標簽流式布局-FlowLayout,開發中我們會經常需要實現類似於熱門標簽等自動換行的流式布局的功能,網上也有
 小米手環怎麼設置來電震動 小米手環來電震動設置教程
小米手環怎麼設置來電震動?小米手環上市開始就受到廣大用戶的青睐,不僅功能使用,價格還很公道,下面小編為大家帶來小米手環來電震動設置方法。小米手環設置來電震動