編輯:關於Android編程
新年第一篇。
最近在做藍牙開鎖的小項目,手機去連接單片機總是出現問題,和手機的連接也不穩定,看了不少藍牙方面的文檔,做了個關於藍牙連接的小結。
在做android藍牙串口連接的時候一般會使用
BluetoothSocket tmp = null;
// Get a BluetoothSocket for a connection with the
// given BluetoothDevice
try {
         tmp = device.createRfcommSocketToServiceRecord(MY_UUID);
} catch (IOException e) {
	Log.e(TAG, "create() failed", e);
}
然後是tmp賦給BluetoothSocket,接著調用connect方法進行藍牙設備的連接。
可是 BluetoothSocket 的connect方法本身就會報很多異常錯誤。
以下根據對藍牙開發的一點研究可通過以下方法解決:
方法1.先進行藍牙自動配對,配對成功,通過UUID獲得BluetoothSocket,然後執行connect()方法。
方法2.通過UUID獲得BluetoothSocket,然後先根據mDevice.getBondState()進行判斷是否需要配對,最後執行connnect()方法。
    private class ConnectThread extends Thread {
        String macAddress = "";

        public ConnectThread(String mac) {
            macAddress = mac;
        }

        public void run() {
            connecting = true;
            connected = false;
            if(mBluetoothAdapter == null){
                mBluetoothAdapter = BluetoothAdapter.getDefaultAdapter();
            }
            mBluetoothDevice = mBluetoothAdapter.getRemoteDevice(macAddress);
            mBluetoothAdapter.cancelDiscovery();
            try {
                socket = mBluetoothDevice.createRfcommSocketToServiceRecord(uuid);

            } catch (IOException e) {
                // TODO Auto-generated catch block
                //e.printStackTrace();
                Log.e(TAG, "Socket", e);
            }
            //adapter.cancelDiscovery();
            while (!connected && connetTime <= 10) {
                connectDevice();
            }
            // 重置ConnectThread
            //synchronized (BluetoothService.this) {
               //ConnectThread = null;
            //}
        }

        public void cancel() {
            try {
                socket.close();
                socket = null;
            } catch (Exception e) {
                e.printStackTrace();
            } finally {
                connecting = false;
            }
        }
    }
接下來是調用的連接設備方法connectDevice():
protected void connectDevice() {
        try {
            // 連接建立之前的先配對
            if (mBluetoothDevice.getBondState() == BluetoothDevice.BOND_NONE) {
                Method creMethod = BluetoothDevice.class
                        .getMethod("createBond");
                Log.e("TAG", "開始配對");
                creMethod.invoke(mBluetoothDevice);
            } else {
            }
        } catch (Exception e) {
            // TODO: handle exception
            //DisplayMessage("無法配對!");
            e.printStackTrace();
        }
        mBluetoothAdapter.cancelDiscovery();
        try {
            socket.connect();
            //DisplayMessage("連接成功!");
            //connetTime++;
            connected = true;
        } catch (IOException e) {
            // TODO: handle exception
            //DisplayMessage("連接失敗!");
            connetTime++;
            connected = false;
            try {
                socket.close();
                socket = null;
            } catch (IOException e2) {
                // TODO: handle exception
                Log.e(TAG, "Cannot close connection when connection failed");
            }
        } finally {
            connecting = false;
        }
    }
方法3.利用反射通過端口獲得BluetoothSocket,然後執行connect()方法。
    private class ConnectThread extends Thread {
        String macAddress = "";

        public ConnectThread(String mac) {
            macAddress = mac;
        }

        public void run() {
            connecting = true;
            connected = false;
            if(mBluetoothAdapter == null){
                mBluetoothAdapter = BluetoothAdapter.getDefaultAdapter();
            }
            mBluetoothDevice = mBluetoothAdapter.getRemoteDevice(macAddress);
            mBluetoothAdapter.cancelDiscovery();
            initSocket();
            //adapter.cancelDiscovery();
            while (!connected && connetTime <= 10) {
                try {
                    socket.connect();
                    connected = true;
                } catch (IOException e1) {
                    connetTime++;
                    connected = false;
                    // 關閉 socket
                    try {
                        socket.close();
                        socket = null;
                    } catch (IOException e2) {
                        //TODO: handle exception
                        Log.e(TAG, "Socket", e2);
                    }
                } finally {
                    connecting = false;
                }
                //connectDevice();
            }
            // 重置ConnectThread
            //synchronized (BluetoothService.this) {
               //ConnectThread = null;
            //}
        }

        public void cancel() {
            try {
                socket.close();
                socket = null;
            } catch (Exception e) {
                e.printStackTrace();
            } finally {
                connecting = false;
            }
        }
    }
接下來是初始化並得到BluetoothSocket的方法
/**
     * 取得BluetoothSocket
     */
    private void initSocket() {
        BluetoothSocket temp = null;
        try {
            Method m = mBluetoothDevice.getClass().getMethod(
                    "createRfcommSocket", new Class[] { int.class });
            temp = (BluetoothSocket) m.invoke(mBluetoothDevice, 1);//這裡端口為1
        } catch (SecurityException e) {
            e.printStackTrace();
        } catch (NoSuchMethodException e) {
            e.printStackTrace();
        } catch (IllegalArgumentException e) {
            e.printStackTrace();
        } catch (IllegalAccessException e) {
            e.printStackTrace();
        } catch (InvocationTargetException e) {
            e.printStackTrace();
        }
        socket = temp;
    }
要點:1.藍牙配對和連接是兩回事,不可混為一談。
2.藍牙串口連接可通過端口 (1-30)和UUID兩種方法進行操作。
3.通過UUID進行藍牙連接最好先進行配對操作。
 Android 從底部彈出Dialog(橫向滿屏)的實例代碼
項目中經常需要底部彈出框,這裡我整理一下其中我用的比較順手的一個方式(底部彈出一個橫向滿屏的dialog)。效果圖如下所示(只顯示關鍵部分):步驟如下所示:1.定義一個d
 Android實現浮層的上下滑動(支持內部添加View)
前言 我K,今天居然是情人節,對於資深的單身狗來說,簡直是個噩耗,今天注定是各種秀恩愛,心塞中。。。。 話題到此結束,管他什麼情人節,今天給大家帶來的
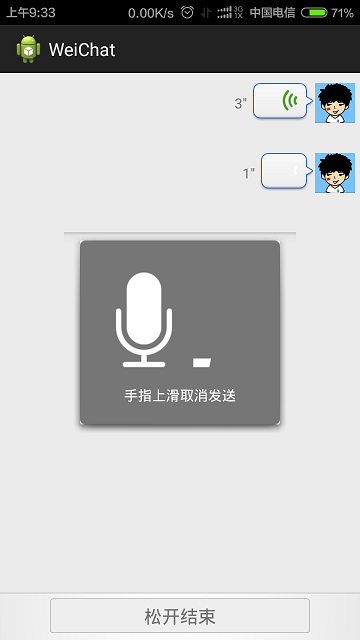 Android仿微信語音聊天功能
本文實例講述了Android仿微信語音聊天功能代碼。分享給大家供大家參考。具體如下:項目效果如下:具體代碼如下:AudioManager.javapackage com.
 Android網絡編程 HttpUrlConnection HttpClient AsyncTask
1,HttpUrlConnection一個UrlConnection常用來通過網絡發送和獲取數據,數據可以使任何類型任何長度,HttpUrlConnecti