編輯:關於Android編程
本系列文章均為A2BGeek原創,轉載務必在明顯處注明:
轉載自A2BGeek的【Android每周專題】系列,原文鏈接:http://blog.csdn.net/a2bgeek/article/details/11580395
本期專題將講解網絡編程。
很多APP或多或少會有一些訪問網絡的功能,比如用戶的登錄,文件的上傳和下載,更新等功能,本期專題將注重實踐,會有大量的代碼,讀者可以直接拷貝使用。
HTTP 協議可能是現在 Internet 上使用得最多、最重要的協議了,在 JDK 的 java.net 包中已經提供了訪問 HTTP 協議的基本功能:HttpURLConnection。HttpURLConnection是java的標准類,HttpURLConnection繼承自URLConnection,可用於向指定網站發送GET請求、POST請求。
在一般情況下,如果只是需要Web站點的某個簡單頁面提交請求並獲取服務器響應,HttpURLConnection完全可以勝任。但在絕大部分情況下,Web站點的網頁可能沒這麼簡單,這些頁面並不是通過一個簡單的URL就可訪問的,可能需要用戶登錄而且具有相應的權限才可訪問該頁面。在這種情況下,就需要涉及Session、Cookie的處理了,如果打算使用HttpURLConnection來處理這些細節,當然也是可能實現的,只是處理起來難度就大了。
為了更好地處理向Web站點請求,包括處理Session、Cookie等細節問題,Apache開源組織提供了一個HttpClient項目,看它的名稱就知道,它是一個簡單的HTTP客戶端(並不是浏覽器),可以用於發送HTTP請求,接收HTTP響應。但不會緩存服務器的響應,不能執行HTML頁面中嵌入的Javascript代碼,也不會對頁面內容進行任何解析、處理。
簡單來說,HttpClient就是一個增強版的HttpURLConnection,HttpURLConnection可以做的事情HttpClient全部可以做;HttpURLConnection沒有提供的有些功能,HttpClient也提供了,但它只是關注於如何發送請求、接收響應,以及管理HTTP連接。這裡說的用戶登錄僅僅是向服務器發送用戶名和密碼,服務器驗證一下,返回一個標志(比如1代表用戶名和密碼正確登錄成功),真正的登錄功能是沒有這麼簡單的,還需要維護Session。在本小節我將通過四種方式編寫登錄代碼,分別是HttpURLConnection的GET方式和POST方式以及HttpClient的GET方式和POST方式,目的是熟悉Android的網絡編程。服務器端我選用了Facebook的開源框架Tornado,服務器端大家可以根據自己的喜好選擇,比如LAMP的經典組合。接下來就直接上代碼了。
public static String HttpURLConnectionGet(String username, String passwd) {

	String response = "HttpURLConnectionGet ";
	try {
		String urlStr = "http://XXX.XXX.XXX.XXX:8888/normalrequest?username="
				+ username + "&password=" + passwd;
		URL url = new URL(urlStr);
		HttpURLConnection urlConnection = (HttpURLConnection) url
				.openConnection();
		InputStream is = urlConnection.getInputStream();
		BufferedReader br = new BufferedReader(new InputStreamReader(is));
		String readLine = null;
		while ((readLine = br.readLine()) != null) {
			response += readLine;
		}
		is.close();
		br.close();
		urlConnection.disconnect();
	} catch (MalformedURLException e) {
		// TODO Auto-generated catch block
		Log.v("a2bgeek", "MalformedURLException--->" + e.getMessage());
	} catch (IOException e) {
		// TODO Auto-generated catch block
		Log.v("a2bgeek", "IOException--->" + e.getMessage());
	}
	return response;
}
我電腦的IP地址就不寫啦,用XXX代替了。
public static String HttpURLConnectionPost(String username, String passwd) {
	String response = "HttpURLConnectionPost ";
	try {
		String urlStr = "http://XXX.XXX.XXX.XXX:8888/normalrequest";
		URL url = new URL(urlStr);
		HttpURLConnection urlConnection = (HttpURLConnection) url
				.openConnection();
		urlConnection.setDoInput(true);
		urlConnection.setDoOutput(true);
		urlConnection.setRequestMethod("POST");
		urlConnection.setUseCaches(false);
		urlConnection.connect();
		DataOutputStream out = new DataOutputStream(
				urlConnection.getOutputStream());
		String content = "username=" + username + "&password=" + passwd;
		out.writeBytes(content);
		out.flush();
		out.close();

		InputStream is = urlConnection.getInputStream();
		BufferedReader br = new BufferedReader(new InputStreamReader(is));
		String readLine = null;
		while ((readLine = br.readLine()) != null) {
			response += readLine;
		}
		is.close();
		br.close();
		urlConnection.disconnect();
	} catch (MalformedURLException e) {
		// TODO Auto-generated catch block
		Log.v("a2bgeek", "MalformedURLException--->" + e.getMessage());
	} catch (IOException e) {
		// TODO Auto-generated catch block
		Log.v("a2bgeek", "IOException--->" + e.getMessage());
	}
	return response;
}
public static String HttpClientGet(String username, String passwd) {

	String response = "HttpClientGet ";
	try {
		String urlStr = "http://XXX.XXX.XXX.XXX:8888/normalrequest?username="
					+ username + "&password=" + passwd;
		HttpGet httpGet = new HttpGet(urlStr);
		HttpClient httpClient = new DefaultHttpClient();
		HttpResponse httpResponse = httpClient.execute(httpGet);
		if (httpResponse.getStatusLine().getStatusCode() == HttpStatus.SC_OK) {
			response += EntityUtils.toString(httpResponse.getEntity());
		}
	} catch (ClientProtocolException e) {
		// TODO Auto-generated catch block
		Log.v("a2bgeek", "ClientProtocolException--->" + e.getMessage());
	} catch (IOException e) {
		// TODO Auto-generated catch block
		Log.v("a2bgeek", "IOException--->" + e.getMessage());
	}
	return response;

}
public static String HttpClientPost(String username, String passwd) {

	String response = "HttpClientPost ";
	try {
		String urlStr = "http://XXX.XXX.XXX.XXX:8888/normalrequest";
		HttpPost httpPost = new HttpPost(urlStr);
		List params = new ArrayList();
		params.add(new BasicNameValuePair("username", username));
		params.add(new BasicNameValuePair("password", passwd));
		HttpEntity httpEntity = new UrlEncodedFormEntity(params);
		httpPost.setEntity(httpEntity);
		HttpClient httpClient = new DefaultHttpClient();
		HttpResponse httpResponse = httpClient.execute(httpPost);
		if (httpResponse.getStatusLine().getStatusCode() == HttpStatus.SC_OK) {
			response += EntityUtils.toString(httpResponse.getEntity());
		}
	} catch (UnsupportedEncodingException e) {
		// TODO Auto-generated catch block
		Log.v("a2bgeek",
				"UnsupportedEncodingException--->" + e.getMessage());
	} catch (ClientProtocolException e) {
		// TODO Auto-generated catch block
		Log.v("a2bgeek", "ClientProtocolException--->" + e.getMessage());
	} catch (IOException e) {
		// TODO Auto-generated catch block
		Log.v("a2bgeek", "IOException--->" + e.getMessage());
	}
	return response;
}
服務器端是使用tornado框架編寫的,不了解的讀者請谷歌一下。
server.py
import tornado.ioloop
import tornado.web
from request import NormalRequestHandler
application = tornado.web.Application([
    (r"/normalrequest", NormalRequestHandler),
])

if __name__ == "__main__":
    application.listen(8888)
    tornado.ioloop.IOLoop.instance().start()
request.py
import tornado.web
class NormalRequestHandler(tornado.web.RequestHandler):
    def get(self):
        username = self.get_argument('username')
        password = self.get_argument('password')
        if username=='a2bgeek' and password=='123456':
            self.write('login success')
        else:
            self.write('login fail')
    def post(self):
        username = self.get_argument('username')
        password = self.get_argument('password')
        if username=='a2bgeek' and password=='123456':
            self.write('login success')
        else:
            self.write('login fail')
在這裡有一點必須要提醒讀者,Android4.0以後涉及網絡的操作不能放在主線程裡面做了,所以需要開一個線程來做。
一般文件的上傳使用POST方式,因為GET對字節數有限制只能傳很少的數據,而POST理論上是沒有限制的。
public static String HttpURLConnectionFileUpload(File file) {
        String response = "HttpURLConnectionFileUpload ";
	String boundary = "a2bgeek";
	try {
		String urlStr = "http://XXX.XXX.XXX.XXX:8888/fileupload";
		URL url = new URL(urlStr);
		HttpURLConnection urlConnection = (HttpURLConnection) url
					.openConnection();
		urlConnection.setDoInput(true);
		urlConnection.setDoOutput(true);
		urlConnection.setRequestMethod("POST");
		urlConnection.setUseCaches(false);
		urlConnection.setRequestProperty("Content-Type",
					"multipart/form-data; boundary=" + boundary);
		urlConnection.connect();
		DataOutputStream dos = new DataOutputStream(
					urlConnection.getOutputStream());
		dos.writeBytes("--" + boundary);
		dos.writeBytes("\r\n");
		dos.writeBytes("Content-Disposition: form-data; name=\"file\"; filename=\""
					+ file.getName() + "\"" + "\r\n");
		dos.writeBytes("\r\n");
		FileInputStream fis = new FileInputStream(file.getPath());
		byte[] buffer = new byte[1024 * 1024];
		int count = 0;
		while ((count = fis.read(buffer)) != -1) {
			dos.write(buffer, 0, count);
		}
		fis.close();
		dos.writeBytes("\r\n");
		dos.writeBytes("--" + boundary + "--");
		dos.flush();
		dos.close();

		InputStream is = urlConnection.getInputStream();
		BufferedReader br = new BufferedReader(new InputStreamReader(is));
		String readLine = null;
		while ((readLine = br.readLine()) != null) {
			response += readLine;
		}
		is.close();
		br.close();
		urlConnection.disconnect();
	} catch (MalformedURLException e) {
		// TODO Auto-generated catch block
		Log.v("a2bgeek", "MalformedURLException--->" + e.getMessage());
	} catch (IOException e) {
		// TODO Auto-generated catch block
		Log.v("a2bgeek", "IOException--->" + e.getMessage());
	}
	return response;
}
public static String HttpClientFileUpload(File file) {
	String response = "HttpClientFileUpload ";
	try {
		String urlStr = "http://XXX.XXX.XXX.XXX:8888/fileupload";
		HttpPost httpPost = new HttpPost(urlStr);

		MultipartEntity multipartEntity = new MultipartEntity();
		multipartEntity.addPart("file", new FileBody(file));

		httpPost.setEntity(multipartEntity);
		HttpClient httpClient = new DefaultHttpClient();
		HttpResponse httpResponse = httpClient.execute(httpPost);
		if (httpResponse.getStatusLine().getStatusCode() == HttpStatus.SC_OK) {
			response += EntityUtils.toString(httpResponse.getEntity());
		}
	} catch (UnsupportedEncodingException e) {
		// TODO Auto-generated catch block
		Log.v("a2bgeek",
				"UnsupportedEncodingException--->" + e.getMessage());
	} catch (ClientProtocolException e) {
		// TODO Auto-generated catch block
		Log.v("a2bgeek", "ClientProtocolException--->" + e.getMessage());
	} catch (IOException e) {
		// TODO Auto-generated catch block
		Log.v("a2bgeek", "IOException--->" + e.getMessage());
	}
	return response;

}
import tornado.web
import os

class UploadFileHandler(tornado.web.RequestHandler):
    def get(self):
        self.write('''
一般文件的下載使用的是GET方式,其實也可以使用POST方式,這兩種是沒有本質區別的。只是GET比較方便,POST的話需要在服務器端編寫返回文件的代碼。
public static void HttpURLConnectionFileDownload() {
	try {
		int BUFFER_SIZE = 1024 * 1024;
		String urlStr = "http://XXX.XXX.XXX.XXX:8888/pic/one.png";
		URL url = new URL(urlStr);
		HttpURLConnection urlConnection = (HttpURLConnection) url
				.openConnection();
		InputStream is = urlConnection.getInputStream();
		FileOutputStream fos = new FileOutputStream(new File(Environment
				.getExternalStorageDirectory().getPath()
				+ "/NetConn/downone.png"));
		byte[] buffer = new byte[BUFFER_SIZE];
		int count = 0;
		while ((count = is.read(buffer)) > 0) {
			fos.write(buffer, 0, count);
		}
		is.close();
		fos.close();
		Log.v("a2bgeek", "HttpURLConnectionFileDownload success");
	} catch (MalformedURLException e) {
		// TODO Auto-generated catch block
		Log.v("a2bgeek", "MalformedURLException--->" + e.getMessage());
	} catch (IOException e) {
		// TODO Auto-generated catch block
		e.printStackTrace();
	}
}
public static void HttpClientFileDownload() {
	try {
		int BUFFER_SIZE = 1024 * 1024;
		String urlStr = "http://XXX.XXX.XXX.XXX:8888/pic/two.png";
		HttpGet httpGet = new HttpGet(urlStr);
		HttpClient httpClient = new DefaultHttpClient();
		HttpResponse httpResponse = httpClient.execute(httpGet);
		HttpEntity httpEntity = httpResponse.getEntity();
		InputStream is = httpEntity.getContent();
		FileOutputStream fos = new FileOutputStream(new File(Environment
				.getExternalStorageDirectory().getPath()
				+ "/NetConn/downtwo.png"));
		byte[] buffer = new byte[BUFFER_SIZE];
		int count = 0;
		while ((count = is.read(buffer)) > 0) {
			fos.write(buffer, 0, count);
		}
		is.close();
		fos.close();
		Log.v("a2bgeek", "HttpClientFileDownload success");
	} catch (ClientProtocolException e) {
		// TODO Auto-generated catch block
		e.printStackTrace();
	} catch (IOException e) {
		// TODO Auto-generated catch block
		e.printStackTrace();
	}
}
 Android仿斗魚直播的彈幕效果
記得之前有位朋友在我的公眾號裡問過我,像直播的那種彈幕功能該如何實現?如今直播行業確實是非常火爆啊,大大小小的公司都要涉足一下直播的領域,用斗魚的話來講,現在就是千播之戰
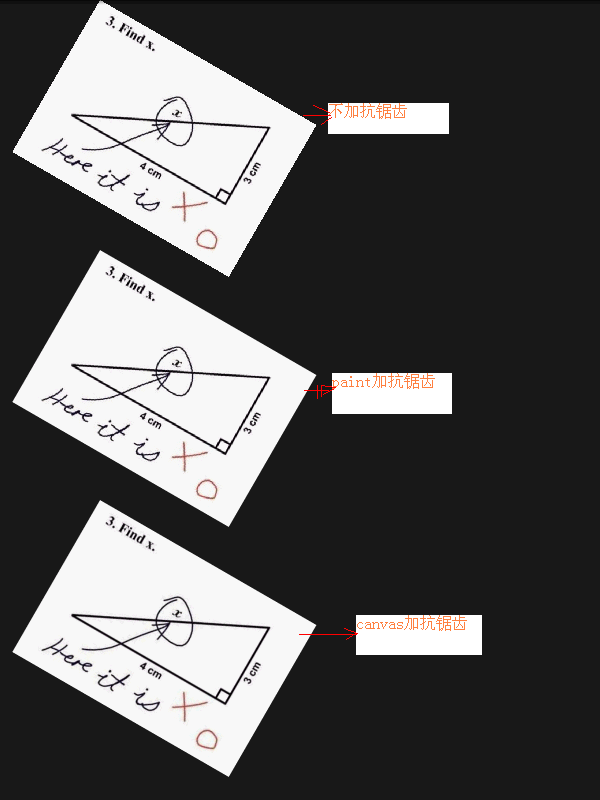
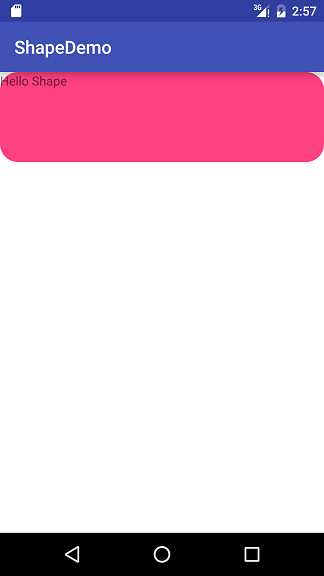 Android Drawable - Shape Drawable使用詳解(附圖)
shape_rectangle.xml shape_oval.xml shape_line.xml
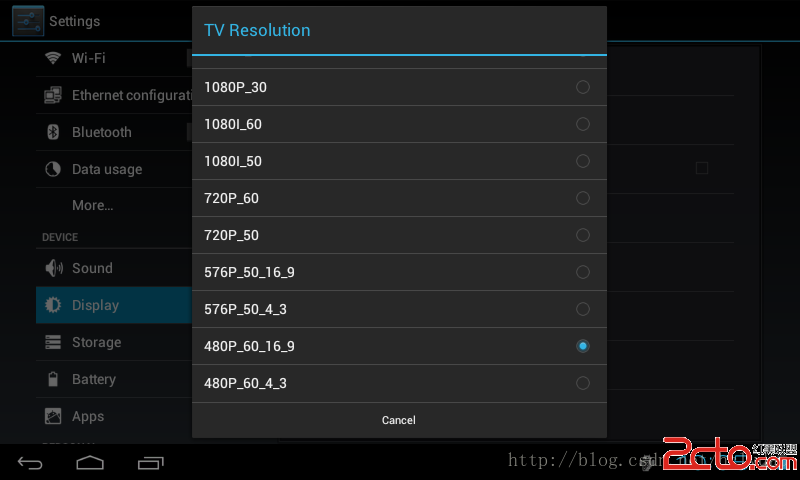 android4.0.4 增加HDMI設置
最近到4412最基本的都調了 然後覺得沒事做了 所以增加一個HDMI的設置 不能閒著 以下使用的是廣州斯道的icool210開發板 源碼修改如下 最開始我是先在設置裡加上
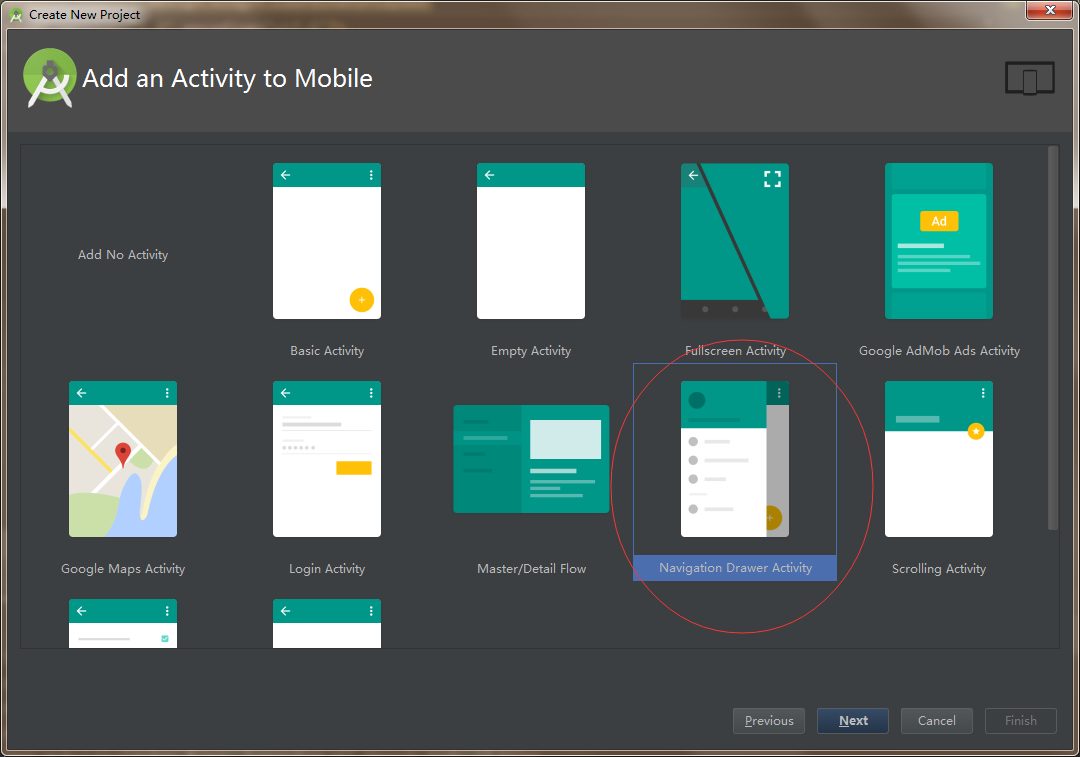
 Android5.0之NavigationView的使用
導航菜單的制作方式多種多樣,網上也有各種炫酷效果的具體實現方式,那麼今天我主要是想來說說Google在Android5.0之後推出的NavigationView的具體使用