編輯:關於Android編程
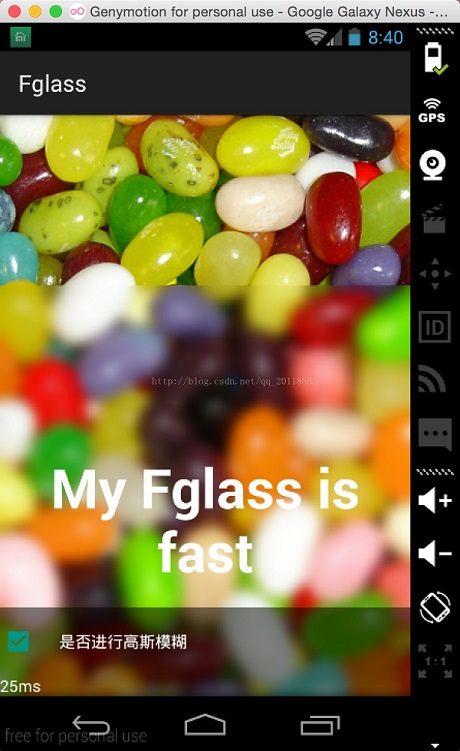
為了實現毛玻璃效果,我們需要一組compute kernels(.rs文件中編寫),及一組用於控制renderScript相關的Javaapi(.rs文件自動生成為Java類)。 由於compute kernels的編寫需要一定的學習成本,從JELLY_BEAN_MR1開始,Androied內置了一些compute kernels用於常用的操作,其中就包括了Gaussian blur。
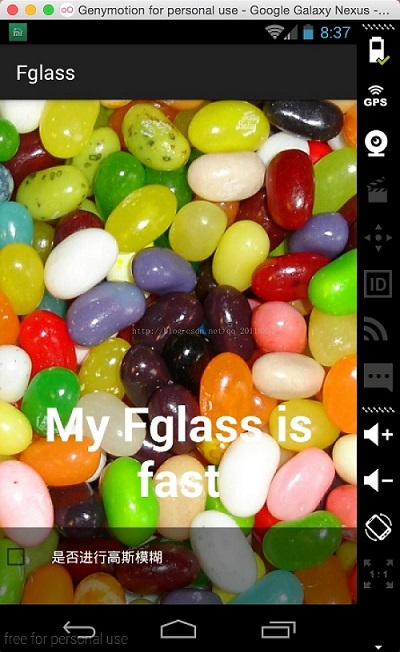
下面,通過實操來講解一下RenderScript來實現高斯模糊,最終實現效果(講文字背景進行模糊處理):
實現代碼:
<html><head>
<meta http-equiv="content-type" content="text/html; charset=UTF-8"></head><body><textarea >private
 void applyBlur() {
  image.getViewTreeObserver().addOnPreDrawListener(new
ViewTreeObserver.OnPreDrawListener() {
    @Override
    public boolean onPreDraw() {
      image.getViewTreeObserver().removeOnPreDrawListener(this);
      image.buildDrawingCache();
      Bitmap bmp = image.getDrawingCache();
      blur(bmp, text, true);
      return true;
    }
  });
}
@TargetApi(Build.VERSION_CODES.JELLY_BEAN_MR1)
private void blur(Bitmap bkg, View view) {
  long startMs = System.currentTimeMillis();
  float radius = 20;
  Bitmap overlay = Bitmap.createBitmap((int)(view.getMeasuredWidth()),
 (int)(view.getMeasuredHeight()), Bitmap.Config.ARGB_8888);
  Canvas canvas = new Canvas(overlay);
  canvas.translate(-view.getLeft(), -view.getTop());
  canvas.drawBitmap(bkg, 0, 0, null);
  RenderScript rs = RenderScript.create(SecondActivity.this);
  Allocation overlayAlloc = Allocation.createFromBitmap(rs, overlay);
  ScriptIntrinsicBlur blur = ScriptIntrinsicBlur.create(rs,
overlayAlloc.getElement());
  blur.setInput(overlayAlloc);
  blur.setRadius(radius);
  blur.forEach(overlayAlloc);
  overlayAlloc.copyTo(overlay);
  view.setBackground(new BitmapDrawable(getResources(), overlay));
  rs.destroy();
  statusText.setText("cost " + (System.currentTimeMillis() - startMs) +
 "ms");
}</textarea></body></html>
布局如下:
<?xml version="1.0" encoding="utf-8"?>
<FrameLayout xmlns:Android="http://schemas.android.com/apk/res/android"
android:layout_width="match_parent"
android:layout_height="match_parent" >
  <ImageView
    android:id="@+id/picture"
    android:layout_width="match_parent"
    android:layout_height="match_parent"
    android:src="@drawable/splash"
    android:scaleType="centerCrop" />
  <TextView
    android:id="@+id/text"
    android:gravity="center_horizontal"
    android:layout_width="match_parent"
    android:layout_height="wrap_content"
    android:text="Gaussian Blur"
    android:textColor="@android:color/black"
    android:layout_gravity="center_vertical"
    android:text
    android:textSize="48sp" />
  <LinearLayout
    android:id="@+id/controls"
    android:layout_width="match_parent"
    android:layout_height="wrap_content"
    android:background="#7f000000"
    android:orientation="vertical"
    android:layout_gravity="bottom" />
</FrameLayout>
以上所述是小編給大家介紹的Android中實現iOS中的毛玻璃效果,希望對大家有所幫助,如果大家有任何疑問請給我留言,小編會及時回復大家的。在此也非常感謝大家對本站網站的支持!
 Android的通知(Notification)使用詳解
這篇博客講解一下在Android中使用Notification提示消息給用戶,Notification是一種具有全局效果的通知,程序一般通過NotificationMan
 Andriod Studio科普篇——3.關於編譯的常見問題
1、android支持庫未安裝 編譯不過,提示如下: Could not find any version that matches com.android.suppor
 Android ListView優化篇
在上篇文章的例子中,我們使用了一張圖片和一個文本作為每一行的數據,發現效果已經完全達到了,而且沒出現什麼問題。但如果我們將Item的數量調大,比如調到1000、10000
 刷機大師刷安卓手機方法
手機用一段時間特別卡,就要去刷機,但是又不想去售後,只有自己在網上找刷機大師刷了。那刷機大師怎麼刷機呢,現在告訴大家刷機大師刷機方法。前提准備1、下載安裝刷