編輯:關於Android編程
一、簡介
二、方法
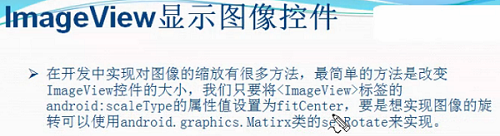
1)設置圖片放大縮小效果
第一步:將<ImageView>標簽中的android:scaleType設置為"fitCenter"
android:scaleType="fitCenter"
第二步:獲取屏幕的寬度
DisplayMetrics dm=new DisplayMetrics();
getWindowManager().getDefaultDisplay().getMetrics(dm);
dm.widthPixels
第三步:設置seekBar的最大progree值為屏幕寬度
sb_one.setMax(dm.widthPixels);
第四步:設置imageview的布局參數,也就是寬和高,也就是畫布的寬高
int width=progress;
int height=progress*3/4;
iv_pic.setLayoutParams(new LinearLayout.LayoutParams(width, height));
2)設置圖片旋轉方法
第一步:給matrix設置角度,用於新的bitmap
private Matrix matrix;
matrix.setRotate((int)(progress*3.60));
第二步:獲取bitmap資源
BitmapDrawable bitmapDrawable=(BitmapDrawable)(getResources().getDrawable(R.drawable.image1));
Bitmap bitmap=bitmapDrawable.getBitmap();
第三步:重建bitmap用於顯示
Bitmap newBitmap=bitmap.createBitmap(bitmap, 0, 0, bitmap.getWidth(), bitmap.getHeight(),matrix,false);
第四步:給imageview設置新的bitmap
iv_pic.setImageBitmap(newBitmap);
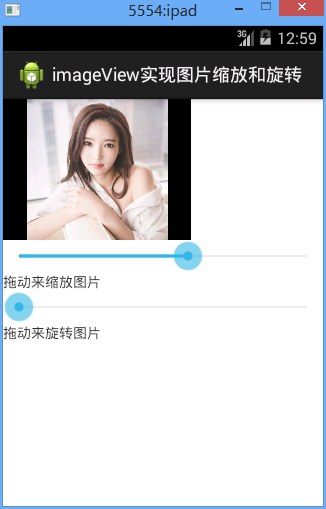
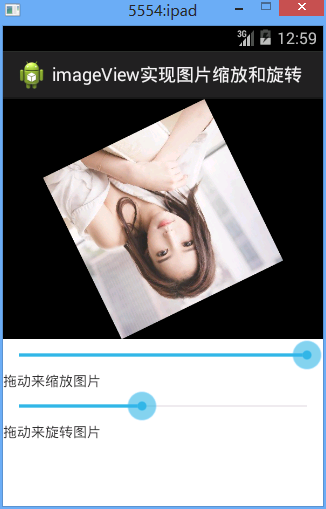
三、代碼實例
效果圖:
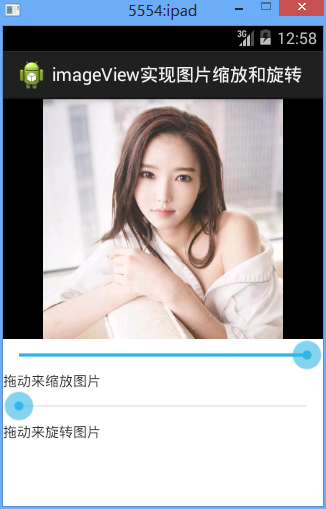
設置大小和設置旋轉的效果圖
代碼:
fry.Activity02
package fry;
import com.example.iamgeViewDemo1.R;
import android.app.Activity;
import android.graphics.Bitmap;
import android.graphics.Matrix;
import android.graphics.drawable.BitmapDrawable;
import android.os.Bundle;
import android.util.DisplayMetrics;
import android.view.ViewGroup.LayoutParams;
import android.widget.ImageView;
import android.widget.LinearLayout;
import android.widget.SeekBar;
import android.widget.SeekBar.OnSeekBarChangeListener;
public class Activity02 extends Activity implements OnSeekBarChangeListener{
  private ImageView iv_pic;
  private SeekBar sb_one;
  private SeekBar sb_two;
  private Matrix matrix;
  @Override
  protected void onCreate(Bundle savedInstanceState) {
    // TODO Auto-generated method stub
    setTitle("imageView實現圖片縮放和旋轉");
    super.onCreate(savedInstanceState);
    setContentView(R.layout.activity02);
    iv_pic=(ImageView) findViewById(R.id.iv_pic);
    sb_one=(SeekBar) findViewById(R.id.sb_one);
    sb_two=(SeekBar) findViewById(R.id.sb_two);
    //設置SeekBar的progress值改變監聽事件
    sb_one.setOnSeekBarChangeListener(this);
    sb_two.setOnSeekBarChangeListener(this);
    matrix=new Matrix();
//    1)設置圖片放大縮小效果
//
//    第一步:將<ImageView>標簽中的android:scaleType設置為"fitCenter"
//
//    第二步:獲取屏幕的寬度
//
//    第三步:設置seekBar的最大progree值為屏幕寬度
//
//    第四步:設置imageview的布局參數,也就是寬和高,也就是畫布的寬高
    //設置圖片放大縮小效果
    //第一步:獲取屏幕的寬度
    DisplayMetrics dm=new DisplayMetrics();
    getWindowManager().getDefaultDisplay().getMetrics(dm);
    //第二步:設置seekBar的最大progree值為屏幕寬度
    sb_one.setMax(dm.widthPixels);
  }
  @Override
  public void onProgressChanged(SeekBar seekBar, int progress,
      boolean fromUser) {
    // TODO Auto-generated method stub
    switch (seekBar.getId()) {
    case R.id.sb_one://放大或縮小
      int width=progress;
      int height=progress*3/4;
      //第三步:設置imageview的布局參數,也就是寬和高,也就是畫布的寬高
      iv_pic.setLayoutParams(new LinearLayout.LayoutParams(width, height));
      break;
    case R.id.sb_two://旋轉
      //設置旋轉度數
      //設置圖片旋轉方法
      //第一步:給matrix設置角度,用於新的bitmap
      matrix.setRotate((int)(progress*3.60));
      //第二步:獲取bitmap資源
      BitmapDrawable bitmapDrawable=(BitmapDrawable)(getResources().getDrawable(R.drawable.image1));
      Bitmap bitmap=bitmapDrawable.getBitmap();
      //第三步:重建bitmap用於顯示
      Bitmap newBitmap=bitmap.createBitmap(bitmap, 0, 0, bitmap.getWidth(), bitmap.getHeight(),matrix,false);
      //第四步:給imageview設置新的bitmap
      iv_pic.setImageBitmap(newBitmap);
      break;
    default:
      break;
    }
  }
  @Override
  public void onStartTrackingTouch(SeekBar seekBar) {
    // TODO Auto-generated method stub
  }
  @Override
  public void onStopTrackingTouch(SeekBar seekBar) {
    // TODO Auto-generated method stub
  }
}
activity02.xml
<?xml version="1.0" encoding="utf-8"?>
<LinearLayout xmlns:android="http://schemas.android.com/apk/res/android"
  android:layout_width="match_parent"
  android:layout_height="match_parent"
  android:orientation="vertical" >
  <ImageView
    android:id="@+id/iv_pic"
    android:layout_width="match_parent"
    android:layout_height="300dip"
    android:background="@android:color/black"
    android:scaleType="fitCenter"
    android:src="@drawable/image1"
    />
  <!-- 設置圖片的顯示方式:把圖片按比例擴大/縮小到view的寬度,居中顯示 -->
  <SeekBar
    android:id="@+id/sb_one"
    android:layout_width="match_parent"
    android:layout_height="wrap_content"
    android:progress="100"
    />
  <TextView
    android:layout_width="match_parent"
    android:layout_height="wrap_content"
    android:text="拖動來縮放圖片"
    />
  <SeekBar
    android:id="@+id/sb_two"
    android:layout_width="match_parent"
    android:layout_height="wrap_content"
    />
  <TextView
    android:layout_width="match_parent"
    android:layout_height="wrap_content"
    android:text="拖動來旋轉圖片"
    />
</LinearLayout>
四、收獲
1、設置圖像居中顯示
android:scaleType="fitCenter"
總結
以上所述是小編給大家介紹的Android中imageView圖片放大縮小及旋轉功能示例代碼,希望對大家有所幫助,如果大家有任何疑問請給我留言,小編會及時回復大家的。在此也非常感謝大家對本站網站的支持!
 Android UI概述和常用控件
一、UI 概述Android應用程序的用戶界面是一切,用戶可以看到並與之交互。UI 是用戶能看見並可交互的組件。– 系統 UI– 自定義 UI&n
 Android 自定義ViewGroup之實現FlowLayout-標簽流容器
本篇文章講的是Android 自定義ViewGroup之實現標簽流式布局-FlowLayout,開發中我們會經常需要實現類似於熱門標簽等自動換行的流式布局的功能,網上也有
 自定義View系列(1)--仿支付寶中物流狀態效果
國際慣例,先上支付寶中的原效果圖: 再來一張自定義view的效果圖 看到兩個效果圖的對比,可能會有人問為啥物流狀態被選中時的背景沒有?其實是有的,只不
 Mono for Android 實現高效的導航(Effective Navigation)
Android 4.0 系統定義了一系列的高效導航方式 (Effective Navigation), 主要包括標簽、下拉列表、以及向上和返回等, 本文介紹如何用 Mon