編輯:關於Android編程
一、簡介
1、AutoCompleteTextView的作用

2、AutoCompleteTextView的類結構圖
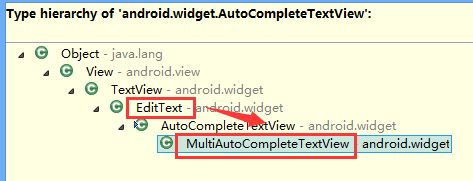
也就是擁有EditText的各種功能
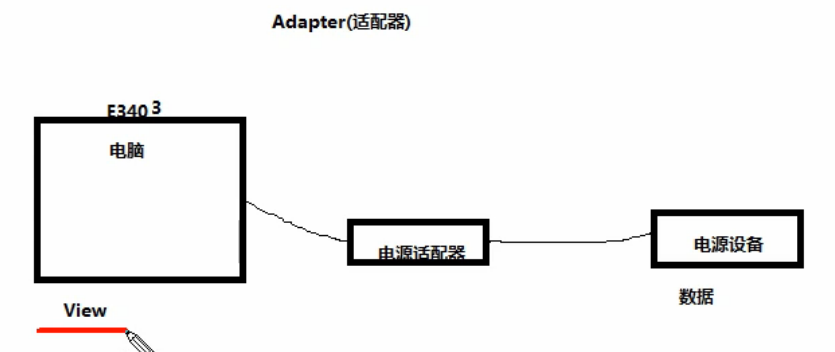
3、AutoCompleteTextView工作原理
AutoCompleteTextView的自動提示功能肯定需要適配器提供數據
4、Android裡的適配器
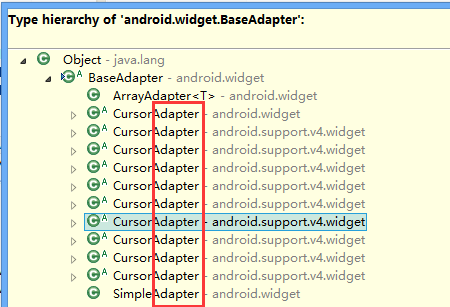
5、適合AutoCompleteTextView的適配器
ArrayAdapter
二、AutoCompleteTextView實現自動提示的方法
1)AutoCompleteTextView實現自動提示的方法
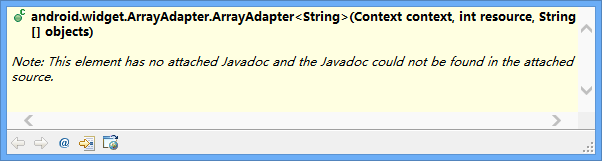
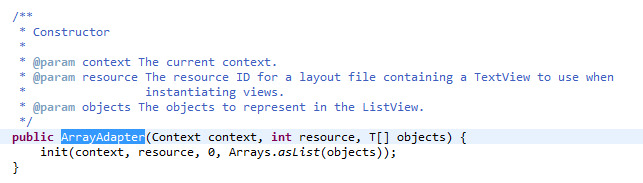
第一步、創建適配器
String[] arr={"凱撒","凱撒廣場","凱撒大帝"};
ArrayAdapter<String> adapter= new ArrayAdapter<String>(this, R.layout.textview, arr);
第二步、AutoCompleteTextView對象應用適配器
autoCompleteTextView1.setAdapter(adapter);
說明:
提示文本是用textview實現的,提示文本裡面的提示數據就是String[] arr。
三、代碼實例

代碼:
fry.Activity01
package fry;

import com.example.AutoCompleteTextViewDemo1.R;

import android.app.Activity;
import android.os.Bundle;
import android.widget.ArrayAdapter;
import android.widget.AutoCompleteTextView;

public class Activity01 extends Activity{
 private AutoCompleteTextView autoCompleteTextView1;
 @Override
 protected void onCreate(Bundle savedInstanceState) {
  // TODO Auto-generated method stub
  super.onCreate(savedInstanceState);
  setContentView(R.layout.activity01);
  autoCompleteTextView1=(AutoCompleteTextView) findViewById(R.id.autoCompleteTextView1);
  /*
   * AutoCompleteTextView實現自動提示的方法
   * 第一步、創建適配器
   * 第二步、AutoCompleteTextView對象應用適配器
   *
   */

  String[] arr={"凱撒","凱撒廣場","凱撒大帝"};
  ArrayAdapter<String> adapter= new ArrayAdapter<String>(this, R.layout.textview, arr);
  autoCompleteTextView1.setAdapter(adapter);
 }
}
fry.Activity01
<?xml version="1.0" encoding="utf-8"?>
<LinearLayout xmlns:android="http://schemas.android.com/apk/res/android"
 android:layout_width="match_parent"
 android:layout_height="match_parent"
 android:orientation="vertical" >

 <AutoCompleteTextView
  android:id="@+id/autoCompleteTextView1"
  android:layout_width="match_parent"
  android:layout_height="wrap_content"
  />

</LinearLayout>
/AutoCompleteTextViewDemo1/res/layout/textview.xml
<?xml version="1.0" encoding="utf-8"?>
<TextView xmlns:android="http://schemas.android.com/apk/res/android"
 android:layout_width="match_parent"
 android:layout_height="match_parent"
 android:orientation="vertical" >
 <!-- 這裡是直接TextView,而不是layout下的TextView -->
</TextView >
四、易錯點
1、這裡是直接TextView,而不是layout下的TextView
/AutoCompleteTextViewDemo1/res/layout/textview.xml
<?xml version="1.0" encoding="utf-8"?>
<TextView xmlns:android="http://schemas.android.com/apk/res/android"
 android:layout_width="match_parent"
 android:layout_height="match_parent"
 android:orientation="vertical" >
 <!-- 這裡是直接TextView,而不是layout下的TextView -->
</TextView >
以上就是本文的全部內容,希望對大家的學習有所幫助,也希望大家多多支持本站。
 Android學習路線(三)運行你的Android應用
如果你按照上一課創建了你的Android項目,那麼它包含默認的 Hello World 的源文件,能夠讓你的項目馬上運行起來。 你如何運行你的應用以來與兩件事:你是否
 Android Studio系列教程二--基本設置與運行
上面一篇博客,介紹了Studio的優點與1.0 RC的安裝與上手體驗,沒想到google的更新速度這麼快,已經出了RC 2版本,主要是修復一些bug。那麼今天就帶大家預覽
 Android 多渠道打包
配置AndroidMainfest.xml以友盟渠道為例,渠道信息一般都是寫在 AndroidManifest.xml文件中,代碼大約如下:如果不使用多渠道打包方法,那就
 建造者模式實例之PopupView
開始說正題。先上上一次的效果圖,其展現出的效果,是建造者模式的思想精髓。關注建造產品的共性,其細節的個性則讓其自由定義(是否顯示,顯示的內容);今天要做的PopupVie